- Windows.old Restore: How to Restore Files from Windows.old Folder
- Can I Recover Files from Windows.old Folder
- Method 1. Manually Windows.old Restore (Easy Steps)
- Method 2. Automatically Windows.old Restore
- Method 3. Recover Deleted or Lost Data Without Windows.old Folder
- Restore Files or Windows from Windows.old Folder in Windows 10
- What is Windows.old folder in Windows 10?
- Restore files from Windows.old in Windows 10
- Restore Windows from Windows.old in Windows 10В
- Delete Windows.old folder to free up disk space
- Useful tips: backup files right now to prevent data lossВ
- FAQs: Restore from Windows.old folderВ
- The way forward
- How to restore a Windows 7-based computer to a previous Windows installation by using the Windows.old folder
- INTRODUCTION
- More Information
- Step 1: Determine whether there is a Windows.old folder and whether there is sufficient free space on the Windows hard disk
- Step 2: Start the Windows Recovery Environment
- Step 3: Move the Windows 7 folders to a new Win7 folder
- Step 4: Copy the contents or move the contents of the Windows.old folder
- Step 5: Restore the boot sector for the previous Windows installation
- Step 6: Restore the Boot.ini file for the previous Windows installation of Windows XP or of Windows 2000
- Step 7: Close the Command Prompt window, and then click Restart
Windows.old Restore: How to Restore Files from Windows.old Folder
Here are three ways to get back the Windows.old folder. You can manually or automatically recover the folder. Or restore files from Windows.old folder using EaseUS file recovery software in just three steps.
Table of Contents
About the Author
Reviews and Awards
Can I Recover Files from Windows.old Folder
«I decided to reinstall Windows 10 after a sudden crash of My PC. And all of my files are in the windows. old folder and they are still taking up space. My games on steam are showing up in the folder but I cannot launch them from steam. I was just wondering if there is a way to restore files from Windows.old folder.»
After upgrading an old version of Windows to another, you have a Windows.old folder automatically created on your computer. It is a folder that contains all of the operating system files and personal data files of your previous version. If you do not like the new Windows version, you can restore from Windows.old folder. Usually, we don’t recommend you to remove this folder because it is quite helpful if you want to get some files back.
If you lost the Windows.old files, we will show you how to manually or automatically retrieve files from Windows.old folder.В
Note: You can try to restore Windows.old folder with special recovery software if you deleted it by mistake.В
Method 1. Manually Windows.old Restore (Easy Steps)
Step 1: Open up the Computer panel and go to the system partition.
Step 2:В Double-tap or double-click the «Windows.old folder > Users folder > your username».
Open the folders that contain the files you want to retrieve.
Step 3: Copy and paste the files that you want from each folder to a folder in Windows 10.
Repeat step 2 for each user account on your PC.
Method 2. Automatically Windows.old Restore
Even you can manually retrieve files from the Windows. old folder by navigating to C:\Windows.old\Users\username folder and cut-pasting the Documents, Pictures, etc folders into your desired location, it is a little bit complicated. Here is an easier way: run the recover personal files troubleshooter to automatically retrieve your files from the Windows. old folder and copy them back to their original location.В
Method 3. Recover Deleted or Lost Data Without Windows.old Folder
Sometimes, you might get some important files lost due to accidental deletion, disk formatting, virus attack, software crash, partition loss, raw error, etc without Windows. old folder. When it happens, how will you get back your lost data? Actually, it is not so difficult as you have expected as long as you find a powerful data recovery software.
Here you can try EaseUS file recovery software. It is popular recovery software that can deal with all data loss situations to effectively retrieve lost files from hard drive, USB flash drive, SD card, memory card, digital camera, and many other storage devices. The data recoveryВ process just takes 3 simple steps.В
If you have any problems, you can watch this video for more help!
Step 1. Select a location and start scanning.
Launch EaseUS Data Recovery Wizard, hover on the partition where you lost data, then click «Scan».

Step 2. Preview and select the files.
Wait until the scanning completes. If you need to double-click the item to preview the file, then select the data you attempt to recover.

Step 3. Recover lost data.
Click «Recover», choose a location to save the recovered data, then click «OK». You should store the data in another place instead of the original one.
Restore Files or Windows from Windows.old Folder in Windows 10
You will learn to restore files or Windows from Windows.old in Windows 10 as well as delete this folder for more space. Learn more below.

By AOMEI  / Last Updated March 24, 2021
Content of this article:
What is Windows.old folder in Windows 10?
After upgrading from an old version of Windows to Windows 10 or refreshing or performing custom install , you will have a Windows.old folder automatically created on your computer. It is a folder that contains all of the operating system files and personal data files of your previous version of Windows. And it will be deleted after 10 days or 30 days automatically to free up disk space for you.

If you do not like the new Windows version, you can restore Windows from Windows.old folder including the operating system, settings, personal files and programs.
Also, you can choose to only restore files from Windows.old folder in Windows 10 that wasn’t properly copied to your new Windows installation or mistakenly deleted.
In addition,В if you think the new version of Windows is fine orВ there is no important files,В you can delete this folder. After all,В the Windows.old folder can take up a large chunk of space (around 20GB)В on your computer.В
Restore files from Windows.old in Windows 10
ToВ recover individual files from your old Windows installation, you can use the following steps:
Step 1. Open file explorer in Windows 10.В
Step 2. Access the Windows.old folder at C:\Windows.old,В and browsing your personal files located atВ C:\Windows.old\Users\your_name.
Step 3. Select the files or folders you want to move, right-click it and select «Copy«.
Step 4. Then, go to the location where you want to store the files or folders, right-click the blank space and select «Paste«.
Step 5. Repeat this step untill all the data are transferred.В
You may find that some important files are missing or have not been saved in the Windows.old folder while browing files in the Windows 10 file explorer, the reason may be thatВ file transfers do not work correctly.В
This is aВ rare case, but if you don’t want lose any important, it’s suggested to backup files to prevent data loss during the transfer process.
And this folder will not remain on your computer for a long time, so you still need toВ backup Windows.old folderВ to a different locationВ before the deadline.В
Restore Windows from Windows.old in Windows 10В
To downgrade Windows 10, you can follow the steps below:
Step 1. Go to «Settings» > «Update & Security» > «Recovery«.
Step 2. Then, you’ll see several options, inluding Reset this PC, Go back to Windows 8.1(this depends on the previous version of your Windws), and other options. Scroll down to «Go back to Windows 8.1» section and click «Get started«
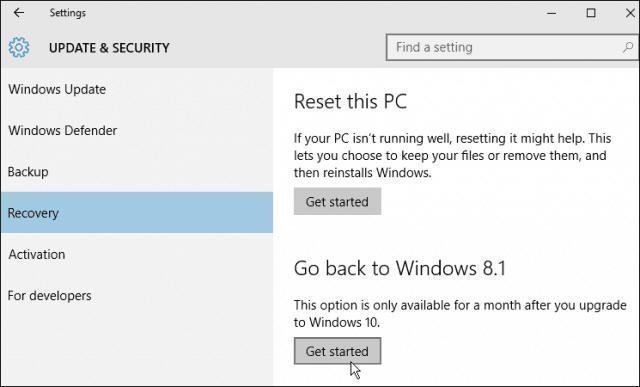
Step 3. Follow the wizard and finish the rest of steps toВ restore your old Windows operating systemВ using the Windows.old folder.
Delete Windows.old folder to free up disk space
To delete Windows.old folder, you can try the following steps.
Step 1. Go to «File Explore» and right-click the system partition(usually C: drive). Then, select «Properties«.
Step 2. Under the General tab, select «Disk Cleanup» option.В
Step 3. Click «Clean up system files«.
Step 4. Then, you will see «Previous Windows Installation(s)«, tick it and click «OK» to apply.
Useful tips: backup files right now to prevent data lossВ
As mentioned earlier, there is a possibility that the Window.old folder will not include some important files of your previous Windows installation. And you will never know when you need to restore files from backup due to file corruption, virus attack, etc.
So, it’s suggested to backup files from now on, preferably toВ schedule automatic backups. It allows you to only backup changed files per day automatically or use a longer backup interval, which greatly reduceВ data loss.
To make it, you need a free backup software like AOMEI Backupper Standard for help. It allows you to backup files,В system, disk, or partition, files and folder and perform corresponding restoration operation, even selective file restore from other backup solutions.
Step 1. Download and launch AOMEI Backupper Standard, you will see its deep-blue interface. Then, clickВ «File Backup«В under the Backup tab.

Note:В To protect your system, you need to create a complete system image in Windows 10 with «System Backup» or backup entire disk with «Disk Backup».
Step 2. ClickВ «Add File«В orВ «Add Folder«В according to your needs. Choose the file or folder you want to backup on the current computer.

Step 3. S elect a different location to store the files or folder. You canВ backup files to external hard drive, NAS network location, or other locations as long as it can be detected by Windows.

Step 4. Click «Schedule«and set backup settings. The default options are daily incremental backup, but you can change it to weekly/monthly or use differential backup.В
Please note that the scheduled differential backup, even triggers and USB plug in are only available on the charged version, AOMEI Backupper Professional, for example.
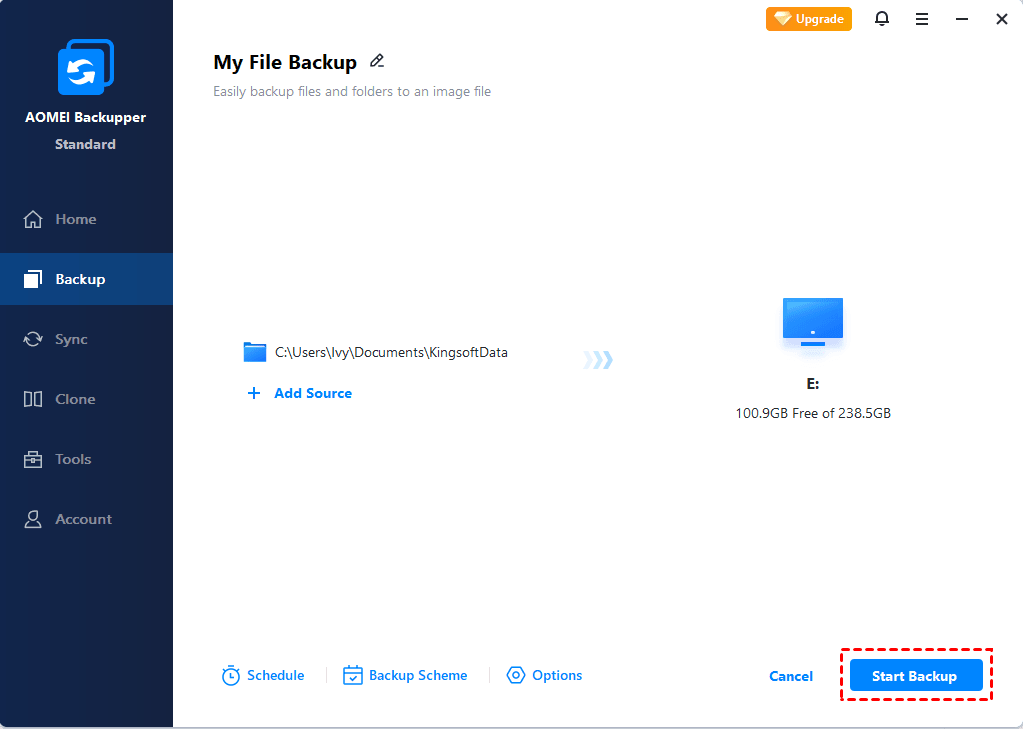
Step 5. Click «Start Backup«В to perform the scheduled file backup task.
Wait until the process complets, you will have an exact of files you want to backup. Then, you can use it to restore files from backup as needed. It’s suggested to create a bootable disc with CD/DVD or USB drive, which allows you to boot computer when it’s unbootable.
If you want to protect unlimited computers within your company, you can pick AOMEI Backupper Technician. With the inbuilt AOMEI Image Deploy tool, you are also allowed to deploy/restore system image file on server-side computer to multiple client-side computers over network.
FAQs: Restore from Windows.old folderВ
1. Can IВ restore programs from Windows.old?
The answer is No, you cannot restore programs or settings from this folder. ItВ is for data retrieval, not program retrieval. Thus, you need to reinstall programs you will use in the near future.В В
2. Is Windows old automatically deleted?
Yes, this operation will be executed 30 days after you upgrade, refresh or custom install. Thus, if you are not sure there is any important, please backup the entire folder or specific folders in advance.
3.В Can I restore Windows 7 from Windows 10?
Of course,В with the help of Windows.old folder,В you can restore Windows 7 from Windows 10 using «Go back to Windows 7» feature in the Recovery settings. The premise is that your previous operating system is Windows 7 instead of Windows 8 or 8.1.
The way forward
For restore from Windows.old, you can restore specific files or entire Windows. Also, you can choose to delete it as long as you make sure all the important data are transferred to new Windows successfully.
In addition, please remember to make an exact copy of files on your current computer with a free backup software like AOMEI Backupper Standard. Only in this way,В you don’t have to worry about data loss owing to any error. Also, it’s suggested to create a system image in Windows 10 or other system.В
How to restore a Windows 7-based computer to a previous Windows installation by using the Windows.old folder
INTRODUCTION
In certain scenarios you may need to restore your Windows 7 Computer back to the previous installation of Windows. This article walks you through the steps to manually restore your computer back to the previous version of Windows.
Note: To do this, you must use the command prompt, and you must type specific commands at the command prompt to rename and to move folders between the different versions of Windows.
Note: If you currently have Service Pack 1 for Windows 7 installed, the uninstall steps are the same as with Windows 7 without any service packs installed. If you are restoring back to a previous Windows 7 installation, you may need to Install Windows 7 Service Pack 1 to that installation.
This article is intended for a beginning to intermediate computer user.
More Information
To resolve this issue, follow the steps listed below to restore your computer back to a previous version of Windows using the Windows.OLD folder.
TIP: You may find it easier to follow the steps if you print this article first.
Step 1: Determine whether there is a Windows.old folder and whether there is sufficient free space on the Windows hard disk
Click Start  , and then click Computer.
On the View menu, click Details.
In the Free Space column, note how much space is available for Local Disk (C:) under the Hard Disk Drives area.
In the Hard Disk Drives area, double-click Local Disk (C:), and then determine whether the Windows.old folder exists.
Important If the Windows.old folder does not exist, you cannot follow the steps in this article to restore the previous Windows installation to this computer. You must backup and restore or transfer your files to the previous operating system.
Right-click the Windows.old folder.
Windows 7 will determine the size of the folder after several seconds.
Determine whether the Windows.old folder is smaller than the free space that is available for Local Disk (C:) in step 1.2.
Note If the Windows.old folder is two times as large as the free space that is available for the Local Disk (C:) entry, you may be unable to restore the previous Windows installation.
Step 2: Start the Windows Recovery Environment
Put the Windows 7 installation disc in the DVD drive, and then restart the computer.
Press a key when you are prompted to restart from the disc.
In the Install Windows window, select a language, a time, a currency, a keyboard input method or other input method, and then click Next.
In the Install Windows window, click Repair your computer.
In the System Recovery Options window, click the version of the Windows 7 operating system that you want to repair, and then click Next.
In the System Recovery Options window, click Command Prompt.
The Command Prompt window opens, and it displays the command prompt. The command prompt is where you will type the commands that are described in the following steps.
Step 3: Move the Windows 7 folders to a new Win7 folder
Note When you type one or more of the commands at the command prompt in the following steps and press ENTER, you may receive the following message:
The system cannot find the file specified.
If you receive this message, go to the next step in this section, and then type the command in that next step.
Type the following commands and press ENTER after each command:
Move Windows Win7\Windows
Move «Program Files» «Win7\Program Files»
Move Users Win7\Users
Attrib –h –s –r ProgramData
Move ProgramData Win7\ProgramData
Rd «Documents and Settings»
Step 4: Copy the contents or move the contents of the Windows.old folder
Note When you type one or more of the commands at the command prompt in the following steps and press ENTER, you may receive the following message:
The system cannot find the file specified.
If you receive this message, go to the next step in this section, and then type the command in the next step.
Type the following commands and press ENTER after each command:
move /y c:\Windows.old\Windows c:\
move /y «c:\Windows.old\Program Files» c:\
move /y c:\Windows.old\ProgramData c:\
move /y c:\Windows.old\Users c:\
move /y «c:\Windows.old\Documents and Settings» c:\
Step 5: Restore the boot sector for the previous Windows installation
Type one of the following commands at the command prompt, as appropriate for your situation.
Note In the following commands, D: represents the DVD drive. If the DVD drive on the computer is represented by a different letter, such as E:, use that letter in the command.
When the previous Windows installation was Windows Server 2003, Windows XP, or Microsoft Windows 2000
Type the following command, and then press ENTER:
D:\boot\bootsect /nt52 c:
When the previous Windows installation was Windows Vista
Type the following command, and then press ENTER:
D:\boot\bootsect /nt60 c:
Step 6: Restore the Boot.ini file for the previous Windows installation of Windows XP or of Windows 2000
Note Follow these steps only when the previous installation is Windows XP or Windows 2000.
Type the following commands and press ENTER after each command:
Attrib –h –s –r boot.ini.saved
Copy boot.ini.saved boot.ini
Step 7: Close the Command Prompt window, and then click Restart
Type the following command at the command prompt, and then press ENTER:
Click Restart to restart your computer.
Note After you have verified that Windows XP is functional, you can remove the C:\Win7 folder if it is not needed for data recovery.


