- Manage windows on Mac
- Move, align and merge windows
- Maximise or minimise windows
- Quickly switch between app windows
- Close windows
- How to run Windows apps on your Mac with CrossOver
- What’s the best way to install Windows apps?
- How to install Windows apps on your Mac using CrossOver
- What are bottles?
- Open a Mac app from an unidentified developer
- The 5 Best Ways to Run Windows on Your Mac
- Find out which option best fits you
- Boot Camp
- Virtualization
Manage windows on Mac
When you open an app or the Finder on your Mac, a window opens on the desktop. Only one app at a time is active; the name of the app (in bold) and the app menus are shown in the menu bar.
Some apps, such as Safari or Mail, let you open multiple windows or different types of windows at the same time. macOS provides several ways to manage open apps and windows.
Move, align and merge windows
On your Mac, do any of the following:
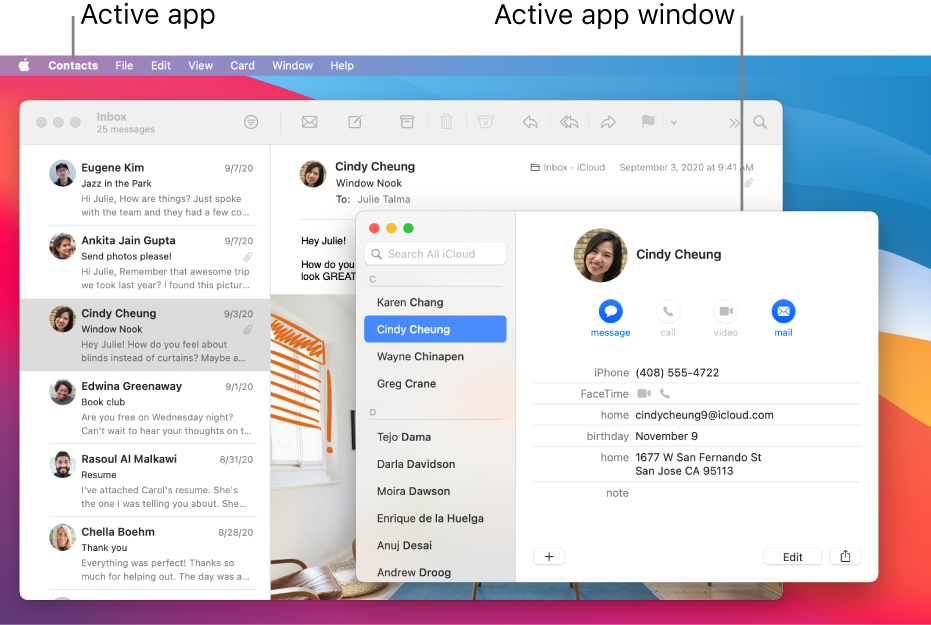
Move a window: Drag the window by its title bar to where you want it. Some windows can’t be moved.
Align windows: Drag a window close to another one — as the window nears the other one, it aligns without overlapping. You can position multiple windows adjacent to each other.
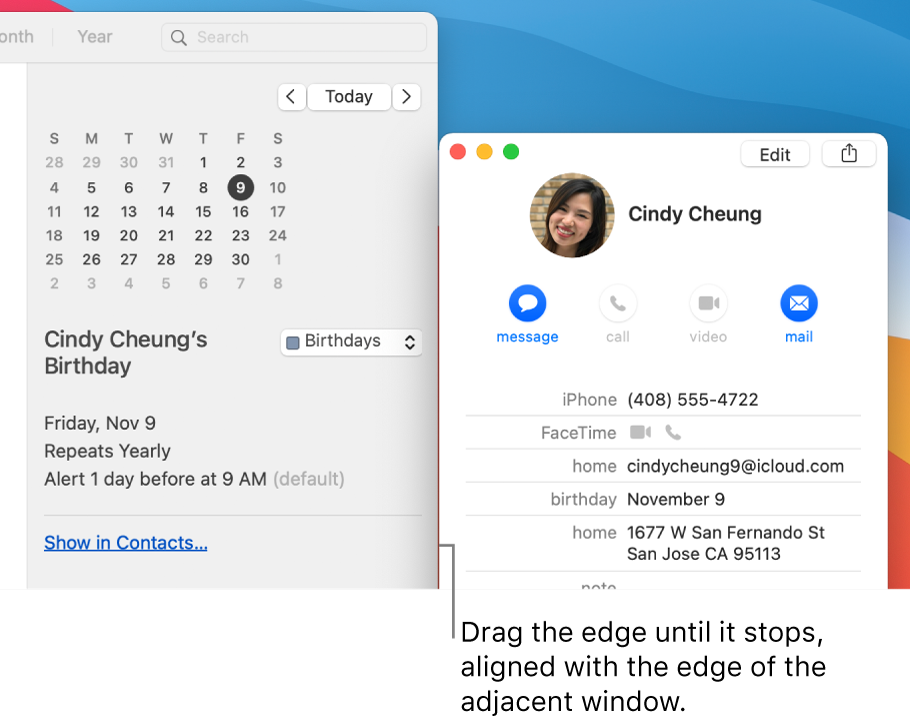
To make adjacent windows the same size, drag the edge you want to resize — as it nears the edge of the adjacent window, it aligns with the edge and stops.
Merge an app’s windows into one tabbed window: In the app, choose Window > Merge All Windows.
To make a tab a separate window again, select the tab, then choose Window > Move Tab to New Window, or just drag the tab out of the window. See Use tabs in windows.
Maximise or minimise windows
On your Mac, do any of the following in a window:
Maximise a window: Press and hold the Option key while you click the green maximise button  in the top-left corner of an app window. To return to the previous window size, Option-click the button again.
You can also double-click an app’s title bar to maximise the window (as long as the option to do so is set to “zoom” in Dock & Menu Bar preferences).
Minimise a window: Click the yellow minimise button  in the top-left corner of the window or press Command-M.
You can set an option in Dock & Menu Bar preferences to have a window minimise when you double-click its title bar.
Most windows can be manually resized. Drag the window’s edge (top, bottom, or sides) or double-click an edge to expand that side of the window.
Quickly switch between app windows
On your Mac, do any of the following:
Switch to the previous app: Press Command-Tab.
Scroll through all open apps: Press and hold the Command key, press the Tab key, then press the Left or Right arrow key until you get to the app you want. Release the Command key.
If you change your mind while scrolling through the apps and don’t want to switch apps, press Esc (Escape) or the Full Stop key, then release the Command key.
Close windows
On your Mac, do any of the following:
Close a single window: In a window, click the red Close button  in the top-left corner of the window, or press Command-W.
Close all open windows for an app: Press Option-Command-W.
Closing one or all windows for an app does not close or quit the app. To do so, press Command-Q, or click the app’s name in the menu bar, then choose Quit [App]. See Quit apps.
You can hide the active app by pressing Command-H.
Use Mission Control to quickly arrange open windows and spaces in a single layer to easily spot the one you need.
How to run Windows apps on your Mac with CrossOver

Every now and then, a Mac user is going to say, «Man I wish there was a version of (insert program here) for Mac. I’d buy that in a heartbeat.» It’s happened to me more times that I really wish to count. Thankfully, most of the apps I want to run on my Mac exist as native apps.
However, there are a couple that slip through my fingers, like Microsoft’s Visio Professional. It doesn’t exist on the Mac side and I really need it for my day job as a software quality vice president.
Thankfully, there’s more than one way to run Windows apps on your Mac.
- You can use Apple’s Boot Camp and run a full installation of Window natively on your Mac
- Use a virtual machine like Parallels Desktop
- Install Windows apps directly with CrossOver and use a Windows app like any other native Mac App
There are advantages and disadvantages to each, but that last one – installing Windows apps directly under CrossOver – is a bit different, and it offers some distinct advantages if you know how to get things going.
With CrossOver, you don’t install Windows and then the app. It’s all about the app, and only the app. Thankfully, while CrossOver is different, it’s not difficult to use. However, there are a few things you need to know. For example, CrossOver doesn’t run ALL Windows apps. Some run better than others, and some won’t run at all.
What’s the best way to install Windows apps?
When trying to determine the best way to install a Windows app, consider the advantages and disadvantages of the three different ways to run Windows on a Mac — natively, via VM or via CrossOver:
| Feature | Dual Booting | Virtual Machine | CrossOver |
|---|---|---|---|
| Run without Rebooting | No | Yes | Yes |
| Run without Windows OS License | No | No | Yes |
| Runs ALL Windows Apps | Yes | No. Not all graphic-intensive features are supported | No. Some run. Some run OK. Some won’t run at all |
| Runs Apps at Native Speed | Yes | No | Yes |
| Needed to Run an App | Windows License, App License | VM License, Windows License, App License | CrossOver License, App License |
| Approximate Costs (App not included) | $120 — $200 for Windows 10 | $80 for Parallels Desktop or VMware Fusion, $120 — $200 for Windows 10 | $40 — $60 for CrossOver |
How to install Windows apps on your Mac using CrossOver
If you want to install Windows apps on your Mac without all the overhead associated with Windows, follow these steps.
- Navigate to CodeWeavers and download CrossOver.
Go to your Downloads folder and locate the Zip file you downloaded. Double Click it to open it. Archive Utility will Open it up and decompress the contents of the archive.

Double click the CrossOver.app in your Downloads folder. It will offer to move itself to your Applications folder.
CrossOver will start for the first time. When it does, it’s going to ask you how you want it to run. By default, it runs in trial mode. However, you also enter in your registration information or buy a license right from this page.
From the screen that appears, click the Install a Windows Application button.
Type the name of the application you want to run. CrossOver will search its database and display appropriate matches.
![]()
Click the Continue button.
![]()
Click the Continue button. Remember: CrossOver will not find and download the software you want to run for you. You actually have to have the installation file for the software you want to run.
![]()
What are bottles?
CrossOver is powered by the Wine Project. As such, all Windows apps are installed in «containers» called bottles (get it?). When you install an application for the first time, CrossOver will create a bottle and automatically place your application in it. When you install new applications, CrossOver will also give you hints about which apps can work and play well in the same bottle. If your apps can be installed in the same bottle, putting them together will save some space. If they can’t, CrossOver will tell you and suggest creating a new bottle. It will also suggest a name for it. Keep the suggestion or give the bottle a name of your own choice.
Click the Continue button.
![]()
Click the Install button.
![]()
The software will install. CrossOver displays a progress screen where it will run through not only the creation of the bottle, but it will download any needed support software, and then run the installer you chose. Once the installation process completes, you should be ready to run your software.
![]()
Find the bottle you just created and run your software.
Running Windows and Windows apps on a Mac can be challenging. Finding the right method for you and your needs can be equally as challenging; however, if you think about it, there are a number of ways to run Windows on a Mac.
Some are expensive. Some aren’t.
Some take time and are complicated. Others aren’t.
CrossOver isn’t just easy to use, it’s affordable. For less than 1/4 the price of Windows plus the price of the application you need to run, you can run it on your Mac. For the odd app out, this is a total no-brainer; and it’s fairly easy to do. If you want to make sure your app works with CrossOver before you give it a shot, you can always search for it on their website.
Open a Mac app from an unidentified developer
If you try to open an app that isn’t registered with Apple by an identified developer, you get a warning dialogue. This doesn’t necessarily mean that something’s wrong with the app. For example, some apps were written before developer ID registration began. However, the app has not been reviewed, and macOS can’t check whether the app has been modified or broken since it was released.
A common way to distribute malware is to take an app and insert harmful code into it, and then redistribute the infected app. So an app that isn’t registered by an unidentified developer might contain harmful code.
The safest approach is to look for a later version of the app from the Mac App Store or look for an alternative app.
To override your security settings and open the app anyway follow these steps:
In the Finder  on your Mac, locate the app you want to open.
Don’t use Launchpad to do this. Launchpad doesn’t allow you to access the shortcut menu.
Control-click the app icon, then choose Open from the shortcut menu.
The app is saved as an exception to your security settings, and you can open it in the future by double-clicking it just as you can any registered app.
Note: You can also grant an exception for a blocked app by clicking the Open Anyway button in the General pane of Security & Privacy preferences. This button is available for about an hour after you try to open the app.
To change these preferences on your Mac, choose Apple menu

> System Preferences, click Security & Privacy, then click General.
To change your security settings, see Protect your Mac from malware.
The 5 Best Ways to Run Windows on Your Mac
Find out which option best fits you
While macOS is made to run using Mac hardware, it is not the only operating system that can run on a Mac computer.
Plenty of other operating systems, including Window and Linux, will work on a Mac device. That makes the Mac among the most versatile computers you can buy. Here’s what we’d use to install Windows on a Mac.
Boot Camp
:max_bytes(150000):strip_icc()/BootCampPartition-5849de633df78c491eaf721b.jpg)
Supports Windows 7, 8.1, and 10
Windows runs natively on Mac hardware for best performance
Requires a full Windows license for the initial install.
Cannot run Windows and Mac OS concurrently.
Perhaps the best-known option for running Windows on a Mac is Boot Camp. Included free with your Mac, Boot Camp allows you to install Windows and then choose between Mac and Windows on startup.
Because Boot Camp runs Windows directly on your Mac’s hardware (there is no virtualization or emulation to be performed) Windows can run at the best possible speed your Mac is able to deliver.
Installing Windows on your Mac is no more difficult than installing Windows on a PC. Apple even provides the Boot Camp Assistant to partition the startup drive to make room for Windows as well as to install all the drivers Windows needs for special Apple hardware.
Virtualization
:max_bytes(150000):strip_icc()/ParallelsWizard-576f016d5f9b585875b92396.jpg)
Run both macOS and a guest OS side-by-side.
Not limited to Windows; a large number of guest operating systems are supported.
Performance tuning and customization needed to achieve the best performance.
May impact the performance of your Mac.
Virtualization allows several operating systems to run on computer hardware at the same time. Virtualization abstracts the hardware layer, making it look like each operating system has its own processor, RAM, graphics, and storage.
Virtualization on the Mac makes use of a software layer called a hypervisor to emulate all of the underlying hardware. As a result, the guest operating system running on the virtual machine does not run as fast as in Boot Camp. But unlike Boot Camp, both the Mac operating system and the guest operating system run at the same time.
There are three primary virtualization apps for Mac:
- Parallels: The first to bring virtualization to the Mac. Parallels supports a wide range of guest OS, including Windows, Linux, and Mac.
- VMWare Fusion: Fusion is the Mac virtualization app offered by VMWare — a leader in virtualization tech. Fusion supports the installation of many different operating systems, including Windows, Linux, and macOS.
- VirtualBox: Oracle supports an open source virtualization app known as VirtualBox. This free virtualization app runs on multiple computer systems, including Mac. Like the other virtualization apps, VirtualBox can be used to run many different operating systems, including Windows, Linux, and macOS.
Installing the virtualization apps is similar to any other Mac app. Guest OS may be more involved with some customization required to obtain the best performance. All three apps have lively forums and support services to help with tuning the performance.


