- the painted surface
- the painted surface
- How To Paint a Window
- How To Paint a Double Hung Window
- How To Paint a Casement Style Window
- How To Paint a Divided Light Window
- the painted surface
- Where is MS Paint in Windows 10, how to find, run, start?
- Find and open the Windows 10 MS-Paint , or create a desktop shortcut for Paint APP on the Windows 10 Desktop!
- 1.) . Start the ms-paint via Run-Command Dialog in Windows 10! 2.) . Create a ms-paint desktop shortcut for the Windows-10 Desktop PC and Tablet-PC! 3.) . Start the mspaint via Windows-10 Search! 4.) . Run Paint when you start Windows 10 or Log in!
- 1.) Start the ms-paint via Run-Command Dialog in Windows 10!
- 2.) Create a ms-paint desktop shortcut for the Windows-10 Desktop!
- 3.) Start the mspaint via Windows-10 search!
- 4.) Run Paint when you start Windows 10 or Log in!
- How to Paint Vinyl Windows
- How to Paint Windows
- Painting Accessories
- Painting the Windows
- Step One: Clear the Work Area and Prep the Windows
- Step Two: Painting the Windows
- What Type of Paint Should I Use?
- Common Painting Problems and How to Fix Them
- Painting Your Windows Doesn’t Have to Be Hard
the painted surface
Article List
the painted surface
How To Paint a Window
This article will be limited to specific tips about painting windows. It is a companion article to «How To Paint Woodwork» which covers the general tips and techniques for painting all woodwork and should definitely be read along with this one.
If a window has been «painted shut» because of previous coats of paint, try cutting it open with a putty knife. It may take tapping on the handle of the knife with a hammer to break the paint seal. Check the interior and exterior side, there should be a small gap between the window sash and the casing or track. Slide a putty knife or similar type cutting tool around the window in this gap to break paint that may have previously seaped in and dried there. While you have the window open check to make sure it will open and close easily. Newer windows usually have metal or vinyl runners that can be lubricated. The wooden tracks of older windows may need to be scraped clean and then lubricated with WD-40 or paraffin wax.. Do not use silicone lubricants. Paint does not adhere well to surfaces that have been exposed to silicone.
How To Paint a Double Hung Window
First remove all of the hardware, it is much easier to remove these small parts than to paint around them. A basic rule of painting anything is to paint the farthest part away from you first and work toward yourself. To paint an interior window, lower the upper sash and paint the lower half of it, then push it back up to paint the top half. The upper sash should be completely painted and pushed almost into place, leave a small gap for drying. The bottom sash is then painted, lowered almost in place and then the top edge of it is painted. Now begin painting the frame, starting at the top and working your way down. Be careful to allow as little paint on the tracks as possible, wipe it off while the paint is wet. Do not shut the window yet. Leave a small space at the top and bottom until the paint is fully dry. Later, check to make sure the window is not stuck. If it is, the paint will not be hard to cut loose and then the window can be shut. When the paint has dried, spray the tracks with WD-40 (not silicone spray) to lubricate them. It is a good idea to check the windows again after a couple of days to see if they can be opened. The steps for an exterior window are reversed. The bottom sash should be painted first because from the outside it is the farthest away.
A drawing of a double hung window and more painting tips can be seen at «Painting a Double Hung Window».
How To Paint a Casement Style Window
Casement windows seem awkward to paint at first because the hardware limits the movement of the window and so it is hard to reach the entire surface. This problem can be solved. Take a close look at the hardware and there will be a release to free the window. In many cases the arm is pushed down as the window is opened and once it comes to the release point in the track, it pops free. Now the window can be moved back and forth making it easier to reach all the surfaces. These windows should have weather stripping around them and it is best to remove this if possible. If the stripping does not remove easily do not force its removal, just be careful and paint around it. Any missing weather stripping should of course, be replaced to prevent drafts. These windows should not be closed tightly before the paint has completely dried, they are very difficult to free if they have been painted shut.
How To Paint a Divided Light Window
This type window is very common in traditional style homes. It is a window, double hung or fixed, that is made of many small panes of glass held together with stiles and mullions in a window sash. The stiles run horizontal and the mullions run vertical. The number of parts to paint seem overwhelming. To make painting easier follow the tips given above for the double hung window. Also develop a pattern. Paint all the stiles across a row, then the mullions on the right, then left and the bottom stile of that row last. Do each row of panes this way, working down each sash. This method reduces fatigue because your position will change less. It will also reduce missed parts when you paint in a pattern. Try to keep paint off the glass for a neat looking job. If the paint does not flow from the brush smoothly, add a small amount of thinner to the paint. Add thinner in small amounts until the paint releases from the brush easily. These type windows and doors are time consuming to paint but with practice they do get easier.
These steps should make painting a window a simpler task. More details about specific painting subjects are covered in the additional articles. In those will be found details, tips and techniques gathered from over 20 years of painting experience. Here is a list of links to the articles:
More helpful painting tips, techniques and how-to articles can be found by following these links:
More details about specific painting subjects are covered in the additional articles. In those will be found details, painting tips and techniques gathered from over 20 years of painting experience. Here is a list of links to the articles:
An excellent source for all of your film and digital camera needs. order with confidence.

Links
If you have a website we invite you to link to the painted surface. Linking code can be found at; «Link to us». If you know a website owner please share this with them.
Thank you,
Michael
Editor — the painted surface
the painted surface
© 2021 the painted surface
All rights reserved.
Where is MS Paint in Windows 10, how to find, run, start?
Find and open the Windows 10 MS-Paint , or create a desktop shortcut for Paint APP on the Windows 10 Desktop!
1.) . Start the ms-paint via Run-Command Dialog in Windows 10!
2.) . Create a ms-paint desktop shortcut for the Windows-10 Desktop PC and Tablet-PC!
3.) . Start the mspaint via Windows-10 Search!
4.) . Run Paint when you start Windows 10 or Log in!
The solution for a fast access, for example, to edit an image or wallpaper is also suitable 4 Server 2019, 2016, . and Windows all Desktop OS!
In Windows-10 is the mspaint.exe full path, also in:
C:\Windows\system32\mspaint.exe e.g. %WINDIR%\system32\mspaint.exe
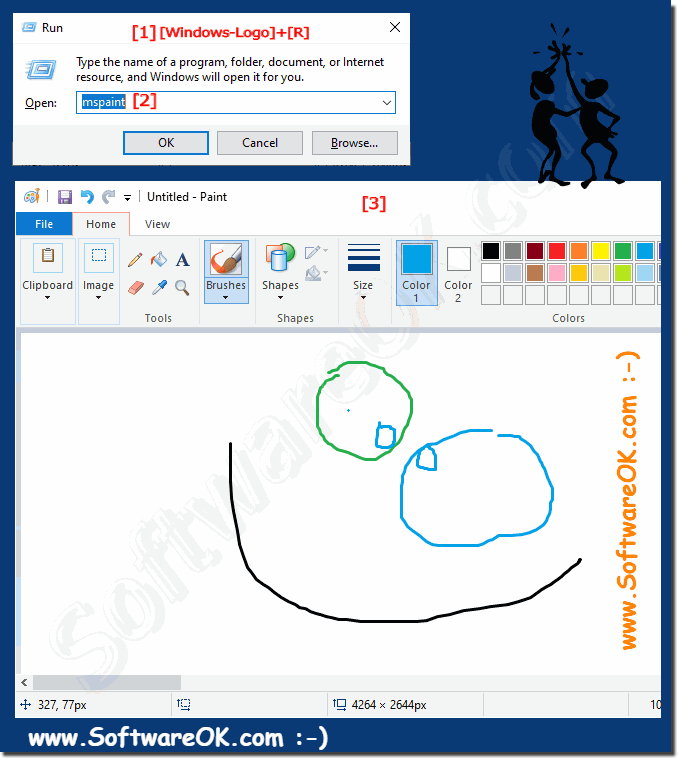
1.) Start the ms-paint via Run-Command Dialog in Windows 10!
1. Please press the keys [Windows Logo+R]
2. then simply enter the command mspaint
| (Image-1) Run the Paint in windows 10 via run-command dialog! |
 |
Despite all the benefits of the Windows 10 operating system, it can sometimes be quite difficult to find the right program that will eventually be needed. This is such a common graphics editor as Paint, yet it’s hard to find for a large number of users.

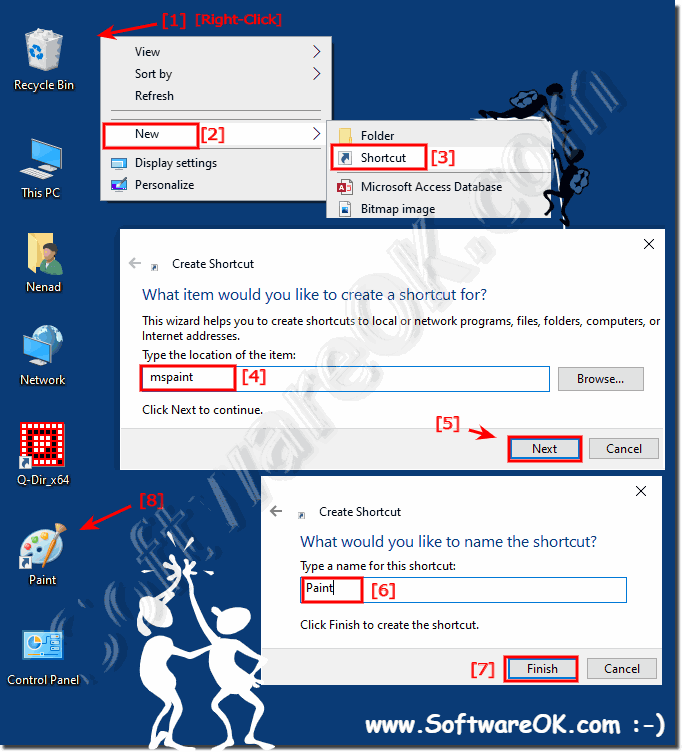
2.) Create a ms-paint desktop shortcut for the Windows-10 Desktop!
1. Right click on a free space on the Windows 10 desktop
2. select «New», «Shortcut» ( Right click = Long Tap on Tablet PC)
3. Now enter in the location the full path of the Windows 10 Paint: %WINDIR%\System32\mspaint.exe
(or «mspaint»)
4. Click the Button «Next».
5. Please enter the name for the Paint Desktop-Shortcut
6. You can mspaint.exe leave or enter «Paint» as name.
| (Image-2) Windows 10 desktop shortcut for Paint! |
 |
The Paint program is a simple graphics editor that lets you perform any operation on images. In the previous version of the operating system old Windows 7, it was very easy to run this program. It was in the start menu. At 10, this menu has changed slightly.
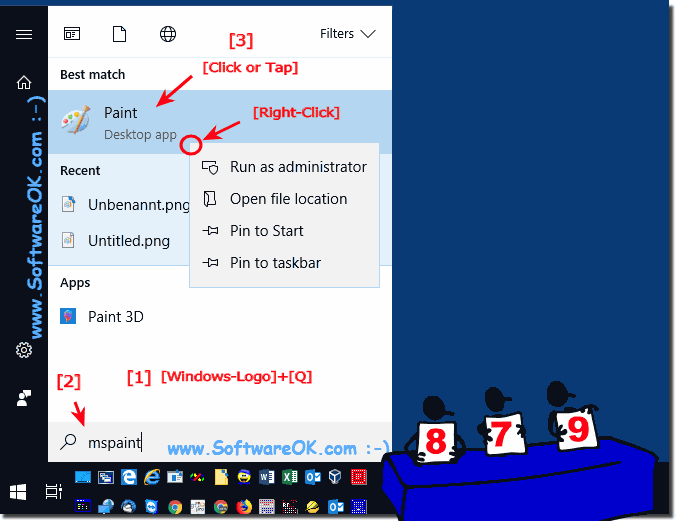
3.) Start the mspaint via Windows-10 search!
1. Please click the Windows-10 Logo or the Windows-Logo Key!
1b. Or: Use Keyboard-Shortcut Windows-Logo+Q
2. Enter in Search Box mspaint and start the Paint in Windows-10!
2b. Or: Do a right Click to start MS-Paint in Admin Mode
| (Image-3) Run paint from windows 10 search box! |
 |
Paint is a feature in Windows 10 that you can use to draw, color, and edit pictures. You can use Paint like a digital sketchpad to make simple pictures, creative projects, or to add text and designs to other pictures, such as those taken with your digital camera on Windows 10.
When you start Paint on Windows 10 , you’ll see an empty window; drawing and painting tools are located in the ribbon at the top of the window.
The ribbon in Paint includes a handy collection of drawing tools for Windows 10. You can use these tools to create freehand drawings and add a variety of shapes to your pictures on windows 10.
Some tools and shapes, such as the Pencil, Brush, Line, and Curve, let you make a variety of straight, curved, and squiggly lines. What you draw on new Windows-10 paint is determined by how you move the mouse as you draw. You can use the Line to draw a straight line.
4.) Run Paint when you start Windows 10 or Log in!
If you use paint very often, you also have the option to start the drawing program MS-Paint at the start. Ergo user login in Windows 10!
Control-Panel in Autostart for currently logged-on user please use:
shell:startup or %appdata%\Roaming\Microsoft\Windows\Start Menu\Programs\Startup
Add Control-Panel shortcut in Auto-Startup-Folder all users:
shell:common startup or %programdata%\Microsoft\Windows\Start Menu\Programs\Startup
Please use drop-action, for example, to add the MS-Paint to the Win-10 startup folder.
How to Paint Vinyl Windows
Last Updated: November 30, 2019 References
This article was co-authored by our trained team of editors and researchers who validated it for accuracy and comprehensiveness. wikiHow’s Content Management Team carefully monitors the work from our editorial staff to ensure that each article is backed by trusted research and meets our high quality standards.
There are 14 references cited in this article, which can be found at the bottom of the page.
This article has been viewed 5,117 times.
Painting windows is a great way to give your home an updated look. If you have vinyl windows, you might have heard that you can’t paint them. This is because vinyl is so slick that it repels most paints. Fortunately, as long as you sand the frames to create a rough surface and choose vinyl-safe paint and primer, you can add this home improvement project to your to-do list.

\u00a9 2021 wikiHow, Inc. All rights reserved. wikiHow, Inc. is the copyright holder of this image under U.S. and international copyright laws. This image is not licensed under the Creative Commons license applied to text content and some other images posted to the wikiHow website. This image may not be used by other entities without the express written consent of wikiHow, Inc.
\n
Tip: If you also want to clean the glass windows, dip a soft cloth into soapy water and rub it over the glass. Then, spray the windows with water to rinse away dirt and soapy residue. Dry the glass with a soft lint-free cloth.
How to Paint Windows
The article is designed to provide you with a detailed step by step guide on how to paint windows.
Cracking paint on a window frame can be an unsightly part of your home and can leave your window frames prone to damage. You should first examine the window to make sure there isn’t damage and that a fresh paint coat can restore it.

Painting the trim around your windows is no small task but it is one that you can do easily by yourself. When painted properly, you can go years without having to repaint your windows. Make sure to start early in the day so your windows are dry and ready for use at night.
Painting Accessories
When painting a window you wont need to invest in many tools and accessories. You will need the following;
- Masking tape
- Paint of your choice, oil or water-based.
- Paint primer
- Putty knife/scraper
- Paintbrush
- Sandpaper
Additionally, you may need the following tools and accessories for your project:
- A sturdy ladder that is safety approved and appropriate for the job
- A place to place your windows when painting
- Straight-edged razor blades
Painting the Windows
Step One: Clear the Work Area and Prep the Windows
- Clean and Scrape Before Painting – It can feel like a waste of time scraping off old paint, but this step is critical to ensure your new coat of paint goes on smooth.
- Remove All the Hardware – Remove any latches and handles from your windows to ensure a neat-looking paint job.
- Sand the Surfaces You’re Going to Paint– You will want to create a smooth surface to help the primer and paint adhere better. Make sure to remove any dust from the window before painting. Be careful when sanding to avoid scratching the glass.
- Mask the Glass – Make sure to use a masking tape that has an edge-seal technology to avoid paint getting underneath the tape. Make sure to place masking tape on the window tracks to avoid painting these parts.
- Clear the Work Area – It is important to have everything you need in one location to make your job easier. Make sure your room has plenty of ventilation to avoid paint fumes from circulating within.

Step Two: Painting the Windows
There are still several steps you will need to follow before you begin to paint your windows to ensure your paint will last longer.
- Repair Damaged Caulking – To prevent air leakage apply new caulk to the exposed seams to protect your home from the outside elements.
- Prime Your Windows– Use a fast-drying primer in a neutral color to ensure a solid protective coating on your windows. Make sure to work the primer into the edges around the glass.
- Apply the First Coat – Once your primer is dry, using an angled brush apply the first coat of paint. Start out by painting the windows at the top, inner most part and work your way out. Apply a liberal coat and immediately brush it out smooth. Once the first coat of paint is dry, lightly sand the paint with a finer sandpaper and then wipe away the dust.
- Second Coat – Once your first coat is dried and sanded, apply the finishing coat. Using the same techniques from the step above, apply paint liberally to avoid any cracking. Paint over any new caulk you may have applied to give your windows another layer to prevent moisture from penetrating. Once this layer has dried remove any masking tape from your windows to check for paint left on the glass. If there is any paint on the glass, wait for it to dry, then wet the surface to avoid scratching the glass and remove with a window scraper.

What Type of Paint Should I Use?
Depending on if your window is an interior or exterior window there are two different types of paint that will give you the professional look you desire.
An oil-based paint is great for your windows as it will give you a hard finish. The downside to oil paint is that it can be prone to yellowing if it is used on exterior windows. If used on an indoor window an oil-based paint will last for a long time. Because oil-based paints have the hard-shell texture it will give your windows a brush mark free paint job if done properly. Since oil-based paint requires petroleum-based solvents it is defiantly harder to clean than water-based paint.
Water-based paint is the more common choice for windows because it will maintain the sheen much longer than an oil-based paint. Brush marks are also minimized with water-based paint. Clean-up is also easier compared to oil-based paint and can be done with just soap and water.
Common Painting Problems and How to Fix Them
Below are some of the common problems you may experience when painting your windows and how to fix them.
- Cracking, Clumping, Flaking and Peeling – Paint can crack when the surface was insufficiently prepped. Applying your paint too thin can also lead to your paint cracking. On the other hand, if you apply your paint too thick it can lead to a clumpy look. Cracks can also appear if you don’t allow adequate time for your windows to dry between coats of paint. Finally, over time paint will naturally become brittle causing it to crack and flake.
- How to Repair and Prevent – If the damage is extensive you may need to re-sand your entire window and start your project over to avoid running into the problem again. If the damage isn’t extensive, then begin by removing all of the cracked or flaking paint with a scraper, wire brush or a heat gun. Once you have removed any bad paint follow the steps above to re-apply a new coat of paint.
Painting Your Windows Doesn’t Have to Be Hard
Painting your windows can not only add to your homes curb appeal but it can also increase the lifespan of your windows. Remember, before deciding to paint your windows, make sure to seek the help of a window professional near you if you have any further concerns.


