- How to Create Partitions in Linux
- Option 1: Partition a Disk Using parted Command
- Step 1: List Partitions
- Step 2: Open Storage Disk
- Step 3: Make a Partition Table
- Step 4: Check Table
- Step 5: Create Partition
- Option 2: Partition a Disk Using fdisk Command
- Step 1: List Existing Partitions
- Step 2: Select Storage Disk
- Step 3: Create a New Partition
- Step 4: Write on Disk
- Format the Partition
- Mount the Partition
- How to Access Linux Partitions in Windows
- Choosing The Right Software for Linux Partitions
- Using DiskInternals Linux Reader
- Read & Write Access With Ext2Fsd
- Safely Accessing Your Linux Files On Windows
How to Create Partitions in Linux
Home » SysAdmin » How to Create Partitions in Linux
Creating disk partitions enables you to split your hard drive into multiple sections that act independently.
In Linux, users must structure storage devices (USB and hard drives) before using them. Partitioning is also useful when you are installing multiple operating systems on a single machine.
In this step-by-step tutorial, you will learn how to create a partition using the Linux parted or fdisk command.
- A system running Linux
- A user account with sudo or root privileges
- Access to a terminal window / command line (Activities >Search >Terminal)
Option 1: Partition a Disk Using parted Command
Follow the steps below to partition a disk in Linux by using the parted command.
Step 1: List Partitions
Before making a partition, list available storage devices and partitions. This action helps identify the storage device you want to partition.
Run the following command with sudo to list storage devices and partitions:
The terminal prints out available storage devices with information about:
- Model – Model of the storage device.
- Disk – Name and size of the disk.
- Sectorsize – Logical and physical size of the memory. Not to be confused with available disk space.
- PartitionTable – Partition table type (msdos, gpt, aix, amiga, bsd, dvh, mac, pc98, sun, and loop).
- DiskFlags – Partitions with information on size, type, file system, and flags.
Partitions types can be:
- Primary – Holds the operating system files. Only four primary partitions can be created.
- Extended – Special type of partition in which more than the four primary partitions can be created.
- Logical – Partition that has been created inside of an extended partition.
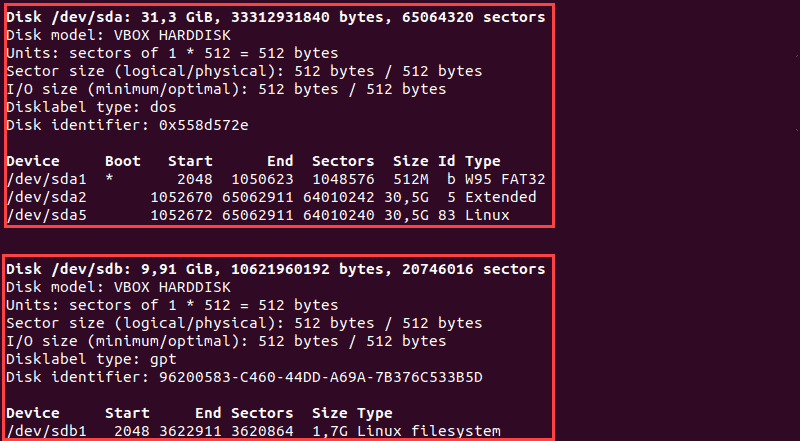
In our example, there are two storage devices ( /dev/sda and /dev/sdb ):
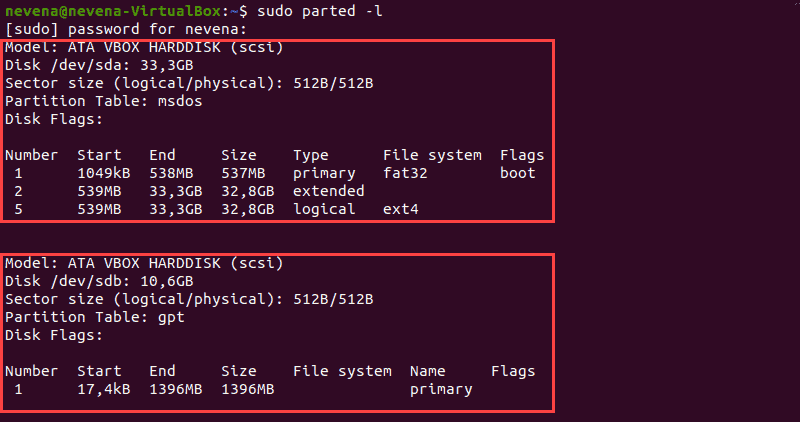
Note: The first storage disk ( dev/sda or dev/vda ) contains the operating system. Creating a partition on this disk can make your system unbootable. Only create partitions on secondary disks ( dev/sdb , dev/sdc , dev/vdb , or dev/vdc ).
Step 2: Open Storage Disk
Open the storage disk that you intend to partition by running the following command:

Always specify the storage device. If you don’t specify a disk name, the disk is randomly selected. To change the disk to dev/sdb run:
The dev/sdb disk is open:

Step 3: Make a Partition Table
Create a partition table before partitioning the disk. A partition table is located at the start of a hard drive and it stores data about the size and location of each partition.
Partition table types are: aix, amiga, bsd, dvh, gpt, mac, ms-dos, pc98, sun, and loop.
The create a partition table, enter the following:
For example, to create a gpt partition table, run the following command:
Type Yes to execute:

Note: The two most commonly used partition table types are gpt and msdos. The latter supports up to sixteen partitions and formats up to 16TB of space while gpt formats up to 9.4ZB and supports up to 128 partitions.
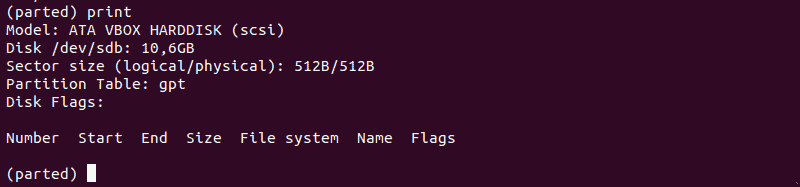
Step 4: Check Table
Run the print command to review the partition table. The output displays information about the storage device:
Note: Run help mkpart command to get additional help on how to create a new partition.
Step 5: Create Partition
Let’s make a new 1854MB-partition using the ext4 file system. The assigned disk start shall be 1MB and the disk end is at 1855MB.
To create a new partition, enter the following:
After that, run the print command to review information on the newly created partition. The information is displayed under the Disk Flags section:
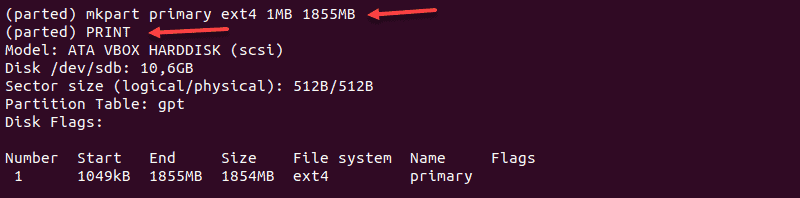
In a gpt partition table, the partition type is the mandatory partition name. In our example, primary is the name of the partition, not the partition type.
To save your actions and quit, enter the quit command. Changes are saved automatically with this command.

Note: The “You may need to update /etc/fstab file” message signals that the partition can be mounted automatically at boot time.
Option 2: Partition a Disk Using fdisk Command
Follow the steps below to partition a disk in Linux by using the fdisk command.
Step 1: List Existing Partitions
Run the following command to list all existing partitions:
The output contains information about storage disks and partitions:
Step 2: Select Storage Disk
Select the storage disk you want to create partitions on by running the following command:
The /dev/sdb storage disk is open:

Step 3: Create a New Partition
1. Run the n command to create a new partition.
2. Select the partition number by typing the default number (2).
3. After that, you are asked for the starting and ending sector of your hard drive. It is best to type the default number in this section (3622912).
4. The last prompt is related to the size of the partition. You can choose to have several sectors or to set the size in megabytes or gigabytes. Type +2GB to set the size of the partition to 2GB.
A message appears confirming that the partition is created.

Step 4: Write on Disk
The system created the partition, but the changes are not written on the disk.
1. To write the changes on disk, run the w command:

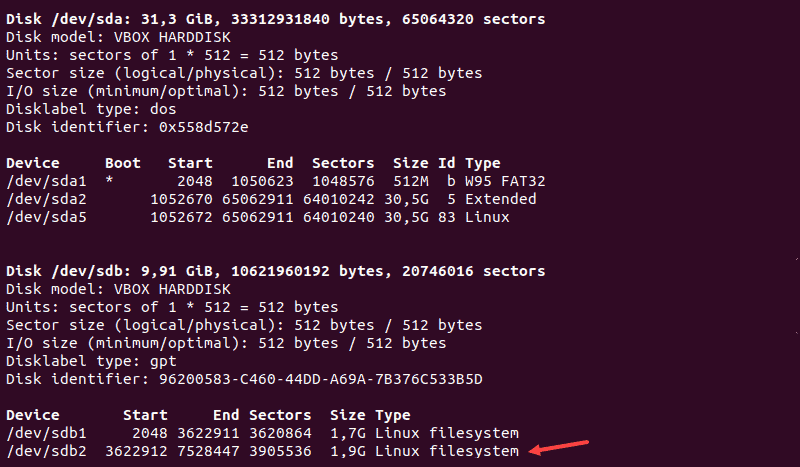
2. Verify that the partition is created by running the following command:
As you can see, the partition /dev/sdb2 has been created.
Format the Partition
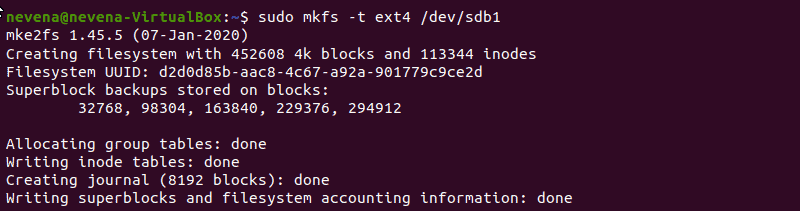
Once a partition has been created with the parted of fdisk command, format it before using it.
Format the partition by running the following command:
Note: Check out our guide and learn how to format and mount disk partitions in Linux using ext4, FAT32, or NTFS file system!
Mount the Partition
To begin interacting with the disk, create a mount point and mount the partition to it.
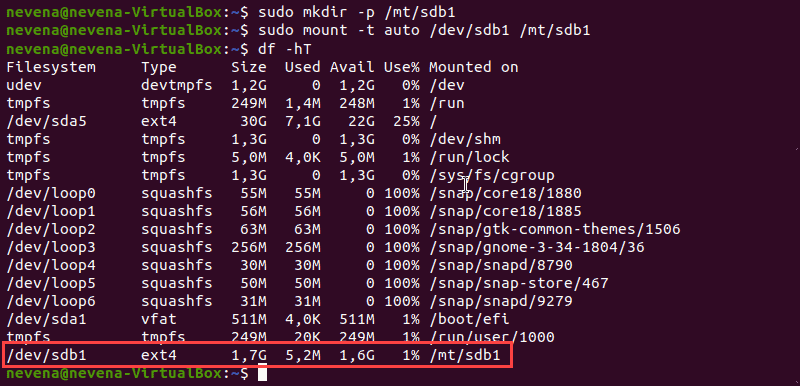
1. Create a mount point by running the following command:
2. After that, mount the partition by entering:
The terminal does not print out an output if the commands are executed successfully.
3. Verify if partition is mounted by using the df hT command:
Note: If you have NTFS partitions on your hard drive, check out our article on how to mount NTFS partitions in Linux.
After following this step-by-step tutorial, you should have a better understanding on how to partition a disk in Linux by using the parted or fdisk command.
For more Linux commands, see our Linux Commands Cheat Sheet.
Источник
How to Access Linux Partitions in Windows
For those who need access to both operating systems
If you have a Linux distribution sitting alongside Windows on your PC, you’ll have no problem accessing your Windows drive. NTFS, the default Windows file system, is well supported, and most Linux distros will be able to mount NTFS drives with ease.
The same can’t be said for Windows users, however. Common Linux file systems like Ext4 aren’t supported. If you want to access Linux partitions in Windows, you’ll need to install some additional software to do the job.
Choosing The Right Software for Linux Partitions
There are several software options for Windows users looking to access their files on Linux. For many years, Ext2Fsd has been the go-to option, allowing you to read and write to your Linux file systems within Windows itself.
Unfortunately, Ext2Fsd hasn’t been updated since 2017, and the penultimate release, 0.68, had a “critical bug” that could corrupt your data on Ext4 drives with 64-bit mode enabled. The site for Ext2Fsd has gone down, and it’s unclear whether Ext2Fsd 0.69 fixed this bug.
It’s still an option if you need write access to your Linux drive, but given the risks, it isn’t our main recommendation if you have a 64-bit Ext4 Linux partition. Make sure you back up any critical data first and use only the most recent, 0.69 release of Ext2Fsd.
As an alternative, we recommend DiskInternals Linux Reader. It lets you access files from the most common Linux file systems. Unlike Ext2fs, it doesn’t do this through Windows Explorer, but through its own file manager. It’s also free for you to use.
It won’t let you write files to your Linux drive directly, but you can save any files you need to edit to your Windows drive. A similar, open-source alternative, Ext2read, is also available for you to use, with many of the same features. You don’t need to install Ext2read, as it comes as a portable .exe file.
Using DiskInternals Linux Reader
DiskInternals Linux Reader is freeware, so you don’t have to pay to download and use it.
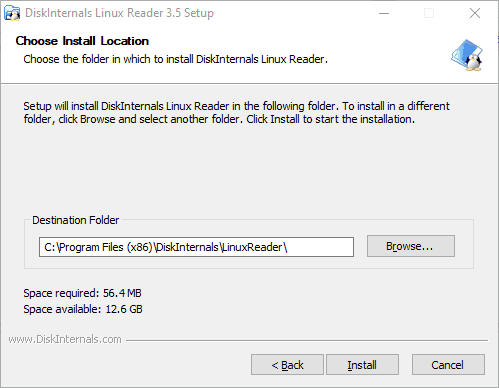
To begin, you’ll need to download the Linux Reader installer. Open the installer, accept the terms, confirm your installation location and click Install.
Once the installation is complete, make sure the Run DiskInternals Linux Reader checkbox is checked, and then click Finish.
The Linux Reader client is well designed and has some similarities in design to the Windows File Explorer. You’ll see a list of your drives, including any removable storage like USB flash drives or SD cards.

Find your Linux partition, under either Hard Disk Drives or Drives with Removable Storage.
You can either double-click to view your files, or right-click and select Open Partition from the drop-down menu instead.
You’ll see a split-screen, with the top half showing files and folders on your Linux drive. As we’ve mentioned already, you can’t make any changes to the drive directly. You’ll need to copy the files to your Windows drive, or to another Windows-suitable partition.
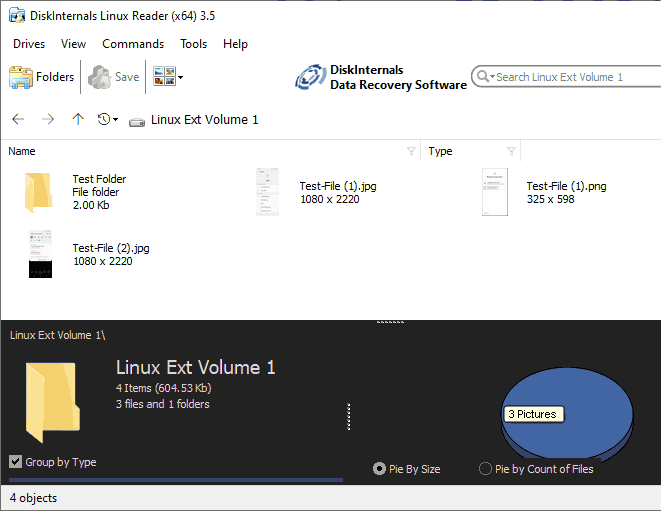
To do this, select the files and folders you want to copy. Right-click the selected files and click Save.
In the Export Wizard, you’ll see the option to save files is already selected.
Click Next.
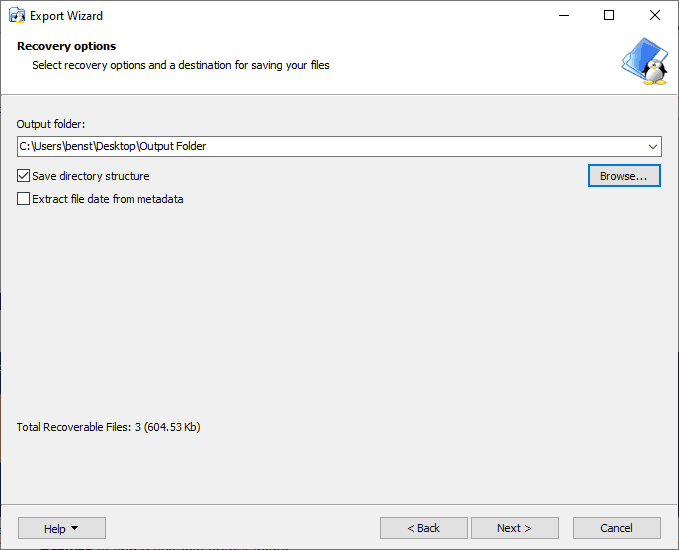
Choose the location to save your files and folders. You can type the location yourself, or click Browse to find a suitable output folder before clicking Next.
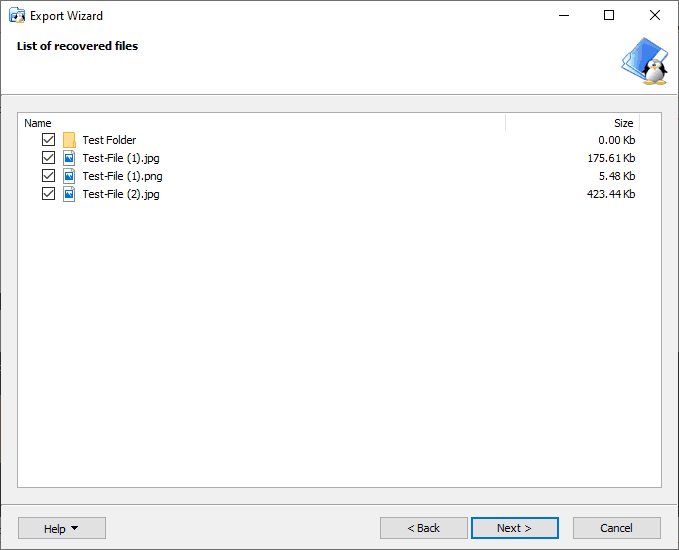
You’ll see a final list of your chosen files and folders. If you want to remove any files or folders before the copying process begins, uncheck the checkbox next to any items.
Click Next to proceed.
Once completed, you’ll see a final confirmation, confirming the number of files and folders copied, as well as the save location. Click Finish to close the Export Wizard.

While DiskInternals Linux Reader doesn’t allow you to modify files or folders directly, you can use it to quickly access any essential Linux files. You can then transfer these back to your Linux drive when you’re running Linux or, if you’re willing to take the risk, you can use Ext2Fsd instead.
Read & Write Access With Ext2Fsd
Ext2Fsd, as we mentioned previously, is the only option for users who need to make changes to files or folders on their Linux drive directly from within Windows. Once it’s installed, you can access your drive from within Windows File Explorer as normal. Ext2Fsd 0.69 is recommended, especially for users with Ext4 64-bit Linux partitions.
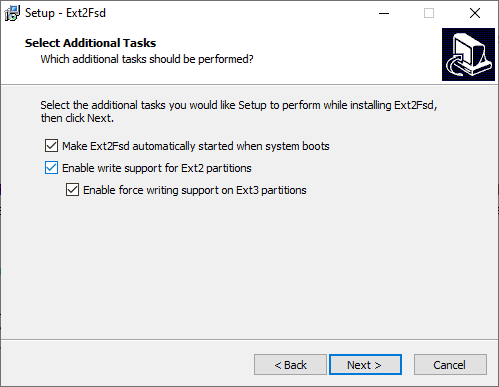
To start, download the Ext2Fsd installer file and begin the installation. Accept the terms and installation location, and make sure that under Select Additional Tasks, all the checkboxes are checked.
Once the installer is completed, you’ll be asked to restart your PC. Safely close any essential programs and click Finish to reboot.
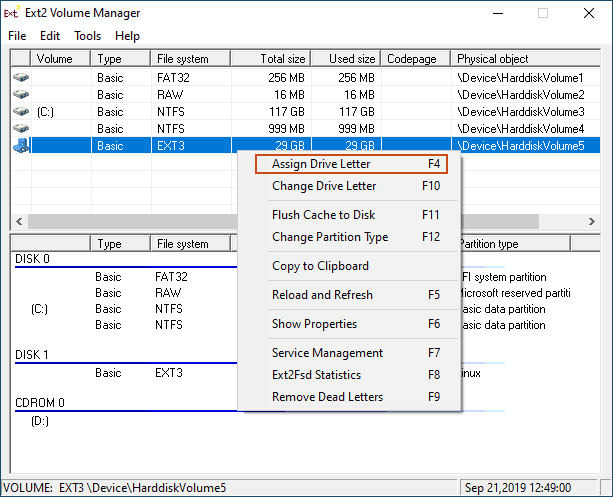
Once you’ve rebooted, see if you spot your drive in File Explorer and double-click to open it. If you don’t see it, open the Ext2 Volume Manager, right-click your drive, and click Assign Drive Letter.
As soon as a drive letter is assigned to your drive, you should be able to see it in File Explorer. You’ll be able to create, copy, move, or delete files as you would any other drive, but given the risks, don’t use this for critical data unless you’re certain you have a backup available.
Safely Accessing Your Linux Files On Windows
The safest method for accessing Linux files or folders is to use a read-only option like DiskInternals Linux Reader. With software like this, the chances of corrupting your files are zero.
If you absolutely need to edit files or folders on your Linux drive, Ext2Fsd will allow you to do it, but take care to avoid risks by using the most recent version, and only on a drive with non-critical files.
If you want to avoid this problem in the future, consider having a “pooled” Linux partition drive (formatted as NTFS) to share your files across both systems, or sync your files to Google Drive instead.
Ben Stockton is a freelance technology writer based in the United Kingdom. In a past life, Ben was a college lecturer in the UK, training teens and adults. Since leaving the classroom, Ben has taken his teaching experience and applied it to writing tech how-to guides and tutorials, specialising in Linux, Windows, and Android. He has a degree in History and a postgraduate qualification in Computing. Read Ben’s Full Bio
Источник


