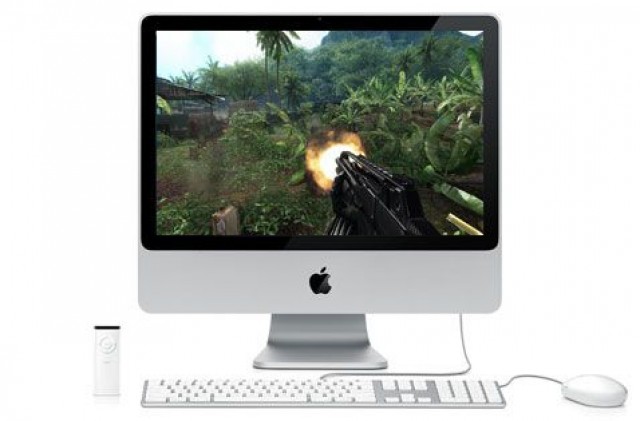
- How to Play Windows Games on Mac Without Boot Camp in 2019, 2020?
- Scenario
- Want to play Windows games on a Mac?
- The best way to play Windows game on Mac
- How to play Windows games on Mac without Boot Camp in 2019, 2020?
- Conclusion
- How to Play PC Games on Mac Without Installing Windows
- Look for Mac-Friendly Games
- Get PC Games Running Under Wine
- Go Retro With Emulators
- How to play games from windows to mac
- What Is Wine?
- What You’ll Need
How to Play Windows Games on Mac Without Boot Camp in 2019, 2020?
How to play Windows games on a Mac? This post will teach you 2 ways of successfully running Windows Games on your Mac without Boot Camp.

By Dylan  / Last Updated September 25, 2020
Scenario
Can I play Windows games on my Mac book?
I bought a new Mac book Pro 13, and I bought lots of games on steam that are not supported by Mac OS. And I know Boot Camp can help me to install Windows, but it will take a lot of space. Is there another way of playing Windows steam games on a Mac without Boot Camp?»
— Question from Forums. Tomsguide.com
Want to play Windows games on a Mac?
Relying on its stable smooth system and great performance, lots of people are willing to use Mac books to work. However, the Mac gaming ecosystem is not as good as the Windows gaming ecosystem. And most popular games don’t support Apple system. Maybe you just enjoy one or two Windows games and it is apparently unnecessary to buy a Windows game book. Therefore you may ask how to play Windows games on a Mac.
Next, we will introduce the best way to run Windows games on a Mac computer.
The best way to play Windows game on Mac
Some users may have tried to install a Windows system on their Mac book via Boot Camp or to run their games on virtual machine. If your Mac computer has a large capaciry and good performance, the 2 methods are good ways to go. But pratically, the 2 methods can give plays horrible game experience, espacilly virtual machine will takes lots of space on virtual memory.
The best solution is to create a Windows To Go USB drive via AOMEI Partition Assistant Professional. It installs a full Windows system on a USB drive. With the drive connected, you Mac book can run a Windows system environment. And it owns several advantages over Boot Camp and other tools:
в—Џ It doesn’t take any space on your Mac. AOMEI Partition Assistant just create a Windows environment on an external drive, it doesn’t need any free space on your Mac computer.
в—Џ It is portable. After creating a Windows external device, you can insert it to any other Mac book to run Windows games and software programs on mac.
в—Џ It supports Mac and Windows computers. You can create a bootable Windows 10, 8, 7 external hard drive to boot a Mac computer or Windows PC.
Now, you can download the Demo version on a Windows PC, and follow the steps below to see how it works:
How to play Windows games on Mac without Boot Camp in 2019, 2020?
Before the operation, you need to make sure the Mac computer can meet the minimum requirements of the games you want to play. And if possible, you can use a portable SSD that gives you better experience.
вњЌPreparation work:
A working computer running with Windows system
Download the Windows system ISO file you need.
A USB drive, or portable SSD, HDD.
Backup files on the device to cloud storage or another external hard drive if there is any important data on it
Step 1. Install and launch AOMEI Partition Assistant on a Windows PC, and click “All Tools” > “Windows To Go Creator”.

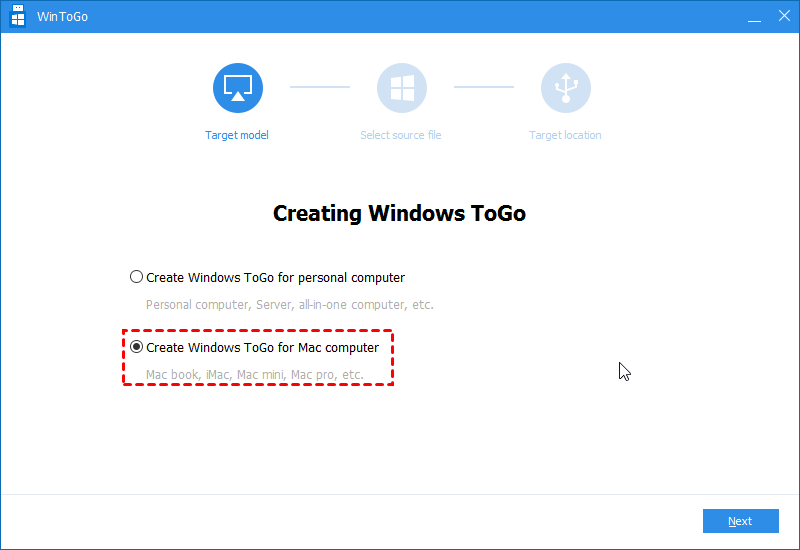
Step 2. Choose “Create Windows To Go for Mac computer”. And click “Next”.
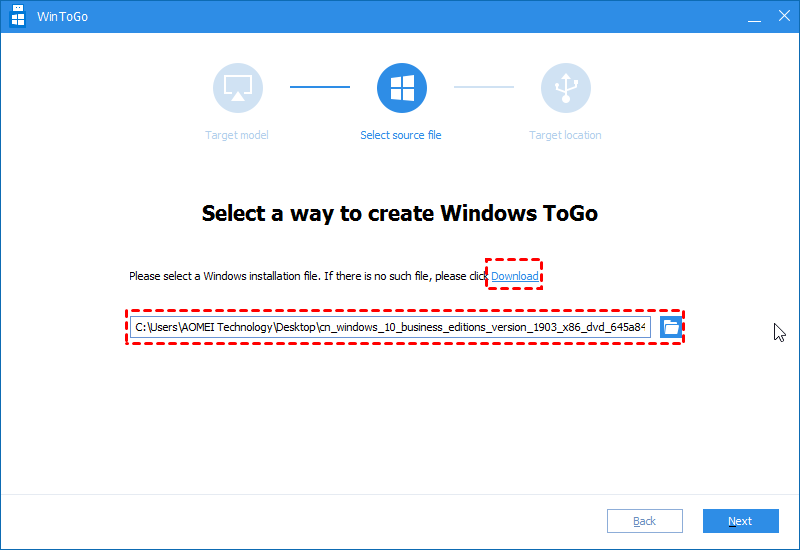
Step 3. Select the Windows system ISO file, and click “Next”.
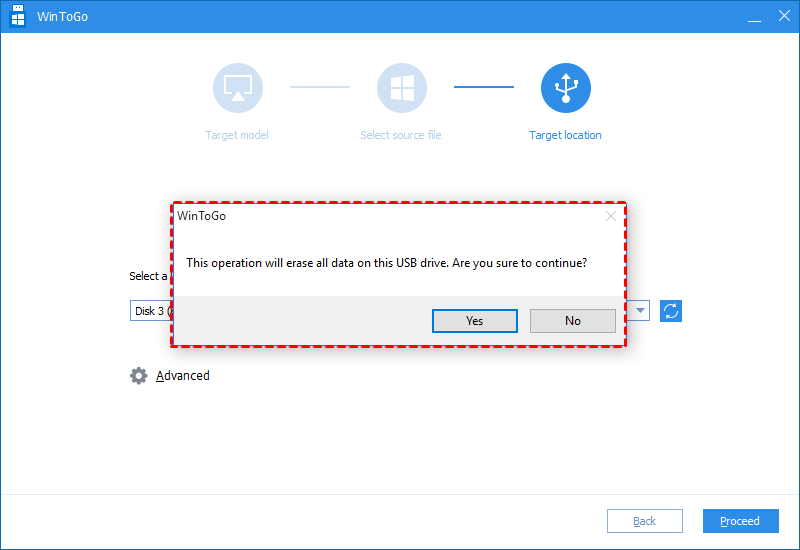
Step 4. And choose the USB or the external hard drive you inserted, and click “Proceed”. Ensure you’ve backed up all important data, and click “Yes” to confirm the operation.
Then wait for a while, this process would last about 30 minutes.
Step 5. When it is over, connect the USB to your Mac book, and follow the steps below to set it as the startup disk.
1. Power on the Mac book, and press the “Apple” key to open System Preferences.
2. Choose “Startup Disk” on the System Preferences window.
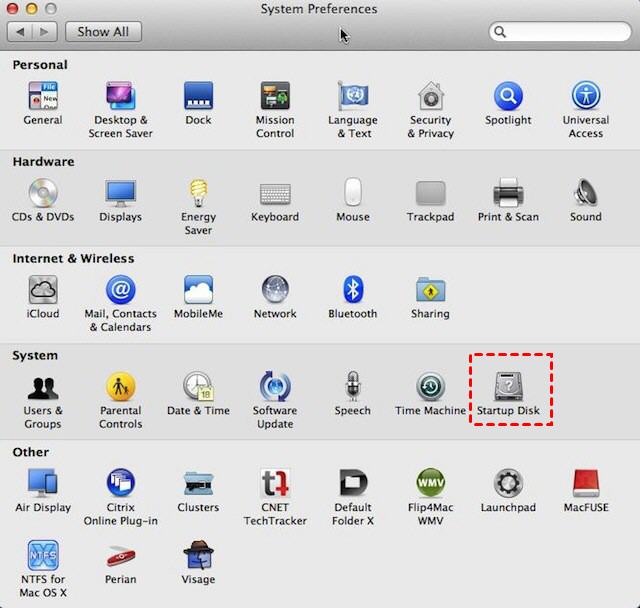
3. Choose the USB flash drive as the startup device from the listed disk. Then restart your Mac book, it will run Windows OS. And you can run your games on this Mac.
вњЌNote: You may need to adjust the resolutions to adapt to the game if you encounter the issue of unstable running.
Conclusion
You have known how to play Windows games on a Mac without Boot Camp. In this way, you can also run other Windows programs, software on your Mac. And if you don’t need it one day, AOMEI Partition Assistant can also help you to unboot the USB to the normal state.
And if you want to use its features on Windows Server system, you can turn to AOMEI Partition Assistant Server Edition.
How to Play PC Games on Mac Without Installing Windows
Don’t want to install Windows on your Mac to play PC games? Turn to programs like Wine, OpenEmu, DOSbox, and GeForce Now instead.


Mac users have it rough. You get some of the best hardware on the market with super polished, stable software—and so few games to play on it. But just because developers aren’t releasing their games for macOS doesn’t mean you can’t get PC games running on your Apple-made machine. It just takes a bit of finesse.
If you really want to play PC games to the best of your hardware’s capability, you’ll want to install Windows on your Mac using Boot Camp (unless you have an ARM-based Mac, which won’t support Boot Camp). It’s the easiest way to get games running, and provides the best performance. It does, however, take up a lot of space on your hard drive, and it’s annoying to reboot your computer every time you want to play a game. You could install Windows via Parallels or VirtualBox, but you’ll sacrifice a lot in performance.
If you don’t want to deal with the hassle of installing Windows, though, we understand. Here are your alternatives for playing games on your Mac.
Look for Mac-Friendly Games
First, let’s get the obvious out of the way—there are plenty of Mac-compatible games out there. Steam, for example, shows a little Apple logo next to every game that’s compatible with macOS, and I was surprised to find a decent number of my own games were available on the platform, including Shadow of the Tomb Raider, Call of Duty Black Ops III, and Civilization VI. Just make sure you look for that Apple logo, or go to Browse > Mac OS X before you buy.
Also, remember that Steam isn’t the only place to find games—Blizzard offers Mac versions of its games through its Battle.net service, and you’ll find plenty of great Mac titles on GOG.com as well. Remember to search across the various stores when you shop, since you might be surprised what exclusives you’ll find.
Get PC Games Running Under Wine
Okay, so you’ve exhausted all the Mac-compatible games in popular stores, and you’re ready to tinker in order to get some other games running. Some Windows-only titles may run on macOS through Wine, a compatibility layer for Mac and Linux systems designed to run Windows programs. Wine itself can get rather technical to set up, especially when it comes to games, but there are a few third-party tools that make things easier.
Porting Kit is usually my first go-to, since it attempts to do a lot of the heavy lifting for you. Just search Porting Kit’s app or website for a game, like Among Us, and it’ll provide an Install Now button along with any quirks, patches, or extra steps you might need to take for smooth gameplay. It can still take a bit of fiddling, but Porting Kit has some built-in tutorials to help you out. Once you’re able to get a game working the first time, it’ll be easy to launch in the future, since the title appears in your Applications folder like any other Mac app.
While Porting Kit is the easiest and most up-to-date tool for installing games with Wine, other programs aim to do something similar, like PlayOnMac or the $40 CrossOver. Some may work better with certain games, so your best bet is to search for «the best way to get [the game you want] running on a Mac.» To browse Wine-friendly games before you buy, check out the Wine Database alongside Porting Kit’s library to get a feel for what might work on your system.
Go Retro With Emulators
If you want to relive games from your youth, there’s a good chance your favorite retro titles can be emulated on your Mac. There are plenty of emulators for retro game consoles out there, but Mac users have it pretty easy with OpenEmu, which can put all your favorite retro games in one place. Install the program, select the systems you want to emulate, and you’re off to the races.
You’ll have to grab a ROM file for any game you want to play—we’ll leave it to you to find those—after which you can just drag them into OpenEMU’s main window to add them to your game library. Or click the Homebrew tab to find free, newly developed games for those classic systems. You can read our full guide to OpenEmu here, and if you want to emulate a system it doesn’t support, check out our list of the best emulators for more options.
While OpenEmu focuses on classic game consoles, you can also emulate the DOS programs of yore with DOSBox. It isn’t quite as plug-and-play as OpenEmu—you’ll need to do just a bit of that command-line work you did in the actual days of DOS—but for many games, it’s pretty simple.
Download a game’s files to your Mac (again, we’ll leave it up to you to find them), put them in a folder (like
/Documents/DOSgames), then open DOSBox and run mount c
How to play games from windows to mac
By Rob LeFebvre • 9:00 am, August 20, 2012
- How-To
- News
- Top stories
PC games: they can be the bane of a Mac gamer’s existence. The Mac may be a better computer than a windows box, but even so, most games don’t support OS X. Even on Steam, the leader in cross-platform computer game support, most games run only on Windows. The reasons for this are manifold, including mid-level integrated graphics chips and less customizable hardware, but it shouldn’t be this disparate.
There are a few options for running those PC games on Macs, of course. There’s Boot Camp, which allows you to run a full copy of Windows right on your Intel-based Mac, but it requires a reboot to switch between OS X and Windows environments, which can be tedious. There are emulators you can buy, like Parallels and VMWare Fusion, but these never quite pan out, in my experience, as they always seem to be fraught with issues when connecting peripherals, mice, etc. They also cost a bit, and require a full copy of Windows, which will run you some money, too.
I just want a way to play a game that is created for the Windows operating system on my Mac, without a reboot, without buying a new program or new copy of an operating system I really don’t want to use.
Luckily, there’s a way to do just that.
What Is Wine?
 Seriously, that’s the self-referencing recursive acronym for Wine. Get it? So clever, those open source folks.
Wine actually runs as more of a translator between the instructions in the PC program and the Mac operating system. It basically fools Windows into thinking they are running in a Windows environment, without actually emulating that environment (and taking the same performance hit) like Parallels does. Wine has the benefit of a large, open-source community for support as well, which means it will continue to get better and improve compatibility for a lot of games along the way.
Speaking of compatibility, not all PC games are going to work with Wine. To find out if the game you want to try to install on your Mac via Wine will work, head over to the Wine HQ website, where they have an entire database full of the games and applications that will work with Wine. They even have levels of how well these work with Wine, including Platinum, Gold, and Silver levels of compatibility.
I chose Guild Wars: it’s a game that has gone free to play lately, is Windows-only for now, and it is listed in the Platinum compatibility list on the Wine HQ site. All the examples from here on out will be from my own experience installing Wine to play Guild Wars on my Mac Mini 2011.
Once you head over there and pick a game, you’ll be ready to make sure you have what you need to run Wine.
What You’ll Need
 First up, you’re gonna need an Intel Mac. If you’re still running a Power-PC Mac, a) it’s time to upgrade and b) this isn’t going to work. To find out what kind of Mac you have, click on the Apple menu in the upper left corner of your screen, choose About This Mac, and it will tell you. Honestly, though, if you don’t know what kind of Mac you’re running, you might have a bit of trouble with the following instructions, which assume you have access to your admin account and password, can install XCode, and have the latest Java Development package (it comes as default with Mac OS X 10.7 and up).
You’ll also need the X11 app, which used to be a standard install app starting in OS X 10.5, but which has recently been removed from OS X 10.8 Mountain Lion. If you’re running 10.8, head over to the XQuartz web page to download an open source version of X11 for Mountain Lion. Install it as you would any other package file.
You’ll also need to be comfortable using the command line via the Terminal app, an internet connection, and a couple of hours to work through all the steps involved. It’s not rocket science, but there is a certain level of patience that will be needed.
Next Page: Getting Your Game Running!


