- How to properly configure windows
- International Settings
- Prepare keyboards, time zones, and other regional settings
- Configure international settings by using Windows PowerShell
- Configure international settings by using Control Panel
- Configure international settings by using DISM
- Configure international settings by using an answer file
How to properly configure windows
Configuring Windows Server 2012 and 2008 R2 to push out a group policy to all users can be challenging with Microsoft’s introduction of Group Policy Preferences. These preferences provide more than 20 Group Policy extensions that increase the number of configurable settings in a Group Policy object (GPO). Within most preference items, the configuration interface looks similar to the applicable user interface for configuring settings so the layout will be familiar. The guidelines to set up users’ browsers with a proxy configuration are alike for Internet Explorer 7, 8, 9, and 10, and the following instructions are for Internet Explorer 10.
- Go to Group Policy Management, and select the GPO to which you want to add the Internet Explorer 10 settings.
- Edit the GPO.
- In the Group Policy Management Editor, go to User Configuration, Preferences, Control Panel Settings, and then Internet Settings. If you have already created settings for Internet Explorer 7, 8, and 9, they will be displayed here.
- Right-click in the right-hand pane, select “New,” and then select “Internet Explorer 10.”
- In the New Internet Explorer 10 Properties dialog box, click the Connections tab, and then click LAN Settings.
- Under Proxy server, select the check box to enable the “Use a proxy server…” option.
- In the Address field, enter the IP address of your proxy server, and in the Port field, enter the port number.
- Now you need to enable the settings and apply them to all users. You can individually enable and disable underlined settings or settings preceded by a circle within a preference item. The underlining or circle of the setting indicates whether it is currently enabled or disabled.
- A setting with a solid green underline or a green circle is enabled. The preference extension applies this setting’s value to the user or computer.
- A setting with a dashed red underline or red circle with a slash is disabled. The preference extension does not apply this setting’s value to the user or computer.
- Press the following function keys to enable or disable the settings within a preference item. To select a setting, click the actual text of the setting or its text field.
- F5 – Enable all settings on the current tab.
- F6 – Enable the currently selected setting.
- F7 – Disable the currently selected setting.
- F8 – Disable all settings on the current tab.
The following diagram illustrates how the function keys work. 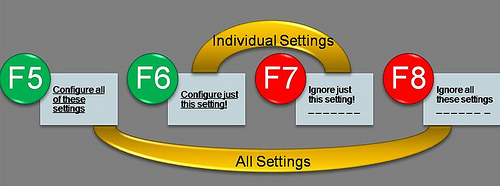
International Settings
You can specify the default language, locale, and keyboard values during deployment or after Windows is installed. You can configure international settings by using the International module for Windows PowerShell, by using an answer file with Windows Setup, or by using Deployment Imaging Servicing and Management (DISM).
For information about using DISM to configure international settings in an offline Windows image, see DISM Languages and International Servicing Command-Line Options.
In Windows 10, Control Panel items are gradually being migrated over to the Settings application. Intl.cpl can be used to manage features that exist on the cpl page. However, it’s not supported for settings migrated to the new Settings application. For items in Settings Application, use Windows PowerShell cmdlets.
In addition, Deployment Imaging Servicing and Management (DISM) should also only be used against an offline Windows image. In Windows 10, language settings are dynamically configured based on the user’s language list. Individual settings, such as the display language, default input method, and user locale may be reset dynamically based on user preferences on a running Windows installation. Use the International PowerShell cmdlet settings to change the international settings of a running Windows installation.
Prepare keyboards, time zones, and other regional settings
You can specify the default keyboard layout, language, or locale, either during deployment or after Windows is installed.
- Configure International Settings in Windows
- Default Input Profiles (Input Locales) in Windows: Lists the default input profiles (language and keyboard pairs) used for each region.
- Default Time Zones: Lists the default time zone used for each region.
- Keyboard identifiers for Windows: Lists the keyboard hexadecimal values used when configuring input profiles.
Configure international settings by using Windows PowerShell
In WindowsВ 10, you can use the International Settings PowerShell cmdlets to change the language on a running Windows installation.
Open a Windows PowerShell prompt.
Display the locale information:
Set the locale for the region and language, for example, to Japanese:
Configure international settings by using Control Panel
On a running Windows installation, you can use Control Panel to select language packs and configure additional international settings.
On the Start page, type language, and select Add a language.
Browse or search for the language that you want to install. For example, select Catalan, and then select Add.
Catalan is now added as one of your languages.
In the Change your language preferences pane, select Options next to the language that you added.
If a language pack is available for your language, select Download and install language pack.
When the language pack is installed, the language is displayed as available to useВ for the Windows display language.
To make this language your display language, move it to the top of your language list.
Log off and then log back on to Windows for the change to take effect.
Installing many additional language packs affects disk space and system performance. In particular, disk space and system performance are affected during servicing operations, such as service pack installations. Therefore, we recommend that you add a language pack to your computer only if you plan to use the language pack.
Language packs also let multiple users who share a computer select distinct display languages. For example, one user can select to see the dialog boxes, menus, and other text in Japanese, whereas another user can select to see the same content in French.
Configure international settings by using DISM
You can use Deployment Imaging Servicing and Management (DISM) to change the international settings against an offline Windows image
Mount a Windows image. For example,
Get the language settings that are configured in the Windows image by using the /Get-Intl parameter. For example
Change the default language, locale, and other international settings by using the /set-allIntl parameter.
Configure international settings by using an answer file
You can configure international settings in an answer file in the following ways:
Language Packs are installed from a distribution share and settings are configured installed during WindowsPE configuration pass.
Corporations that deploy a multilingual edition of Windows typically create an answer file that configures international settings during the WindowsPE configuration pass. For multilingual deployments, language packs can exist in both a distribution share and in the image. You can add and configure Language packs from the distribution share during the WindowsPE configuration pass, or you can add these Language pa cks during the WindowsPE configuration pass and configure the settings in another configuration pass.
The Microsoft-Windows-International-Core-WinPE component includes the settings that you can use to modify the language and locale settings during the windowsPE configuration pass. Additionally, you can change the Setup UI language for Windows Setup by specifying values in this component.
Language packs are installed to the Windows image and settings are configured during specialize and oobesystem configuration passes.
OEMs and corporations that deploy a single-language edition of Windows to various regions typically create an answer file for each region and set the locale and keyboard settings in the specialize configuration pass. In this scenario, the language pack is added to the Windows image before international settings are configured.
The Microsoft-Windows-International-Core component includes the settings that you can use to modify the language and locale settings during the specialize and oobeSystem configuration passes.
You can pre-select a language and skip the WindowsВ Welcome language selection UI page for users by specifying language and locale settings in the oobeSystem configuration pass in the Microsoft-Windows-International-Core component. In general, a user can choose between the default Setup language and any additional languages that are installed in the image. The selection of the language will update the other regional settings to the default values that are associated with that language. The user can then individually change the default settings.
To configure international settings during the WindowsВ PE configuration pass
Verify that the necessary language packs are available in the image or in a Windows distribution share. For more information about multilingual distribution shares, see Add Multilingual Support to a Windows Distribution.
Open Windows System Image Manager (WindowsВ SIM) and create an answer file. For more information, see Create or Open an Answer File.
Add the Microsoft-Windows-International-Core-WinPE component to the answer file to apply settings during the windowsPE configuration pass.
Configure international settings in the Microsoft-Windows-International-Core-WinPE component. For example, if the Spanish language pack is available in the distribution share, you can add es-ES values to the component settings in the windowsPE configuration pass.
Most system locales require a restart. When you configure your locale settings during the windowsPE configuration pass, the computer will automatically restart. Additional restarts are not required.
For more information about these settings, see the Microsoft-Windows-International-Core-WinPE components in the WindowsВ® Unattended Setup Reference.
Save the answer file and close WindowsВ SIM. The language pack in the distribution share will be automatically added and the international settings will be applied when you run WindowsВ Setup and specify this answer file.
To configure international settings during the specialize configuration pass
Verify that the necessary language packs are available in the image. For more information about how to add a language pack offline, see Add and Remove Language Packs Offline Using DISM. For more information about how to add a language pack using an answer file, see Add a Package to an Answer File.
Open WindowsВ SIM and create a new answer file. For more information, see Create or Open an Answer File.
Add the Microsoft-Windows-International-Core component to apply settings during the specialize and oobeSystem configuration passes.
Most system locales require a restart. When you process language settings during the specialize or oobeSystem configuration passes, the computer might require an additional restart.
Edit the settings for the Microsoft-Windows-International-Core component to configure international settings for a specific region. For example, you can add EN-US values to the Microsoft-Windows-International-Core settings in the specialize configuration pass.
You can also pre-select a language and specify language and locale settings in the oobeSystem configuration pass in the Microsoft-Windows-International-Core component. When you do this, the WindowsВ Welcome language selection UI page will be skipped when the users boot to WindowsВ Welcome. In general the user can select between the default Setup language and any additional languages that are installed in the image. The selection of the language will update the other regional settings to the default values associated with that language. The user can then change these default settings individually.
For more information about these settings, see the Microsoft-Windows-International-Core component in the WindowsВ® Unattended Setup Reference.
Save the answer file and close WindowsВ SIM. When you run WindowsВ Setup specifying this answer file, the regional settings that you specified in the answer file will be applied.
To change international settings in separate configuration passes in the same answer file:
Create multiple sections in an answer file that will process different language settings during different phases of Windows installation. This enables you to configure multiple language settings in an answer file by specifying different settings to be processed in different configuration passes. For more information, see How Configuration Passes Work.
For example, you can create language and locale settings in the windowsPE configuration pass with the Microsoft-Windows-International-Core-WinPE component.
You can then change the default settings in either the oobeSystem or the specialize configuration pass by adding settings to the Microsoft-Windows-International-Core component.
For example, you can specify EN-US as the default language to use on the computer in the windowsPE configuration pass. Then, if you intend to send the computer to a different region, you can add more language and locale settings to the oobeSystem configuration pass.
If language settings are processed during the oobeSystem configuration pass, a restart might be required. Also, the time that is required for the computer to process the language settings might prevent the end user from starting WindowsВ Welcome quickly.


