- Install Windows from a USB Flash Drive
- What you need
- Step 1 — Format the drive and set the primary partition as active
- Step 2 — Copy Windows Setup to the USB flash drive
- Step 3 — Install Windows to the new PC
- If your Windows image is larger than 4GB
- Two Ways to Put Windows 10 on USB Drive
- Need to put Windows 10 on a USB drive
- How to: put Windows 10 on USB drive [2 ways]
- Boot Windows 10 from USB drive
- Windows
Install Windows from a USB Flash Drive
Here’s how to create a bootable Windows installation USB drive starting with a Windows .iso file or a Windows Setup DVD.
If you’re looking for an easy way to create a bootable USB Windows installation drive, use the media creation tool.
What you need
- Windows 10 install .iso or DVD
- USB flash drive with at least 5GB free space. This drive will be formatted, so make sure it doesn’t have any important files on it.
- Technician PC — Windows PC that you’ll use to format the USB flash drive
- Destination PC — A PC that you’ll install Windows on
Step 1 — Format the drive and set the primary partition as active
Connect the USB flash drive to your technician PC.
Open Disk Management: Right-click on Start and choose Disk Management.
Format the partition: Right-click the USB drive partition and choose Format. Select the FAT32 file system to be able to boot either BIOS-based or UEFI-based PCs.
Set the partition as active: Right-click the USB drive partition and click Mark Partition as Active.
If Mark Partition as Active isn’t available, you can instead use diskpart to select the partition and mark it active.
Step 2 — Copy Windows Setup to the USB flash drive
Use File Explorer to copy and paste the entire contents of the Windows product DVD or ISO to the USB flash drive.
Optional: add an unattend file to automate the installation process. For more information, see Automate Windows Setup.
Step 3 — Install Windows to the new PC
Connect the USB flash drive to a new PC.
Turn on the PC and press the key that opens the boot-device selection menu for the computer, such as the Esc/F10/F12 keys. Select the option that boots the PC from the USB flash drive.
Windows Setup starts. Follow the instructions to install Windows.
Remove the USB flash drive.
If your Windows image is larger than 4GB
Windows USB install drives are formatted as FAT32, which has a 4GB filesize limit. If your image is larger than the filesize limit:
Copy everything except the Windows image file (sources\install.wim) to the USB drive (either drag and drop, or use this command, where D: is the mounted ISO and E: is the USB flash drive.)
Split the Windows image file into smaller files, and put the smaller files onto the USB drive:
Two Ways to Put Windows 10 on USB Drive
AOMEI Partition Assistant Professional enables you to put Windows 10 (ISO) on USB and make a bootable USB drive for a portable Windows workspace.

By Cherry  / Last Updated March 24, 2021
Need to put Windows 10 on a USB drive
“I am a Windows 10 user, and I always on my business trip. Recently, I want to put my Windows 10 on a USB drive so that I can only take this USB drive instead of a heavy laptop on my trip. Is there any easy way to help me put Windows 10 on USB drive? Thanks in advance!”
How to: put Windows 10 on USB drive [2 ways]
Actually, there are certain Windows 10/8/7 users who would like to put their Windows 10/8/7 on USB drive. The portable Windows 10/8/7 USB drive could help users boot any computer so that they can work with their own system everywhere, which is convenient and humanized. You may know that Windows 8/10 Enterprise version and Windows 10 Education version allow you to create Windows To Go USB drive with a Microsoft-certified USB drive. But what if you are not using Windows 10 Enterprise or Education version, or you don’t have a Microsoft-certified USB drive, what can you do?
To install Windows 10 on USB flash drive, you need to find a Windows 10 bootable USB tool first. And here we highly recommend you AOMEI Partition Assistant Professional, a disk partition manager that including Windows To Go Creator, which allows you to put Windows 10 on USB easily, ignoring what Windows 10’s version is and whether it is a Microsoft-certified USB drive. The operation is simple, and it can break out the limitation of Windows built-in Windows To Go Creator. What’s more, no matter you have Windows 10 installation disc/Windows 10 ISO file or not, AOMEI Partition Assistant can help you create a bootable Windows 10 USB drive. If you are using Windows Server 2008 R2/2012/2012 R2/2016/2019, you should use AOMEI Partition Assistant Server edition.
вњ” Way 1. If you have a Windows 10 installation disc/ISO
If you have a Windows 10 installation disc/ISO file, AOMEI Partition Assistant provides you a way to put Windows 10 on USB SSD, HDD or flash drive easily. And you can follow the steps below:
Preparing:
в–Є A Windows 10 ISO file.
в–Є A 3.0 USB drive that is at least 32GB. The larger is better.
в–Є AOMEI Partition Assistant and install it on your Windows 10 PC.
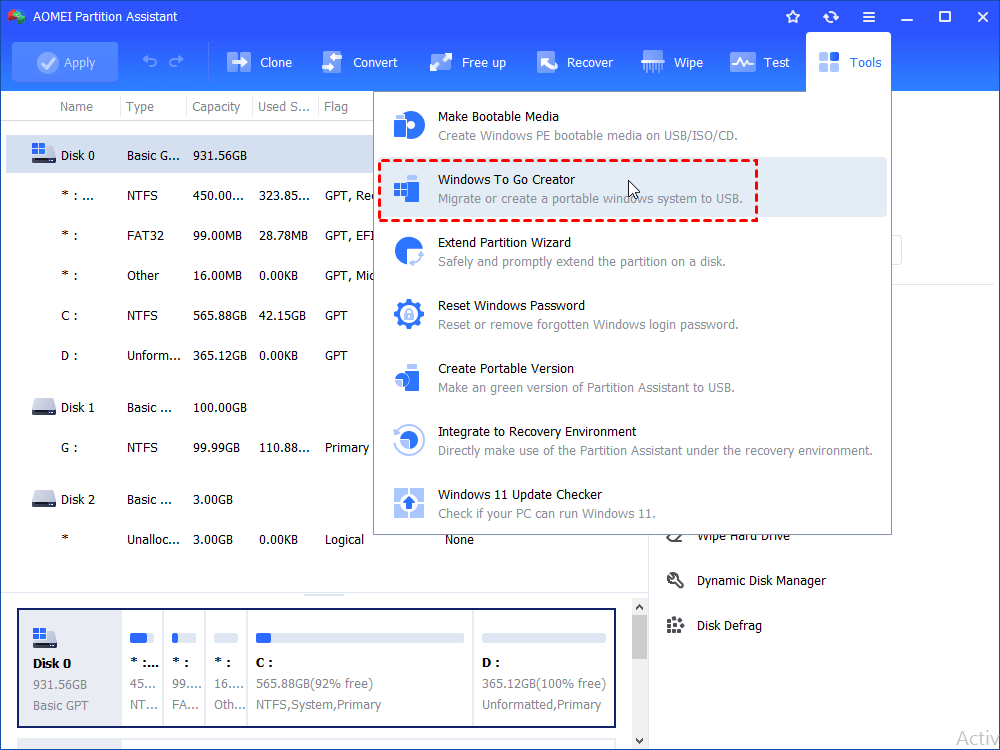
Step 1. Launch AOMEI Partition Assistant, to bring Windows 10 to USB flash drive, here you need to click «All Tools» > «Windows To Go Creator».
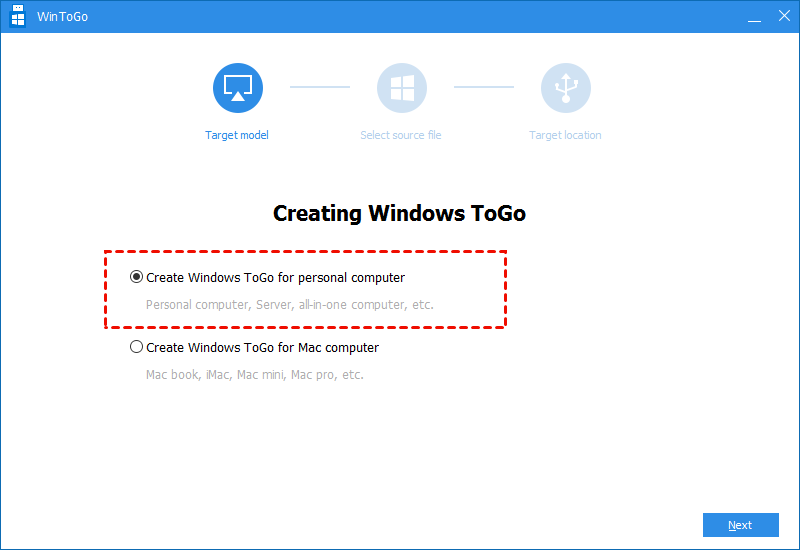
Step 2. Choose «Create Windows ToGo for personal computer» and click Next.
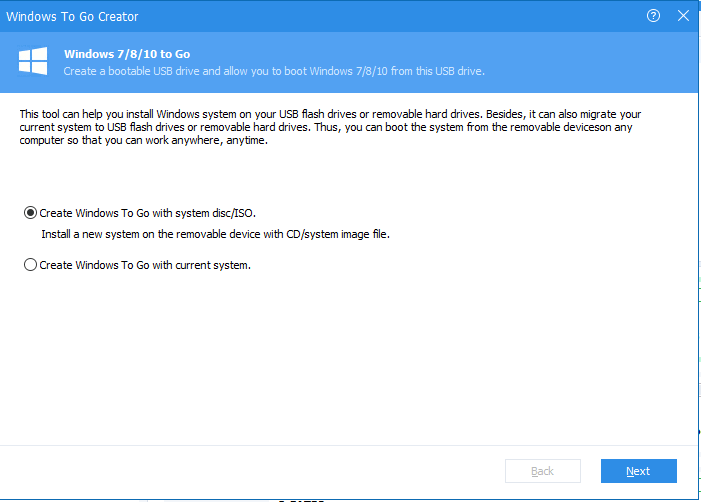
Step 3. In Windows To Go Creator wizard, here you need to choose the first method, and click «Next».
Step 3. Select the USB drive you prepared before. And then, click Browse to select the Windows ISO file. Then, click Proceed.
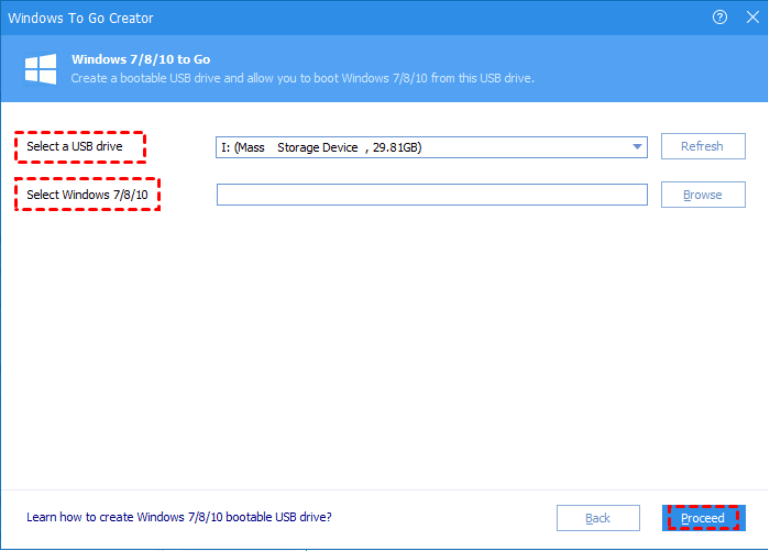
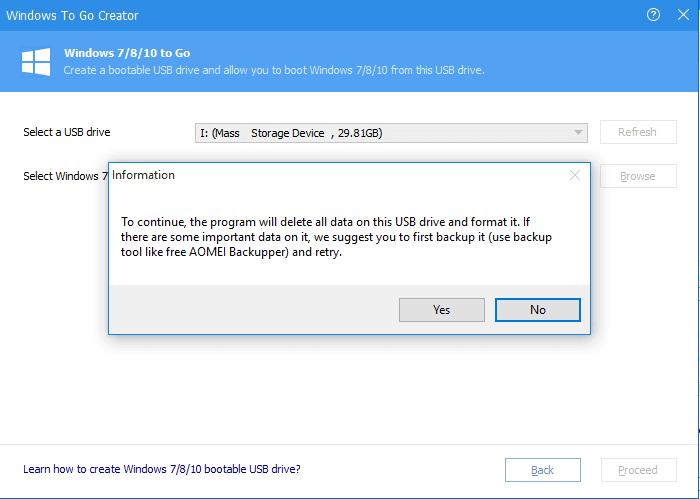
Step 4. It will pop-up a window to remind you that the program will delete all data on the USB drive and format it. If there is any important data, please backup files on USB drive before starting. Click Yes. And it will start to create Windows 10 bootable USB drive for you.
✔ Way 2. If you don’t have Windows 10 installation disc or ISO file
If you don’t have Windows 10 installation disc or ISO file, AOMEI Partition Assistant can also help you install Windows 10 on USB — It can migrate your current system (support Windows 7/8/8.1/10) to USB flash drives or removable hard drives and completely retain all data and the software installed on the current system.
Connect the USB drive to your computer. For a smooth running, the USB drive should be at least 64GB, larger is better, and follow the steps below:
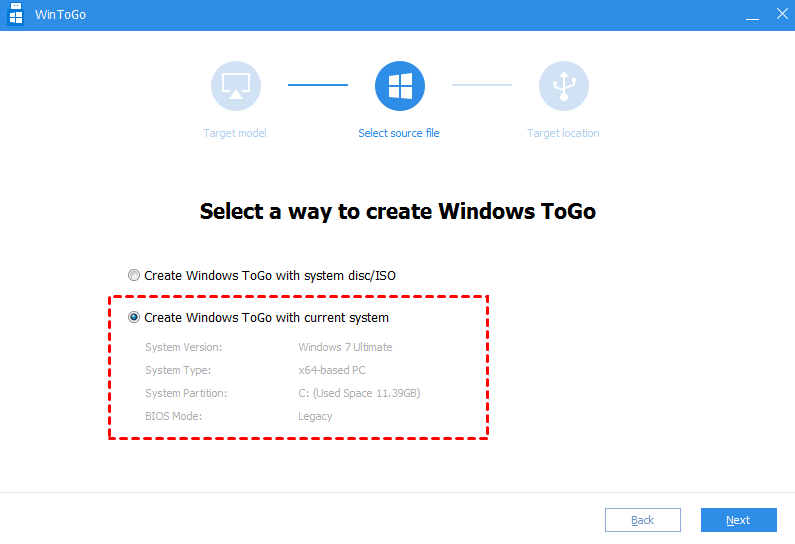
Step 1. Launch AOMEI Partition Assistant Professional, click «All Tools» -> «Windows To Go Creator». Then, choose «Create Windows To Go for personal computer» and «Create Windows To Go with current system”.
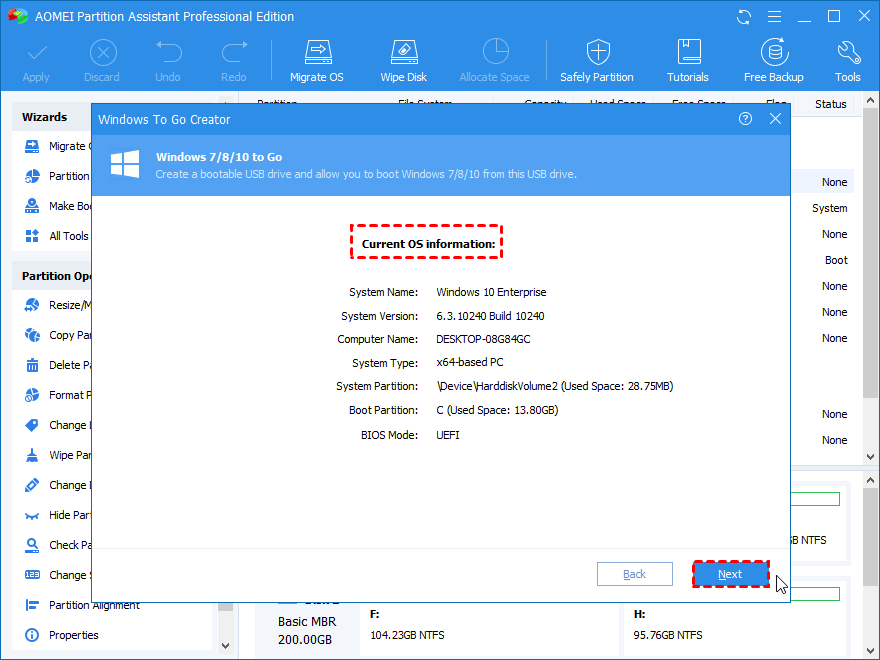
Step 3. It will display you the current OS information, confirm it, and click «Nex t» .
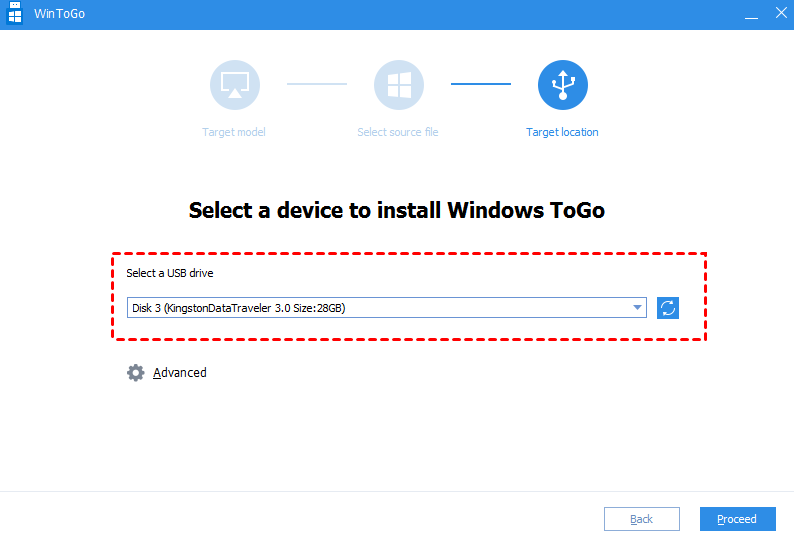
Step 4. Here to select a target location from the removable devices below to migrate the current system. Besides USB drive, you can also use SSD/HDD.
Step 5. Click «Proceed». It will remind you that the program will restart into the Windows PE environment to create Windows To Go. And the operation will clear all data on the target USB drive. Click “Yes” to continue. Wait until the progress reaches 100%.

After that, disconnect the USB drive, and you can boot Windows 10 from the USB drive on any computer.
Boot Windows 10 from USB drive
After putting Windows 10 on a USB drive, you can connect the Windows 10 bootable drive to any computer. Get into BIOS during starting. Then, change the boot order to boot Windows 10 from the USB drive.
Windows
Whether you won’t give up Windows XP or you’ve settled in with Windows 10, we can help you optimize features and troubleshoot problems to fix things on your own.
How to Make the Taskbar Smaller on Windows 10
How to Clear the Cache in Windows 10
How to Enable Bluetooth on Windows 10
:max_bytes(150000):strip_icc()/how-to-use-policy-editor-win10-9ecfa903131742b2a3f67946af33ed2e.jpg)
How to Find and Use the Group Policy Editor in Windows 10
:max_bytes(150000):strip_icc()/how-to-fix-it-when-wifi-keeps-disconnecting-on-windows-10-82ecee38bc374f14a14c0934671103fc.jpg)
How to Fix It When Wi-Fi Keeps Disconnecting on Windows 10
:max_bytes(150000):strip_icc()/how-to-import-photos-from-iphone-to-windows-10-e9a03a37b63b4d59b62b9cce54f6172b.jpg)
How to Import Photos From iPhone to Windows 10
:max_bytes(150000):strip_icc()/how-to-turn-on-or-off-discovery-network-in-windows-10-74c70951f2ef41318b30937d76f80049.jpg)
How to Turn On or Off Network Discovery in Windows 10
:max_bytes(150000):strip_icc()/blue-screen-of-death-bsod-windows-56a6faab3df78cf772913ee6.png)
How to Fix the Inaccessible Boot Device Error in Windows 10
How to Fix a DPC Watchdog Violation in Windows 10
:max_bytes(150000):strip_icc()/CtrlWindowsAlt-7c0a4239875045b0a2a6727ddcaed784.jpg)
How to Fix It When the Windows Key Is Not Working in Windows 10
How to Show or Hide Icons in the Windows 10 System Tray
:max_bytes(150000):strip_icc()/quicklaunchwindows10-3796716f98b645ceb8544dc09bcdd08d.jpg)
How to Add the Quick Launch Toolbar in Windows 10
:max_bytes(150000):strip_icc()/windowsupdatefailed-5f81258a632b459ba58e31d768459605.jpg)
Windows 10 Update Failed? Here’s How to Fix That
:max_bytes(150000):strip_icc()/Apple-Music-iTunes-Windows-5114672-03ec135140e84a3fbb124d69c03e0ada.jpg)
How to Use Apple Music on Windows 10
:max_bytes(150000):strip_icc()/how-to-change-font-in-windows-10-99c457a6c11c49ac955c1763d5e59e8a.jpg)
How to Change Font in Windows 10
:max_bytes(150000):strip_icc()/Mouse-Cursor-c19f97af331d492495d56e419fafc3d6.jpg)
How to Change the Cursor on Windows 10
:max_bytes(150000):strip_icc()/eventviewer02-0746b85b6ccf420a9ab997a822c411a0.jpg)
How to Use Event Viewer in Windows 10
:max_bytes(150000):strip_icc()/userfolder01-7590c79c38bf43e4837d5ea10f5a6c5b.jpg)
How to Change the User Folder Name in Windows 10
:max_bytes(150000):strip_icc()/repairloop01-4471d4610e5c47b694340642d4b418cd.jpg)
How to Fix the Windows 10 Automatic Repair Loop
:max_bytes(150000):strip_icc()/Windows-10-Set-Default-Printer-5114085-a713350b23224288ab50a4a4c8bc62f6.jpg)
How to Set a Default Printer in Windows 10
:max_bytes(150000):strip_icc()/blue-screen-of-death-bsod-windows-583d9aa55f9b58d5b1e4f024.PNG)
How to Fix Bad Pool Caller Error on Windows 10
:max_bytes(150000):strip_icc()/missing-mouse-cursor-8401a2ee178846179afdca1789450857.png)
How to Fix It When the Cursor Disappears in Windows 10
:max_bytes(150000):strip_icc()/how-to-fix-windows-10-mouse-lag-5113449-1-29a7886e8f6f4309ad2af6bbbb3b4041.jpg)
How to Fix Windows 10 Mouse Lag
:max_bytes(150000):strip_icc()/how-to-format-a-usb-drive-in-fat32-on-windows-10-5113286-076bf6d0ad3e4afda84f2540fd36ce74.jpg)
How to Format a USB Drive in FAT32 on Windows 10
:max_bytes(150000):strip_icc()/trim-video-photos-7c97811b51d6474a94b12421a727d3d0.png)
How to Trim Video in Windows 10
:max_bytes(150000):strip_icc()/uac-windows-10-624bdf97a5fc4002bc6ca895b72ebfd0.png)
How to Disable UAC in Windows 10
:max_bytes(150000):strip_icc()/admin-name-change-e96e89d3b98344c78a30f9c27c6d0e0b.png)
How to Change the Administrator Name in Windows 10
:max_bytes(150000):strip_icc()/how-to-create-an-automated-task-with-windows-10-task-scheduler-5112606-17-123bd4247576452f971760c6f0f115cd.jpg)
How to Create an Automated Task with Windows 10 Task Scheduler
:max_bytes(150000):strip_icc()/Identity-29000d9dda1e492bace4778353e32b81.jpg)
How to Change Account Names in Windows 10
:max_bytes(150000):strip_icc()/how-to-fix-problems-caused-by-windows-updates-2625775-efbaf6d8f3a440f78d923d10c1710890.jpg)
How to Fix a Bad System Config Info Error in Windows 10
:max_bytes(150000):strip_icc()/reinstallwindows10-7bcd8d95c1c243d9bc8a205bfe938c6c.jpg)
How to Reinstall Windows 10
:max_bytes(150000):strip_icc()/GettyImages-151066382-d86357131c3542a09016516af3a38f6e.jpg)
Complete Guide to Your Windows System Run Commands
:max_bytes(150000):strip_icc()/001-how-to-turn-hibernate-on-or-off-in-windows-10-5100972-9c276f812acb4292a579f457168928bd.jpg)
How to Turn Hibernate On or Off in Windows 10
:max_bytes(150000):strip_icc()/how-to-fix-a-page-fault-in-nonpaged-area-error-in-windows-10-5097398-2-bb715251d49948e481011408df8567ca.jpg)
How To Fix a ‘Page Fault in Nonpaged Area’ Error in Windows 10
:max_bytes(150000):strip_icc()/008_Windows_Fax-f07db7aeb3044363a8e1fa127c88cfc6.jpg)
How To Fax From a Windows 10 Computer
:max_bytes(150000):strip_icc()/001-how-to-factory-reset-an-hp-laptop-5097009-643e4560e87b45079ac2d78a8a6cf3e4.jpg)
How to Factory Reset an HP Laptop
:max_bytes(150000):strip_icc()/dell-laptop-0cf06dd2dcab48ccb511004b2e5f97a7.jpg)
How to Screenshot on Dell Laptops
:max_bytes(150000):strip_icc()/GettyImages-136595963-3ae69ba238794b6a9292a626ef248552.jpg)
How To Create a Windows 10 Bootable USB
:max_bytes(150000):strip_icc()/lenovolaptopkeyboard-d0fdc85aef6744638ca19430d3159c60.jpg)
How To Screenshot On a Lenovo Laptop
:max_bytes(150000):strip_icc()/how-to-defragment-a-windows-10-hard-drive-5096084-14-29ec375fd7974b9fb6ebd3341933c19f.jpg)
How To Defragment a Windows 10 Hard Drive
:max_bytes(150000):strip_icc()/BIOS-Firmware-b72da49756384d5b8eb4767b9ef9a8f3.jpg)
How To Enter BIOS on Windows 10
:max_bytes(150000):strip_icc()/installwindowsusb01-e7eef1fceb6645caaa390338c48ef15b.jpg)
How to Install Windows 10 From USB
:max_bytes(150000):strip_icc()/resetwindows08-a2737ea5635c4a8ea0b8c8f4e592d25b.jpg)
How to Factory Reset Windows 10
:max_bytes(150000):strip_icc()/windows-10-server-2019-984da52f283a486eada7a2b29e6e940c.jpg)
How to Install Remote Server Administration Tools in Windows 10
:max_bytes(150000):strip_icc()/501521DELLPCwithxmasstuff1-656808746e374c19a8156737c69ce910.jpg)
How to Get Help in Windows 10
:max_bytes(150000):strip_icc()/how-to-fix-it-when-a-windows-10-keyboard-is-not-working-b65edb7289b44c9d96cc80f22b4183aa.jpg)
How to Fix It When a Windows 10 Keyboard Is Not Working
:max_bytes(150000):strip_icc()/flushdnswindows10-c47a1e997c9d47fa8c2894efd298c764.jpg)
How to Flush and Clear Windows DNS Cache
:max_bytes(150000):strip_icc()/windows10adminaccount-c08785ef15cd434a861d95b8c65e7cd9.jpg)
How to Enable (or Disable) the Administrator Account in Windows 10
How to Fix It When Windows 10 Desktop Icons are Missing
:max_bytes(150000):strip_icc()/ManworkingonDesktopPC-54eeb758f9a34fb4889dba53542460c2.jpg)
How to Rotate Screen in Windows 10
:max_bytes(150000):strip_icc()/windows10flicker-0bf46c4c769645b38164e18b06099a6d.jpg)
How to Fix Screen Flickering Problems in Windows 10
:max_bytes(150000):strip_icc()/GettyImages-177014604-8b6ec60af9744ec1999b7560fa777ef4.jpg)
How to Fix a Black Screen in Windows 10
:max_bytes(150000):strip_icc()/Fast-Windows-Computer-b6b45bf7c2ce4129be8e4eaea4436315.jpg)
How to Disable Windows 10 Fast Startup
:max_bytes(150000):strip_icc()/Computeronacounter-ee4111d275564de2893fea52aca64550.jpg)
How to Turn on Bluetooth on Windows 10
:max_bytes(150000):strip_icc()/windows-10-startup-settings-safe-mode-abede6124519459fae382d09aace051f.png)
How to Boot in Safe Mode on Windows 10
:max_bytes(150000):strip_icc()/2503129WomanusingPClaptop-e4ee727582914f5ea3502f8d0a612c9a.jpg)
4 Ways to Take Screenshots on Windows 10
:max_bytes(150000):strip_icc()/Windows10Aboutwindow-c6143e807fe046fca08034054a2d4190.jpg)
How to Find Your Computer’s Name in Windows
:max_bytes(150000):strip_icc()/Windows10LanguageInstall5-716222152a8f40c3893782f3e6db8423.jpg)
How to Change the System Language on Windows 10
:max_bytes(150000):strip_icc()/windows-10-checking-updates-0b37b723d6a64fc2b296fef2e505534a.png)
How to Fix It When Windows 10 Won’t Update
:max_bytes(150000):strip_icc()/Copy-Paste-cda03b11d7934572ac748ef01bc4162c.jpg)
How to Clear Clipboard History in Windows 10
:max_bytes(150000):strip_icc()/ssdmove-e698065bf62742cca4760fda11fc0652.jpg)
How to Move Windows to SSD
:max_bytes(150000):strip_icc()/howtomakeabatchfileinwindows-d81d033a57ff4ad3bd87cec3fb598a16.jpg)
How to Create a Batch File in Windows 10
:max_bytes(150000):strip_icc()/systembackup06-ee43f8874b9e4b1a98cc56594307458d.jpg)
How to Create a Full Backup on a Windows 10 Computer
:max_bytes(150000):strip_icc()/how-to-make-a-laptop-faster-hero1-4cc5a267661248648dcede635cab97e2.jpg)
How to Make a Laptop Faster
:max_bytes(150000):strip_icc()/dualbootwindowsubuntu-328aafe5b7324f57a88936beddda3200.jpg)
How to Dual Boot Windows and Ubuntu Linux
:max_bytes(150000):strip_icc()/vram011-e44eac7c13894d2fbfeb1e31d869ab39.jpg)
How to Increase VRAM on your Windows PC
:max_bytes(150000):strip_icc()/secureboot01-fe7df309b7bd45a3924a99de26db209f.jpg)
How to Disable Secure Boot
:max_bytes(150000):strip_icc()/2503129WomanusingPClaptop-87a259dd4f354f23bc7080a1c89aba58.jpg)
How to Record Your Screen on Windows 10
:max_bytes(150000):strip_icc()/GettyImages-116359432-fff0c0ff216a4191bfa5c3a023dee38b.jpg)
How to Install Fonts in Windows 10
:max_bytes(150000):strip_icc()/how-to-clean-a-hard-drive-in-windows-5069420-1-d107bd79787540c5952388e547a77558.jpg)
How to Clean a Hard Drive in Windows
:max_bytes(150000):strip_icc()/the-xx-best-free-operating-systems-4847283-1-394956ccc1ca47748f8a299223c484d3.jpg)
The 9 Best Free Operating Systems
:max_bytes(150000):strip_icc()/how-to-batch-rename-files-in-windows-10-4847089-13-f0f44946f38047c8ac5124050aa84324.jpg)
How to Batch Rename Files in Windows 10
:max_bytes(150000):strip_icc()/1967479PClaptopontable-00da6205637346faa45bab86e1230eba.jpg)
How to Upgrade Windows 10 32-bit to 64-bit
:max_bytes(150000):strip_icc()/005_how-to-fix-it-when-a-windows-10-microphone-is-not-working-4843233-6f8fc01fe4164cdb8de0d48dcfde5455.jpg)
How to Fix It When a Windows 10 Microphone is Not Working
:max_bytes(150000):strip_icc()/addprogramstostartupwindows10-85e21f6c817f4632ac482063f905b654.jpg)
How to Add Programs to Startup in Windows 10
:max_bytes(150000):strip_icc()/disablestartupprogramswindows10-236272f353b5462092d104d33d29968a.jpg)
How to Disable Startup Programs on Windows 10
:max_bytes(150000):strip_icc()/file-directory-corrupted-unreadable-error-412aaafbb9444a77b988b32829a20d85.png)
How to Fix ‘The File or Directory is Corrupted and Unreadable’ Errors
:max_bytes(150000):strip_icc()/windows-terminal-cmd-a4897c867d61464ba3b90f08d9f05f74.png)
What Is the Windows Terminal & How Does It Work?
:max_bytes(150000):strip_icc()/command-prompts-57ed85a03df78c690fdd85eb.png)
21 Best Command Prompt Tricks
:max_bytes(150000):strip_icc()/003_how-to-fix-it-when-you-get-a-clock-watchdog-timeout-error-in-windows-10-4778090-77e8b623b51e4c6c803ebbd58e6d4bab.jpg)
How to Fix a Clock Watchdog Timeout Error in Windows 10
![]()
How to Install Windows on a Chromebook
:max_bytes(150000):strip_icc()/syntax-error-wolf-gettyimages-5c3def44c9e77c00013e76b4.jpg)
:max_bytes(150000):strip_icc()/001_2688246-5b916f32c9e77c0025c0cc9c.jpg)
How to Type the Copyright Symbol on Your Computer
:max_bytes(150000):strip_icc()/command-window-ping-web_site-56a1ad4b3df78cf7726cf9a8.png)
How to Perform a Computer Ping Test (And When You Need To)
:max_bytes(150000):strip_icc()/take-screenshots-using-windows-3507009-3079c7b233eb4473bed09e1a5a4a7c61.gif)
How to Take a Screenshot on a PC
:max_bytes(150000):strip_icc()/startup-settings-windows-8-56a6f90f3df78cf7729134e1.png)
How Do I Start Windows in Safe Mode?
:max_bytes(150000):strip_icc()/cord-4088057_1920-968ca50cf48a4c9aa13b3bd7e20238df.jpg)
How to Use the Windows Snipping Tool
:max_bytes(150000):strip_icc()/carbonite-review-2617904_final-5bdcde2f414f43d7a5d4903b19199c8d.png)
:max_bytes(150000):strip_icc()/itunes-64-bit-5bd065af46e0fb005186e449.jpg)
Where to Download iTunes for 64-Bit Windows
:max_bytes(150000):strip_icc()/icloudwindows10-5c68e92b46e0fb0001f0e3e7.jpg)
How to Use iCloud For Windows
:max_bytes(150000):strip_icc()/how-to-convert-heic-files-to-jpg-in-windows-4769870-4e735aca2c544361b99b955cfc262195.jpg)
How to Convert HEIC to JPG in Windows
:max_bytes(150000):strip_icc()/bluestacks-windows-96084934b33a461ab5b5d2cf3c750e0d.png)
7 Best Android Emulators for Windows 10
:max_bytes(150000):strip_icc()/173580191-56a6f9b85f9b58b7d0e5cb75.jpg)
What Is Hexadecimal?
:max_bytes(150000):strip_icc()/xbox-app-screenshot-5c64471a46e0fb0001dcd7f0.jpg)
How to Remove the Xbox App From Windows 10
:max_bytes(150000):strip_icc()/GettyImages-1087241656-16fe8656eb4d49f29fbe382effdead9c.jpg)
How to Create a Recovery Drive for Any Version of Windows
:max_bytes(150000):strip_icc()/how-to-download-install-directx-2624489-d66a56d5d90a44f49f0c0822e5cf74f1.png)
How to Download and Install DirectX
:max_bytes(150000):strip_icc()/bios-basic-input-output-system-2625820-0cba3da3db2546998fb342ac6df7f6ae.png)
What Is BIOS (Basic Input Output System)?
:max_bytes(150000):strip_icc()/Windows-10-Home-vs-Windows-10-Pro-30aad4eb5b9c4f06b19e2316a363a9ff.jpg)
Windows 10 Home vs. Windows 10 Pro
:max_bytes(150000):strip_icc()/GettyImages-6760175001-a6f0a215af0140479f603e6fd62874e2.jpg)
The Difference Between Local and Microsoft Accounts in Windows


