- Get started with the Windows Desktop client
- Install the client
- Update the client
- Workspaces
- Subscribe to a Workspace
- Subscribe with a user account
- Subscribe with URL
- Workspace details
- Refreshing a Workspace
- Unsubscribe from a Workspace
- Managed desktops
- Desktop settings
- Give us feedback
- Access client logs
- How To Enable RDP In Windows 7 Home Premium
- Method 1: Using the W7-SP1-RTM-RDP
- Method 2: Concurrent RDP Patcher
- Method 3: Undo KB3003743
Get started with the Windows Desktop client
Applies to: Windows 10, Windows 10 IoT Enterprise, and Windows 7
You can use the Remote Desktop client for Windows Desktop to access Windows apps and desktops remotely from a different Windows device.
- This documentation is not for the Remote Desktop Connection (MSTSC) client that ships with Windows. It’s for the new Remote Desktop (MSRDC) client.
- This client currently only supports accessing remote apps and desktops from Windows Virtual Desktop.
- Curious about the new releases for the Windows Desktop client? Check out What’s new in the Windows Desktop client
Install the client
Choose the client that matches the version of Windows. The new Remote Desktop client (MSRDC) supports Windows 10, Windows 10 IoT Enterprise, and Windows 7 client devices.
You can install the client for the current user, which doesn’t require admin rights, or your admin can install and configure the client so that all users on the device can access it.
Once you’ve installed the client, you can launch it from the Start menu by searching for Remote Desktop.
Update the client
You’ll be notified whenever a new version of the client is available as long as your admin hasn’t disabled notifications. The notification will appear in either the Connection Center or the Windows Action Center. To update your client, just select the notification.
You can also manually search for new updates for the client:
- From the Connection Center, tap the overflow menu (. ) on the command bar at the top of the client.
- Select About from the drop-down menu.
- The client automatically searches for updates.
- If there’s an update available, tap Install update to update the client.
Workspaces
Get the list of managed resources you can access, such as apps and desktops, by subscribing to the Workspace your admin provided you. When you subscribe, the resources become available on your local PC. The Windows Desktop client currently supports resources published from Windows Virtual Desktop.
Subscribe to a Workspace
There are two ways you can subscribe to a Workspace. The client can try to discover the resources available to you from your work or school account or you can directly specify the URL where your resources are for cases where the client is unable to find them. Once you’ve subscribed to a Workspace, you can launch resources with one of the following methods:
- Go to the Connection Center and double-click a resource to launch it.
- You can also go to the Start menu and look for a folder with the Workspace name or enter the resource name in the search bar.
Subscribe with a user account
- From the main page of the client, tap Subscribe.
- Sign in with your user account when prompted.
- The resources will appear in the Connection Center grouped by Workspace.
Subscribe with URL
- From the main page of the client, tap Subscribe with URL.
- Enter the Workspace URL or your email address:
- If you use the Workspace URL, use the one your admin gave you. If accessing resources from Windows Virtual Desktop, you can use one of the following URLs:
- Windows Virtual Desktop (classic): https://rdweb.wvd.microsoft.com/api/feeddiscovery/webfeeddiscovery.aspx
- Windows Virtual Desktop: https://rdweb.wvd.microsoft.com/api/arm/feeddiscovery
- To use email, enter your email address. This tells the client to search for a URL associated with your email address if your admin has setup email discovery.
- If you use the Workspace URL, use the one your admin gave you. If accessing resources from Windows Virtual Desktop, you can use one of the following URLs:
- Tap Next.
- Sign in with your user account when prompted.
- The resources will appear in the Connection Center grouped by Workspace.
Workspace details
After subscribing, you can view additional information about a Workspace on the Details panel:
- The name of the Workspace
- The URL and username used to subscribe
- The number of apps and desktops
- The date/time of the last refresh
- The status of the last refresh
Accessing the Details panel:
- From the Connection Center, tap the overflow menu (. ) next to the Workspace.
- Select Details from the drop-down menu.
- The Details panel appears on the right side of the client.
After you’ve subscribed, the Workspace will refresh automatically on a regular basis. Resources may be added, changed, or removed based on changes made by your admin.
You can also manually look for updates to the resources when needed by selecting Refresh from the Details panel.
Refreshing a Workspace
You can manually refresh a Workspace by selecting Refresh from the overflow menu (. ) next to the Workspace.
Unsubscribe from a Workspace
This section will teach you how to unsubscribe from a Workspace. You can unsubscribe to either subscribe again with a different account or remove your resources from the system.
- From the Connection Center, tap the overflow menu (. ) next to the Workspace.
- Select Unsubscribe from the drop-down menu.
- Review the dialog box and select Continue.
Managed desktops
Workspaces can contain multiple managed resources, including desktops. When accessing a managed desktop, you have access to all the apps installed by your admin.
Desktop settings
You can configure some of the settings for desktop resources to ensure the experience meets your needs. To access the list of available settings right-click on the desktop resource and select Settings.
The client will use the settings configured by your admin unless you turn off the Use default settings option. Doing so allows you to configure the following options:
- Display configuration selects which displays to use for the desktop session and impacts which additional settings are available.
- All displays ensures the session always uses all your local displays even when some of them are added or removed later.
- Single display ensures the session always uses a single display and allows you to configure its properties.
- Select displays allows you to choose which displays to use for the session and provides an option to dynamically change the list of displays during the session.
- Select the displays to use for the session specifies which local displays to use for the session. All selected displays must be adjacent to each other. This setting is only available in Select display mode.
- Maximize to current displays determines which displays the sessions will use when going full screen. When enabled, the session goes full screen on the displays touched by the session window. This allows you to change displays during the session. When disabled, the session goes full screen on the same displays it was on the last time it was full screen. This setting is only available in Select display mode and is disabled otherwise.
- Single display when windowed determines which displays are available in the session when exiting full screen. When enabled, the session switches to a single display in windowed mode. When disabled, the session retains the same displays in windowed mode as in full screen. This setting is only available in All displays and Select display modes and is disabled otherwise.
- Start in full screen determines whether the session will launch in full-screen or windowed mode. This setting is only available in Single display mode and is enabled otherwise.
- Fit session to window determines how the session is displayed when the resolution of the remote desktop differs from the size of the local window. When enabled, the session content will be resized to fit inside the window while preserving the aspect ratio of the session. When disabled, scrollbars or black areas will be shown when the resolution and window size don’t match. This setting is available in all modes.
- Update the resolution on resize makes the remote desktop resolution automatically update when you resize the session in windowed mode. When disabled, the session always remains at whichever resolution you specify in Resolution. This setting is only available in Single display mode and is enabled otherwise.
- Resolution lets you specify the resolution of the remote desktop. The session will retain this resolution for its entire duration. This setting is only available in Single display mode and when Update the resolution on resize is disabled.
- Change the size of the text and apps specifies the size of the content of the session. This setting only applies when connecting to Windows 8.1 and later or Windows Server 2012 R2 and later. This setting is only available in Single display mode and when Update the resolution on resize is disabled.
Give us feedback
Have a feature suggestion or want to report a problem? Tell us with the Feedback Hub.
You can also give us feedback by selecting the button that looks like a smiley face emoticon in the client app, as shown in the following image:
To best help you, we need you to give us as detailed information about the issue as possible. For example, you can include screenshots or a recording of the actions you took leading up to the issue. For more tips about how to provide helpful feedback, see Feedback.
Access client logs
You might need the client logs when investigating a problem.
To retrieve the client logs:
- Ensure no sessions are active and the client process isn’t running in the background by right-clicking on the Remote Desktop icon in the system tray and selecting Disconnect all sessions.
- Open File Explorer.
- Navigate to the %temp%\DiagOutputDir\RdClientAutoTrace folder.
—>
How To Enable RDP In Windows 7 Home Premium
The Remote Desktop Protocol allows you to access your computer running windows over port 3389 securely and easily. Although, there are numerous programs out there such as TeamViewer, LogMeIn, JoinMe BUT they are all paid and does not provide the feel that RDP does. Once it’s enabled, it stays enabled and as long as the windows computer is set to allow Remote Connections via RDP (Remote Desktop Protocol) is turned on you can connect to it from any part of the world using any Windows-based computer or a Mac (How to RDP from a Mac OS X).
By default, RDP uses the port 3389 which can be a security risk because vulnerability scanners are set to scan default ports to exploit vulnerabilities, imaging that a vulnerability for RDP comes out, and you have system running RDP hosting sensitive data (such as medical records); a hacker may be able to exploit it and gain access using the default port. Therefore, i highly recommend changing RDP Port once it’s setup. (see steps here)
Windows has limited the use and setup of RDP to their professional versions only, which means Home, Starter, and Basic versions of Windows will not be able to setup RDP.
The aim of this guide is to help you setup RDP on versions where Windows limits them.
To enable Remote Desktop where available, you can go to Control Panel -> System -> Advanced System Settings -> and Click on the Remote tab.
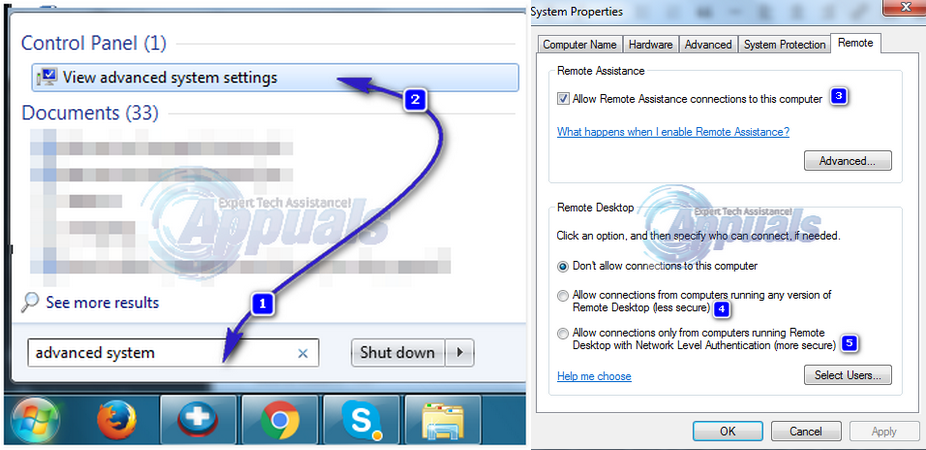
There’s a small bit to understand here, which can leave you scratching your head in trying to troubleshoot RDP if it’s not setup correctly, at the initial stage and that is Authentication. When setting up RDP, you have two choices under the Remote Desktop option, they are “Allow connections from computers running any version of Remote Desktop” and “Allow connections only from computers running Remote Desktop with Network Level Authentication“, if the computer you are enabling RDP on is the same version from where you will connect, then you choose the second option, which is the Network Level Authentication, otherwise, you will need to choose the first option which is to allow connections from any version of Remote Desktop because of the way windows treats authentication protocols.
Now coming back to the objective of this guide and as discussed earlier, the Remote Desktop option is limited to Professional versions and above, but there is a patcher known as Concurrent RDP Patcher which serves two purposes, allowing concurrent connections and enabling RDP in the versions where it is not available. Concurrent RDP Patcher was released at The Green Buttons forum which is the official Windows Media Center Community forum.
Method 1: Using the W7-SP1-RTM-RDP
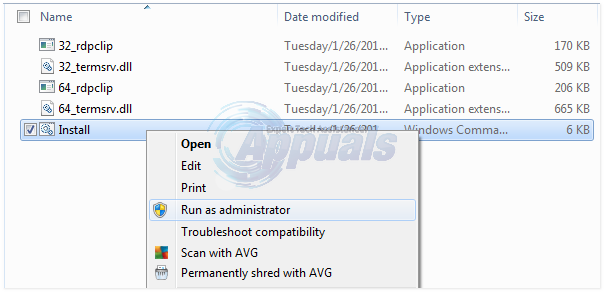
Download W7-SP1-RTM-RDP from here. Open the downloaded folder and extract it to your desktop. In it there will be a file named Install.cmd. Right click on it and click Run as Administrator. Click Yes to User Account Control warning message.
Command Prompt will launch, and execute the instructions in the file. Once done, follow the steps above to Enable RDP. If this method doesn’t work, then try Method 2.
Method 2: Concurrent RDP Patcher
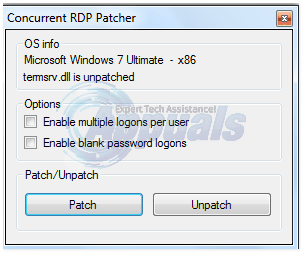
Download the Concurrent RDP Patcher from here. Extract the downloaded file, and execute Concurrent RDP Patcher file. Click the Patch button. Once done, you should be able to enable RDP and also be able to allow concurrent connections to it.
An update by Windows KB3003743 was released, which reverts the changes made by RDP Patcher. If this is the case, then follow Method 3 to make the patch work.
Method 3: Undo KB3003743
A Microsoft update KB3003743 was released on 11 November 2011 which reverts changes made by the above patcher, leaving RDP Disabled.
To undo these changes, we will use an update patch made specifically for fixing it. Download the updated patcher from here. Open the downloaded folder and Double click on Concurrent RDP Patcher to run it. Click the Patch button. This will revert changes made by the update to disable RDP Patcher.


