- How to Rebuild BCD File and Master Boot Record (MBR) in Windows 10?
- How to Automatically Repair Bootloader in Windows 10?
- Identifying Disk Partition Style and Drive Letters
- Repair Master Boot Record (MBR) in Windows 10
- How to Manually Rebuild Boot Configuration File on Windows 10?
- How to rebuild Windows Icon Cache without closing explorer.exe or restarting Windows?
- Attempts
- Question
- How to rebuild BCD or Boot Configuration Data file in Windows 10
- Rebuild BCD in Windows 10
- Windows 10 indexing — reset to default options
- Replies (14)
How to Rebuild BCD File and Master Boot Record (MBR) in Windows 10?
The Boot Manager in the modern Windows versions uses the BCD (Boot Configuration Data) file to boot the operating system installed on the computer. This file contains information about the installed OS and boot parameters. Windows cannot boot normally if the BCD file is deleted or corrupted. Also, you won’t be able to boot your Windows if the Mater Boot Record (MBR) on the hard disk is damaged. In this article, we will show how to manually rebuild the boot configuration (BCD) file and fix MBR on Windows 10.
If the BCD file is missing or corrupted, if you removed/formatted a separate disk partition with the System Reserved label (and 500 MB in size) or a special OEM recovery partition, a user is likely to see the following message when trying to boot Windows 10:
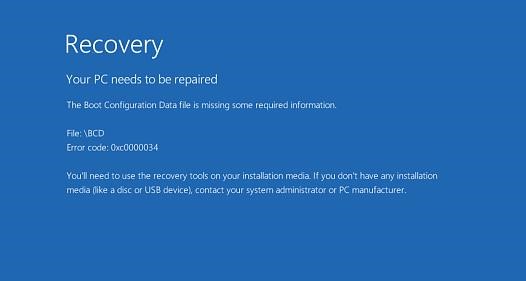
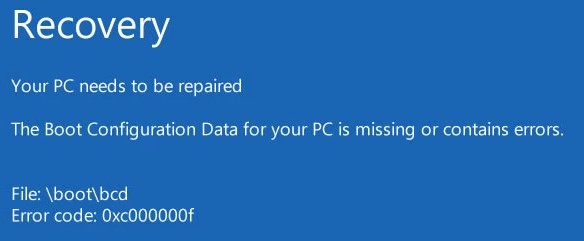
Also, the error may look like this:
Error Code: 0xc000000f
How to Automatically Repair Bootloader in Windows 10?
If this error appears, first of all, try to fix the problem with booting the OS using the Startup Repair mode that can be started from the Windows Recovery Environment (Windows RE).
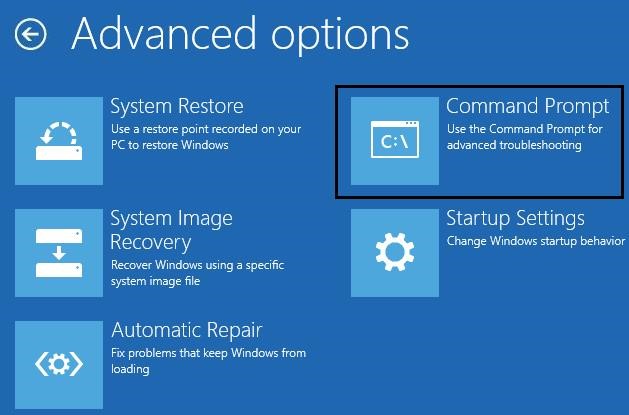
If the automatic repair using Startup Repair did not help, boot your computer from Windows boot/installation disk or in the WinRE environment (Repair your computer -> Troubleshoot -> Advanced options -> Command Prompt). Start the command prompt and try to create a new BCD file and update the MBR record from scratch.
In this example, I will use Windows 10 installation disk. Change the primary boot device to DVD drive or USB flash drive in the BIOS settings (depending on which device you want to boot the computer from). Boot your computer from the Windows install image and press Shift + F10 on the language selection screen. You will see a command prompt.
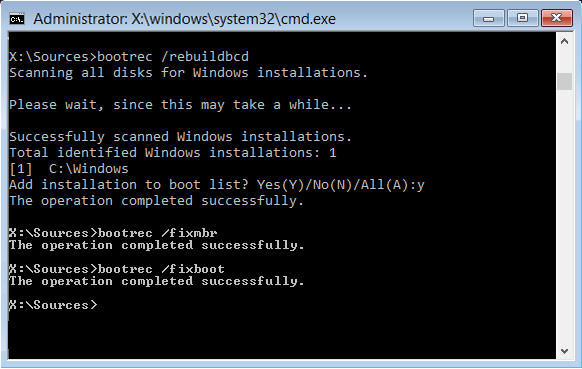
Try to restore the BCD file automatically using this command:
Reboot your computer and check if Windows boots (do not forget to change the boot priority settings in BIOS). If it isn’t, boot from the installation disk again and start the command prompt.
Identifying Disk Partition Style and Drive Letters
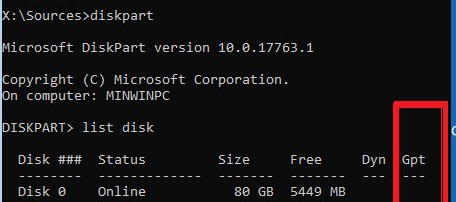
How to understand if you have a computer with BIOS or UEFI? The easiest way is to check the disk partition table on which Windows is installed: GPT or MBR. To do this, run the command:
Then list available disks:
If the disk has an asterisk ( * ) in the Gpt column, then the GPT partition table is used on this disk (this means that you have a computer with UEFI and you need to use the article from the link above to restore the Windows bootloader). If there is no asterisk in the GPT column, then you have the MBR partition table on the disk, and you can continue to follow this instruction.
Next, you need to identify the local drives and volumes on your computer (most likely the volume letters assigned to them will be different from those you see when working in Windows). It is easier to do it using diskpart. Run these commands:
diskpart
list vol
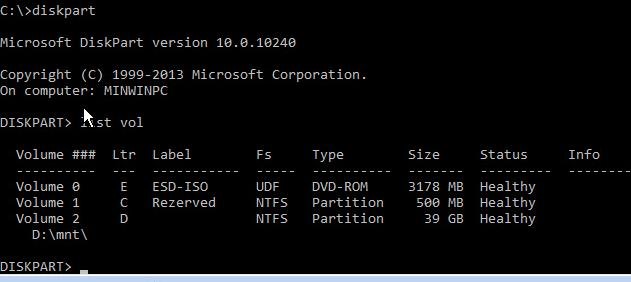
You will see the list of partitions, the drive letters assigned to them and their sizes. In our case, there is one hard drive on the computer with the two volumes on them:
- System Reserved partition with the size of 500 MB and the drive letter C: assigned to it. By default, BCD file is located in this little service partition (read more);
- NTFS partition with the size of 39 GB and the letter D: assigned. This partition contains installed Windows, programs and user data.
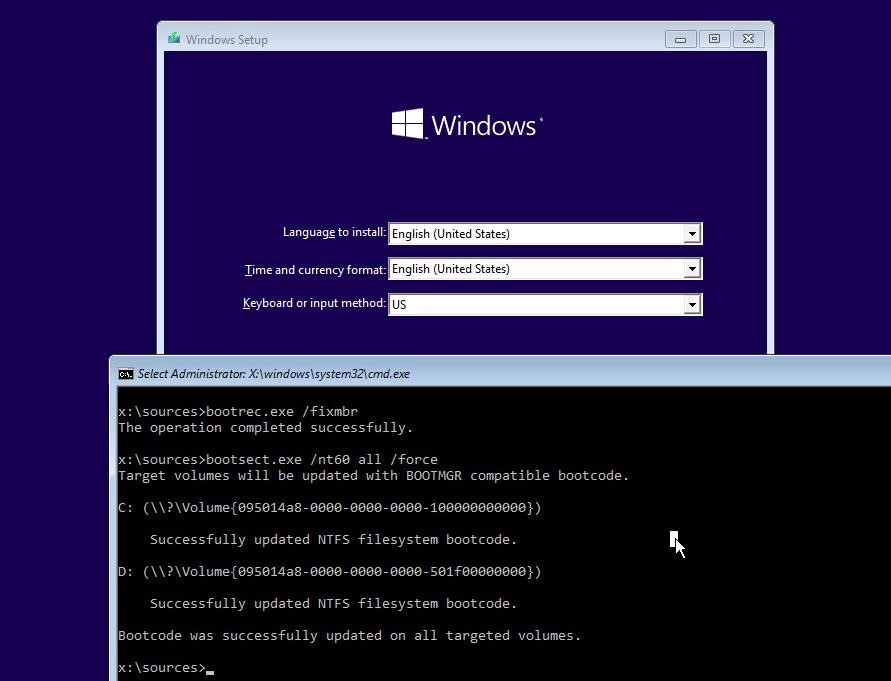
Repair Master Boot Record (MBR) in Windows 10
Using the following commands, we’ll overwrite the Master Boot Record on boot sector of your hard drive, and add the necessary links to Windows 10 bootloader.
bootrec.exe /fixmbr
bootsect.exe /nt60 all /force
If bootsect.exe command is not found, try to specify the full path to it:
X:\boot\bootsect.exe /nt60 all /force
bootrec /FixBoot – the command recreates the boot sector on the system partition;
bootrec /ScanOs
bootrec /RebuildBcd – scan all disks and search for installed Windows, add found copies to the BCD bootloader configuration.
After that, restart the computer and check the Windows boot. If the OS doesn’t boot, follow the instructions below.
How to Manually Rebuild Boot Configuration File on Windows 10?
Then using BCDedit command, create a new Boot Configuration Data file (it is supposed, you don’t have the BCD file backup).
Delete the old (corrupted) BCD file in System Reserved partition and create a new one instead:
Select your local disk (in my case, only one hard disk is installed on the computer, but you can list local disks with the list disk command): select disk 0
The screenshot above shows that the System Reserved partition is called Volume 1. Select it: select volume 1
Assign a drive letter (I assigned a letter C:, but you can use any other letter, in this case change the path in the following commands): assign letter C:
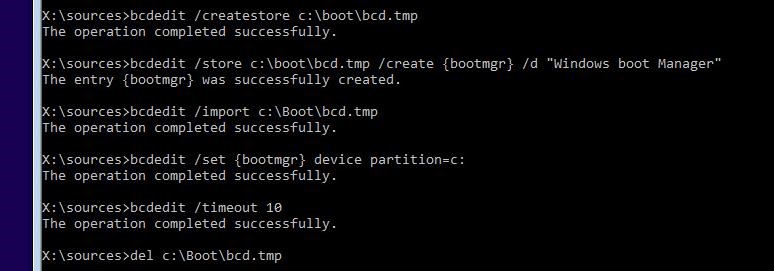
Create an empty temporary file bcd.tmp:
bcdedit /createstore c:\boot\bcd.tmp
Create an entry for the Boot Manager (bootmgr):
bcdedit.exe /store c:\boot\bcd.tmp /create
Import settings from bcd.tmp to your BCD:
bcdedit.exe /import c:\boot\bcd.tmp
Specify that the Boot Manager is located on the System Reserved partition (the letter C: is assigned to it): bcdedit.exe /set
Configure the timeout to select an OS:
bcdedit.exe /timeout 10
Delete the temporary file:
del c:\boot\bcd.tmp
So we have a file with the bootloader parameters. Now you have to add the entries about the installed Windows.
Create a new entry for Windows 10 in the BCD configuration:
bcdedit.exe /create /d «Windows 10» /application osloader
The command will return the unique identificator (GUID) of this bootloader entry.
The entry <8a7f03d0-5338-11e7-b495-c7fffbb9ccfs>was successfully created.

Specify that bootmgr must use this entry by default (after the timeout, this entry is used to boot):
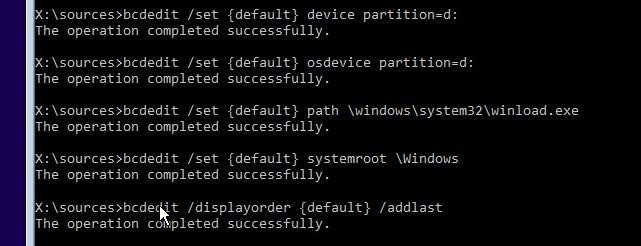
Now you have to specify the paths to the installed Windows 10 copy in the new bootloader entry. We have seen in WinPE that the letter D: is assigned to Windows partition. Use this drive letter in the following commands:
bcdedit.exe /set
bcdedit.exe /set
bcdedit.exe /set
bcdedit.exe /set
Make this boot record in BCD visible, since it is hidden by default:
bcdedit.exe /displayorder
So we have re-created Windows 10 bootloader and BCD file, and fixed the boot sector on MBR. Now you can restart your computer and make sure that Windows 10 boots as usual.
How to rebuild Windows Icon Cache without closing explorer.exe or restarting Windows?
I am trying to customise a folder icon from within my Application but due to the way Windows caches icons and thumbnails I am struggling to get the changed folder to update it’s new icon.
In Windows there are two ways that I know of to customise a folders icon, the simplest way is to right click the folder from Windows Explorer, Properties and then select the Customize tab and change its icon, this method is no good though as it requires manually changing the folder properties.
The second way which I am doing from my program is to create a desktop.ini file and place it inside the folder that requires the icon changing, documentation on desktop.ini can be found here: http://hwiegman.home.xs4all.nl/desktopini.html and an article here: http://helpdeskgeek.com/how-to/customize-folder-icons-desktop-ini/
As shown below though, the folder icon in Windows is not updated although you can see from the folder properties that the icon has changed, just Windows is not showing the updated folder icon:

I am fully aware of Windows caching icons and thumbnails, I have searched and read several pages on ways to supposedly rebuild the icon cache and thus get Windows to display the newly changed icon and not the cached one, however I am unable to get this to work from my Application without restarting Windows or the Explorer.exe process, this needs to be done without interrupting Windows though so closing Explorer.exe or requiring a restart is absolutely not an option.
Interestingly though, when changing a folder icon from the first way I described earlier, Windows somehow manages to flush and rebuild the icon cache as the changed folder is promptly updated to show the new icon, however I cannot see what tricks Windows does to achieve this.
Attempts
A few things I tried unsucessfully, (in no particular order):
- Executing the following: ie4uinit.exe -ClearIconCache
- Running this code in Lazarus: SHChangeNotify(SHCNE_ASSOCCHANGED, SHCNF_IDLIST, nil, nil);
- Deleting the IconCache.db file from AppData\Local
- Toggling the «Always show icons, never thumbnails» Explorer option from the registry, located here: HKEY_CURRENT_USER\SOFTWARE\Microsoft\Windows\CurrentVersion\Explorer\Advanced which is stored in the IconsOnly value
- Changing the icon size from the registry and back, located here: HKEY_CURRENT_USER\Control Panel\Desktop\WindowMetrics which is stored in the Shell Icon Size value
- This link provides an apparent solution in Delphi which I was unable to convert in Lazarus: http://www.aha-soft.com/faq/q18.htm
- I am aware of cached db files here: AppData\Local\Microsoft\Windows\Explorer although I am not sure if they are of any help, attempting to delete some of them does not seem possible as they may be locked etc.
- Renaming the folder and then rename back to original name.
- Right click an empty space in Windows Explorer and selecting Refresh does not seem to update the folder icon either.
Have also tried performing some of the above in combination with no luck.
Question
When changing a folder icon directly from Windows Explorer, using the properties context menu and customize tab, when applying and closing this dialog the folder icon is changed almost immediately, there is no closing explorer.exe or restarting Windows, the change happens very much right away.
How can I achieve this from my Application programmatically the same way Windows Explorer does? Is there a way to find out how Windows Explorer does this?
My Operating System is Windows 10 which could explain why some of the older methods don’t work for me.
How to rebuild BCD or Boot Configuration Data file in Windows 10
BCD or otherwise known as Boot Configuration Data contains boot configuration parameters on how to start your Windows. If the configuration file gets corrupted, you will have to rebuild BCD or Boot Configuration Data file. Usually, when BCD gets corrupted, it results in unbootable situations on Windows 10/8/7.
In earlier versions of Windows, the boot information was stored in the Boot. ini file. On EFI-based operating system, you’ll find the entry in the EFI firmware boot manager, which is available at- \EFI\Microsoft\Boot\Bootmgfw.efi.
Rebuild BCD in Windows 10
BCD or Boot Configuration Data is a firmware-independent database file which has boot-time configuration data. It is required by Windows Boot Manager and replaces the boot.ini that was used by NTLDR earlier. In the case of boot problems, you may be required to rebuild BCD.
- Boot your computer into Advanced Recovery Mode
- Launch Command Prompt available under Advanced Options.
- To rebuild the BCD or Boot Configuration Data file use the command – bootrec /rebuildbcd
- It will scan for other operating systems and let you select the OS’s you want to add to BCD.
If this does not help, you can manually set the boot path. However, do so only if you are an expert, as it could create issues.
In the Command Prompt, type the following command and hit Enter:
The BCDboot tool is a command-line tool that enables you to manage system partition files. If the system partition has been corrupted, you can use BCDboot to replace the system partition files with new copies of these files from the Windows partition.
When you run this command, it will give you a new Bootloader. Here “c” is the System drive. You should only do this when you know the exact drive on which Windows was installed.
Lastly, we recommend you take a look at this post to how to repair & rebuild MBR or Master Boot Record. If you are not comfortable with the commands, then you can use third-party tools such as EasyBCD or Dual-Boot Repair to repair your BCD file.
Windows 10 indexing — reset to default options
How do I reset the Windows 10 indexing locations to the default values?
I would like to set it back to the «out of the box» state.
Replies (14)
* Please try a lower page number.
* Please enter only numbers.
* Please try a lower page number.
* Please enter only numbers.
By default, Windows will use the index when searching to give you faster search results. The search index only includes your selected locations . These locations can be filtered for what file types , file properties, and file contents you want yo be indexed. Here are the steps that you can follow to rebuild search index in Windows 10:
- Open the Control Panel (icons view) , click/tap on the Indexing Options icon, and close the Control Panel.
- Click/tap on the Advanced button.
- In the Index Settings tab, click/tap on the Rebuild button under Troubleshooting .
- Click/tap on OK to confirm.
- Indexing will now be in progress.
- When indexing has completed, click/tap on Close .
Let us know if you need further help.
18 people found this reply helpful
Was this reply helpful?
Sorry this didn’t help.
Great! Thanks for your feedback.
How satisfied are you with this reply?
Thanks for your feedback, it helps us improve the site.


