- How To Record Screen In Windows 10 in 2021 (Without Any Software)
- Steps To Record Screen In Windows 10 in 2021
- Using VLC Media Player
- How to Record the Screen on Your Windows PC or Mac
- Record Your Screen with the Windows Game Bar
- Record Your Screen in macOS
- OBS Studio
- Free Cam
- How to record your screen in Windows 10
- How to record your screen in Windows 10
- How to Record Screen on Windows 10
- Quick Summary
- Method 1: Windows Built-In Screen Recorder (through the XBOX app)
- Method 2: Using Microsoft Powerpoint
- Method 3: OBS Studio
- Method 4: FlashBack Express / FlashBack Pro
- Method 5: APowerSoft Online Screen Recorder
- Alternative Methods
- YouTube Live Streaming
- Filmora Scrn
- Camtasia
- Snagit
- CamStudio
- Conclusion
How To Record Screen In Windows 10 in 2021 (Without Any Software)
You might be using Windows 10 for a while, but that doesn’t mean that you have discovered everything it has to offer. Actually, Windows 10 offers users lots of features, but most remain undiscovered. In this article, we will talk about a hidden feature of Windows 10 that would allow you to record your screen.
To record the screen on Windows 10, users generally need to install third-party software. However, what if I tell you that you can record the Windows 10 screen without installing any additional software? Windows 10 has a hidden screen recording tool built into the Game Bar.
The screen recording tool is specially designed for gamers who want to record their gameplay videos. In this article, we will share a working method that would help you record Windows 10 screens easily. So, let’s check out how to Record a screen in Windows 10 without using any software.
Steps To Record Screen In Windows 10 in 2021
The method is straightforward, and you need to use some shortcut keys on your keyboard. Windows 10 will display the game bar you will use to record the screen. So follow the complete steps below.
Step 1. First of all, in your Windows 10, click on start and then type “Xbox app” and then open the Xbox app.
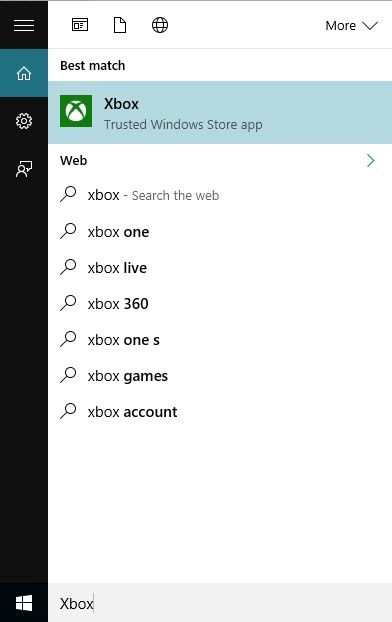
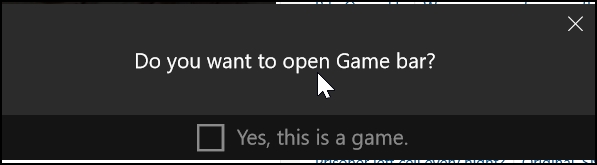
Step 2. Now in the Xbox app, you have to press a keyboard that is “win+G” this can be done on the screen you want to record. Now, as soon as you press this combination, the popup will appear, asking you that it is a game? Simple click on Yes, it is a game.
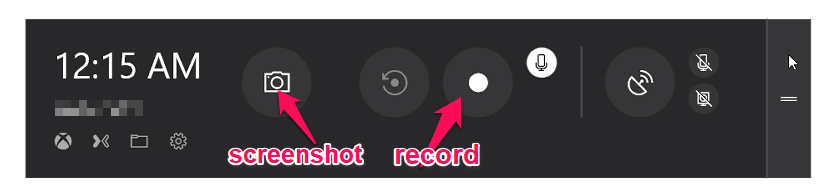
Step 3. Now you will see few options that are “Screenshot,” “Start Recording,” and “Settings.”
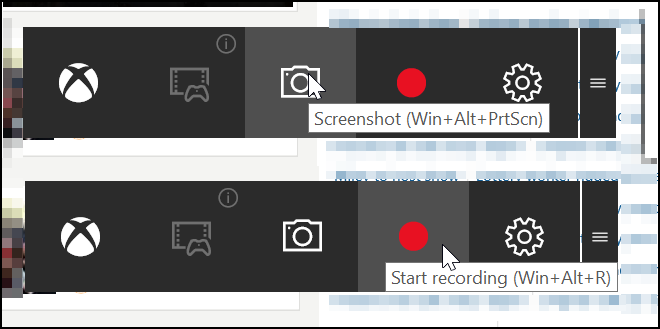
Step 4. Now select the Start recording button, and the recording will get started, and you can stop recording when you are done.
By default, all your recordings get saved to the folder
“C/Users/Videos/Captures“.
That’s it! You are done; now, you can easily record the screen with this cool trick that will not need any third-party tool. You can also choose out the screenshot feature in this game bar tool.
Using VLC Media Player
Well, VLC Media Player is software, and the reason I had mentioned VLC Media player is that almost everyone uses it. With the VLC Media player’s help, you can record the screen without any external third-party recording software. You can use this method in Windows 7,8, and 10. Let’s know how to record the screen using the VLC media player.
Step 1. First of all, download and install VLC Media Player on your Windows computer if you don’t have one.
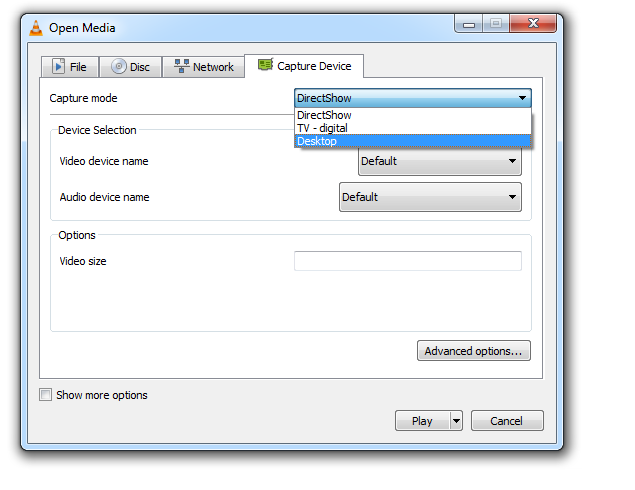
Step 2. Now launch the VLC media player, click on “Media,” and then select “Open Capture Device.”

Step 3. Under Capture mode, you need to click on the drop-down and then select desktop.
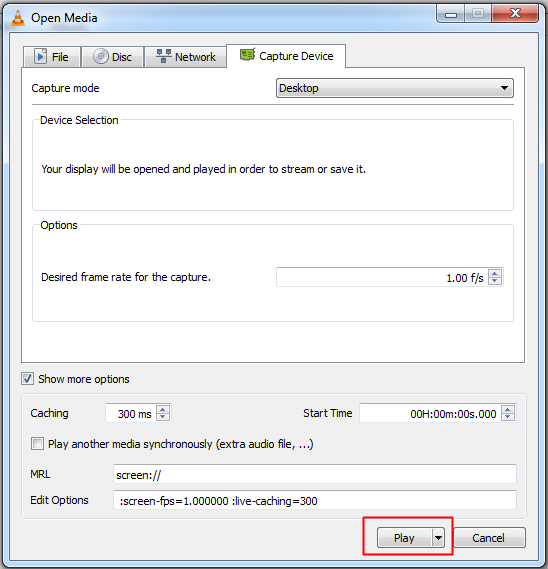
Step 4. Set all other options according to your wish, and then click on the “Play” button.
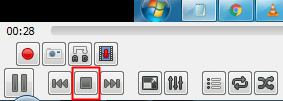
Step 5. Now you need to click on the “Stop” button.
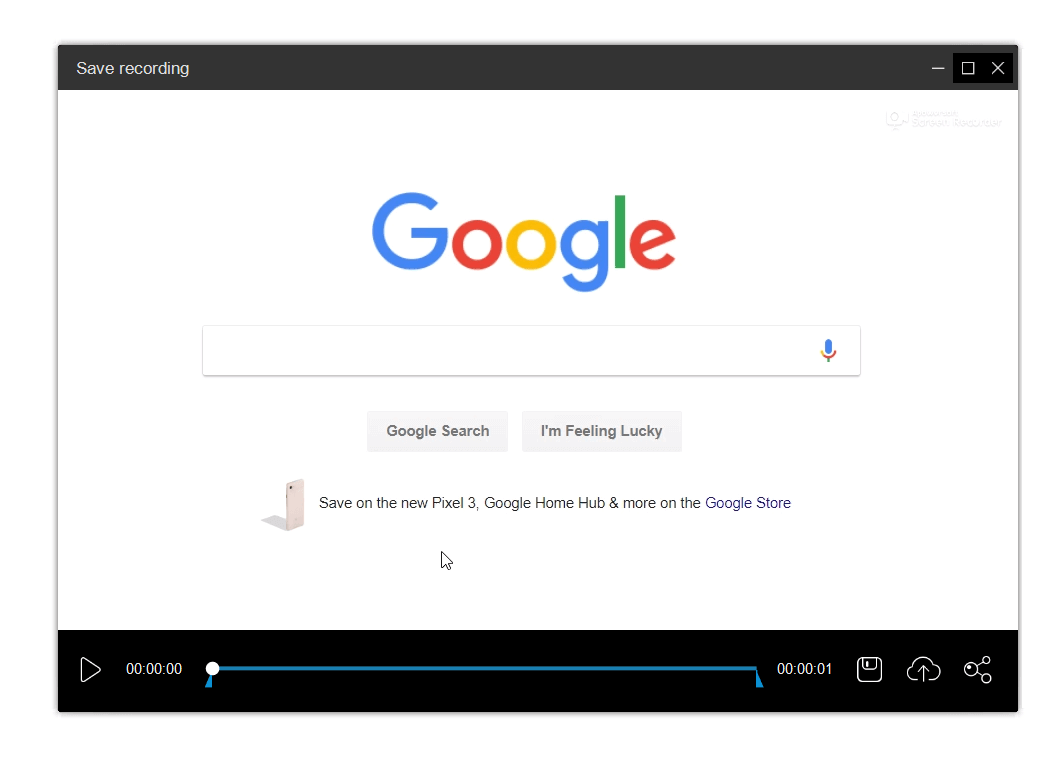
Step 6. Now you will see the screen like below. Here you need to right-click on your recording and select the option “Save,” and save it to your desired location.

That’s it! You are done. This VLC media player method works with every Windows version. You don’t need any additional software to record your desktop screen.
So, this is all about Windows 10 screen recording. We have shared the two best methods to record Windows 10 screen. If you don’t want to go through all hassle and want a straightforward way to record Windows 10 screen, you need to visit our article Best Screen Recording Software For Windows. I hope this article helped you! Please share it with others also.
How to Record the Screen on Your Windows PC or Mac
Here’s how to capture your computer screen using the built-in tools on Windows and macOS or third-party screen-capture apps.


Want to record the screen on your PC? Maybe you’re a professional who needs to capture your screen for a presentation at work, a software developer generating a how-to video, or someone who wants to upload something fun to YouTube. Windows and macOS allow you to capture your screen activity thanks to built-in tools, though there are also many third-party screen-capture apps. Here’s how to use all available tools.
Record Your Screen with the Windows Game Bar
Built into Windows 10, Game Bar was designed to record games that you play directly on your PC or those you stream from an Xbox One. However, it can just as easily capture screen activity from other applications. After you’ve recorded the chosen activity, the generated video is automatically saved as an MP4 file, which can then be uploaded anywhere you like.
To set this up, go to Settings > Gaming > Game bar and turn on the switch for Record game clips, screenshots, and broadcast using Game bar. Here, you can change any keyboard shortcuts associated with opening the Game Bar, taking a screenshot, and recording video.
If you connect an Xbox Controller to your PC, you can trigger the Game Bar by pressing the Xbox button on the controller.
You can record activity in most applications and windows, except the Windows desktop, File Explorer, and certain Windows apps, such as Weather. Navigate to the screen you wish to record and press Win+G to open Game Bar. Several Game Bar widgets appear on the screen with controls for capturing screenshots, recording video and audio, and broadcasting your screen activity.
Click the Start Recording button to capture your screen activity. Instead of going through the Game Bar pane, you can also just press Win+Alt+R to start your recording.
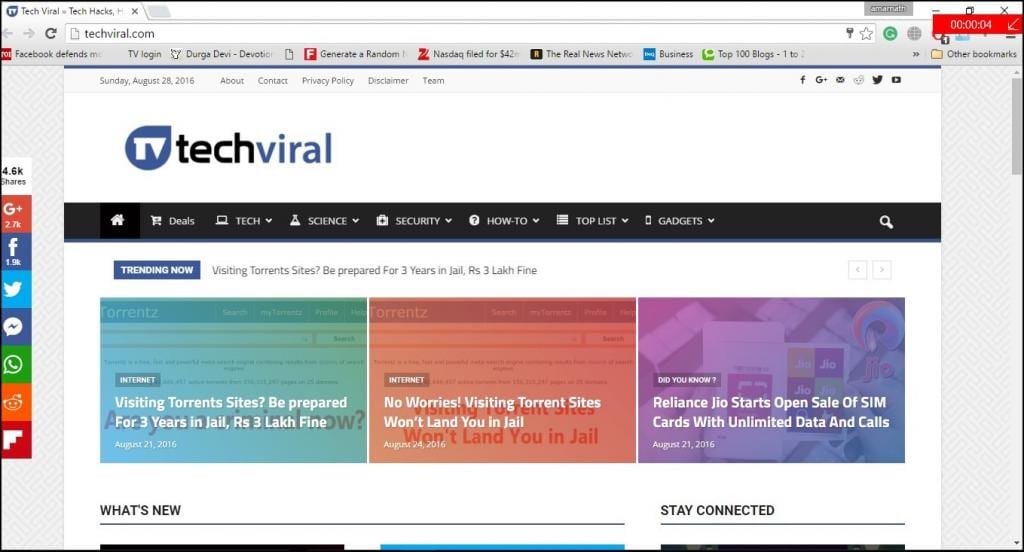
Now perform whatever screen actions you want to capture. After you click on the screen, the Game Bar widgets vanish, replaced by a small floating bar in the upper-right corner of the screen through which you can control the recording. To stop the recording, click the Recording button on the floating bar.
Once the recording ends, a notification will appear to tell you that the game clip was recorded. Click the notification, and File Explorer will open to the location of the recording. At this point, you can view the video file or upload wherever you want.
Record Your Screen in macOS
Your Mac comes with its own screen-recording feature on macOS Mojave and higher. Open the app or window you want to record, then press Shift+Command+5 to open the system’s screen capture tool. From the bottom toolbar, you can opt to capture the entire screen, just the selected window, or a selected portion of the screen.
Click the Options button, and you can choose where to save your recording and initiate a countdown timer to start the recording. Make sure to check the option to use your Mac’s microphone if you’re recording your own voice or external audio.
Click Record Entire Screen or Record Selected Portion to begin recording. A Recording button appears at the top of the screen on the menu bar. Click this button to stop recording, and a thumbnail of your recording will be added to your computer. Double-click the screen recording file to play it in your default video player.
You can also trigger the screen recording directly from QuickTime on a Mac. Open QuickTime Player, then click File > New Screen Recording. The first time you do this, you’ll be asked to open System Preferences to grant QuickTime Player permission to record your screen. Go into your settings and check the box to grant the proper permissions. Start the new recording through QuickTime again, and you can then use the Mac’s recording tool.
OBS Studio
Compatible with Windows 10, 8.1, and 8, as well as macOS, the free OBS Studio packs a lot of features into one program. Use the program’s floating control panel to start and stop your recording. Along the way, OBS Studio can record screen activity, your microphone, and computer audio, then saves the output as an MP4 file.
You can also stream your video live or turn to Studio Mode to add cuts, fades, and other transitions to the video. The program offers an array of settings where you can change the format and other criteria for both the video and audio portions of the recording. OBS Studio looks intimidating at first, but you should be able to catch onto it pretty quickly and learn how to use it effectively.
Free Cam
Free Cam is an extremely basic but still capable screen recorder. Designed for Windows 10, 8.1, and 7, this program captures your screen activity and audio, then saves your recording as a WMV file. Simply click the button for New Recording. Then select which area of the screen you want to capture, anywhere from a single window or application to the entire screen.
Click the Record button, perform the screen activity, and then press Esc when you’re done. Your recording appears in a preview window where you can edit it, save it as a video file, or upload it directly to YouTube.
How to record your screen in Windows 10
By Melanie Pinola 22 December 2020
Save your actions by learning how to record your screen in Windows 10
Did you know Windows 10 has a screen recording utility called the Xbox Game Bar? With it, you can record a video of your actions in just about any Windows app on your laptop, whether you want to capture gameplay or create a tutorial for someone on using Microsoft Office. To make it easier for you, we’ve outlined a few simple steps on how to record your screen in Windows 10.

The screen recording tool is part of the Xbox app that comes installed by default in Windows 10. Xbox Game Bar recently received some major updates to make it more useful, so you can now take screenshots and even make memes.
How to record your screen in Windows 10
1. Open the app you want to record. Unfortunately, the screen recorder tool can’t capture some programs, such as File Manager, or the entire desktop, but it does work in regular apps, whether from the Windows Store or desktop apps.
2. Press the Windows key + G at the same time to open the Game Bar dialog.
3. Check the «Yes, this is a game» checkbox to load the Game Bar. This is the procedure whether you are screen recording a game or another kind of app.
4. Click on the Start Recording button (or Win + Alt + R) to begin capturing video.
5. Stop the recording by clicking on the red recording bar that will be on the top right of the program window. (If it disappears on you, press Win + G again to bring the Game Bar back.)
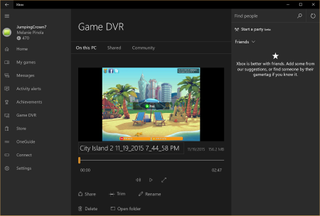
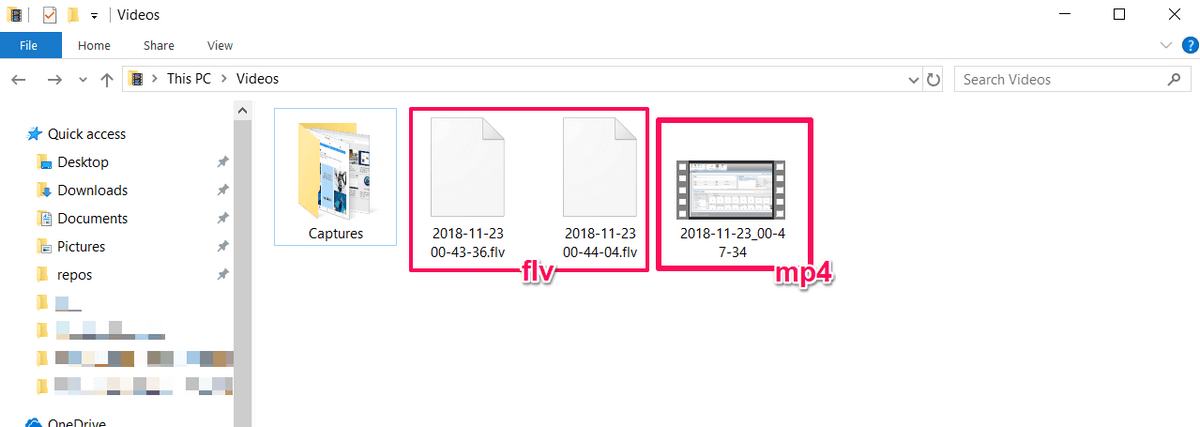
That’s it! You’ll find your recorded videos, which are MP4 files, under the Videos folder in a subfolder called Captures. You’ll also find them in the Xbox app under the Game DVR menu, where you can trim a video and share it on Xbox live (if it’s a game).
Note that you can also use the Xbox screen recording tool to take screenshots. Instead of clicking the recording button, click the camera icon on the Game Bar or Win+Alt+PrtScn.
We hope that this helped, and you could even teach someone else how to screen record in Windows 10.
How to Record Screen on Windows 10
Print Screen has its own dedicated keyboard button on most Windows computers, but what about when a still image doesn’t cut it? After all, it would be really hard to make a tutorial, stream a game, or film a lesson if you couldn’t capture a screen recording.
Using an external camera is clunky and difficult, so instead, we have compiled a list of built-in methods and available third-party software that will do the trick instead. It may not be as simple as pressing “prt sc”, but these tools are more than capable of doing the job.
Quick Summary
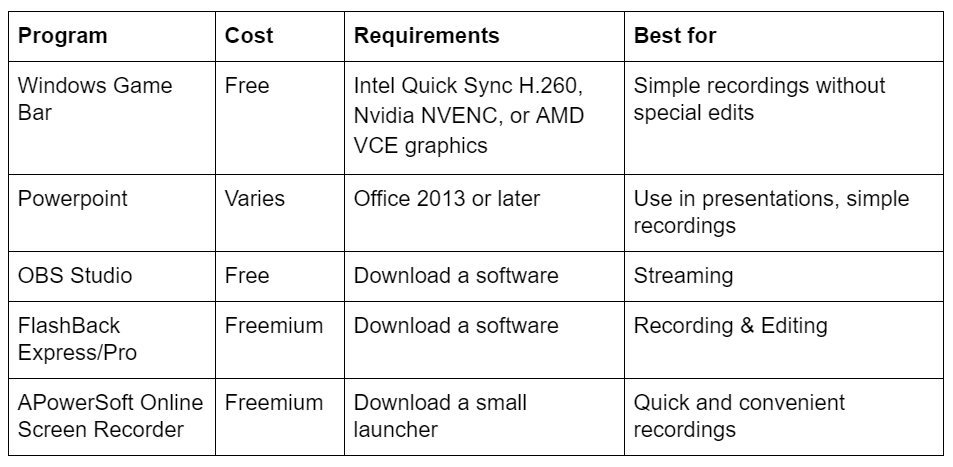
Method 1: Windows Built-In Screen Recorder (through the XBOX app)
Windows 10 has a built-in screen recorder you can use without installing anything extra. However, it’s only available if you have a graphics card with Intel Quick Sync H.260 (2011 models or later), Nvidia NVENC (2012 models or later), or AMD VCE (2012 models or later except Oland), so if you’re having trouble, make sure your computer is up to spec.
For those who do have the proper hardware, here’s how to do it. Now, this feature is meant for gamers, but it can be used with any screen material.
First, press the WINDOWS and G keys. Then, in the pop up choose “Yes, this is a game”. 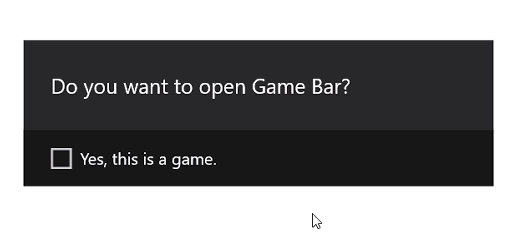
From there, recording is simple. You can use the red button on the bar to start and stop a recording, or use the settings menu to set an automatic cut off time for your recording.
Once you’re done, the file will be saved as an MP4 in your Videos\Captures folder. For more information on using the Game Bar for screen recording, you can check out this youtube video:
Method 2: Using Microsoft Powerpoint
Happen to have Office PowerPoint on your computer? Then you can use the program to create screencasts, not just presentations.
Normally, this will embed the screen recording on a slide, but you can also choose to save it as a file. Here’s how to do it.
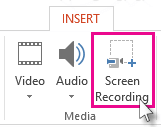
First, open Microsoft PowerPoint. Then choose the Insert tab and Screen Recording.
Next, choose which part of your screen you want to record with the Select Area tool. If you’re using Office 2016 or later, you can also use the hotkey WINDOWS + SHIFT + A. Click and drag the cross hairs to select your recording area. If you do not want to record audio, press WINDOWS + SHIFT + U to toggle it.
Once you’re ready, press the Record button.
The small control panel will disappear unless pinned, but you can make it reappear by moving your mouse to the top edge of the screen.
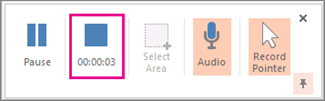
After you’re done, press the Record button again. The video will be automatically embedded in your slide, and you can choose FILE > SAVE AS to save your presentation. If you only want to save the video, choose FILE > SAVE MEDIA AS and then choose the destination folder and video name.
Note: If you are using PowerPoint 2013, you’ll need to follow some special instructions for recording and saving your video. You can find the official tutorial here.
Method 3: OBS Studio
If you’re not a fan of PowerPoint or want a dedicated tool for regular screen recording, OBS Studio is a great video recording software. It’s open source, doesn’t watermark or place time limits on your content, and offers many powerful editing features as well. It also supports live streaming at 60FPS and is a popular choice for this as well.
Before you get started, you’ll need to download OBS Studio from their website here. Since this is a very full-featured program, you’re going to want to run through some basic setup and settings before you get started.
This means you should check out all the settings such as enable/disable automatic recording, streaming setup, bitrate, audio sampling rate, hotkeys, and file naming format among others. What you choose for these will depend on where you plan to show your videos and the capabilities of your computer.
Alternatively, OBS studio does offer an auto-setup wizard that can choose some things for you.
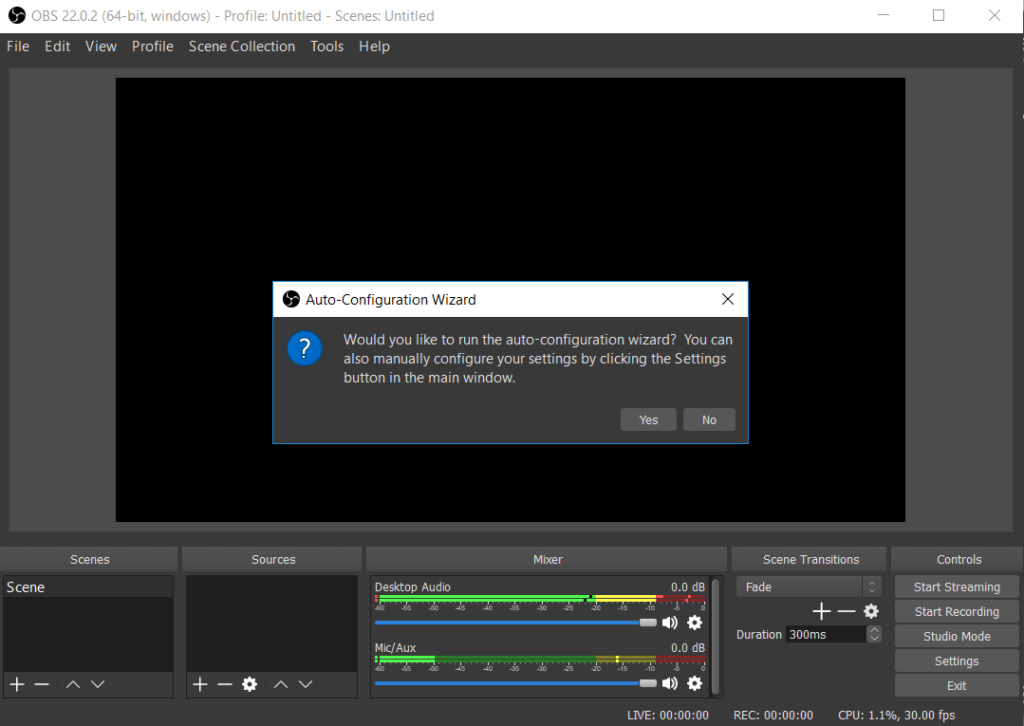
After all the setup, you can get started with a basic screen capture. First, put OBS in “Studio Mode” so that the left side says ‘preview’ and the right side says ‘live’.

To set up a screen capture, choose Sources > + > Window Capture > Create New. In the drop down list that appears, choose the window you want to record.
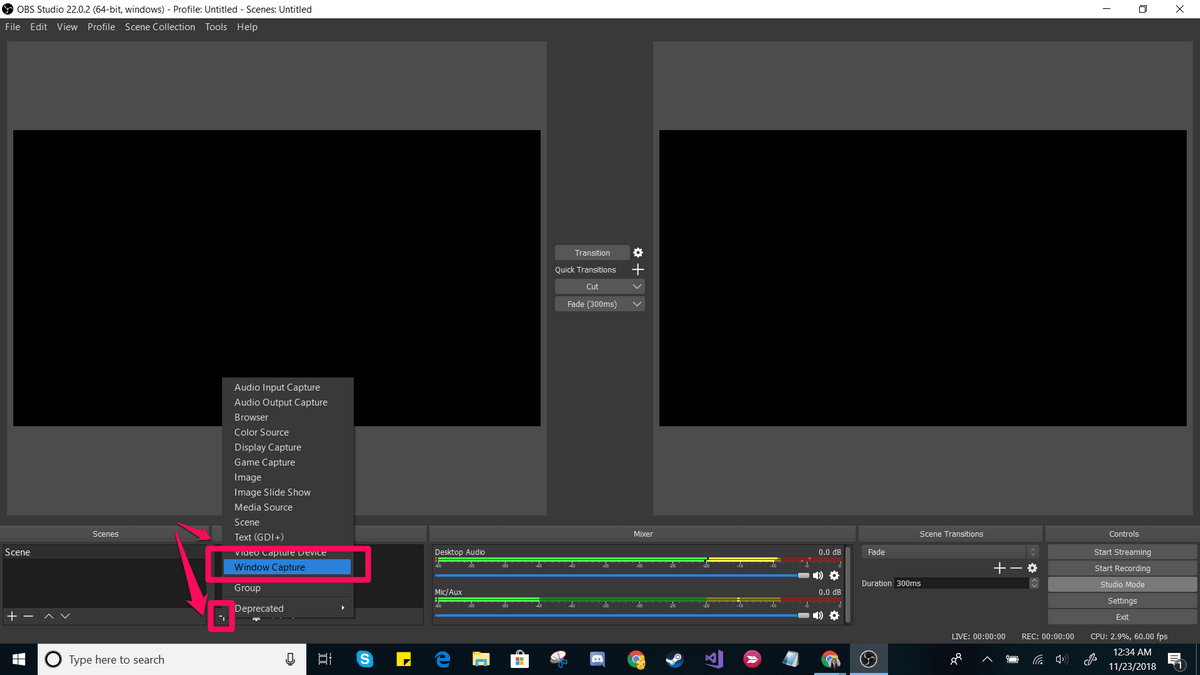
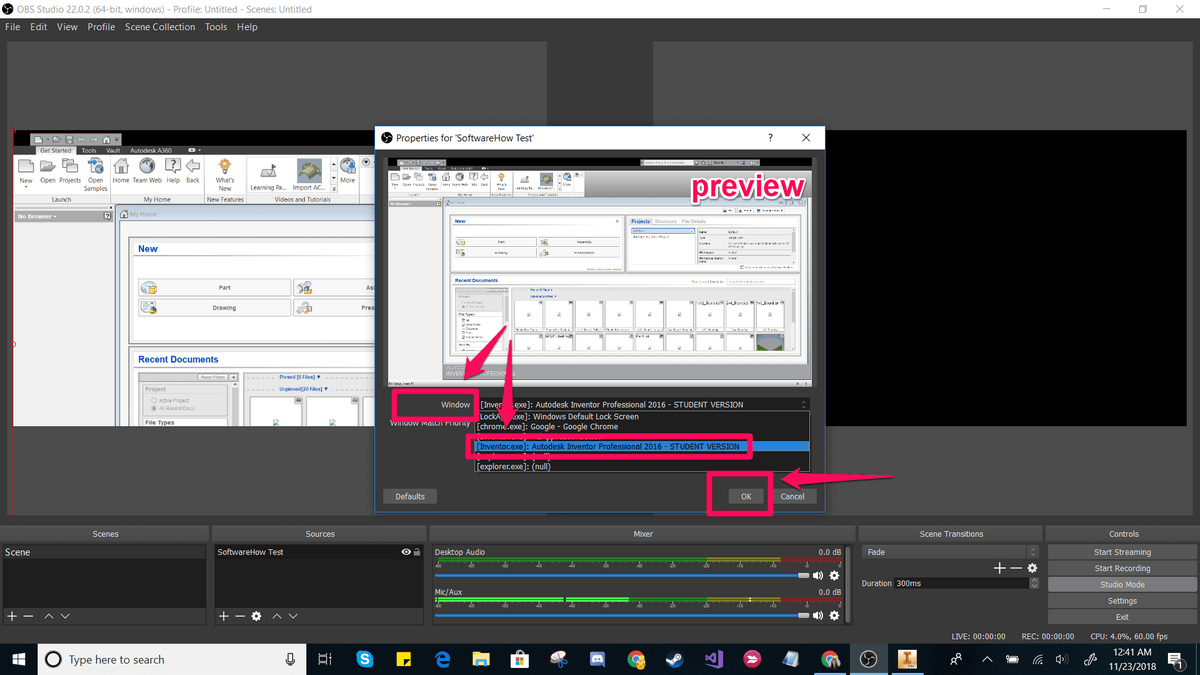
This should place your window in the ‘preview’ panel. If it looks the way you want it to, click transition in the center of the screen. If it doesn’t, drag the red corners until the preview is adjusted to the size you would like.
Then, click Start Recording and Stop Recording to create your video. By default, these are saved as flv files in the user/videos folder, but you can alter this path and save type in the settings.
OBS Studio is a very powerful software, and perhaps one of the best free programs for creating screen recordings or streaming. Its features extend far beyond the simple setup shown here. Unfortunately, it doesn’t come with a lot of tutorial materials so you’re going to need to find most of your resources from the online community. Streamers may find that a good place to start is this tutorial from Youtube.
Method 4: FlashBack Express / FlashBack Pro
If you’re looking for a dedicated software that can do both the recording and the editing, FlashBack might be a good choice. You can use their free version just for doing basic captures, but the paid option will allow you to make use of editing tools, save in a variety of formats, and add special content to your videos. It’s also one of the best screen recording software we’ve reviewed.
Here’s how to get started with FlashBack. First, download FlashBack from their site (choose “Express” if you want to start for free).
This will download an exe file. If this makes you uncomfortable, consider a different software. Next, click through the installation process.
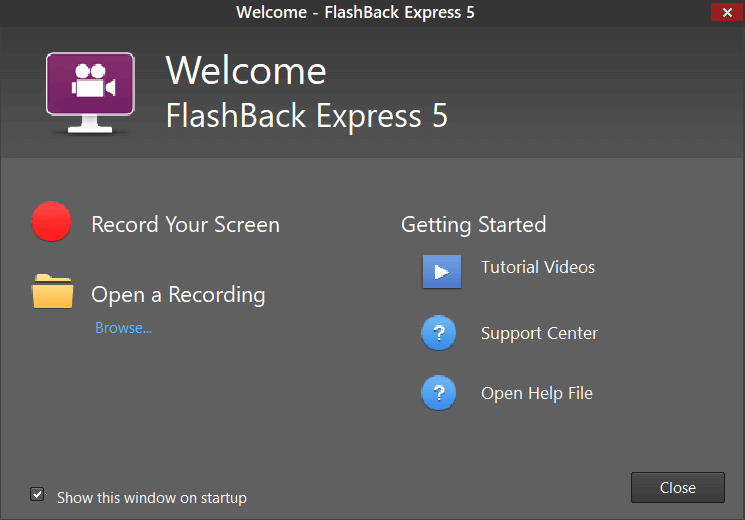
When you reach this startup screen, choose “Record Your Screen”.
You’ll then have the option to change some settings for your recording, such as the audio source and capture size.
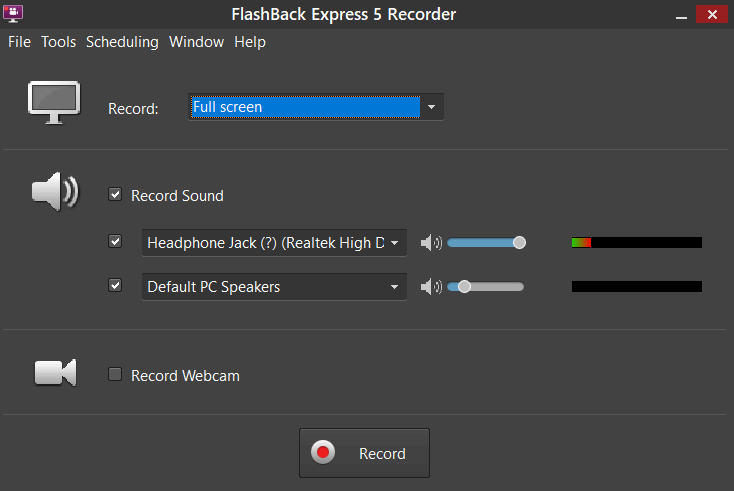
You can also decide whether to capture a window, a region, or the entire screen. If you select region, you’ll see some red cross hairs that you can drag to create a selection.
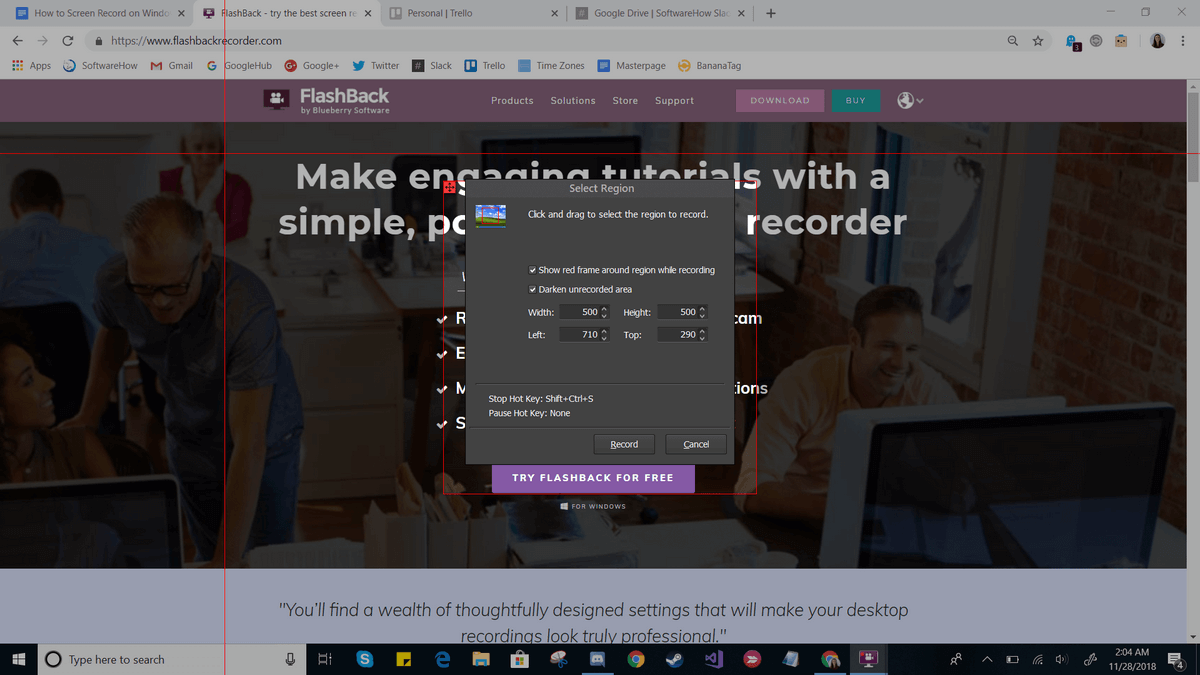
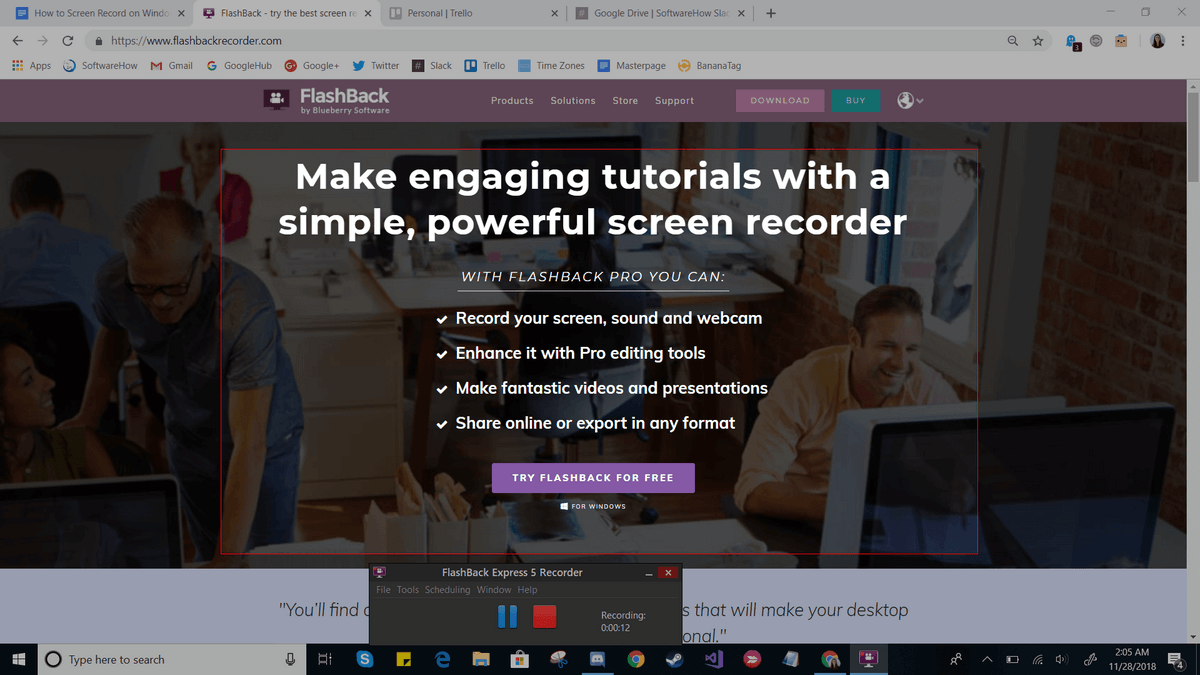
Then, press “Record” and do everything you need to. While recording, you should see a small bar on the bottom with “pause” and “stop” buttons. This bar can be hidden or shown at will.
Once you’re done, you’ll be asked to either review, discard, or save your recording. In Express, you will see a limited editor that will allow you to trim and crop the video as needed. Pro users will have a more full-featured video editor.
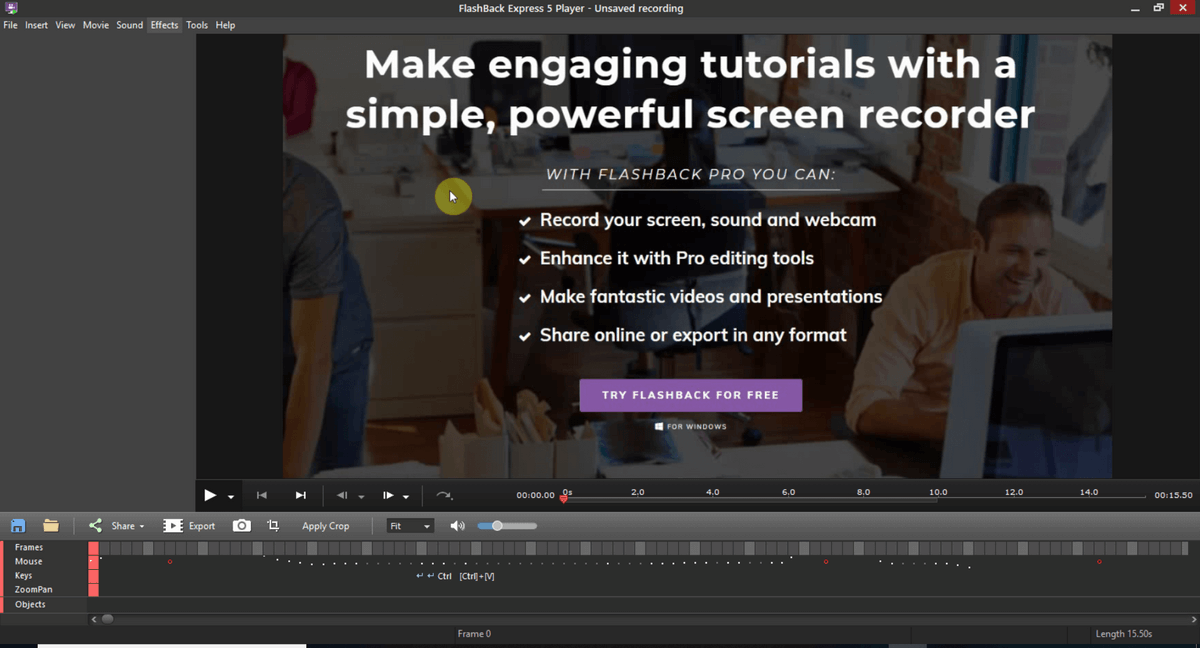
When you’re done editing, you can use the “Save” feature to save your video in a program-specific format. Or, you can use the export feature to save it as a normal file.
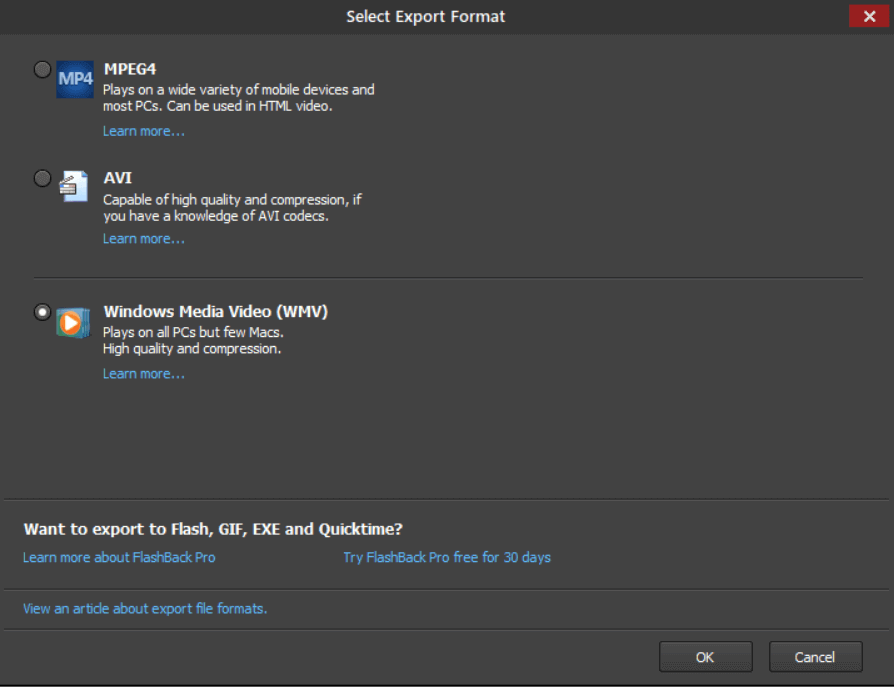
There are quite a few options, such as WMV, AVI, and MPEG4. Additionally, you can choose to export directly to YouTube instead by going to File > Share.
FlashBack Express is a simple solution with a lot of potential for screen recording and editing. It’s very easy to get started, and if you want to get more out of it you can buy a pro license just once (there’s no monthly subscription).
Method 5: APowerSoft Online Screen Recorder
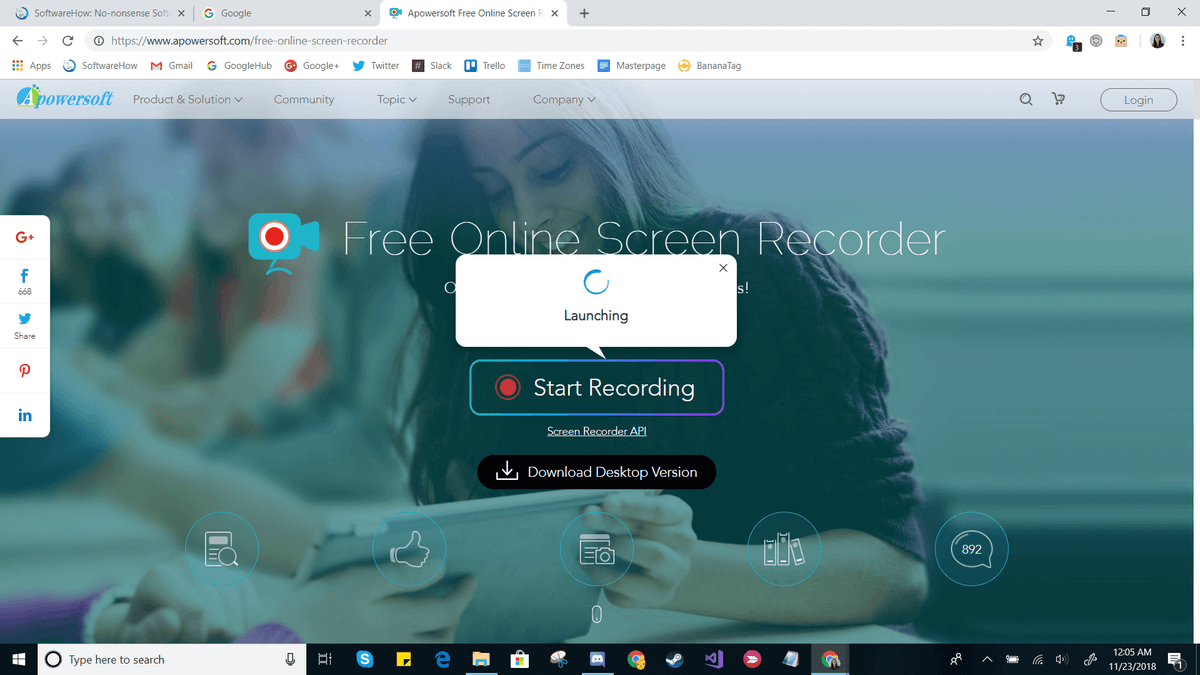
If you prefer a web-based solution, APowerSoft offers an online recorder. The name though, appears to be a bit misleading – when attempting to try the software, we found that it does ask you to download a small package. However, the functionality comes completely from the website.
To use this tool, you’ll need to go the APowerSoft Screen Recorder website. Then, just click the “Start Recording” button in the middle of the screen.
Agree to any prompts that appear, such as “Open APowerSoft Online Launcher”. If you choose not to create an account, you’ll also see the following warning before you get started:
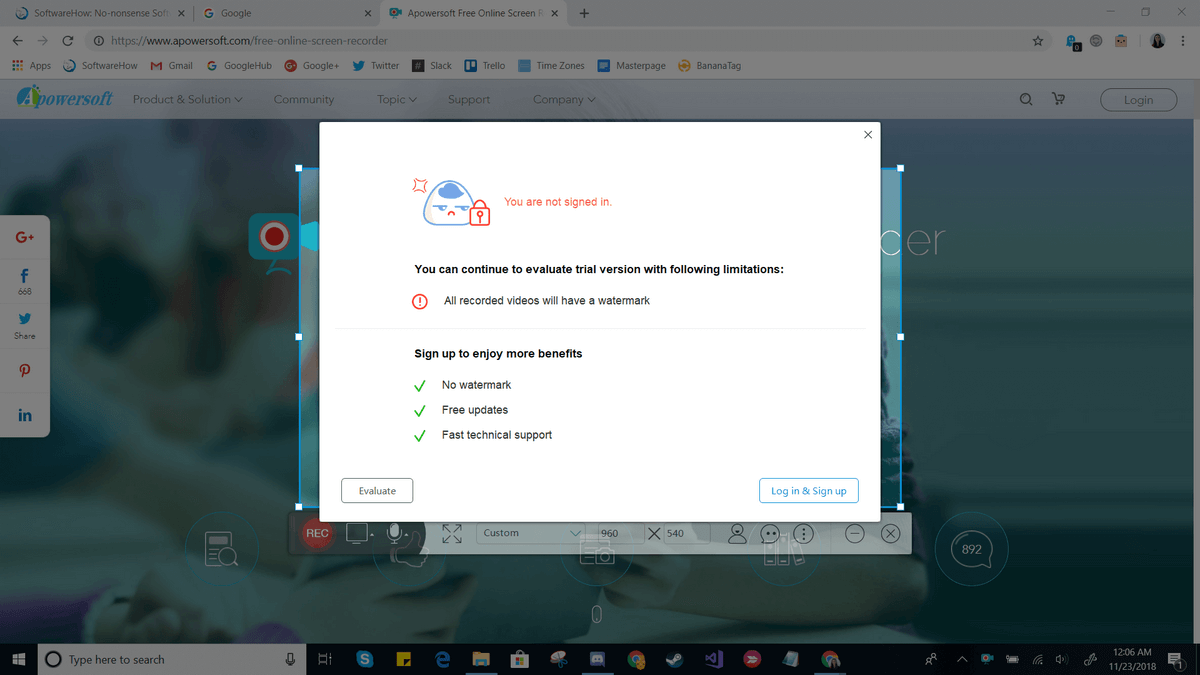
Creating an account is simple enough if you want to remove the watermark, but you can get started without one. Just click the “x” in the top right and you’ll see a new recording window appear. From here, you can resize your capture zone, move it around, or adjust special settings such as hide/show the toolbar, hotkeys, and etc.
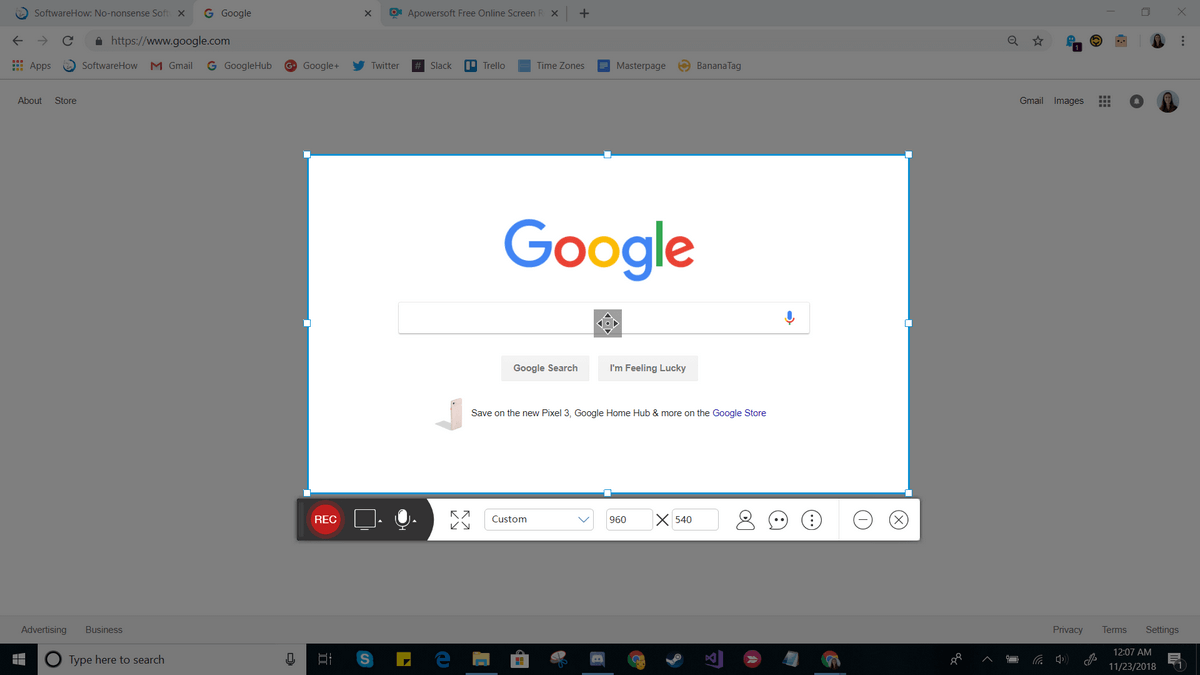
To start and stop recording, just press the red button. When you’re done, you’ll be shown your video clip.
You can use the save icon to save your screencast as a video file or as a GIF, or use the share icon to upload it to YouTube, Vimeo, Drive, or Dropbox.
APowerSoft is a very lightweight program. It does give you some flexibility – for example, you can capture audio from the system, microphone, both or neither – but it is limited as far as editing capabilities unless you buy the paid version. You’d need to use a separate program on your computer if you plan to do any kind of edits. On the other hand, the tool is very quick to use and could be great in a pinch or if you don’t need to make any fancy changes before sharing them.
Alternative Methods
YouTube Live Streaming
If you have a YouTube channel, you can take advantage of the YouTube Creator Studio to film a screen recording. This requires using the live stream feature, so it’s not a great fit for everyone, but it could work out in some cases. To get started with using YouTube for screencasting, check out this tutorial.
Filmora Scrn
Filmora Scrn is a dedicated screen recording software made by Wondershare. It offers dual camera recording (screen and webcam), plenty of export options, and editing tools. Some people prefer it because the interface is a lot cleaner than some competing applications, but as this isn’t a free software, it’s not quite as accessible as some of the other methods listed here. However, if you’re interested in an easy-to-use and specialized screen recording software, you can check out Filmora here. We’ve also reviewed Filmora with more details.
Camtasia
Unlike many of the more specialized programs, Camtasia is a full-featured video editor first and a screen recording software second. It offers the most editing and production capabilities, which makes it a great choice if you want to do more than just record your screen or plan to produce several kinds of videos. The interface is very clean and easy to use. You can check out our full review of Camtasia here.
Snagit
Snagit is a program made by TechSmith, the same company that makes Camtasia. However, Snagit is not an all-in-one tool, and instead is only meant for screen recording. It offers some interesting features such as a magic selection tool that can automatically detect areas to record as well as an editing panel that will let you annotate your final videos. You can learn more about it here or read our detailed Snagit review here. Note: Snagit is a paid software.
CamStudio
CamStudio is a free software, but it’s an older and less well supported software compared to some alternatives. The program is maintained primarily by one individual and definitely has a few bugs that are still being worked out, but if you’re interested in trying it’s worth giving a shot. CamStudio may not be as “shiny” as some alternatives, but it is free and available here should you be interested in it.
Conclusion
Whether you’re making videos for a small classroom, thousands of subscribers, or for your own enjoyment, learning how to record screen on Windows 10 can make a huge difference. Depending on what features are important to you, there’s a variety of options that can meet your needs and no reason why you shouldn’t succeed in making a great video.
Wow! this post is really great. I love the detailed information about the tool. It helps me a lot since I’m looking for another screen recorder that I may use for my project. Besides, I’m using Acethinker Screen Grabber Pro with more than a year, this tool is very easy to use because you don’t need to download any third party app to use it. You may also include it on your List.
Very well written.
I need it. I tried CamStudio. That Didn’t work. Then I tried Gaming Console in Win 10. But that do not have video recording in Win 10 Home.
I will try these.
I have tried Any Video Converter Ultimate to record the video screen on my Windows 10 laptop, and it worked. The paid version allows you to record the video screen for free.


