- Xrdp — Connect Ubuntu Linux Remote Desktop via RDP from Windows
- Xrdp Requirement
- 1) Installation on Linux
- on Ubuntu 18.04
- On Centos/Redhat 7
- 2) Connect from Windows
- Access Remote desktop of Ubuntu/CentOS
- How to Remote Access to Ubuntu 16.04 from Windows
- How to remotely control Linux Systems from Windows
- Why establish a remote connection to Linux from Windows?
- Linux Ubuntu:
- Find the IP address:
- Method 1:Remote Access using SSH (Secure Shell)
- Method 2:Using RDP (Remote Desktop Protocol)
- Method 3:Setting up a connection using Virtual Network Connection (VNC)
- Conclusion:
- About the author
- Zeeman Memon
- How to remote control a Linux system from Windows
- Know your Ubuntu IP
- Method 1: Connecting To Ubuntu Via SSH
- Method 2: Connecting To Ubuntu Via Remote Desktop Connection
- Method 3: Connecting To Ubuntu Via VNC
Xrdp — Connect Ubuntu Linux Remote Desktop via RDP from Windows

How often do you access Linux Desktop? What tools do you use to access remote desktop?
Xrdp is an open source tool which allows users to access the Linux remote desktop via Windows RDP. Apart from Windows RDP, xrdp tool also accepts connections from other RDP clients like FreeRDP, rdesktop and NeutrinoRDP. Xrdp is now supporting TLS security layer.
Xrdp Requirement
- xrdp and xorgxrdp packages
- Listens on 3389/tcp. Make sure your firewall accepts connections
In this article, I will show how you can remotely connect to Ubuntu Desktop from a Windows machine using Xrdp tool.
1) Installation on Linux
on Ubuntu 18.04
First, you need to install Xrdp on Ubuntu
You have to configure the polkit rule to avoid an authenticate popup after inputting the username and password at the xrdp login screen on windows
restart the xrdp service
Then make sure that the service is running
Now make sure to automatically start the service at the system startup
Now you will need to check your ip address because you will need it for the connection
My ip address is 172.16.8.177 . So keeps yours it in your mind.
Xrdp works with port 3389 so make sure to open it. UFW is disabled by default so you will need to enable the firewall and create a rule for xrdp
Now you can continue the configuration on windows side
On Centos/Redhat 7
Make sure to install the Epel repositories before
Now install xrdp packages
Add a rule in the firewall. On Centos/RedHat is not ufw but firewalld to configure
Then reload the firewall
Now enable and restart the xrdp service
Check your ip address for the remote connection on Windows
2) Connect from Windows
On your windows machine such as windows 10 in our case, launch the default remote desktop connection tool.

You will need to enter the ip address of your machine and you will be asked to enter the username
Access Remote desktop of Ubuntu/CentOS
Enter the ip address and the username

Now confirm the information and launch the connection. If you are not logged out in local, the remote login would fail.

Now you will be asked for your password

Now confirm your credentials. You can see the IP address of my Ubuntu on the top and the login page. Enter your password and enjoy

Are you aware of any other tools? Please advise us on the comments
How to Remote Access to Ubuntu 16.04 from Windows
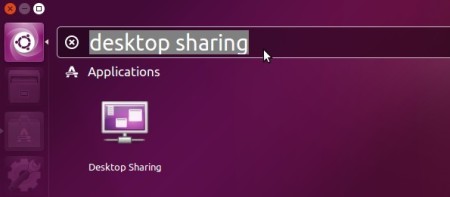
This tutorial is going to show beginners how to easily setup a VNC server in Ubuntu 16.04 so to connect from remote machines.
1.) Ubuntu desktop provides vino VNC server out-of-the-box with a simple UI called Desktop Sharing.
2.) After launching the utility, you can easily enable VNC server in Ubuntu by checking the boxes that says:
- Allow other users to view your desktop
- Allow other users to control your desktop (Optional)
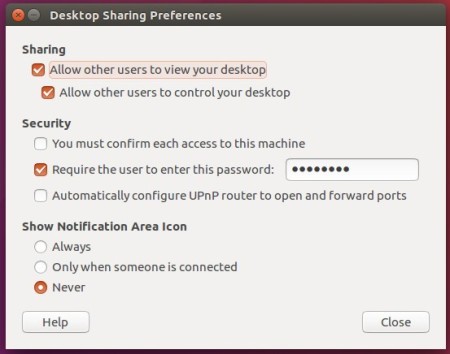
For security options:
- If you want to be able to choose whether to allow someone to access your desktop, enable the first box.
- To require other people to type a password when connecting to your desktop, enable the second one and set a password.
- If your router supports UPnP and it’s enabled, you can allow people not in local network to connect by selecting “Automatically configure UPnP router to open and forward ports”
After setting up the VNC server, just close the utility.
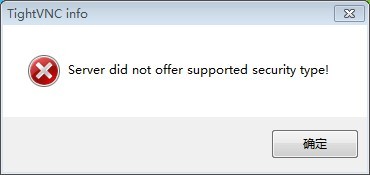
3.) Disable encryption.
Due to this bug, the common used TigerVNC, TightVNC viewer does not support vino’s security type. You’ll get the error below when you try to connect:
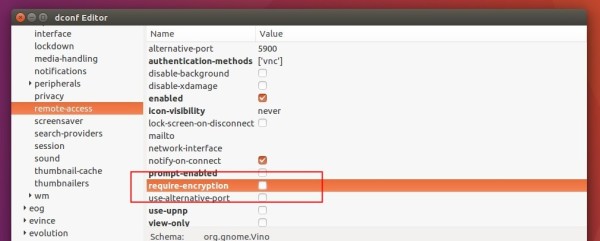
A workaround is to disable encryption requirement. To do so, install dconf Editor from Ubuntu Software (or via sudo apt install dconf-editor command in terminal), and launch it.
When it opens, navigate to org -> gnome -> desktop -> remote-access, and uncheck the value of “require-encryption” in right.
Finally connect to this desktop on remote machine by typing the IP and password using a VNC client!
How to remotely control Linux Systems from Windows
Why establish a remote connection to Linux from Windows?
Suppose you are running a business, and you have a meeting with board members in about 10 minutes. All of a sudden, you remember that your presentation file is on your home system; remote access can potentially save the day.
Or you are running a windows system in one location and your Linux system in another room, and you want to run some commands on your Linux or retrieve some files from your Linux, and your Linux is inaccessible, or you are just too lazy. Either way, in all cases, remote access provides great convenience and saves much time.
Linux Ubuntu:
Now out of all the popular Linux distros, Ubuntu is by far the most popular one. All of the other Linux distros combined make up a total of a mere 35% of Ubuntu (google search trends). Upon searching Linux, 161 million results appear, while the next most popular Linux distros i.e., the Debian Linux, has a mere 65.9 million search results, so keeping in mind the above stats, I will be using Ubuntu for this tutorial. To establish the connection, you would need to access the Ubuntu machine physically. But don’t worry, this is a one-time thing.
There are many methods through which you can remotely access your Linux from windows. Here I will be sharing three ways through which you can access remotely control Linux Systems from Windows.
Find the IP address:
Regardless of what method you use, finding the IP address of your system is required almost in every case. Following is an easy way to find the IP of your Linux system.
Go to the terminal in your Linux machine and type the following command:
Now enter the following command:
After writing the above command, your terminal window will look like this
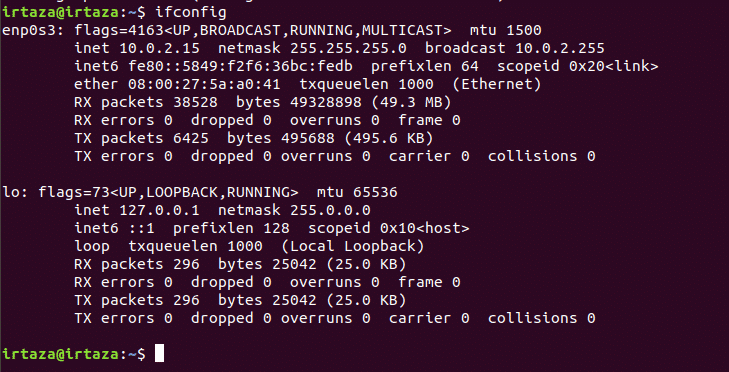
You will find your IP address next to “inet” in the first section. In this case, as you can see from the above screenshot, the IP address is “10.0.2.15”
If the method mentioned above doesn’t work for you, you can try the following ways:
In the terminal, write the following command. Remember, this works for some of the Linux versions like Ubuntu.

Method 1:Remote Access using SSH (Secure Shell)
For this method, you should install the PuTTY software, as it’s better than using windows default SSH function. PuTTY establishes an SSH connection between your Linux and your Windows desktop, which gives you access to the Linux terminal.
After Installing the PuTTY software write the name of your Linux system, or it’s IP address under the “Host Name (or IP address)” label. Make sure to set the connection to SSH if it isn’t. Now click open. And voila, you now have access to the Linux command line.
Note: This will give only you access to the terminal, i.e., there will be no mouse control. Still, this is useful to install software using Terminal commands
Method 2:Using RDP (Remote Desktop Protocol)
RDP is the easiest method so far. The RDP tool is already installed in the windows. So the windows system doesn’t require any work (software-wise). However, this is not the case for your Linux system. On your Linux system, you will need to install XRDP tool. For this open the terminal (Ctrl+ Alt+ T) and type the following command
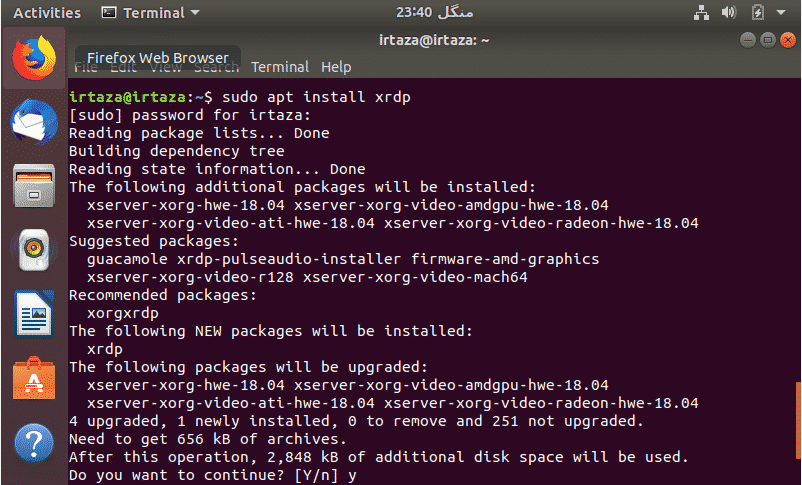
Press “y” and hit enter. It will then continue to install.

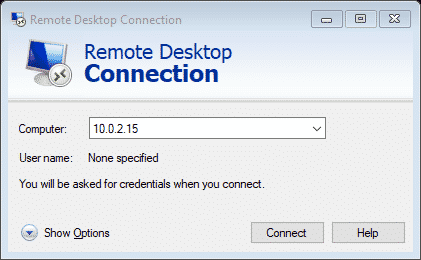
The first command will install the XRDP tool. The second command will allow the auto-enable on startup option. In other words, the xrdp tool will automatically start when the Linux boots. After this process completes. Go to your windows system and in search bar type “RDP.” Click on the “Remote Desktop App.”
Type the IP address of your Linux system adjacent to the “Computer ” label, and click connect
Enter the Username and the Password of your Linux system.
TroubleShooting: Although connecting through RDP is the easiest method for remote connecting, some problems occur during connecting with Ubuntu. This started happening after the Ubuntu 18.4 LTS release. Linux doesn’t like it when it is accessed remotely when the user is logged in. So a simple solution is to try RDP after logging out of your Linux
Method 3:Setting up a connection using Virtual Network Connection (VNC)
You can also connect using VNC. As mention above, SSH provides access to the terminal (no mouse control). VNC provides access to the Linux desktop (full mouse control). However, there is some prerequisite for connecting using this method, i.e., you have to install some VNC software.
Go to your Linux system and type the following command to make sure it’s up to date
Now input the following command
Now create a password for your connection. You will be given a desktop number, mostly 1. Remember this number.
After this, install the VNC client on windows. These TightVNC tools are installed in bundles, so once installed, go to the windows search bar and search “TightVNC Viewer. “ Launch the app and enter the IP address of the Linux device.
Now enter the IP of your Linux system followed by the desktop number, as shown in the above screenshot.
Conclusion:
Now that you know these methods, you should know which way is best for your use.
- RDP uses xrdp which is open source
- SSH can be used to remote access the terminal
- VNC can be used instead of RDP, but it’s a little less secure
It is recommended to set up SSH regardless of what method you use as it makes the installation for the other two methods much more easier.
Ubuntu has a built-in remote desktop tool, which is VNC-compatible.
About the author
![]()
Zeeman Memon
Hi there! I’m a Software Engineer by degree, Blogger by skills who loves to write about tech, develop websites & do SEO. You can reach out to me on LinkedIn.
How to remote control a Linux system from Windows
Sometimes connecting to your Linux system from your Windows machine is handy. The Linux machine can function as backup storage, server, or just another desktop to link.

I f you use separate Windows and Linux computers, sometimes you need to connect to Linux system from your Windows machine. The Linux machine can function as backup storage, server, or just another desktop to link.
In this tutorial, we cover how to control your Ubuntu machine from Windows one remotely. There are three methods to connect to your Ubuntu remotely.
- Connecting to Ubuntu via SSH.
- Connecting to Ubuntu via Remote Desktop Connection.
- Connecting to Ubuntu via VNC (Virtual Network Computing).
Before starting our tutorial, you need to make sure that your Ubuntu is up-to-date using the following commands:
Know your Ubuntu IP
Step 1. First, we need to install the net-tools package.
 Install net-tools Package
Step 2. To get the IP of the Ubuntu machine, you can use the following command.
 Ubuntu Machine IP
As you can see in the previous the Ubuntu machine, IP is 192.168.1.7.
Method 1: Connecting To Ubuntu Via SSH
In this method, we will install the ssh package on Ubuntu. Then we use an ssh client on Windows to connect to Ubuntu.
Step 1. On your Ubuntu machine, install the ssh package using the ssh command.
 Install ssh Package On Ubuntu
Step 2. Install the nmap package using the following command.
 Install Nmap Package On Ubuntu
Step 3. Check the ssh port is it is opened or not.
 Check If ssh Port Is Opened Or Not
As you can see in the previous screenshot the default port of ssh service which is 22 is open.
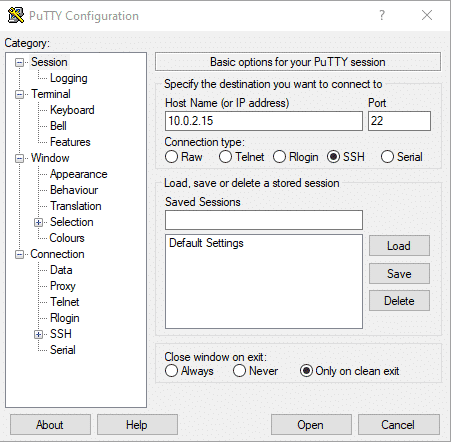
Step 4. On the Windows machine, you can use an ssh client such as putty. Download the putty client from here.
Now let’s open the putty client:
 Open Putty Application From Windows Machine
The putty interface should look like the below screenshot:
Step 5. Enter your Ubuntu machine IP in the “Host Name” textbox. Also, you can save the IP in the saved sessions section.
 Enter Ubuntu Machine IP
Press the Open button to connect to the Ubuntu machine.
Step 6. A security alert appears you can press the Yes button to continue.
 Putty Security Alert
Step 7. Next, you can use your Ubuntu username and password then press Enter button.
 Enter Your Ubuntu Username And Password
Step 8. Now you are logged in to your Ubuntu.
 Remotely Logged In To Your Ubuntu Machine Via Putty
You can start executing commands in the putty client:
 Start Executing Commands
Method 2: Connecting To Ubuntu Via Remote Desktop Connection
In this method, we are going to install the xrdp package on Ubuntu machine. Next, we shall use the Remote Desktop Connection from the Windows machine to connect to the Ubuntu one.
Step 1. On the Ubuntu machine, install the xrdp package using the following command.
 Install xrdp Package On Your Ubuntu Machine
Step 2. Start the xrdp service.
 Start xrdp Service
Step 3. Enable the xrdp service to run with system startup.
 Enable xrdp To Run With System Startup
Step 4. Check the xrdp service status to ensure that everything is up and running successfully.
 Check The xrdp Service Status
Step 5. From your Windows machine, open the Remote Desktop Connection from the Start menu.
 Open Remote Desktop Connection Application Windows
Step 6. Enter your Ubuntu machine IP. Then press the connect button to continue.
 Open Remote Desktop Connection Application Windows
Step 7. You should get a warning message, and you can press Yes button to open the connection.
 Remote Desktop Warning Message
Step 8. Next, you can use your Ubuntu username and password.
 Enter Your Ubuntu Username And Password In Remote Desktop Application
Step 9. Now you are remotely logged in to your Ubuntu machine, and you can start using the machine.
 Remotely Logged In To Your Ubuntu Machine Via Remote Desktop Connection
Method 3: Connecting To Ubuntu Via VNC
VNC is a Virtual Network Computing, and it is a graphical tool that is used to connect and access the Ubuntu remotely. In this method we are going to install a VNC server on the Ubuntu machine, then we shall use a VNC client from the Windows host to connect to Ubuntu.
Step 1. Install the tightvncserver package using the following command.
 Installing tightvncserver package
Step 2. Start the tightvncserver service using the following command.
You are required to enter a password that should be used while connecting in the Windows VNC client.
 Open The tightvncserver Application
As you can see in the previous screenshot, you should see a number like this “:1”, this number act as the desktop number. Remember this number because you should use it in the Windows machine.
Step 3. On your Windows machine, download and install any VNC client like the TightVNC viewer. You can download the TightVNC from here.
Step 4. After the installation completes successfully, you can open the TightVNC viewer from the Start menu.
 Open TightVNC Viewer
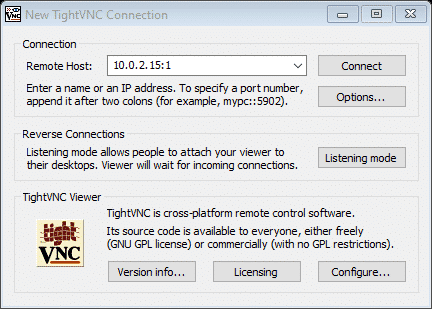
Step 5. Enter the Ubuntu machine IP and the desktop number mentioned previously.
 Enter Ubuntu Machine IP In The TightVNC Viewer
Step 6. Now press the connect button to open the connection and enter your Ubuntu username and password.
For further details about how to configure the VNC server on Ubuntu check this tutorial, and to configure the VNC on CentOS check this.


