- Using Device Manager to Uninstall Devices and Driver Packages
- Add and Remove Drivers to an offline Windows Image
- Driver types
- Add drivers to an offline Windows image
- Remove drivers from an offline Windows image
- Add drivers to an offline Windows image by using an unattended answer file
- Remove or Uninstall a Printer Driver from Windows 10
- How To Remove Or Uninstall Printer Drivers In Windows 10
- Uninstall Printer Software Using Settings
- Remove Printer Driver From Print Server Properties
- Uninstall Printer Driver Using Control Panel
- Use Print Management To Remove Old Printers
- Delete Old Printers Via Registry Editor
- Uninstall Printer Using Command Prompt
- Remove a Printer Using PowerShell
- Delete Remnants From The Windows Driver Store
- What Happens When Drivers Are Deleted?
Using Device Manager to Uninstall Devices and Driver Packages
This page describes how to uninstall a device or driver package on Windows 10. Before uninstalling a device, it is recommended that the device is unplugged from the system. If the device is uninstalled before it is unplugged, the operating system may rediscover the device and give it new settings in the time between the uninstall and unplugging the device.
First, open Settings (you can do this using the Windows+I keyboard shortcut) and type Remove. Select Add or remove programs. If the device or driver package that you wish to remove appears in the list of programs, select uninstall.
If your device or driver package does not appear in the list, then the device can be uninstalled via Device Manager. If that device is the only device using the driver package, then the driver package can also be removed via Device Manager. To launch Device Manager, click the Start button, type Device Manager, and press Enter.
Then follow these steps:
- Click on the View menu and turn on «Show Hidden Devices»
- Expand the node that represents the type of device that you want to uninstall, right-click the device entry for the device you want to uninstall, and select Uninstall.
- On the Confirm Device Removal dialog box, if you wish to remove the driver package in addition to uninstalling the device, select the Delete the driver software for this device option. When ready to complete the operation, select OK.
With some devices, if the device is still plugged in when it is uninstalled, the device might continue to function until the system has been restarted.
For more information about uninstalling driver and driver packages, see How Devices and Driver Packages are Uninstalled.
Add and Remove Drivers to an offline Windows Image
You can use DISM to install or remove driver (.inf) files in an offline Windows or WinPE image. You can either add or remove the drivers directly by using the command prompt, or apply an unattended answer file to a mounted .wim, .ffu, .vhd, or .vhdx file.
When you use DISM to install a device driver to an offline image, the device driver is added to the driver store in the offline image. When the image is booted, Plug and Play (PnP) runs and associates the drivers in the store to the corresponding devices on the computer.
To add drivers to a WindowsВ 10 image offline, you must use a technician computer running WindowsВ 10, Windows ServerВ 2016, or Windows Preinstallation Environment (WinPE) for WindowsВ 10. Driver signature verification may fail when you add a driver to a WindowsВ 10 image offline from a technician computer running any other operating system.
To learn how to add a driver on a running Windows PC, see Add a driver online in audit mode or Install a plug and play device. To learn how to add a driver to a PC running WinPE, see Drvload command line options.
Driver types
- .inf-style drivers: Many drivers include an information file (with an .inf extension) to help install the driver. These can be installed using tools described in this topic.
- .exe-style drivers: Drivers without an .inf file often must be installed like typical Windows desktop applications. To learn how to add these, see Add a driver online in Audit Mode
- Boot-critical drivers: Graphics and storage drivers may sometimes need to be added to the Windows image (as shown in this topic), as well as the Windows PE image, and in the Windows recovery (WinRE) image.
Add drivers to an offline Windows image
To add drivers to an offline image, you have to mount an image prior to adding drivers.
If you’re adding drivers to a WinPE image, you can add them to the WinPE image in the output folder you specified when you ran copype, for example: C:\WinPE_amd64\media\sources\boot.wim . This ensures that drivers will be included in WinPE each time you build WinPE media from that folder.
- Mount a Windows image. For example:
- Add a driver to the image.
To install all of the drivers from a folder and all its subfolders, point to the folder and use the /Recurse option.
To see all DISM driver servicing command line options, see DISM driver servicing command-line options.
Using /Recurse can be handy, but it’s easy to bloat your image with it. Some driver packages include multiple .inf driver packages, which often share payload files from the same folder. During installation, each .inf driver package is expanded into a separate folder. Each individual folder has a copy of the payload files. We’ve seen cases where a popular driver in a 900MB folder added 10GB to images when added with the /Recurse option.
To install an unsigned driver, use /ForceUnsigned to override the requirement that drivers installed on X64-based computers must have a digital signature.
- Check to see if the driver was added. Drivers added to the Windows image are named Oem*.inf. This guarantees unique naming for newly added drivers. For example, the files MyDriver1.inf and MyDriver2.inf are renamed Oem0.inf and Oem1.inf.
- Commit the changes and unmount the image.
Remove drivers from an offline Windows image
- At an elevated command prompt, mount the offline Windows image:
- Remove a specific driver from the image. Multiple drivers can also be removed on one command line.
Removing a boot-critical driver package can make the offline Windows image unbootable. For more information, see DISM Driver Servicing Command-Line Options. пїЅ
- Commit the changes and unmount the image.
Add drivers to an offline Windows image by using an unattended answer file
- Gather the device driver .inf files that you intend to install on the Windows image.
All drivers in the directory and subdirectories that are referenced in the answer file are added to the image. You should manage the answer file and these directories carefully to address concerns about increasing the size of the image with unnecessary driver packages.
- Use WindowsВ System Image Manager (WindowsВ SIM) to create an answer file that contains the paths to the device drivers that you want to install.
- Add the Microsoft-Windows-PnpCustomizationsNonWinPE\DriverPaths\PathAndCredentials\Credentials component to your answer file in the offlineServicing configuration pass.
For each location that you intend to access, add a separate PathAndCredentials list item by right-clicking on DriverPaths in the Answer File pane and clicking Insert New PathAndCredentials.
See Configure components and settings in an answer file for information on how to modify an answer file.
- For each path in Microsoft-Windows-PnpCustomizationsNonWinPE , specify the path to the device driver and the credentials that are used to access the file, if the file is on a network share.
When you include multiple device driver paths by adding multiple PathAndCredentials list items, you must increment the value of Key for each path. For example, you can add two separate driver paths where the value of Key for the first path is equal to 1 and the value of Key for the second path is equal to 2.
- Save the answer file and exit WindowsВ SIM. The answer file must resemble the following sample.
- Mount the Windows image that you intend to install the drivers to by using DISM:
If you’re working with a VHD or FFU, specify /Index:1 .
- Apply the answer file to the mounted Windows image:
For more information about how to apply an answer file, see DISM Unattended Servicing Command-Line Options.
The .inf files referenced in the path in the answer file are added to the Windows image.
- Check to see if the driver was added. Drivers added to the Windows image are named Oem*.inf. This guarantees unique naming for newly added drivers. For example, the files MyDriver1.inf and MyDriver2.inf are renamed Oem0.inf and Oem1.inf.
For example, type:
- Unmount the .wim file and commit the changes. For example, type:
If you need drivers for WinPE to see the local hard disk drive or a network, you must use the windowsPE configuration pass of an answer file to add drivers to the WinPE driver store and to reflect boot-critical drivers required by WinPE. For more information, see Add Device Drivers to Windows During Windows Setup.
Remove or Uninstall a Printer Driver from Windows 10
Get rid of any that you are not using
If you connect to different printers across several locations all the time, you’ll probably not use all of the printers installed on your device – probably just once or twice. However, your device ends up with many printers installed on it without you realizing it.
Thankfully, you can remove any printer you’re no longer using, except it doesn’t completely get erased from your device – the printer driver remains in your device’s inventory in case you need it again.
If you’re sure you won’t need it, you can remove or uninstall old, obsolete or uninstalled printer drivers, and leftover driver packages or registry entries from your device.
We’re going to walk you through five ways to completely uninstall printer drivers in Windows 10.
How To Remove Or Uninstall Printer Drivers In Windows 10
These are a few of the ways you can remove printer drivers in Windows 10:
- Uninstall printer software using Settings.
- Remove printer driver from Print Server Properties.
- Uninstall printer driver using Control Panel.
- Use Print Management to remove old printers.
- Delete old printers via Registry Editor.
- Uninstall printer using Command Prompt.
- Remove a printer using PowerShell.
- Delete remnants from Windows driver store.
Uninstall Printer Software Using Settings
If you don’t need a particular printer anymore, you can follow the usual steps to uninstall a printer from Settings and then uninstall its software, especially if using a third-party utility.
If the Settings app installed other tools to manage your printer automatically, you’ll have to manually remove the leftover software.
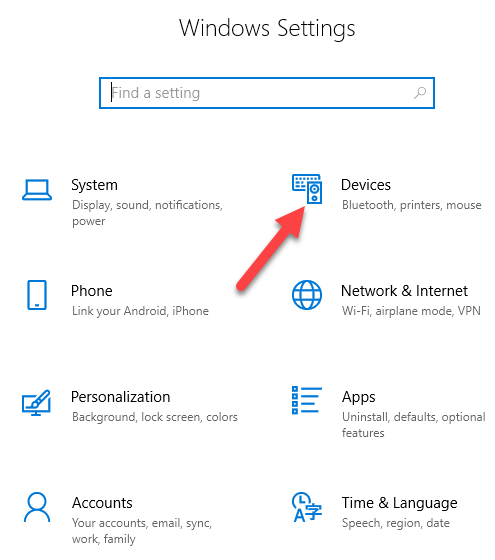
- Open Settings>Devices.
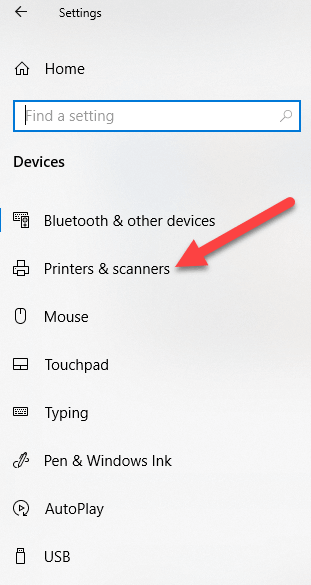
- Click Printers & Scanners.
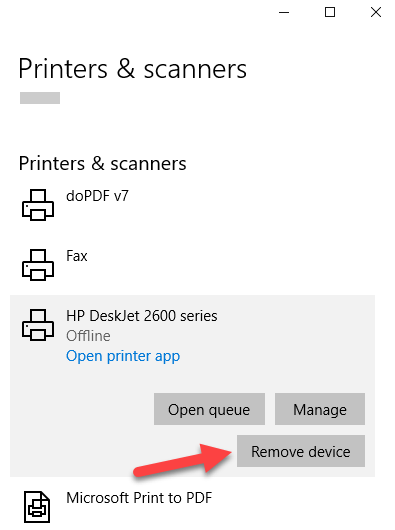
- Select your printer, click Remove device, and click Yes when asked to confirm the deletion.
Note: The steps above only remove the printer from the list, so you’ll need to remove any leftover printer software or related applications.
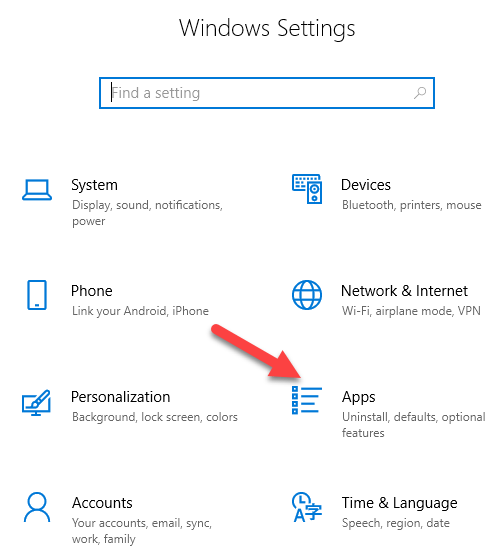
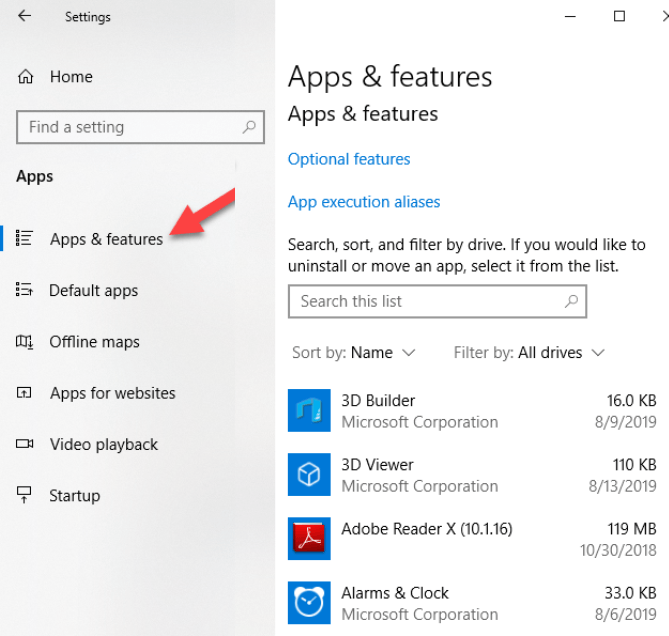
- Open Settings>Apps.
- Click Apps & Features and select the printer software you’d like to remove.
- Click Uninstall and follow the steps to completely remove any leftover printer-related applications.
Remove Printer Driver From Print Server Properties
If you’re still seeing an old printer, or one that you previously uninstalled, appearing on the Printers & Scanners page, you can remove or uninstall the printer driver and driver packages.
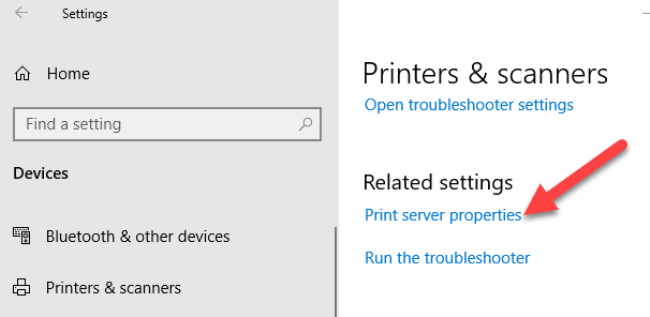
- Open Settings>Devices>Printers and Scanners on the left pane.
- Scroll down to Related settings and click Print Server Properties. Alternatively, you can right-click Start>Run and type printui /s /t2 to go to the Print Server properties page directly.
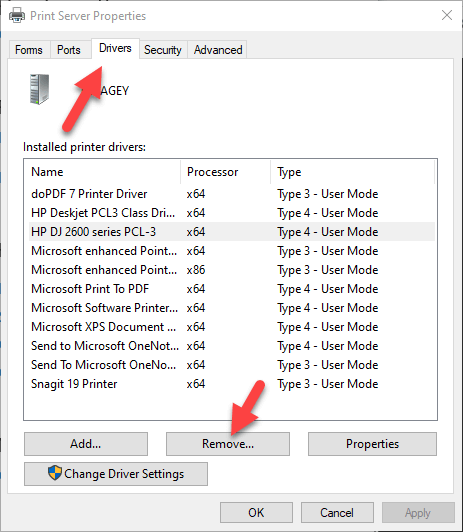
- Select the Drivers tab. From the list, click on the old printer entry and select Remove.
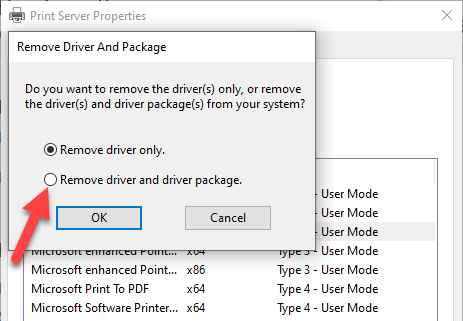
- You’ll get two options in a popup – Remove driver or Remove driver and driver package. Select the latter and click OK.
- If you get a confirmation prompt to Remove Driver Package, click Delete.
Uninstall Printer Driver Using Control Panel
You can remove and uninstall your printer and leftover printer driver or related apps from Control Panel using these steps.
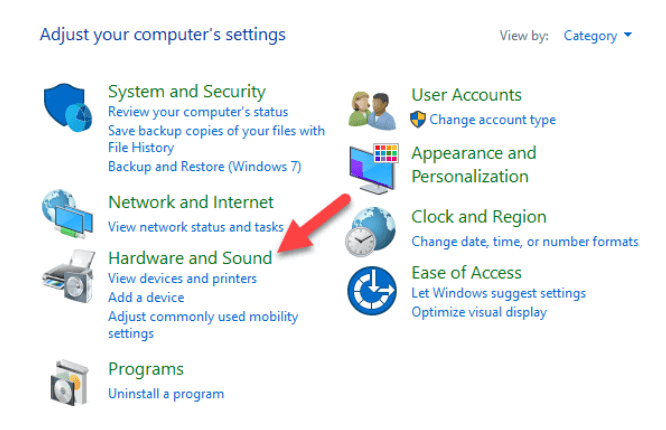
- Open Control Panel>Hardware and Sound.
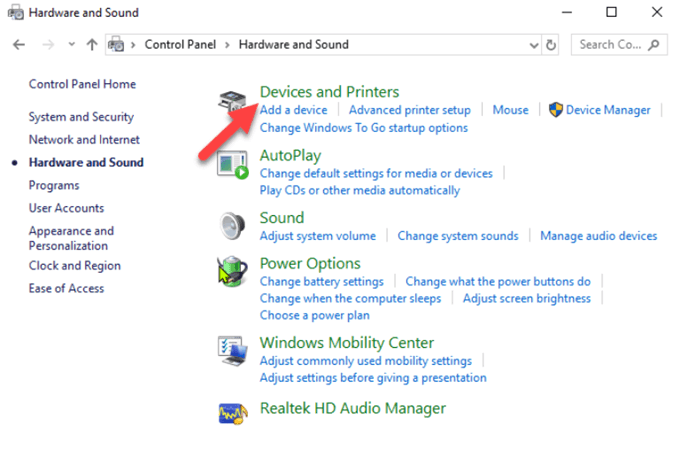
- Click Devices and Printers.
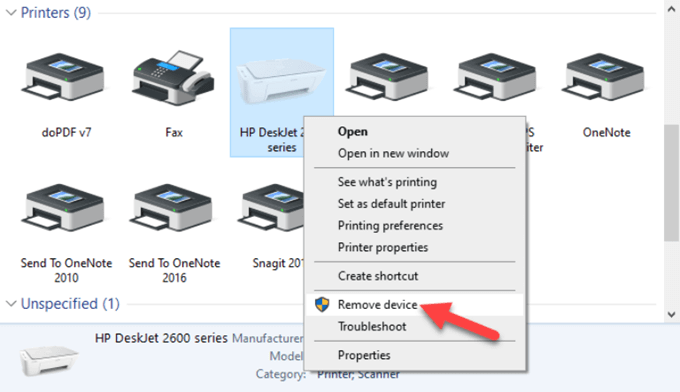
- Under Printers, right-click your device and click Remove device. Click Yes to confirm the action.
- Next, go to Settings>Apps>Apps & Features and select the software you want to remove.
- Click Uninstall and follow the on-screen steps to completely remove the printer software.
Use Print Management To Remove Old Printers
Ideally, if you used the Print Server properties method above, it should remove and uninstall the printer driver. However, you can use the Print Management console to completely remove printers you no longer use, and their drivers.
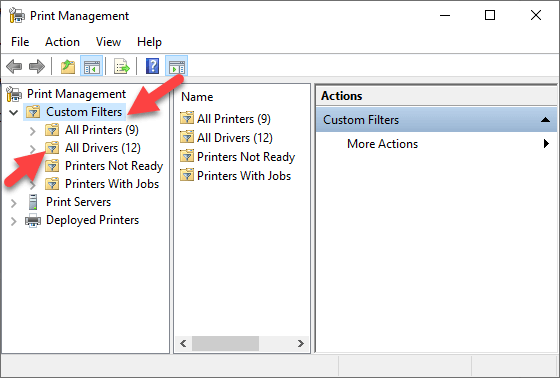
The Print Management dialog shows you the printers and current print jobs on your device. Before you delete the old printer driver though, make sure it’s not being used by any other printer.
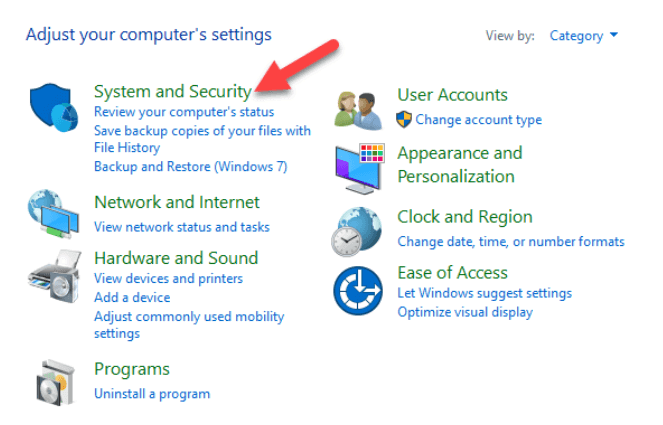
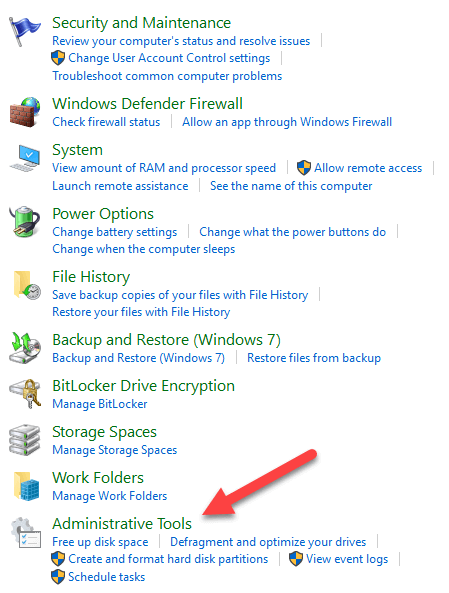
- Open Control Panel>System and Security.
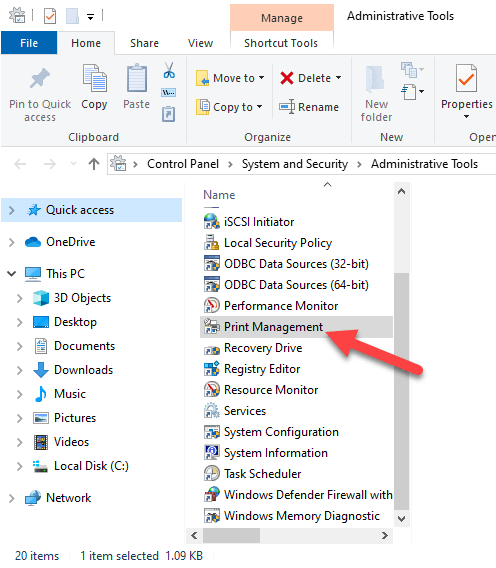
- Click Administrative Tools.
- Double-click the Print Management shortcut.
- Under Custom Filters, select All Printers.
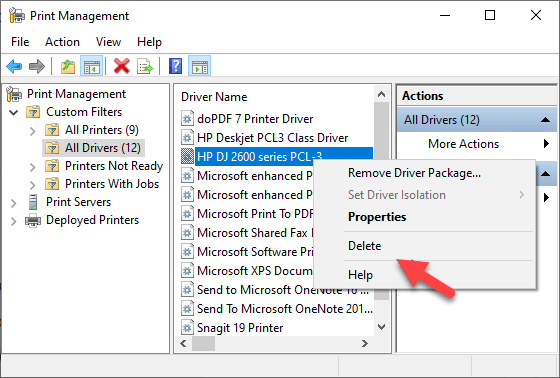
- Right-click the printer you want to remove.
- Click Delete and Yes to confirm the action.
- Open Settings>Apps>Apps & Features and click the printer software you want removed.
- Click Uninstall and follow on-screen instructions to completely remove the printer driver.
Delete Old Printers Via Registry Editor
If you open the Add a printer page and find old printers still listed there, edit the registry to remove leftover entries. To do this, start by creating a system restore point, and then follow the steps below.
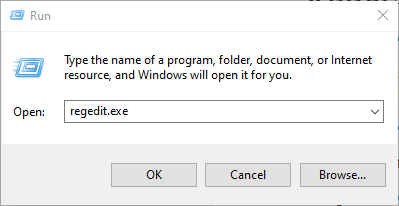
- Right-click Start>Run.
- Type regedit.exe and click OK (or press Enter on your keyboard) to open the Registry Editor.
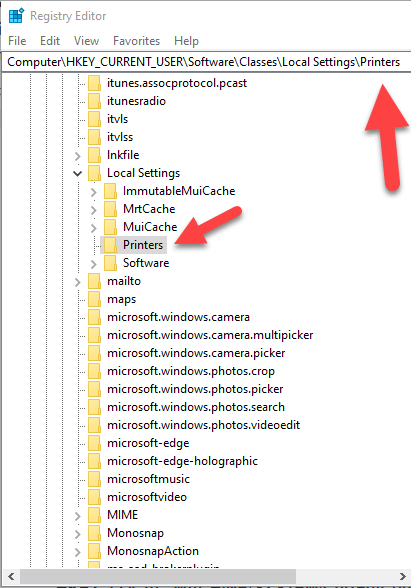
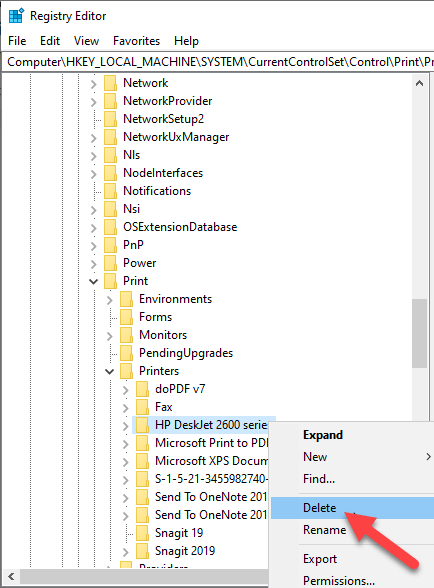
Find the registry key:
- Right-click the printer from the right pane, and select Delete.
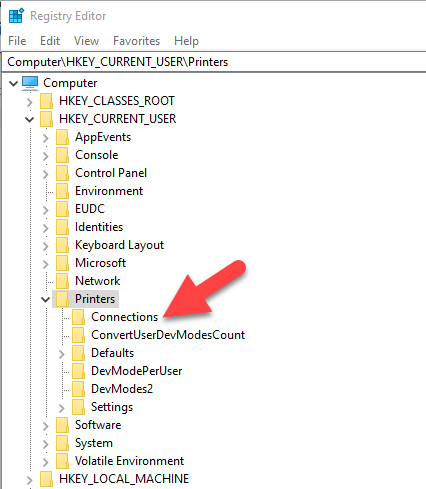
- Check printer entries and delete unwanted items by going to this key: HKEY_CURRENT_USER\Printers\Connections
Next, go to this key:
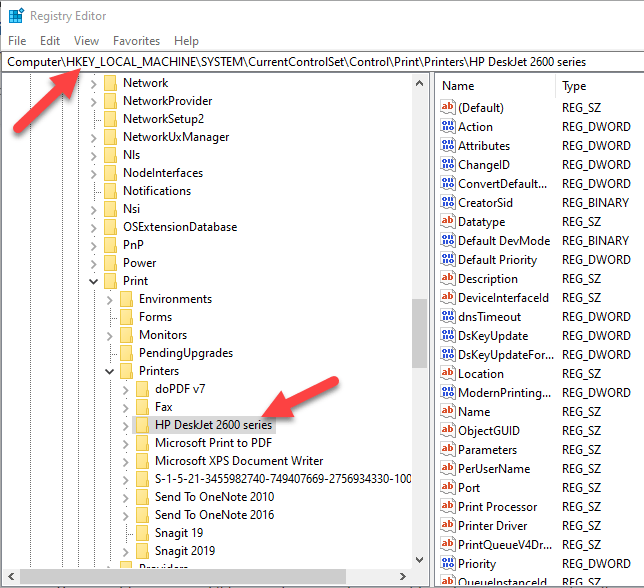
- Click to expand the key, right-click your printer and select Delete.
Some subkeys may still have references to your old printer, so you can clear the following as well:
Once this is done, exit the Registry Editor.
Uninstall Printer Using Command Prompt
If you’re a fan of command lines, the Command Prompt is another tool you can use to delete a printer and remove related drivers and apps.
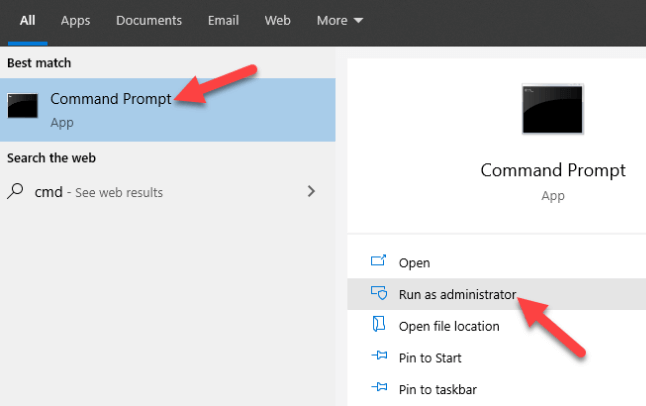
- Click Start and type CMD in the search bar.
- Click Command Prompt and select Run as administrator from the right pane.
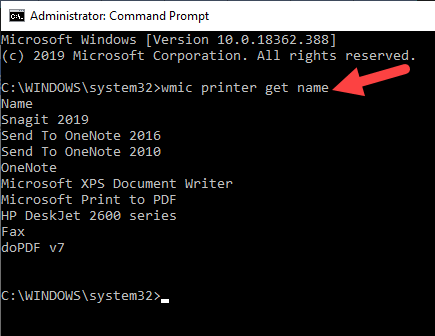
- In the Command Prompt window, type this command: wmic printer get name and press Enter to see the list of printers on your device.
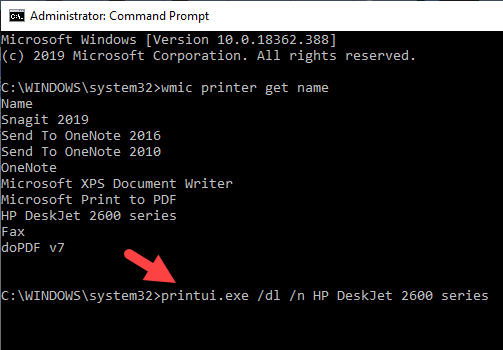
- To uninstall the printer, type printui.exe /dl /n “YOUR-PRINTER-NAME” and press Enter. Remember to replace YOUR-PRINTER-NAME with your printer’s full name. For example, printui.exe /dl /n HP DJ 2600 Series CL3.
- To uninstall the printer software, open Settings>Apps>Apps & Features and select the printer software you want to remove. Click Uninstall and follow the on-screen instructions to complete the process.
Remove a Printer Using PowerShell
If you prefer PowerShell over Command Prompt, here are the steps to take to remove the printer and related software.
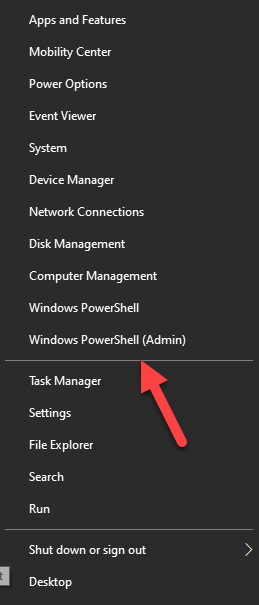
- Right-click Start > Windows PowerShell (Admin).
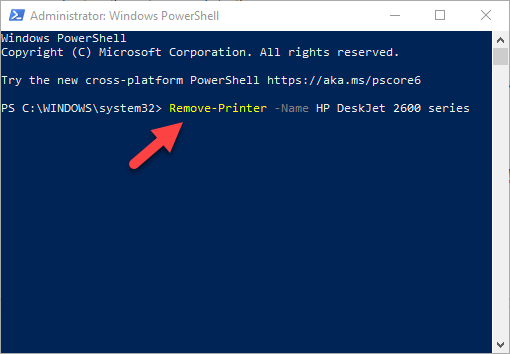
- Type this command: Remove-Printer –Name “YOUR-PRINTER-NAME”.
- Open Settings > Apps > Apps & Features, and click the software you want removed.
- Click Uninstall and follow the directions to remove it completely.
Delete Remnants From The Windows Driver Store
This solution is meant to remove any remnants of drivers that may still be on your device even after deleting driver packages.
In the driver store, you’ll find inbox and third-party driver packages, which were installed and stored in the folder even before the driver itself got installed.
Each of the subfolders in the store holds a driver package and corresponding .inf file, but it’s a bit difficult to find the specific driver package you’d like to remove.
The good news is you can use a third-party tool to explore the Windows driver store and completely remove the old printer driver once for all. It’ll also save you lots of space that would otherwise have been occupied by junk files.
What Happens When Drivers Are Deleted?
A device driver is a piece of software that tells your computer’s operating system how to communicate with the device it’s connected to.
For example, to connect to your printer and execute the print command, a printer driver is needed to bridge the gap between the two devices, and deliver the print job to you.
Without the printer driver, your printer is just hardware that doesn’t work. Similarly, deleting the printer driver after deleting the printer from your computer renders it inoperative.
However, if you delete the driver, you can undo the deletion using System Restore, from the previous restore point created when you deleted the driver from your computer.
Alternatively, Windows will automatically install the driver on your operating system by searching for it from its extensive library of drivers. If it doesn’t find a suitable driver, it’ll search for a driver online through Windows Update. Otherwise, you can visit the device manufacturer’s website to find the specific driver for your printer.
Elsie is a technology writer and editor with a special focus on Windows, Android and iOS. She writes about software, electronics and other tech subjects, her ultimate goal being to help people out with useful solutions to their daily tech issues in a simple, straightforward and unbiased style. She has a BCom degree in Marketing and currently pursuing her Masters in Communications and New Media. Read Elsie’s Full Bio

