Turn off, disable, or uninstall OneDrive
If you want to stop syncing for a short time, learn How to pause and resume sync in OneDrive.
If you want to stop syncing a file, read How to stop or cancel sync in OneDrive.
If you want to remove a OneDrive folder from your computer, follow the steps in Choose which OneDrive folders to sync to your computer.
If you want to cancel your OneDrive subscription, see How to cancel your Microsoft subscription.
If you want to sign out of OneDrive on the web, select your profile photo, then select Sign out.
If you just don’t want to use OneDrive, the easiest solution is to unlink it.
Unlink OneDrive
You won’t lose files or data by unlinking OneDrive from your computer. You can always access your files by signing in to OneDrive.com.
Select the white or blue OneDrive cloud icon in the taskbar or menu bar.

Note: You might need to click the Show hidden icons arrow  next to the notification area to see the OneDrive icon. If the icon doesn’t appear in the notification area, OneDrive might not be running. Select Start, type OneDrive in the search box, and then select OneDrive in the search results.
Select  Help & Settings > Settings.
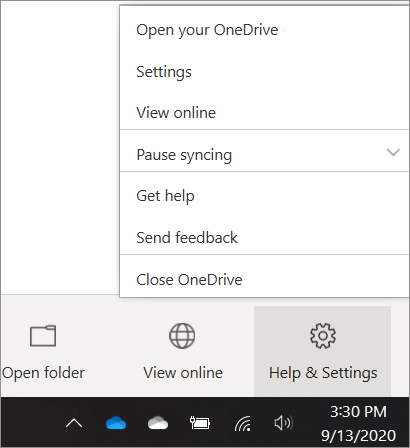
On the Account tab, click Unlink this PC and then Unlink account.
Hide or uninstall OneDrive
On some versions of Windows, you can also hide or uninstall OneDrive. You can also uninstall the OneDrive mobile app from Android and iOS devices.
OneDrive is built in to some versions of Windows and can’t be uninstalled. But you can hide it and stop the sync process, so it stays hidden. To do this, turn off all the OneDrive settings and remove the OneDrive folder from File Explorer.
Select the white or blue OneDrive cloud icon in the notification area, at the far right of the taskbar.
Note: You might need to click the Show hidden icons arrow next to the notification area to see the OneDrive icon. If the icon doesn’t appear in the notification area, OneDrive might not be running. Select Start, type OneDrive in the search box, and then select OneDrive in the search results.
Select Help & Settings > Settings.
On the Settings tab, uncheck all the boxes under General.
On the Auto Save tab, set the Documents and Pictures lists to This PC only, and uncheck the other boxes.
On the Account tab, click Choose folders.
In the Sync your OneDrive files to this PC box, check and uncheck the box at Sync all files and folders in my OneDrive. (The first check selects all the boxes, then the uncheck clears them all.) Click OK to close the box and return to settings.
This step removes all OneDrive files from your computer, but leaves them on OneDrive.com.
Click OK to save your changes in the Settings box.
Open the Settings again. On the Account tab, click Unlink OneDrive. Close the Welcome to OneDrive box that appears.
Open File Explorer, right-click OneDrive, and then click Properties.
On the General tab, next to Attributes, check the Hidden box. This hides OneDrive from File Explorer.
One more time, select Help & Settings and select Quit OneDrive. This removes the OneDrive icon from the Notifications area.
In your computer’s Start menu, press and hold or right-click the OneDrive tile, and then select Unpin from Start.
Go to PC Settings, using the PC Settings tile in the Start menu, or swipe in from the right edge of the screen, select Settings, and then select Change PC settings.
Under PC settings, select OneDrive.
On the File Storage tab, turn off the switch at Save documents to OneDrive by default.
On the Camera roll tab, select Don’t upload photos and turn off the switch at Automatically upload videos to OneDrive.
On the Sync settings tab, under Sync settings with OneDrive, turn off the switch at Sync your settings on this PC.
On the Metered connections tab, turn off all the switches.
To hide OneDrive from File Explorer, open File Explorer and in the folder list on the left, right-click OneDrive and then click Properties.
On the General tab, at Attributes, check the Hidden box.
You won’t lose files or data by uninstalling OneDrive from your computer. You can always access your files by signing in to OneDrive.com.
Select the Start button, type Programs in the search box, and then select Add or remove programs in the list of results.
Under Apps & features, find and select Microsoft OneDrive, and then select Uninstall. If you’re prompted for an administrator password or confirmation, type the password or provide confirmation.
The OneDrive app comes with Windows 8.1 and Windows RT 8.1 and cannot be uninstalled.
Windows 7 or Windows Vista
Click the Start button, then in the search box, type Add Programs , and then, in the list of results, click Programs and Features.
Click Microsoft OneDrive, and then click Uninstall. If you’re prompted for an administrator password or confirmation, type the password or provide confirmation.
Go to Settings and select Storage/Memory.
Select OneDrive and tap Uninstall.
Go to the Home Screen, tap and hold on the OneDrive app icon
Tap X that appears in the upper left corner of the app icon.
Just drag the OneDrive app to the Trash.
Need more help?

Get online help
See more support pages for OneDrive and OneDrive for work or school.
For the OneDrive mobile app, see Troubleshoot OneDrive mobile app problems.

Contact Support
If you still need help, contact support through your browser or shake your mobile device while you’re in the OneDrive app.

Tips
Letting us know your location may help us resolve your issue more quickly.
All fixed? If you contacted us and OneDrive starts working again, please let us know by replying to the email we sent you.
How to uninstall or remove Windows 10 from a Windows 7 or 8.x dual boot computer
Technical Level : Intermediate
Since we will be removing Windows 10 and keeping Windows 7 or Windows 8, follow the steps listed below. The space on your disk drive formerly used by Windows 10 can be kept for future builds and or consumer previews or merged back into your Windows 7 or Windows 8 partition.
*** Note: If you upgraded Windows 7 or 8.1 to Windows 10 thereby removing Windows 7 or 8.1 and replacing it with Windows 10 you do not have a «Dual Boot» (Windows 7 / 8.1 and Windows 10) computer . In which case these Wiki articles are more appropriate and easier to follow:
1) If you have not created any Image Backups while you were evaluating Windows 10:
The first thing you need to do is to install an Image Backup software package and create a backup of the entire disk drive (all partitions) to an external USB drive. This is your safety net should something go wrong and you cannot boot to either version of Windows, just restore the image you created.
EaseUS Todo Backup Home V8.5
Acronis True Image 2015:
Has a 30 day trial version available, trial Key sent to your Email Address.
Note: Cloning and drive initialization (creating a MBR) are not supported in the trial version.
For the trial version, recovery is available only when booting from an Acronis Bootable Media CD.
Install Acronis and then create a bootable Restore/Rescue Media CD before you start creating your first image backup
Macrium Reflect Free:
(no technical support available for the free version)
Note: For users who have a Western Digital disk drive there is a free version of Acronis 2013:
Users Guide for WD Version:
After the backup has been created eject the USB drive and disconnect it.
2) Run Msconfig:
Windows 7 — Click ‘Start’ and in the start search box enter: msconfig and tap the ‘Enter’ key.
Windows 8 — In the ‘Desktop’ mode, right click on ‘Start’ and in the pop-up list, select the ‘Run’ option.
In the Tiles or ‘Start’ screen mode, in the upper left corner click on the ‘Search’ icon.
3) Click on the ‘Boot’ tab to display the versions of Windows that are installed.
4) Click on the Windows 10 entry (as shown above) and then click on the ‘Delete’ button.
Now set the ‘Timeout’ value to 3 seconds and click the ‘Apply’ button.
5) Click on the ‘OK’ button to exit msconfig’s ‘System Configuration’ window and when prompted restart the computer.
6) Run the Disk Management utility (Start / right click on ‘Computer’ / select ‘Manage’).
(For Windows 8.1, right click on the Start button and select ‘Disk Management’).
7) For Windows 7 users — In the left hand column click on the ‘Disk Management’ option to display the partitions on your disk drive.
At this point you can choose to keep the partition for installing future builds of Windows 10 by simply formatting the partition to remove all the Windows 10 operating system files or use the space to increase the size of the Windows 7 or 8.x partition.
8) To format the partition, right click on the Windows 10 partition and select the ‘Format’ option.
Users with a Hard Disk Drive (HDD) should use the ‘Full’ format option, Solid State Drive users should use the ‘Quick’ format option. After the partition has been formatted, proceed to step #12.
9) To delete the Windows 10 partition:
Right click on the Windows 10 partition and select the ‘Delete Volume’ option.
10) Add the now ‘Unallocated’ space back into the Windows 7 or 8 partition:
Right click on the Windows 7 or 8 partition (C:) and select the ‘Extend Volume’ option and follow the Extend Volume Wizard’s guided steps.
11) Now follow the Extend Volume Wizard’s guided steps.
Note: The size of the space shown below will vary depending on the amount of disk space formerly used by the Windows 10 partition.
Click ‘Finish’ when prompted.
Your Windows 7 or 8.x partition should now show that the unallocated space formerly used by Windows 10 has been added to and increased the size of your Windows 7 or 8.x partition. Exit Disk Management.
12) Now create a new Image Backup of the entire disk drive.
That’s it, you’re done.
Additional Wiki articles you may want to read:
how to remove microsoft account from windows 10
Replies (50)
* Please try a lower page number.
* Please enter only numbers.
* Please try a lower page number.
* Please enter only numbers.
![]()
Thank you for posting your query on Microsoft Community.
To remove Microsoft account from the mail app click on the link below: (also applicable for Windows 10)
To remove Microsoft user account follow the steps below:
NOTE: It is always recommended you keep a backup of all your data and the go ahead with the process.
1. Type User Accounts in the search bar and click Enter.
2. Click on Manage another account.
3. Click on the User account you wish to delete.
4. Click on the Delete the account.
5. In the prompt you can either click on keep files (which will keep a back up of all your files) or delete files (which will delete all the files associated with this account).
6. Click on Delete Account.
7. Close Control Panel.
Hope this helps. Please respond if you have further related queries.
213 people found this reply helpful
Was this reply helpful?
Sorry this didn’t help.
Great! Thanks for your feedback.
How satisfied are you with this reply?
Thanks for your feedback, it helps us improve the site.
How satisfied are you with this reply?
Thanks for your feedback.
![]()
I’ve completed the above steps, however when I try to link my local (domain account) to my Microsoft account I receive a message «John Doe is already here» (I substituted John Doe for my real name).
9 people found this reply helpful
Was this reply helpful?
Sorry this didn’t help.
Great! Thanks for your feedback.
How satisfied are you with this reply?
Thanks for your feedback, it helps us improve the site.
How satisfied are you with this reply?
Thanks for your feedback.
I’ve completed the above steps, however when I try to link my local (domain account) to my Microsoft account I receive a message «John Doe is already here» (I substituted John Doe for my real name).
open regedit.exe and delete the johndoe key from the following location:
27 people found this reply helpful
Was this reply helpful?
Sorry this didn’t help.
Great! Thanks for your feedback.
How satisfied are you with this reply?
Thanks for your feedback, it helps us improve the site.
How satisfied are you with this reply?
Thanks for your feedback.
![]()
9 people found this reply helpful
Was this reply helpful?
Sorry this didn’t help.
Great! Thanks for your feedback.
How satisfied are you with this reply?
Thanks for your feedback, it helps us improve the site.
How satisfied are you with this reply?
Thanks for your feedback.
Do I just right click on the «johndoe» key and delete it along with all its info?
2 people found this reply helpful
Was this reply helpful?
Sorry this didn’t help.
Great! Thanks for your feedback.
How satisfied are you with this reply?
Thanks for your feedback, it helps us improve the site.
How satisfied are you with this reply?
Thanks for your feedback.
![]()
Do I just right click on the «johndoe» key and delete it along with all its info?
5 people found this reply helpful
Was this reply helpful?
Sorry this didn’t help.
Great! Thanks for your feedback.
How satisfied are you with this reply?
Thanks for your feedback, it helps us improve the site.
How satisfied are you with this reply?
Thanks for your feedback.
Thanks for your help This thread was very useful.
Was this reply helpful?
Sorry this didn’t help.
Great! Thanks for your feedback.
How satisfied are you with this reply?
Thanks for your feedback, it helps us improve the site.
How satisfied are you with this reply?
Thanks for your feedback.
5 people found this reply helpful
Was this reply helpful?
Sorry this didn’t help.
Great! Thanks for your feedback.
How satisfied are you with this reply?
Thanks for your feedback, it helps us improve the site.
How satisfied are you with this reply?
Thanks for your feedback.
![]()
I see all of the other fixes,, but none solve the root issue. How do I remove the Microsoft Account login from the one and only administrator account?
What I did was after joining my computer to the domain, I made sure my domain account was a local admin. I then created a new local user as an administrator. I deleted the original local account which was tied to my Microsoft account. At that point I had to perform the steps in EvilVirus’s response, before I could link my Microsoft account to my domain account on the computer.
The last two steps were done in Settings — Accounts.
You should log on as the new local user before deleting the other account just to be safe.


