- How to Remove Windows Defender Icon on Windows 10
- How to Remove the Windows Defender Icon from Taskbar or Notification Tray
- Method 1: Removing the Windows Defender Icon via Task Manager
- Method 2: Removing the Windows Defender icon via Taskbar Settings
- Method 3: Disabling Windows Defender Icon via Startup menu
- Method 4: Disabling the Windows Defender icon via Local Group Policy (if applicable)
- Method 5: Disabling Windows Defender icon from Registry Editor
- How to remove blue and yellow shield from an icon in Windows 10
- Why is UAC important?
- Remove the blue & yellow shield from an icon
- 1] Reinstall application and set Compatibility
- 2] Change UAC Level
- 3] Use NirCMD to remove icon but keep UAC
- 4] Bypass UAC for these programs
- How to Remove Double Arrows Overlay on Icons in Windows 10
- Way 1: Remove Blue Arrows Icons in Registry Editor
- Way 2: Remove Blue Arrows Icon in Properties
How to Remove Windows Defender Icon on Windows 10
Windows Defender is a long time component of Windows. But for many Windows iterations, Windows Defender wasn’t as obvious as it is on Windows 10. Starting with the Anniversary Update, Windows Defender got a permanent icon in the notification area of your taskbar.
Update: Starting with Windows 10 build 17661, Windows Defender was renamed to Windows Security.
While this new approach makes it easier for users to access the built-in security suite, a lot of users have reported that the icon is totally useless for them. But what really annoyed a lot of users is the fact that the Windows Defender icon appears even if you are using a 3rd-party antivirus to protect your system.
Luckily, you can dismiss the Windows Defender icon, but as you can expect, the procedure is not as straightforward as one would want. In fact, you can remove the Windows Defender icon without disabling its functionality. If you’re not using an external antivirus, Windows Defender will continue running in the background and will remain accessible via the classic path (Settings > System & Security > Windows Defender > Open Windows Defender).
How to Remove the Windows Defender Icon from Taskbar or Notification Tray
Since you can’t simply right-click on Windows Defender and close it to remove the notification, you’ll need to employ a different solution to hide or unhide the icon.
Below you have a collection of methods that will enable you to hide the Windows Defender icon from the Notification Tray. We will also provide instructions on how to re-enable the icon in case you want it to return on your taskbar. Please follow whichever method seems more convenable to your particular situation.
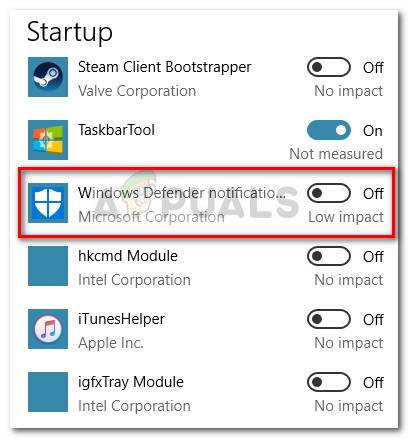
Method 1: Removing the Windows Defender Icon via Task Manager
The most popular way to remove the Windows Defender Icon from the Notification Tray is via Task Manager. Since the tray icon is actually produced by an additional program that automatically launches during the startup phase, you can disable the autostart associated with it via Task Manager.
Here’s a quick guide on how you can use Task Manager to remove the Windows Defender icon:
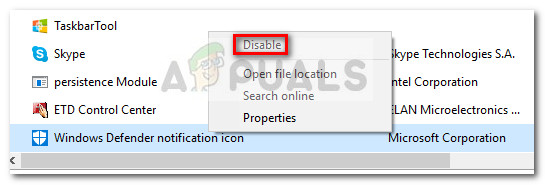
- Press Ctrl + Shift + Esc to open up Task Manager.
- Inside Task Manager, go to the Startup tab, right-click on Windows Defender notification icon and click on Disable.

- That’s it. Since the autorun key associated with the Windows Defender icon is disabled, you should notice that the icon will be removed from the notification tray at the next startup. Restart your computer to see if this method was effective
Restoring the icon is just as easy. Simply return to the Startup tab of Task Manager, right-click on Windows Defender notification icon again and choose Enable. Don’t forget to restart the computer to enforce the changes.
Method 2: Removing the Windows Defender icon via Taskbar Settings
Another way in which you can hide or show the Windows Defender Notification Area (Windows Security) icon is via the Taskbar settings menu. This is the equivalent of using Method 1, but the difference is the change is made via the Windows 10 Settings menu rather than from Task Manager.
Here’s a quick guide on how to remove the Windows Defender icon via Taskbar Settings:
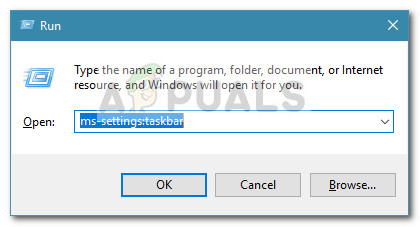
- Press Windows key + R to open up a run box. Then, type “ms-settings:taskbar” and hit Enter to open the Taskbar tab of the Settings menu.
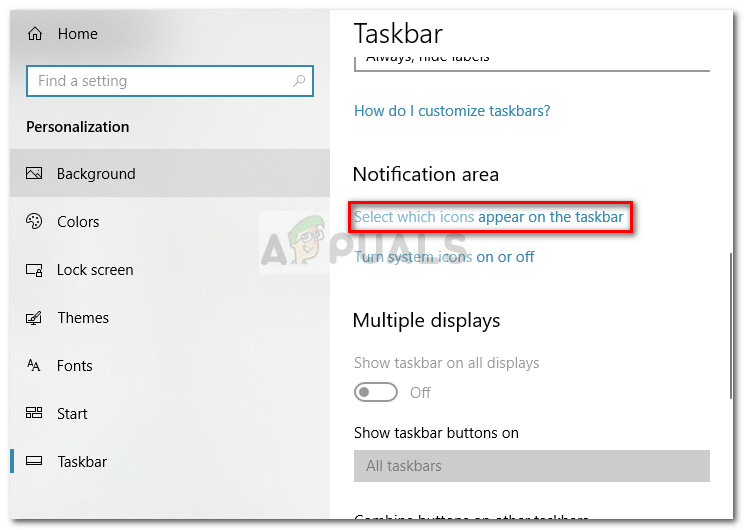
- In the Taskbar tab of the Settings app, scroll down to the Notification area and click on Select which icons appear on the taskbar.
- In the next screen, disable the toggle associated with Windows Defender notification icon.
- That’s it. The Windows Defender icon will disappear immediately from your taskbar. You can bring it back at any time by returning to the menu showcased at step 3 and re-enabling the Windows Defender notification icon toggle.

Method 3: Disabling Windows Defender Icon via Startup menu
Another intuitive way of disabling the Windows Defender Notification Area Icon is via the Windows 10 Startup Tab (inside the Settings app). This will accomplish the same thing as the first two methods, just from a different menu.
Here’s how you can disable the Windows Defender (Windows Security) icon via the Startup menu:
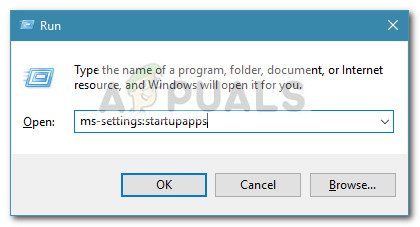
- Press Windows key + R to open up a new Run box. Then, type “ms-settings:startupapps” and hit Enter to open the Startup tab of the Settings app.
- In the Startup tab, scroll down and simply uncheck the toggle associated with Windows Defender notification icon.
- That’s it. Once the toggle is disabled, you should notice that the Windows Defender icon is removed from your taskbar or notification tray. You can re-enable it just as easily by returning to the same menu and re-enabling the Windows Defender notification icon toggle.
Method 4: Disabling the Windows Defender icon via Local Group Policy (if applicable)
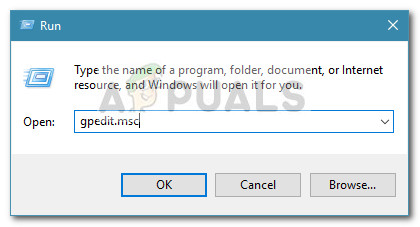
Another way to go around dealing with the Windows Defender icon is to use the Local Group Policy Editor. But keep in mind that you’ll need to use an account with administrator privileges. Furthermore, this option is only available on Windows 10 build version 1803 and above. ,
Note: Only Enterprise, Education and Pro versions of Windows 10 will allow you to use the Local Group Policy Editor.
Here’s a quick guide on disabling the Windows Defender icon using the Local Group Policy editor:
- Press Windows key + R to open a Run box, then, type “gpedit.msc” and hit Enter to open Local Group Policy Editor.
- Use the left pane of the Local Group Policy Editor to navigate to the following location:
- Using the right pane of Systray, double-click on Hide Windows Security Systray policy to edit it. Then, set the policy to Enabled and click Ok.
Note: If you want to re-enable the icon, set the policy to Not Configured or Disabled.
Method 5: Disabling Windows Defender icon from Registry Editor
One final method of disabling the Windows Defender icon is to use the Registry Editor. However, keep in mind that you will need to use an administrator account. Furthermore, the option is only available if you have Windows 10 build 1803 or older.
Here’s a quick guide on how you can disable the Windows Defender icon from Registry Editor:
- Open a new Run box by pressing Windows key + R. Then, type “regedit” and hit Enter to open Registry Editor.
- Inside Registry Editor, use the left-hand pane to navigate to the following location:
- Next, using the right pane, double-click on HideSystray and change the Value Data from 0 to 1, then hit OK.
Note: If HideSystray is not present, right-click inside the right pane and click on New > Dword 32-bit and name it HideSystray. - Reboot your computer for the changes to take effect. If you ever want to re-enable the Windows Defender icon, return to HideSystray using the steps above and set the value to 0.
How to remove blue and yellow shield from an icon in Windows 10
If you notice an application icon or system icon with a blue and yellow shield (Icon overlay) at the corner, it means that the applications need to run with administrator privileges. When you run such an application, you will get a UAC prompt. While they are there for security reasons, it gets annoying to get the prompt every time you run it. In this post, we will show how to remove the blue and yellow shield from an icon in Windows 10.
Why is UAC important?
UAC or User Account Control setting makes sure that no program can run with admin privileges unless allowed by the user. It prevents potentially harmful programs from making changes to your computer. It is best to keep this setting to default and not make any changes unless extremely necessary.
Remove the blue & yellow shield from an icon
The blue and yellow shield is an Icon Overlay. If you wish to remove it, try our suggestions – one is sure to help you:
- Reinstall application and set Compatibility
- Change UAC Level
- Use NirCMD to remove shield but keep UAC
- Bypass UAC for these programs.
Once you have done this, you may need to clear the Icons cache.
1] Reinstall application and set Compatibility
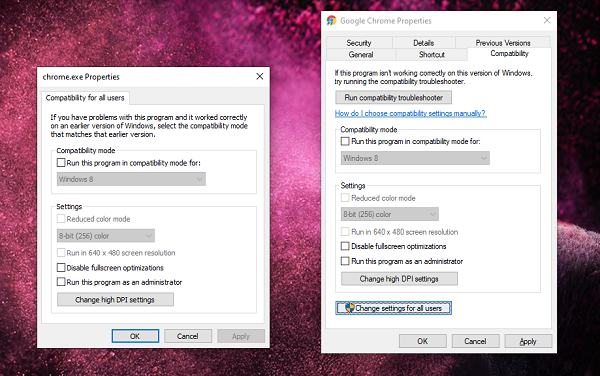
The application icon on which you notice these shields are usually shortcuts. They are to signify that UAC prompt will appear every time you run the application.
- First, uninstall the application, and then reinstall it. Make sure not to run the application unless the rest of the steps are complete.
- Right-click on the shortcut icon.
- Select Properties from the menu.
- Switch to the Compatibility tab and uncheck the box which says Run this program as an administrator.
- Click Apply and OK.
It will remove the shield icons from the application icon in Windows.
2] Change UAC Level
Use WIN + Q to launch search bar. Type UAC to reveal the User Account Control setting. Once you open the setting, you can lower the level.
Choose the setting which says – Notify only when apps try to make changes to my computer. Once you choose this option, you will not get any warning when you run the apps with a blue or yellow shield icon. However, this will become a permanent setting, which can be dangerous if you accidentally run a rouge application.
3] Use NirCMD to remove icon but keep UAC
NirCMD is a command-line utility which allows the user to run applications without displaying any UAC. We can use this to disable the UAC prompt. However, it only bypasses the prompt but makes sure to run it with elevated privileges as expected.
Download nircmd.exe from here and copy it into your C:\Windows folder
Open the Properties dialogue box for the shortcut for which want to rid of the shield symbol
Click ‘Change icon’ and confirm with ‘OK’ right away without any changes
Add ‘nircmd elevate ‘ at the beginning of the target application path-
Confirm with ‘OK.’ The shield symbol will be gone.
The admin privileges will make sure to launch the program with admin privileges, but without any UAC.
4] Bypass UAC for these programs
Read our exhaustive post to find out how you can bypass UAC for these applications.
If the above steps resolve the UAC prompt, but the shield icon remains, you may have to clear the Icon cache.
We hope you find this guide easy to follow and you were able to remove the remove blue and yellow shield icon from those applications.
How to Remove Double Arrows Overlay on Icons in Windows 10
In Windows 10, when youВ compress a file or folder, its icon will have a double blue arrows overlay at the top right corner to indicate that it’s a compressed file or folder.В If you are not happy to see the blue arrow, you can remove them. This article will show you how to remove the double blue arrows icon in Windows 10.
Way 1: Remove Blue Arrows Icons in Registry Editor
To remove double blue arrows icon on folders and files, you have to download the ZIP archive which contains the empty icon. It will be used instead of the blue arrows icon.
Step 1: Download transparent icon.
Step 2: Then move it into yourВ C:\Windows\System32В folder. If prompted to provide administrator permissions, click on Continue to proceed.
Step 4: In the registry editor, go to the following path:
HKEY_LOCAL_MACHINE\SOFTWARE\Microsoft\Windows\CurrentVersion\Explorer
Step 5: Create a new subkey namedВ Shell Icons.
Right-click on Explorer, select New > Key, then give it a name Shell Icons.
Step 6: Under the Shell Icons subkey, create a new string value and name itВ 179.
Step 7: Double-click on 179 string value. Set its value to the full path the «blank.ico» file.
«C:\Windows\blank.ico»
When done, close registry editor. Restart your PC, you’ll find blue arrows icon is removed.
Way 2: Remove Blue Arrows Icon in Properties
To remove double blue arrows icon in file or folder Properties, here’s how:
Step 1: Press Win + E keys to open File Explorer. Go to Document directory.
Step 2: Right-click on that folder with double blue overlaid and then select Properties.
Step 3: Under the General tab, select Advanced in the bottom right corner.
Step 4: Clear Compress contents to save disk space checkbox. Click OK.
Step 5: In the Properties window, then Apply.
Select Apply changes to this folders, subfolders and files option to confirm attribute changes.
You’ll see the double blue arrow disappear. You can repeat do this action for other folders in different directories.


