- Как убрать надпись активация Windows?
- СТАНДАРТНЫЙ СПОСОБ
- УДАЛЕНИЕ НАДПИСИ ОБ АКТИВАЦИИ ИЗ РЕЕСТРА WINDOWS
- ИСПОЛЬЗОВАНИЕ СТОРОННИХ ПРОГРАММ
- Remove Activate Windows 10 watermark Permanently [Updated 2021]
- Activate windows watermark keeps coming back after apply various solutions? Here we have unique methods, to remove windows 10 activation watermark permanently from your desktop
- How to remove activate windows watermark?
- Remove active windows watermark with help of cmd
- Registry Tweak to remove Activate windows watermark
- Windows watermark remover tool
- Disable Activate Windows Watermark by using Ease of Access
- www.makeuseof.com
- Follow MUO
- How to Remove the Activate Windows 10 Watermark: 8 Methods to Try
- What Is Windows Activation?
- What It’s Like to Use Non-Activated Windows 10
- How to Check Your Windows 10 Activation Status
- 1. Enter a Valid Product Key
- 2. Run the Activation Troubleshooter
- 3. Review Enterprise Activation
- 4. Purchase a New Windows 10 Key
- Other Windows 10 Activation Issues
- Possible Workarounds to Remove the «Activate Windows» Watermark
- 5. Try the Universal Watermark Disabler
- 6. Disable Windows 10 Tips
- 7. Kill and Restart File Explorer
- 8. Edit Registry Values
- Be Careful With Watermark Removal Methods
- Banish the «Activate Windows» Watermark
- Subscribe To Our Newsletter
- One More Step…!
Как убрать надпись активация Windows?
Сразу после установки Windows либо спустя некоторое время после (обычно 30 дней) в правом нижнем углу монитора над системным треем появляется надпись о необходимости активации операционной системы. Этот своеобразный водяной знак располагается поверх всех окон, бросается в глаза пользователю, потому сильно мешает (особенно при просмотре видео в полноэкранном режиме).
Убрать надпись «Активация Windows» можно не только путем приобретения дорогостоящей лицензии и последующей официальной активации ОС, но и другими способами. Рассмотрим их.
СТАНДАРТНЫЙ СПОСОБ
Сразу отметим, что стандартный способ удаления надписи об активации может не сработать на некоторых компьютерах. Все зависит от сборки Windows. Если это какая-нибудь любительская сборка (какими сегодня переполнен интернет), способ может и не сработать. Но попробовать стоит — это не сложно и не долго:
- Перейдите из меню «Пуск» в «Панель управления». Если у вас Windows 10, введите в системную поисковую строку (расположена радом с «Пуском») запрос «Панель управления», затем кликните по появившемуся значку.

- Перейдите в раздел «Система и безопасность».

- Затем откройте раздел «Система и безопасность».

- В левой части окна кликните по ссылке «Изменить параметры компонента «Центр безопасности и обслуживания»».

- В разделе «Сообщения о безопасности» снимите галочку с пункта «Активация Windows».

Как видно из изображения выше, пункт «Активация Windows» не активен, т.е. по нему невозможно кликнуть. Обычно такое наблюдается у уже активированных (т.е. купленных) систем. Но бывает и в случаях с использованием любительских сборок Windows. Если и в вашем случае галочку снять невозможно, переходите к следующему разделу статьи.
УДАЛЕНИЕ НАДПИСИ ОБ АКТИВАЦИИ ИЗ РЕЕСТРА WINDOWS
Способ заключается во внесении некоторых изменений в системный реестр:
- Сначала запустите стандартное приложение «Regedit». Самый простой способ — нажмите на клавиатуре комбинацию клавиш Win + R, впишите regedit в отобразившееся окошко, затем нажмите «ОК».

- Далее, используя древо папок в левой части окна, нужно перейти в раздел «Activation», местоположение которого зависит от версии Windows. Для Windows Vista:
HKEY_LOCAL_MACHINE\SOFTWARE\Microsoft\Windows NT\CurrentVersion\SL\Activation
HKEY_LOCAL_MACHINE\SOFTWARE\Microsoft\WindowsNT\CurrentVersion\SoftwareProtectionPlatform\Activation
- Теперь откройте в правой части окна программы Regedit параметр «Manual» и введите в поле «Значение» цифру «1», нажмите ОК. Проделайте то же самое с параметром «NotificationDisabled». Значение параметра «ActivationInterval» смените на «000dbba0», а «DownlevelActivation» (если присутствует) на «00000002».

К сожалению, и этот способ может подвести. Если и в вашем случае он не сработал, переходите дальне.
ИСПОЛЬЗОВАНИЕ СТОРОННИХ ПРОГРАММ
Внимание! Этот способ нелегален. Мы рекомендуем пользоваться только официальными версиями Windows!
Существует несколько распространенных утилит, позволяющих решить проблему с водяным знаком активации Windows. Большинство из них определяются антивирусом и/или встроенным «Защитником Windows» как вирусное ПО. Оно и понятно — такие программы вносят изменения в систему и позволяют обойти защиту от нелегальной активации.
Остались вопросы, предложения или замечания? Свяжитесь с нами и задайте вопрос.
Remove Activate Windows 10 watermark Permanently [Updated 2021]
Activate windows watermark keeps coming back after apply various solutions? Here we have unique methods, to remove windows 10 activation watermark permanently from your desktop
Are you getting “Activate Windows- Go to settings to activate windows” watermark on your desktop? Or Looking for the way to remove activate windows watermark permanently from your desktop? This is because your windows license has expired. If you have a product key then you can activate it directly, to remove activate Windows watermark. But if you don’t have one, here how to remove activate windows 10 watermark without a product key.
How to remove activate windows watermark?
Applied different solutions but still, activate windows watermark keeps coming back? Don’t worry here in this post we have the working ways to remove windows 10 watermark Permanently.
Remove active windows watermark with help of cmd
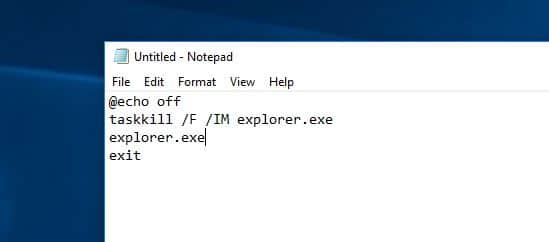
With a simple notepad trick, you can easily remove Activate Windows 10 Watermark from your desktop. Let’s see how to do it.
- First, open notepad on your PC You can do this by click on the start menu search type notepad and hit the enter key. Now on notepad type, the below commands :
@echo off
taskkill /F /IM explorer.exe
explorer.exe
exit
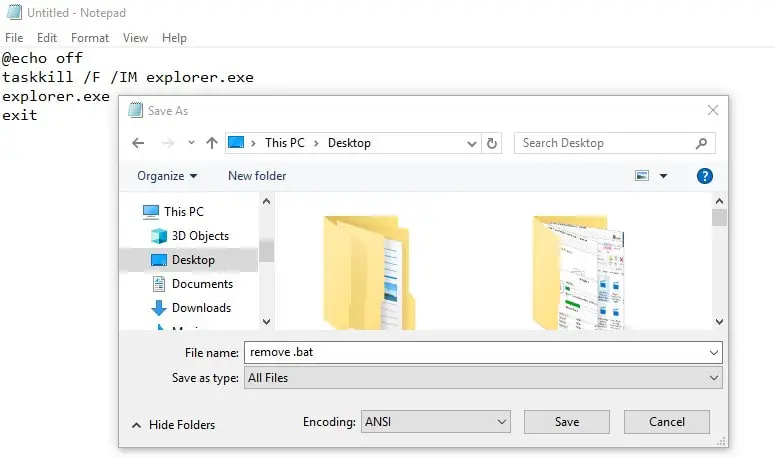
- Go to File and click “Save as”. Here select the location where you want to save the file. Then Change the save as type to All Files (*.*) and Give the file name as “ remove.bat”
- Now open the file location where you saved it. You will see a file as shown below image. Right-click on the remove.bat file and click on “Run as administrator”
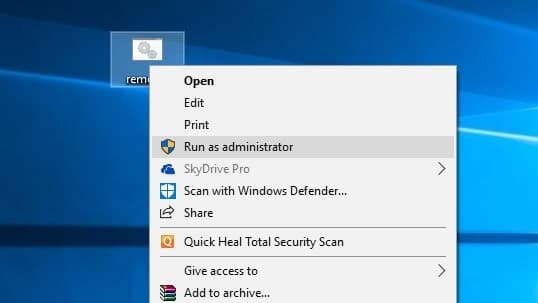
A command prompt will be opened and closed itself, Now restart your laptop or desktop. That’s all there is no more “activate windows go to settings to activate windows” on your Desktop.
Registry Tweak to remove Activate windows watermark
Here another tweak to remove activate windows 10 watermark using the windows registry editor.
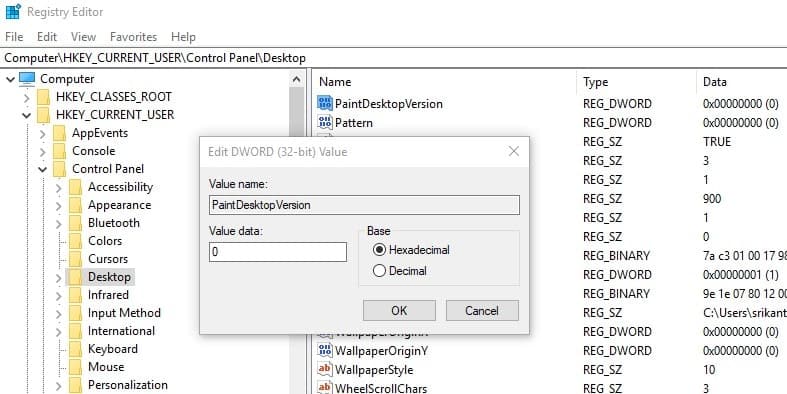
- Open Windows registry editor by Press Windows + R, type regedit and hit the enter key.
- Then expand HKEY_CURRENT_USER\Control Panel\Desktop
- Double click on the value “PaintDesktopVersion” in the right-hand window.
- And Change the value “1” to a “0” and click OK to save changes.
- Close registry editor and any other programs and restart your computer.
In addition, refer to this video for one more registry tweak that help remove activate windows watermark on windows 10.
Windows watermark remover tool
Still activate windows watermark keeps coming back? Y ou can use a third party windows watermark remover tool, “Universal Watermark Disabler 1.0.0.6” which helps remove all kinds of watermarks in Windows 10.
Running this tool didn’t delete any branding strings (for example does not modify system files) only remove watermarks including Test Mode, Build string in the evaluation and pre-release builds,
- Download ‘Universal Watermark Disabler’ here,
- locate and unzip the file in the download folder
- save and close all applications running on your computer
- Finally, double click on uwd.exe to run the tool, Click yes if UAC prompt for permission,
- Click on install, The application will run and automatically restart your computer.
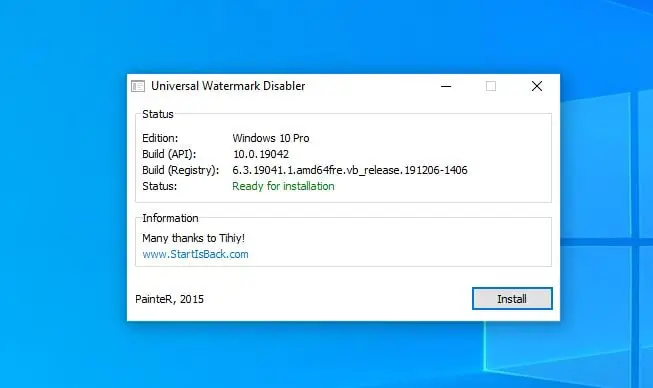
- On the next start when you log in back to your machine you will notice the remove windows activation message disappeared.
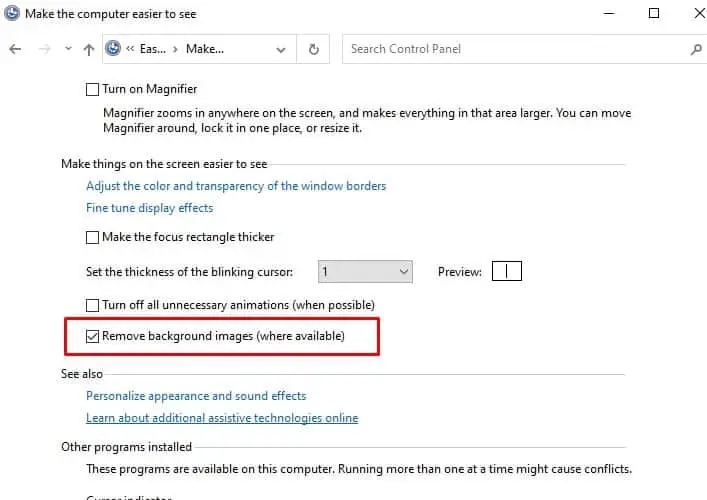
Disable Activate Windows Watermark by using Ease of Access
Yes, also you can also remove the windows 10 activation watermark from the ease of access options.
- Press Windows key + S type control panel and select the first result,
- Go to Ease of Access Centre (to get this option make sure to Change control panel view by large icons)
- Click on Make the computer easier to see, scroll down to the bottom and check the mark on Remove background images (where available)
- Click ok and restart your PC and check the status of remove the windows 10 activation watermark.
that’s all, did the above solutions help remove activate windows watermark on windows 10? Let us know in the comments below.
Sponsored content:
Did you know you can remotely access your Windows desktop applications from anywhere on any device with high-performance XenDesktop from CloudDesktopOnline powered with top-notch support from Apps4Rent.
www.makeuseof.com
Follow MUO
How to Remove the Activate Windows 10 Watermark: 8 Methods to Try
Wondering how to remove the «activate Windows 10» watermark? Here’s how to activate Windows or use a workaround to remove it.
Seeing the Activate Windows watermark in the corner of your Windows 10 desktop? While it’s a minor annoyance, this can sometimes appear even if you’ve activated Windows properly. And it can get in the way of what you’re working on.
We explain what Windows activation means and how you can remove the «activate Windows» watermark in Windows 10.
What Is Windows Activation?
Before we proceed, let’s first briefly explain what Windows activation is. See our Windows 10 activation FAQ for more information.
While you can download Windows 10 freely from Microsoft and install it on any computer at no cost, doing so does not activate the operating system. Activation checks your copy of Windows with Microsoft’s servers to make sure that it’s genuine. You have two main ways to activate Windows 10: with a product key, or through a digital license.
You’ll receive a product key if you buy a Windows 10 license from Microsoft or another retailer. If you purchased your PC ready-built, it also likely came with a product key. Conversely, those who upgraded to Windows 10 from a licensed copy of Windows 7 or Windows 8.1 have a digital license and don’t need a product key for activation.
Windows 10 allows you to link your digital license with your Microsoft account, which makes reactivating it in the future much easier (as we’ll see).
What It’s Like to Use Non-Activated Windows 10
As it turns out, a non-activated copy of Windows 10 works almost exactly the same as an activated one, with a few minor limitations.
You’ll see the «activate Windows» watermark in the bottom-right corner of your screen, plus a message in Settings letting you know that Windows isn’t activated. Additionally, you can’t use any of the items in the Personalization category of Settings. This prevents you from changing the wallpaper, theme color, Start menu, and similar.
If you don’t mind this, however, Windows 10 otherwise functions as normal. You’ll still receive system updates and don’t have to deal with any nagging popups.
Now that you understand activation, let’s take a look at some of the most common reasons this watermark appears. We’ll then dive into how to potentially remove the «activate Windows» watermark using other methods.
How to Check Your Windows 10 Activation Status
To find out why you have the «activate Windows» watermark on your system, head to Settings > Update & Security > Activation. Here you’ll see the status of your Windows 10 license and what you can do to activate it and remove the watermark.
Now that you know what the issue is, let’s review some of the common fixes for non-activated Windows 10. You may need to search for your specific error code if your issue isn’t mentioned here.
1. Enter a Valid Product Key
You can see in the above screenshot that Windows 10 is not activated because the previous version of Windows wasn’t activated either. In this virtual machine, we upgraded an unlicensed copy of Windows 7 to Windows 10 and never entered a product key during the upgrade.
Because of this, Windows 10 is not activated and thus shows the watermark. A similar situation would happen if you installed a fresh copy of Windows 10 on a machine and didn’t enter a product key upon installation.
The easy way to resolve this and remove the Windows 10 watermark is to enter a genuine product key, if you have one. Thankfully, Windows 10 accepts any valid Windows 7, Windows 8.1, or Windows 10 key. If you still have the sticker on your old Windows 7 computer, it should work to activate Windows 10.
Click Change product key and enter your 25-digit product key to activate Windows. If you enter a valid key that hasn’t already been used too many times, Windows 10 should activate and remove the watermark.
If you have an activated Windows 7 or Windows 8.1 machine but don’t know its product key, see how to recover your Windows product key.
2. Run the Activation Troubleshooter
Another common activation issue occurs when you make significant upgrades to your computer, such as replacing the motherboard. Windows 10 ties your digital license to your PC’s components, so when you make major changes, it no longer recognizes it as your computer.
To resolve this, you can run the Windows activation troubleshooter. This will allow you to re-link your Microsoft account to your computer and activate Windows again. Head to Settings > Update & Security > Activation again and click Troubleshoot. Once the troubleshooter starts, click I changed hardware on this device recently. This will prompt you to log into your Microsoft account.
If you haven’t linked your digital license to your Microsoft account prior to the hardware change, this won’t work. You can try contacting Microsoft support to get it sorted out, but there’s no guarantee of success.
3. Review Enterprise Activation
A less common problem, but one still worth mentioning, occurs in business situations. If Windows was activated from an enterprise server, and it loses contact with that server, Windows will show the «activate Windows» watermark after some time.
When you visit the Activation menu, you’ll see a message such as We can’t activate Windows on this device because we can’t connect to your organization’s activation server. In this case, you need to reconnect your computer to your company’s network to reactivate it.
You can try using a company VPN to do this if you can’t physically connect it. If you’re not sure about this, talk with your company’s IT department.
4. Purchase a New Windows 10 Key
If you don’t have a valid Windows key, never connected a digital license to your Microsoft account, and your issue doesn’t lie with enterprise activation, your only (legitimate) option left is to buy a new product key for Windows 10.
You can do this right from the Activation menu in Settings; click Go to Store. Here you can buy a product key for Windows 10 Home ($139) or Windows 10 Pro ($200) depending on which version you have installed.
If you don’t want to pay this much, have a look around the web for alternative retailers. For example, Walmart offers an OEM copy of Windows 10 Home for around $105 at the time of writing. You may be able to find even steeper discounts from third-party sites, but you run the risk of buying a phony key. Follow our tips for getting a cheap and legal Windows 10 license for more ideas.
Once you do activate Windows 10 with a new key, head back to the Activation menu and makes sure it states that your activation is linked to your Microsoft account. If it doesn’t say this, click the Add an account button below. Sign into your Microsoft account so you can reactivate more easily in the future if needed.
Other Windows 10 Activation Issues
The above list of activation scenarios isn’t exhaustive. For example, you might have a mismatched product key and edition of Windows installed. A key for Windows 10 Home won’t activate Windows 10 Pro.
Additionally, Microsoft limits the number of times you can use one product key to activate Windows. If you’ve used the key a lot in the past, it’s possible that you’ve exhausted its uses.
Possible Workarounds to Remove the «Activate Windows» Watermark
If none of the above methods to activate Windows worked for you, and you don’t want to buy a license, you may wonder how to get rid of the «activate Windows» watermark without actually activating it.
We’ll briefly cover a few workarounds for this, but you should know that they aren’t guaranteed to solve the problem. They may work for some time, then revert in the future. Because of this, they aren’t long-term solutions, but can be useful if you want to take a screenshot without the watermark or remove it for a livestream.
Take them with a grain of salt and know that the best way to remove the «activate Windows» watermark is by actually activating it. Also, keep in mind that these methods will only hide the watermark. They won’t actually activate Windows 10 or enable access to the locked features.
5. Try the Universal Watermark Disabler
Winaero offers a tool called Universal Watermark Disabler, which is a quick solution for a Windows 10 watermark remover. Simply download and open it, then choose Install from the dialog box.
This will sign you out of your computer, so make sure you’ve saved your work. After you sign back in, the watermark should be gone. However, this hasn’t worked in all tests, so it’s not a perfect method.
6. Disable Windows 10 Tips
Some people have reported that heading to Settings > System > Notifications & actions and disabling both Show me the Windows welcome experience. and Get tips, tricks, and suggestions. will disable the Windows 10 watermark after a restart.
Your mileage may vary with this, but it’s worth a quick try.
7. Kill and Restart File Explorer
Another possible method is running a batch command that includes the command taskkill /F /IM explorer.exe. All this does is restart File Explorer and the process that runs under it.
It’s not directly related to the watermark, so even if this makes the watermark disappear temporarily, it will most likely come back after you reboot or sign out and back into your PC.
Killing Explorer can also cause some strange behavior in Windows, so you shouldn’t try this unless you really have to.
8. Edit Registry Values
The final oft-cited method for removing the Windows 10 watermark is a Registry edit. This instructs you to find a key called PaintDesktopVersion and set it to 0.
However, this value is usually already set to 0 (including on our test non-activated Windows 10 machine). Thus, it either won’t have any effect or will only work for a short time.
Be Careful With Watermark Removal Methods
You should avoid downloading random software that claims to disable watermarks or activate Windows for you, as they could include malware. Be careful about trying other methods that require modifying or deleting system files, since doing so can cause problems to your system.
These aren’t worth the risk just to remove a small watermark. You can use the removal app or Explorer restart when needed—otherwise, you should learn to live with the watermark or activate Windows properly.
Banish the «Activate Windows» Watermark
We’ve taken a look at what Windows activation is, where the «activate Windows» watermark comes from, and several ways to remove it. Ultimately, the most reliable way to permanently remove the Windows 10 watermark is activating the OS. And you don’t necessarily have to buy a new key to do this, as we’ve seen.
While the workarounds may prove helpful for a short time, the watermark will probably come back before long. If you don’t mind the lack of personalization options, you’ll probably get used to the watermark before long.
Using one of Microsoft’s generic product keys, anyone can install Windows 10. Here’s what you need to know, including some limitations.

Ben is a Deputy Editor and the Onboarding Manager at MakeUseOf. He left his IT job to write full-time in 2016 and has never looked back. He’s been covering tech tutorials, video game recommendations, and more as a professional writer for over six years.
Subscribe To Our Newsletter
Join our newsletter for tech tips, reviews, free ebooks, and exclusive deals!
One More Step…!
Please confirm your email address in the email we just sent you.


