- How to Remove Services in Windows 10
- Option 1 – Command
- Option 2 – Registry
- You Might Also Like
- Reader Interactions
- Comments
- Did this help? Let us know! Cancel reply
- sc.exe удалить sc.exe delete
- Синтаксис Syntax
- Параметры Parameters
- Примеры Examples
- Практическое руководство. Установка и удаление служб Windows How to: Install and uninstall Windows services
- Установка с помощью программы InstallUtil.exe Install using InstallUtil.exe utility
- Удаление с помощью служебной программы InstallUtil.exe Uninstall using InstallUtil.exe utility
- Установка с помощью PowerShell Install using PowerShell
- Удаление с помощью PowerShell Uninstall using PowerShell
- Удаляем службу в Windows 10
- Удаление служб
- Способ 1: «Командная строка»
- Способ 2: Реестр и файлы служб
- Заключение
How to Remove Services in Windows 10
By Mitch Bartlett 11 Comments
Remove services from the list in the services.msc utility in Microsoft Windows with one of these two options.
Option 1 – Command
- You can also remove services using a command line. Hold down the Windows Key, then press “R” to bring up the Run dialog.
- Type “SC DELETE servicename“, then press “Enter“.
“servicename” should be the exact name of the service.
Option 2 – Registry
- Hold down the Windows Key and press “R“.
- Type “regedit“, then select “OK“.
- Navigate to the following location in the registry:
- HKEY_LOCAL_MACHINE
- System
- CurrentControlSet
- Services
- There are folders under “Services” that contain each service. The “DisplayName” values in each of these folders equals the Service Name. Go through the list or use the “Edit” > “Find” menu to search for the service you wish to remove.
These steps only delete the name of the service. How do I delete the actual program that is running as a service?
You can track it down with these steps:
- Right-click the taskbar and choose “Task Manager“.
- Select the “Services” tab.
- Right-click the service you wish to delete, then choose “Go to details“.
- The process related to the service is highlighted. If you wish to remove it, you can track it down by right-clicking it and selecting “Open file location“. From there, either uninstall the related program from “Add/Remove Programs” or delete the EXE file as desired.
You Might Also Like
Filed Under: Windows Tagged With: Windows 10
Reader Interactions
Comments
Rishu kumar dubey says
nothing worked for me as above
for me, the solution was
1. Get the service name, services.msc or taskmanager > services may be the point from where to get the servicename.
2. Open command prompt as admin
3. Use the command: SC DELETE “ServiceName”
4. Press Enter or Ok
Now can check if it is deleted or not with below
All data system services delete and cancel network sharing information system services all media reports that and application data all delete and cancel all like and comment and post and sharing information data all covid 19 and cancel delete
Surjit Dadhwal says
SC DELETE ServiceName did not worked for me. Few points that might be helpful:
1) Use double quotes around ServiceName. So SC DELETE “ServiceName”
2) If 1 does not work then use .exe with SC. So SC.exe DELETE “ServiceName”
Number 2 worked for me.
Maybe take a look here if you are stuck with deleting the service:
Juho Leiniö says
Thanks a ton! The option 1 worked for me.
Thanks! it works for me!
Command –> SC DELETE “ServiceName” binPath= “C:\Program Files (x86)\XXX\ServiceName.exe -c Service.config”
Run the command prompt as administrator:
click start -> search for cmd -> right click -> choose “run as administrator
then run the command in step 1, this worked for me on windows 10
2 one worked.Thanks a lot.
Larry Kavounas says
Friends, this is very helpful! I learned a lot!
Can you please finish the option #2:
Once I find the entry in the registry, what do I do?
I imagine right-mouse-click on the yellow folder and delete?
can you please confirm?
Thanks
Larry
no , i tried both tricks, and both failed.
I first tried the RUN command, and nothing happened, the services were still being shown up on Service Applet listing.
Then i tried the registry trick, but still the service is still being shown on the services applet list., although this time the description given in the services list applet has changed to “Failed to load description. Error code 2”
With the registry trick only its description is lost, service is still on the list
(NB: i have stopped the services before trying these tricks)
Did this help? Let us know! Cancel reply
This site uses Akismet to reduce spam. Learn how your comment data is processed.
sc.exe удалить sc.exe delete
Удаляет подраздел службы из реестра. Deletes a service subkey from the registry. Если служба запущена или другой процесс имеет открытый обработчик, служба помечается для удаления. If the service is running or if another process has an open handle to the service, the service is marked for deletion.
Мы не рекомендуем использовать эту команду для удаления встроенных служб операционной системы, таких как DHCP, DNS или службы IIS. We don’t recommend you to use this command to delete built-in operating system services such as DHCP, DNS, or Internet Information Services. Сведения об установке, удалении и перенастройке ролей операционной системы, служб и компонентов см. в разделе Установка и удаление ролей, служб ролей или компонентов . To install, remove, or reconfigure operating system roles, services and components, see Install or Uninstall Roles, Role Services, or Features
Синтаксис Syntax
Параметры Parameters
| Параметр Parameter | Описание Description |
|---|---|
| Указывает имя удаленного сервера, на котором расположена служба. Specifies the name of the remote server on which the service is located. Имя должно использовать формат UNC (например, \ MyServer). The name must use the Universal Naming Convention (UNC) format (for example, \myserver). Чтобы запустить SC.exe локально, не используйте этот параметр. To run SC.exe locally, don’t use this parameter. | |
| Указывает имя службы, возвращенное операцией жеткэйнаме . Specifies the service name returned by the getkeyname operation. | |
| /? /? | Отображение справки в командной строке. Displays help at the command prompt. |
Примеры Examples
Чтобы удалить подраздел Service невсерв из реестра на локальном компьютере, введите: To delete the service subkey NewServ from the registry on the local computer, type:
Практическое руководство. Установка и удаление служб Windows How to: Install and uninstall Windows services
Если вы разрабатываете службу Windows с помощью .NET Framework, вы можете быстро установить приложение службы с помощью служебной программы командной строки InstallUtil.exe или PowerShell. If you’re developing a Windows service with the .NET Framework, you can quickly install your service app by using the InstallUtil.exe command-line utility or PowerShell. Если вы являетесь разработчиком и хотите создать службу Windows, которую пользователи могут устанавливать и удалять, можно использовать набор инструментов WiX или коммерческие средства, такие как Advanced Installer, InstallShield или другие. Developers who want to release a Windows service that users can install and uninstall can use the free WiX Toolset or commercial tools like Advanced Installer, InstallShield, or others. См. сведения о создании пакета установщика (классическое приложение Windows). For more information, see Create an installer package (Windows desktop).
Если вы хотите удалить службу на своем компьютере, не выполняйте процедуру, описанную в этой статье. If you want to uninstall a service from your computer, don’t follow the steps in this article. Вместо этого определите, какая программа (или программный пакет) установила эту службу, а затем выберите Приложения в параметрах, чтобы удалить эту программу. Instead, find out which program or software package installed the service, and then choose Apps in Settings to uninstall that program. Следует отметить, что многие службы являются составной частью ОС Windows. Если их удалить, это может привести к нестабильной работе системы. Note that many services are integral parts of Windows; if you remove them, you might cause system instability.
Чтобы использовать процедуру, описанную в этой статье, сначала необходимо добавить установщик службы в свою службу Windows. To use the steps in this article, you first need to add a service installer to your Windows service. Дополнительные сведения см. в разделе Пошаговое руководство: создание диспетчера служб Windows. For more information, see Walkthrough: Creating a Windows service app.
Проекты служб Windows нельзя запускать непосредственно из среды разработки Visual Studio путем нажатия клавиши F5. You can’t run Windows service projects directly from the Visual Studio development environment by pressing F5. Перед запуском проекта необходимо установить службу в проекте. Before you can run the project, you must install the service in the project.
Запустите обозреватель сервера и убедитесь, что служба установлена или удалена. You can use Server Explorer to verify that you’ve installed or uninstalled your service.
Установка с помощью программы InstallUtil.exe Install using InstallUtil.exe utility
В меню Пуск выберите каталог Visual Studio и затем Командная строка разработчика для VS . From the Start menu, select the Visual Studio directory, then select Developer Command Prompt for VS .
Появится командная строка разработчика для Visual Studio. The Developer Command Prompt for Visual Studio appears.
Откройте каталог, где находится скомпилированный исполняемый файл вашего проекта. Access the directory where your project’s compiled executable file is located.
Запустите InstallUtil.exe из командной строки, указав исполняемый файл проекта в качестве параметра: Run InstallUtil.exe from the command prompt with your project’s executable as a parameter:
Если вы используете командную строку разработчика для Visual Studio, системный путь должен указывать на файл InstallUtil.exe. If you’re using the Developer Command Prompt for Visual Studio, InstallUtil.exe should be on the system path. Если это не так, можно добавить его в путь или использовать полный путь для его вызова. Otherwise, you can add it to the path, or use the fully qualified path to invoke it. Этот инструмент устанавливается вместе с платформой .NET Framework в папку %WINDIR%\Microsoft.NET\Framework[64]\ . This tool is installed with the .NET Framework in %WINDIR%\Microsoft.NET\Framework[64]\ .
Пример: For example:
- Для 32-разрядной версии .NET Framework 4 или 4.5 и более поздних версий: если каталог установки Windows — C:\Windows, по умолчанию используется путь C:\Windows\Microsoft.NET\Framework\v4.0.30319\InstallUtil.exe. For the 32-bit version of the .NET Framework 4 or 4.5 and later, if your Windows installation directory is C:\Windows, the default path is C:\Windows\Microsoft.NET\Framework\v4.0.30319\InstallUtil.exe.
- Для 64-разрядной версии .NET Framework 4 или 4.5 и более поздних версий: по умолчанию используется путь C:\Windows\Microsoft.NET\Framework64\v4.0.30319\InstallUtil.exe. For the 64-bit version of the .NET Framework 4 or 4.5 and later, the default path is C:\Windows\Microsoft.NET\Framework64\v4.0.30319\InstallUtil.exe.
Удаление с помощью служебной программы InstallUtil.exe Uninstall using InstallUtil.exe utility
В меню Пуск выберите каталог Visual Studio и затем Командная строка разработчика для VS . From the Start menu, select the Visual Studio directory, then select Developer Command Prompt for VS .
Появится командная строка разработчика для Visual Studio. The Developer Command Prompt for Visual Studio appears.
Запустите InstallUtil.exe из командной строки, указав выходные данные проекта в качестве параметра: Run InstallUtil.exe from the command prompt with your project’s output as a parameter:
После удаления исполняемого файла для службы сама служба может по-прежнему присутствовать в реестре. After the executable for a service is deleted, the service might still be present in the registry. В этом случае удалить запись службы из реестра можно с помощью команды sc delete. If that’s the case, use the command sc delete to remove the entry for the service from the registry.
Установка с помощью PowerShell Install using PowerShell
В меню Пуск выберите Каталог Windows PowerShell и Windows PowerShell. From the Start menu, select the Windows PowerShell directory, then select Windows PowerShell.
Откройте каталог, где находится скомпилированный исполняемый файл вашего проекта. Access the directory where your project’s compiled executable file is located.
Выполните командлет New-Service, указав в качестве параметров выходные данные проекта и имя службы. Run the New-Service cmdlet with the with your project’s output and a service name as parameters:
Удаление с помощью PowerShell Uninstall using PowerShell
В меню Пуск выберите Каталог Windows PowerShell и Windows PowerShell. From the Start menu, select the Windows PowerShell directory, then select Windows PowerShell.
Выполните командлет Remove-Service, указав в качестве параметра имя службы. Run the Remove-Service cmdlet with the name of your service as parameter:
После удаления исполняемого файла для службы сама служба может по-прежнему присутствовать в реестре. After the executable for a service is deleted, the service might still be present in the registry. В этом случае удалить запись службы из реестра можно с помощью команды sc delete. If that’s the case, use the command sc delete to remove the entry for the service from the registry.
Удаляем службу в Windows 10
Удаление служб
Необходимость выполнить данную процедуру обычно возникают при некорректной деинсталляции некоторых программ, добавляющих свои службы в систему. Такой «хвост» может создавать конфликты, вызывать различные ошибки или продолжать свою работу, производя действия, приводящие к изменениям параметров или файлов ОС. Довольно часто подобные сервисы появляются во время вирусной атаки, а после удаления вредителя остаются на диске. Далее мы рассмотрим два способа их удаления.
Способ 1: «Командная строка»
В нормальных условиях решить поставленную задачу можно с помощью консольной утилиты sc.exe, которая предназначена для управления системными службами. Для того чтобы дать ей правильную команду, сначала необходимо выяснить имя сервиса.
- Обращаемся к системному поиску, нажав на значок лупы возле кнопки «Пуск». Начинаем писать слово «Службы», а после того, как появится выдача, переходим к классическому приложению с соответствующим названием.

Ищем целевой сервис в списке и кликаем дважды по его названию.
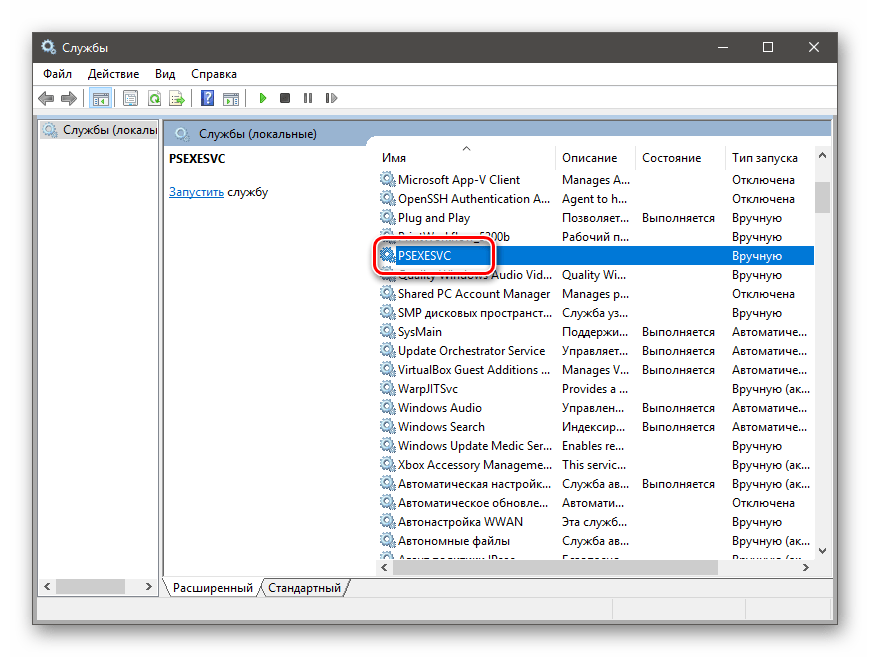
Имя располагается в верхней части окна. Оно уже выделено, так что можно просто скопировать строку в буфер обмена.
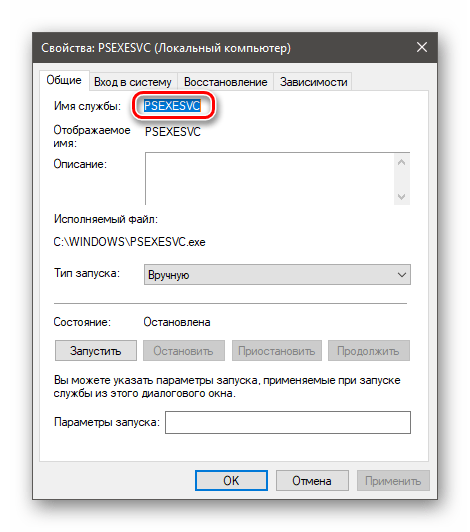
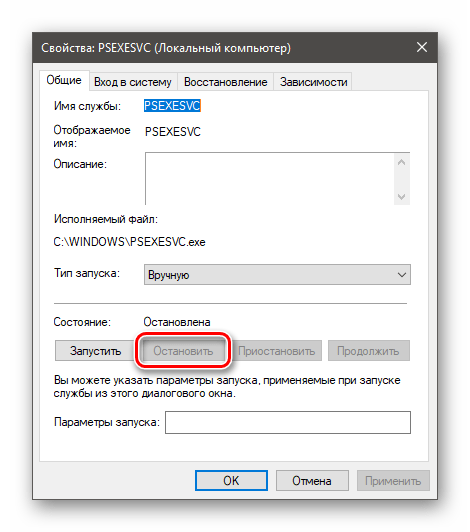
Если служба запущена, то ее нужно остановить. Иногда сделать это невозможно, в таком случае просто переходим к следующему шагу.
Закрываем все окна и запускаем «Командную строку» от имени администратора.
Подробнее: Открытие командной строки в Windows 10
Вводим команду для удаления с помощью sc.exe и жмем ENTER.
sc delete PSEXESVC
PSEXESVC – имя сервиса, которое мы скопировали в пункте 3. Вставить его в консоль можно, нажав в ней правую кнопку мыши. Об успешном выполнении операции нам скажет соответствующее сообщение в консоли.
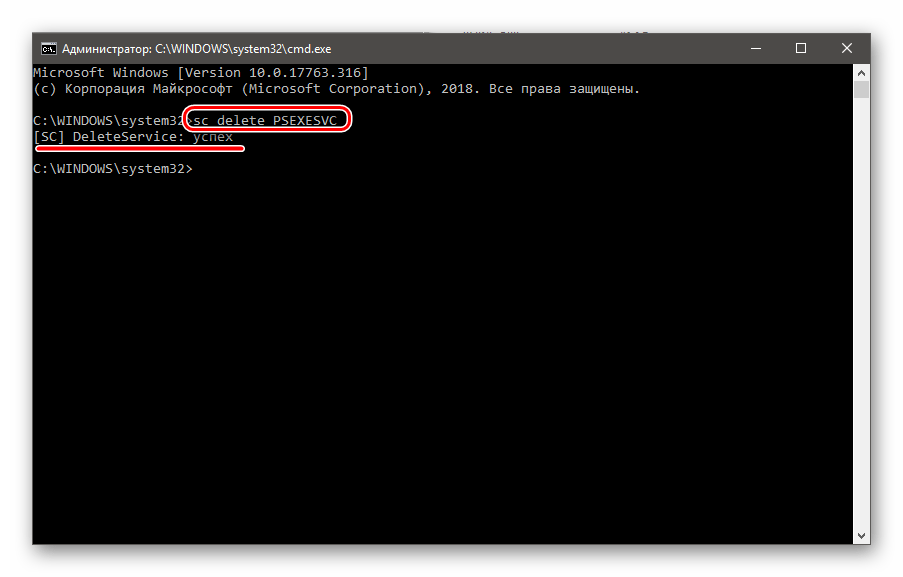
На этом процедура удаления завершена. Изменения вступят в силу после перезагрузки системы.
Способ 2: Реестр и файлы служб
Случаются ситуации, когда невозможно удалить сервис приведенным выше способом: отсутствие такового в оснастке «Службы» или отказ при выполнении операции в консоли. Здесь нам поможет ручное удаление как самого файла, так и его упоминания в системном реестре.
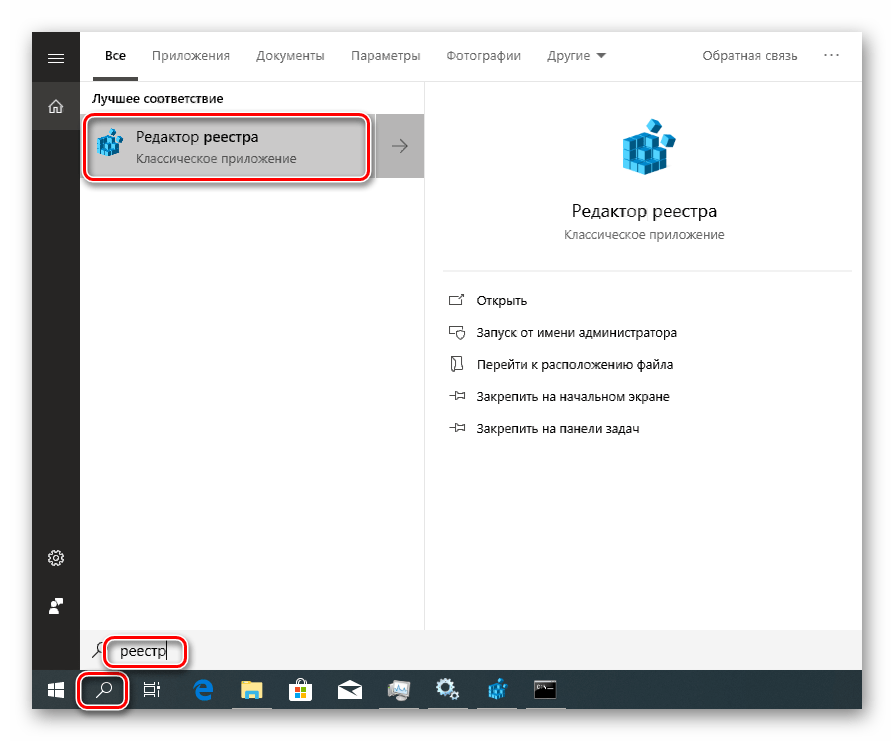
- Снова обращаемся к системному поиску, но на этот раз пишем «Реестр» и открываем редактор.
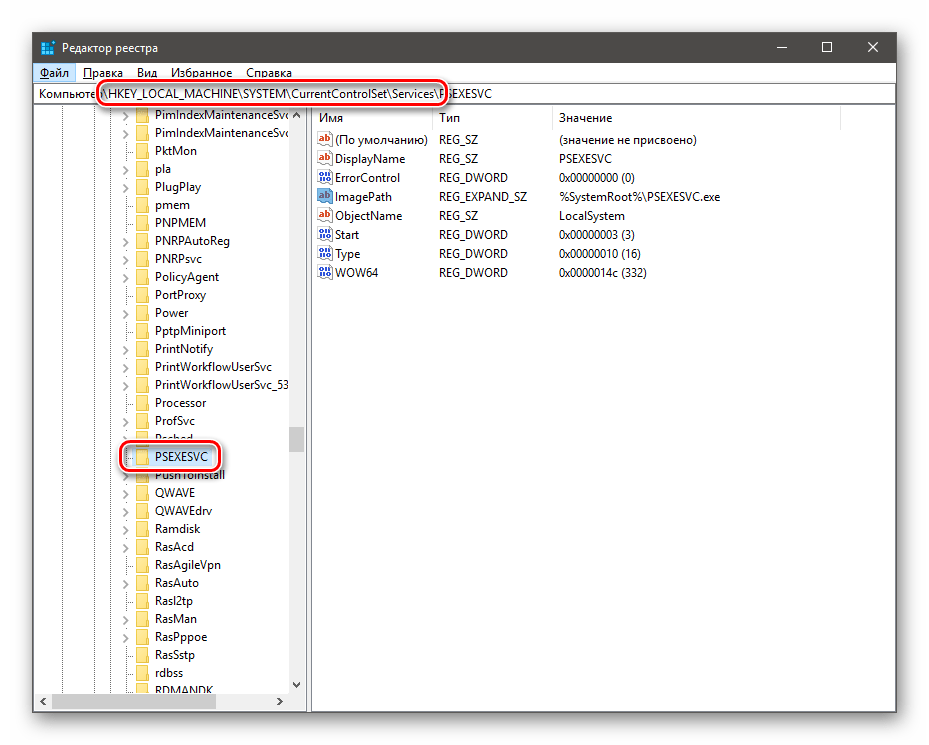
Переходим в ветку
Ищем папку с тем же названием, что и наша служба.
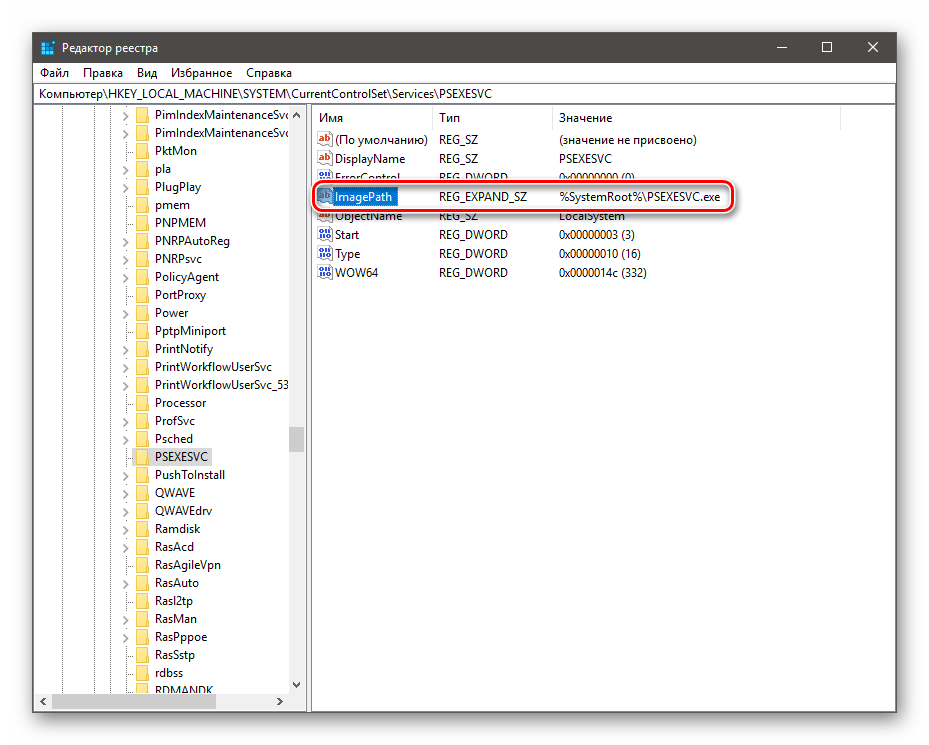
Смотрим на параметр
Он содержит путь к файлу службы (%SystemRoot% — это переменная среды, указывающая путь к папке «Windows» , то есть «C:\Windows» . В вашем случае буква диска может быть другая).
Читайте также: Переменные среды в Windows 10
Переходим по этому адресу и удаляем соответствующий файл (PSEXESVC.exe).
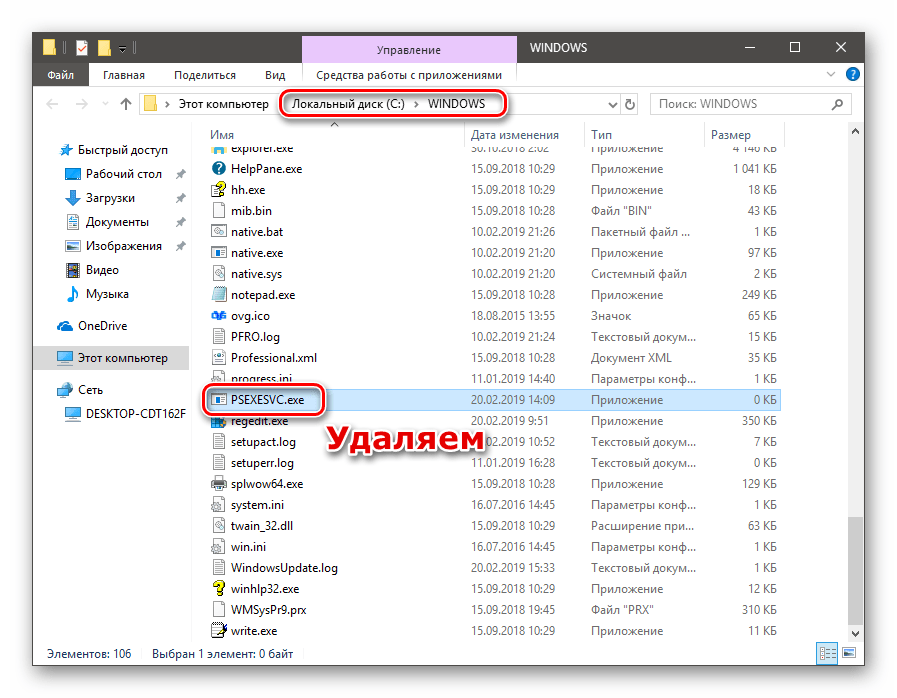
Если файл не удаляется, попробуйте сделать это в «Безопасном режиме», а в случае неудачи ознакомьтесь со статьей по ссылке ниже. Также почитайте комментарии к ней: там приведен еще один нестандартный способ.
Если файл не отображается по указанному пути, возможно, он имеет атрибут «Скрытый» и (или) «Системный». Для отображения таких ресурсов нажимаем кнопку «Параметры» на вкладке «Вид» в меню любой директории и выбираем «Изменить параметры папок и поиска».
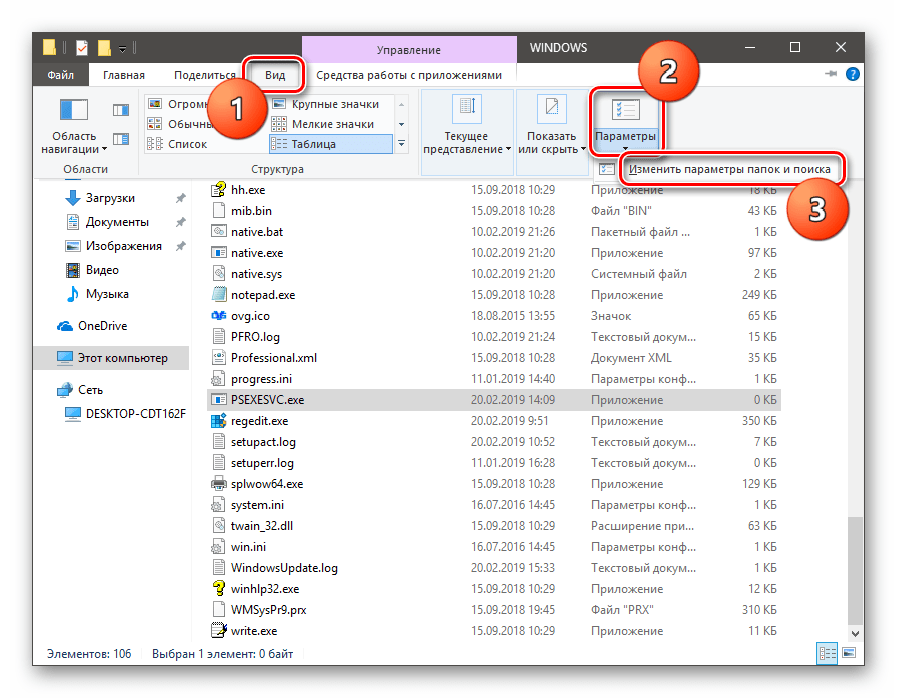
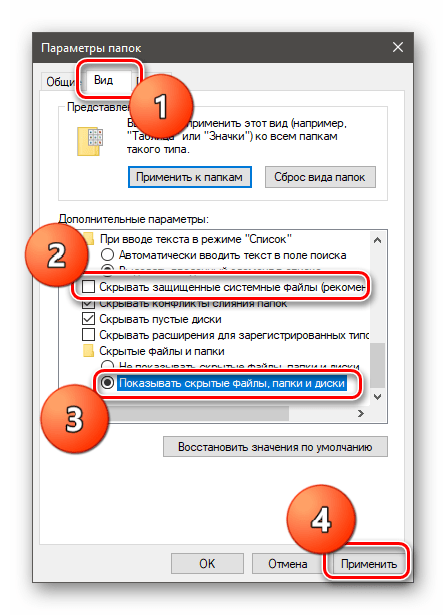
Здесь, в разделе «Вид» снимаем галку возле пункта, скрывающего системные файлы, и переключаемся на отображение скрытых папок. Жмем «Применить».
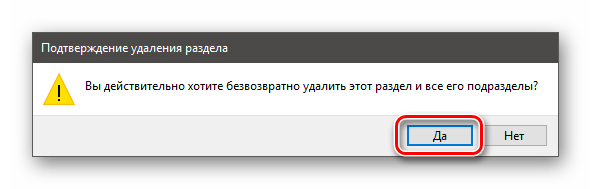
После того, как файл будет удален, или не найден (такое бывает), или путь к нему не указан, возвращаемся в редактор реестра и целиком удаляем папку с именем службы (ПКМ – «Удалить»).
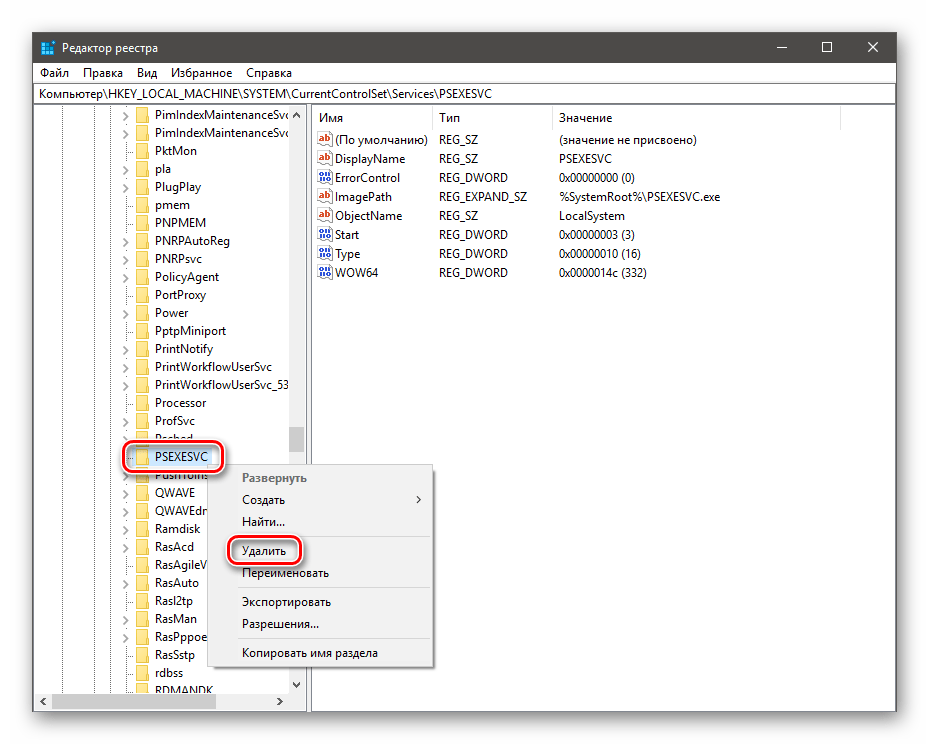
Система спросит, действительно ли мы хотим выполнить данную процедуру. Подтверждаем.
Заключение
Некоторые службы и их файлы после удаления и перезагрузки появляются снова. Это говорит либо об их автоматическом создании самой системой, либо о действии вируса. Если имеется подозрение на заражение, проверьте ПК специальными антивирусными утилитами, а лучше обратитесь к специалистам на профильных ресурсах.
Прежде чем удалять сервис, убедитесь, что он не является системным, так как его отсутствие может значительно повлиять на работу Windows или привести к полному ее отказу.


