- Как использовать screen в Linux
- Введение
- Установить Linux GNU Screen
- Установите Linux Screen в Ubuntu и Debian
- Установите Linux Screen на CentOS и Fedora
- Экран запуска Linux
- Начало именованного сеанса
- Работа с Linux Screen Windows
- Отключиться от сеанса экрана Linux
- Повторное подключение к экрану Linux
- Настроить экран Linux
- Базовое использование экрана Linux
- Выводы
- How to rename and move files and directories on Linux
- Overview
- Rename files on Linux
- Moving a file on Linux
- Moving and Renaming files on Linux
- Moving Multiple files on Linux
- Moving Directories on Linux
- Verbose Output Flag
- Do Not Overwrite Existing Files
- Do Not Prompt to Confirm Overwrites
- How To Rename Files And Directories In Linux
- Table of contents
- Using the file manager
- “mv” command
- Renaming multiple files at once
- “find” command
- “rename” command
- Summary
- How to Use Linux Screen Command [Essential Guide]
- Install Screen on your Linux distribution
- Keybindings in screen
- How to use Screen in Linux
- Start and name a session
- Quick re-attach
- List all sessions in screen
- Use PID for re-attachment
- Closing screens
- View multiple terminal windows at once
Как использовать screen в Linux
Вы когда-нибудь сталкивались с ситуацией, когда вы выполняете длительную задачу на удаленном компьютере, и внезапно ваше соединение разрывается, сеанс SSH завершается, и ваша работа теряется. Что ж, в какой-то момент это случилось со всеми нами, не так ли? К счастью, есть утилита screen которая позволяет нам возобновлять сеансы.
Введение
Экран или GNU Screen — это терминальный мультиплексор. Другими словами, это означает, что вы можете запустить сеанс экрана, а затем открыть любое количество окон (виртуальных терминалов) внутри этого сеанса. Процессы, запущенные в Screen, будут продолжать работать, если их окно не отображается, даже если вы отключитесь.
Установить Linux GNU Screen
В настоящее время пакет screen предустановлен в большинстве дистрибутивов Linux. Вы можете проверить, установлен ли он в вашей системе, набрав:
Если в вашей системе не установлен screen, вы можете легко установить его с помощью диспетчера пакетов вашего дистрибутива.
Установите Linux Screen в Ubuntu и Debian
Установите Linux Screen на CentOS и Fedora
Экран запуска Linux
Чтобы начать сеанс экрана, просто введите screen в консоли:
Это откроет сеанс экрана, создаст новое окно и запустит оболочку в этом окне.
Теперь, когда вы открыли сеанс экрана, вы можете получить список команд, набрав:
Начало именованного сеанса
Именованные сеансы полезны, когда вы запускаете несколько сеансов экрана. Чтобы создать именованный сеанс, запустите экранную команду со следующими аргументами:
Всегда рекомендуется выбирать описательное имя сеанса.
Работа с Linux Screen Windows
Когда вы запускаете новый сеанс экрана, он создает одно окно с оболочкой в нем.
У вас может быть несколько окон внутри сеанса Screen.
Чтобы создать новое окно с типом оболочки Ctrl+a c , ему будет присвоен первый доступный номер из диапазона 0. 9 .
Ниже приведены некоторые наиболее распространенные команды для управления экраном Linux в Windows:
- Ctrl+a c Создать новое окно (с оболочкой)
- Ctrl+a » Показать все окно
- Ctrl+a 0 Перейти в окно 0 (по номеру)
- Ctrl+a A Переименовать текущее окно
- Ctrl+a S Разделить текущую область по горизонтали на две области
- Ctrl+a | Разделить текущий регион по вертикали на два региона
- Ctrl+a tab Переключить фокус ввода на следующую область
- Ctrl+a Ctrl+a Переключение между текущей и предыдущей областью
- Ctrl+a Q Закрыть все регионы, кроме текущего
- Ctrl+a X Закрыть текущую область
Отключиться от сеанса экрана Linux
Вы можете отключиться от сеанса экрана в любое время, набрав:
Программа, запущенная в сеансе экрана, продолжит работу после того, как вы отключитесь от сеанса.
Повторное подключение к экрану Linux
Чтобы возобновить сеанс экрана, используйте следующую команду:
Если на вашем компьютере запущено несколько сеансов экрана, вам нужно будет добавить идентификатор сеанса экрана после переключателя r .
Чтобы найти идентификатор сеанса, укажите текущие сеансы запущенного экрана с помощью:
Если вы хотите восстановить экран 10835.pts-0, введите следующую команду:
Настроить экран Linux
Когда screen запускается, он считывает свои параметры конфигурации из /etc/screenrc и
/.screenrc если файл присутствует. Мы можем изменить настройки экрана по умолчанию в соответствии с нашими предпочтениями, используя файл .screenrc .
Вот пример конфигурации
/.screenrc с настроенной строкой состояния и несколькими дополнительными параметрами:

Базовое использование экрана Linux
Ниже приведены основные шаги для начала работы с экраном:
- В командной строке введите screen .
- Запускаем желаемую программу.
- Используйте последовательность Ctrl-a + Ctrl-d чтобы отключиться от сеанса экрана.
- Повторно подключитесь к сеансу экрана, набрав screen -r .
Выводы
В этом руководстве вы узнали, как использовать Gnu Screen. Теперь вы можете начать использовать утилиту Screen и создавать несколько окон экрана из одного сеанса, перемещаться между окнами, отсоединять и возобновлять сеансы экрана и персонализировать свой экранный терминал с помощью файла .screenrc .
Больше информации о Gnu Screen можно найти на странице руководства пользователя Screen .
Если у вас есть какие-либо вопросы или отзывы, не стесняйтесь оставлять комментарии.
Источник
How to rename and move files and directories on Linux
Overview
In this tutorial, you will learn how to use the mv command to move and renames files and directories on Linux.
Files and directories on Linux as very similar, from a filesystem point of view. This means the operations done on one can be also done on the other, with very few exceptions.
As such, you will notice that commands used to perform actions on files are identical with directories.
Rename files on Linux
To rename a file in Linux you use the mv command. The command accepts two or more arguments. For renaming files, only two arguments are needed, which are the source file and the target file.
The mv command will take the source file specified and rename it to the target file.
To rename a file named student1 to student10, for example, you would run the following command.
Provided the file target is the same directory, all file attributes will remain, including permissions.
Moving a file on Linux
To move a file to another location we use the same method as renaming a file, except the file path should be different.
For example, to move a file from /home/student1/lab-work.log to /var/labs/student1/lab-work.log , you would run the following command.
Moving and Renaming files on Linux
A file can be renamed during a move process using the mv command. You simply give the target path a different name. When mv moves the file, it will be given a new name.
For example, to move a file named student1.txt to /var/students and rename it to class1-student1.txt , you would run the following command.
Moving Multiple files on Linux
The mv command accepts multiple source files, which means we can move two or more files at the same time. When executing the mv command, each file listed will be considered a source with the last path being the exception. The last path will be treated as the target.
For example, to move student1.txt and student2.txt to /var/students , you would run the following command.
Moving Directories on Linux
Moving directories work the same as moving files. We specify the source directory and give a target directory.
For example, to move a directory path /tmp/logs to
/data/logs you would run the following command.
Moving Multiple Directories on Linux
As with files, multiple directories can be moved to a new location. We simply specially all of the directories to be moved, and then give a target directory for them to be moved to.
Verbose Output Flag
The mv command will perform its operations silently. No output will be printed to the screen while files or directories are being moved or renamed.
To instruct the mv command to print out a log of actions being taken, you can use the -v flag. This flag enabled verbosity, which is helpful for auditing.
Do Not Overwrite Existing Files
To force the mv command to not overwrite existing files when moving or renaming a file, use the -n flag.
In the example below, if the student2.txt file already exists, then the mv command will not rename the file and it will exit with an error.
Do Not Prompt to Confirm Overwrites
If you want to forcefully move files or directories and overwrite paths that already exist, you can use the -f flag. This is effective for overwriting old, stale files or directories with new ones with the same name.
Источник
How To Rename Files And Directories In Linux
Table of contents
The ability to change files and directories names is one of the primary skills that every Linux user needs. This article continues the Bash article series and shows how to use various ways like file manager, mv, and rename utilities in combination with finding and bash looping constructs. Improve your Linux skills in just 3 minutes!
Two ways are available for you to do this:
- File manager.
- Command-line terminal.
Using the file manager
 One of the easiest ways of renaming files and directories in Linux for new users is using Midnight Commander.
Midnight Commander – is a console-based file manager cloned from the famous Norton Commander. 
 Midnight Commander interface
To install Midnight Commander under Ubuntu:
For CentOS/Fedora/RHEL, use a different package manager:
To launch Midnight Commander, execute mc command.
You need to use keyboard arrows to move the file selector. To switch between left and right screens, you need to use the Tab key. You may use your mouse too, but you’re limited to select only files, which are visible on the screen.
To rename the file or directory, move the cursor on top of it and press F6. If you forgot the exact key, use your mouse to select Move/Rename from the File menu.
 Renaming files using Midnight Commander (menu)
Next, let’s look at how we can rename the files and directories by using mv and rename commands.
“mv” command
The mv command helps you move or rename files and directories from the source to the destination location. The syntax for the command is the following:
The source and destination can be a file or directory.
To rename file1.txt to file2.txt using mv, execute the following command:
To change the name of folder1 directory to folder2, use the following command:
Renaming multiple files at once
The mv utility can rename only one file at a time, but you can use it with other commands to rename more than one file. These commands include find and Bash for and while loops.
For example, let’s imagine you need to change the file extension for a specific file type in a directory. In the following example, we rename all HTML files and change their extension from html to php.
Here’s the example folder structure:
Now, let’s use the following Bash for-loop construct inside the example directory:
Here we stepped into the example directory. Next, we executed the mv command in Bash for-loop (the command between for and done keywords).
Here’s what’s happening:
- The for-loop is walking through the files ending on the .html and putting every file name to the variable f.
- Then mv utility changes extension of every file f from .html file to .php. A part of the expression $ is responsible for removing the .html from the file name. A complete expression “$
Here’s the expected outcome:
“find” command
Using find utility is one of the most common ways to automate file and directory operations in Linux.
In the example below, we are using the find to achieve the same goal and change file extension.
The find utility finds all files ending on .html and uses the -exec argument to pass every found file name to the sh shell script written in one line.
In the sh script-line, we set the variable f with the value of the file name f=”<>”, then we’re executing familiar mv command. A semicolon is used to split the variable set command from the mv command.
“rename” command
In some cases, it is easier to use the rename command instead of mv. And you can use it with regular expressions without combining with other Linux commands.
Here’s the syntax for the rename command:
For example, let’s rename all .php files back to .html:
If you wish to print the names of the files that you have selected for renaming, you can use the following command:
Summary
In this article, you’ve learned how to change files and directories names in Linux using various ways. We hope, this article was helpful. If so, please, help us to spread it to the world.
Источник
How to Use Linux Screen Command [Essential Guide]
The Screen command in Linux allows the user to create multiple virtual terminals that can be saved by name and reopened using keyboard shortcuts.
Should you consider using screen to improve your workflow? Let’s look at some of the reasons you might want to try it out.
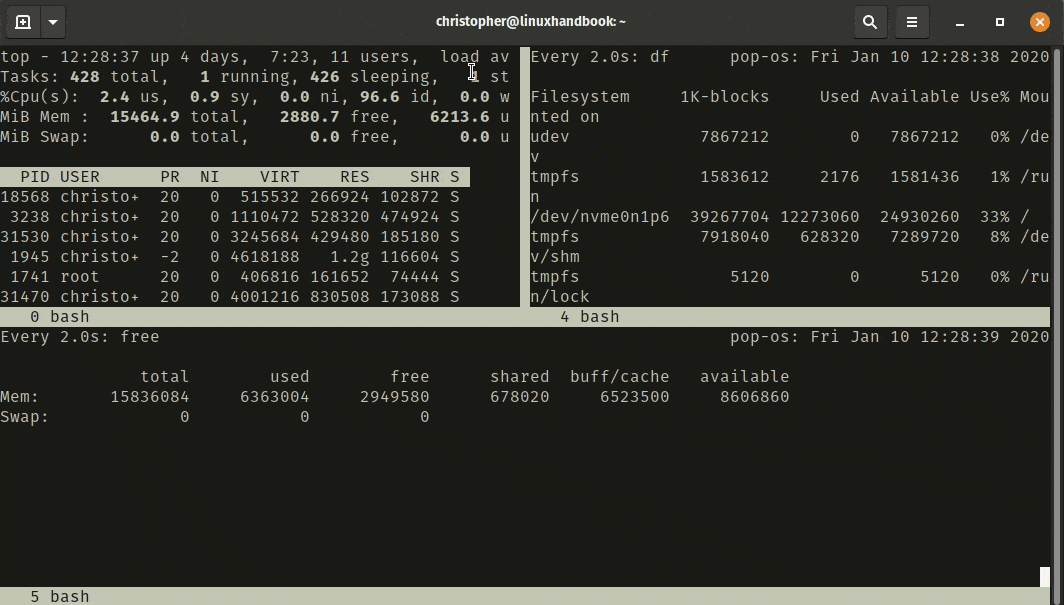
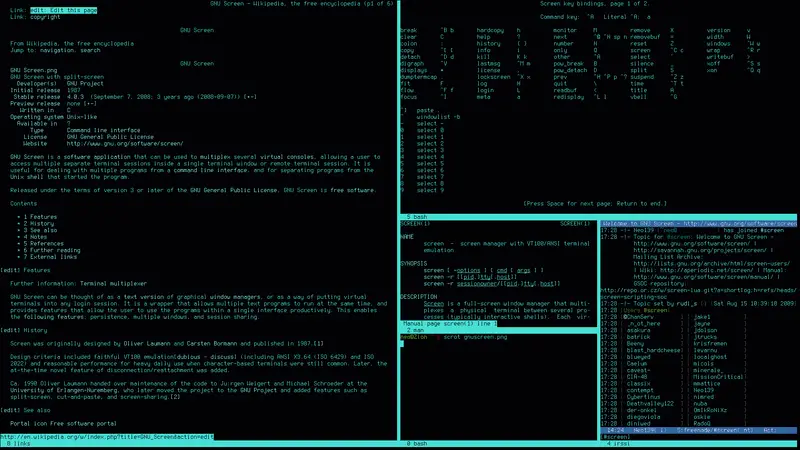 Screenshot of multiple terminals opened in one terminal window
If you spend a lot of time in the terminal, you may find yourself using several terminals at once to perform different tasks.
For example, you may log in via SSH to a remote server and perform some tasks there. At the same time, you may want to keep a tab on the RAM and CPU utilization on the server while doing work on the local system.
With Screen, you can do all of it from one single ‘screen’. You can send running processes and sessions to background without interrupting your current workflow.
Sounds good? Let’s see more about Screen.
Install Screen on your Linux distribution
First, you’ll want to see if this software is already included with your Linux distribution. Many modern distributions include it, but it’s usually easy to install otherwise.
You can check to see if it’s installed by running the following:
I am using Pop OS which is a Debian derivative distribution that uses the apt package manager. Screen is not installed by default, so I will type:
If you are using a different package manager, obviously this command may be different.
Keybindings in screen
Screen is fairly easy to use, but it can still be a little confusing for new users specially because it relies completely on keyboard shortcuts in the terminal.
I’ve created a table to explain some basic functions. You can also access the keybindings screen for a full list.
| Function | Shortcut |
|---|---|
| Detach Screen | [ctrl + a] + d |
| Quit/Kill Screen | [ ctrl + a ] + k |
| Switch to Next | [ ctrl + a ] + n |
| Switch to Previous | [ ctrl + a ] + p |
| All Keybindings | [ ctrl + a ] + ? |
You do not hit all the keys at once. Instead, you will hit [ ctrl + a ] and then the specified key .
It’s important to note that these shortcuts are case-sensitive. Like most things on linux, they can also be customized. This can be achieved by editing the .screenrc file which can usually be found in /etc/screenrc .
How to use Screen in Linux
I will look at these common management tasks in an easy to follow linear method. This will effectively put you in the driver seat as you demo the functionality.
Start and name a session
You can start screen and apply a memorable name.
For this instance, I’ve created one called top (don’t confuse it with the command top, it could be named anything). It automatically launches the named session and I can accomplish whatever task I need to.
I will start an instance of the top command. I will then use the [ctrl + a] + d keyboard shortcut to detach it. Top will continue to run in the background, but I am taken back to the screen application.
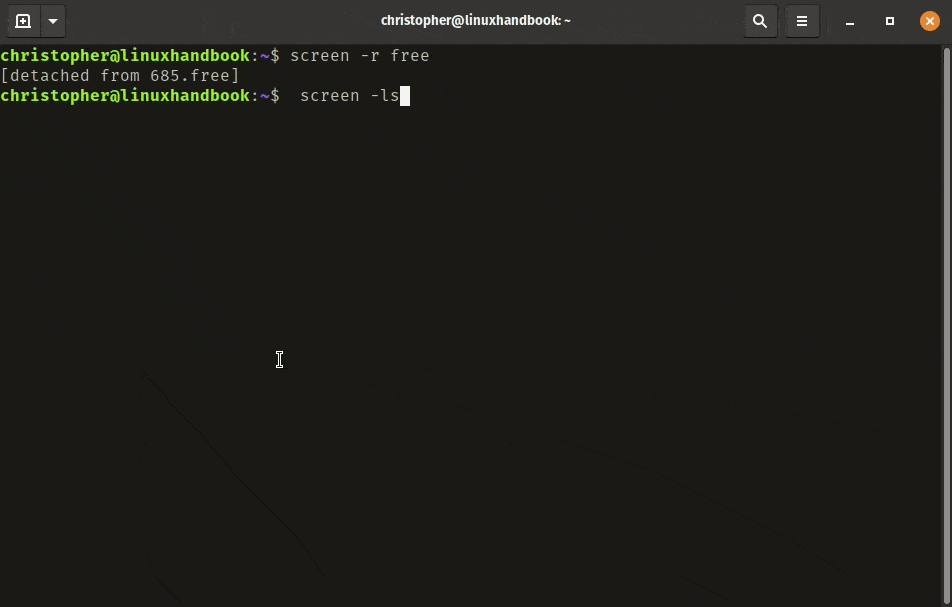
From here, I can start another session. Let’s call it ‘free’ (because I’ll use free command here but it can be named anything like session2 etc) and enter:
Combining watch command with free lets you constantly monitor RAM usage.
Detach once again using the [ctrl + a] + d keyboard shortcut. So, you have two processes running now in the background.
How do you get back to your processes to check on them? I’ll explain that to you.
Quick re-attach
You can use the session name to easily re-attach a screen with option -r.
You can see this in action above. If you’re not getting the same results, you may have made a mistake when naming the session (or forgotten all together). This is nothing to panic about.
List all sessions in screen
You can use the following command to list all your open screen sessions.
Since I detached my free session again to enter this, I get the following output:
Use PID for re-attachment
If you didn’t name your sessions, they will be identifiable by an assigned PID and a computer ID. You can use the process ID (PID) to access the desired screen just like you would for a named session.
This is the PID associated with the screen I’ve named “free”.
Closing screens
Okay, if you’re following along you should have the ‘free session’ open. Let’s get rid of it and stop it from running.
You use [ctrl + a]+ k to kill the active screen. A message will appear in the bottom left with a confirmation prompt. Enter y to exit the session. After a moment you will be left with something like this:
You can confirm by listing all the sessions with -ls again.
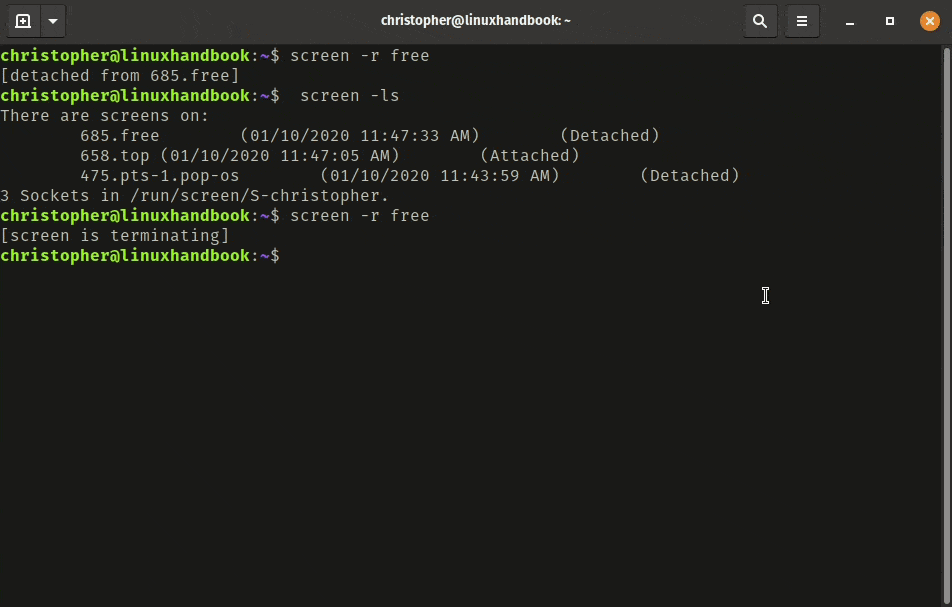
As you can see, the ‘free screen session’ is no longer active.
View multiple terminal windows at once
What truly makes screen indispensable is the ability to split the terminal into multiple windows within one session arranged horizontally or vertically.
Screen will use the active area to perform the split functions and create screen functions. Once a split is created, it will become the active area. However, you may find that you cannot input anything on the active window. You will need to create a screen in order to do that. You can initialize the shell by using [ctrl + a] + c .
There are more keyboard shortcuts essential for managing and navigating terminal windows:
| Function | Shortcut |
|---|---|
| Split Horizontal (Left/Right) | [ctrl+a]+S |
| Split Vertical (Top/Bottom) | [ctrl+a]+| |
| Create Screen/Start Shell | [ctrl+a]+c |
| Switch by Window ID | [ctrl+a]+0,1,etc. |
| Rename Window | [ctrl+a]+A |
| Close Active Window | [ctrl+a]+X |
| Close All Inactive Windows | [ctrl+a]+Q |
| Switch to Next Window | [ctrl+a]+[tab] |
Feel free to create your own arrangement and explore. You can split into many sessions, but I find that, for me personally, anything beyond a quadrant makes text difficult to read.
In the table, you can see the option to rename windows. This is different than the naming of screens you performed earlier with screen -S [name] . You will notice the window name in the bottom left corner. You can get a list of windows with their corresponding names and ID’s by entering [ ctrl + a ] + [«] .
Remember, you can use all the functions you explored earlier within the new windows also. There are a ton of possibilities to explore.
Do you like screen?
There are so many ways to customize your terminal using GNU Screen. It’s a really great way to improve your productivity and make your workflow a little simpler when you’re doing administration tasks via the command line. Especially, if you’re working on a remote machine.
If you are new to this, leave us a comment and let us know if you enjoyed the tutorial. If you’re more experienced, feel free to share some of your go-to setups with other readers. We love feedback from our readers.
Источник


