- How to Use ‘fsck’ to Repair File System Errors in Linux
- When to Use fsck in Linux
- fsck Available options
- How to Run fsck to Repair Linux File System Errors
- Understanding fsck exit codes
- Repair Linux Filesystem Errors
- How to Run fsck on Linux Root Partition
- Force fsck Upon System Boot
- Run fsck in Rescue Mode
- If You Appreciate What We Do Here On TecMint, You Should Consider:
- Ubuntu Documentation
- Check if a filesystem is damaged
- Possible data loss when repairing
- Repair a filesystem
- Guide to Repair Linux Disk Using FSCK and Recover Linux Files
- Is your Linux system giving you hiccups? Do not fret! Whether it is Linux check disk, Linux repair disk or other functions that you need to run, we have all of it right here!
- Overview of Linux Check Disk
- 1. What Linux Check Disk Means?
- 2. Causes of Linux Drive Corruption
- How to Check Linux Disk?
- Smartctl
- Install smartmontools
- For Ubuntu:
- For Debian
- For Arch Linux
- Fedora
- OpenSUSE
- 1 Checking the Linux Disk Speed
- 2 Checking the Linux Disk for Errors
- How to Repair Linux Disk?
- 1 Using ‘fsck’to Auto Repair Filesystem
- 2 Repairing Linux Filesystem Errors
- 3 Running fsck on the Linux Root Partition
- 4 Invoke fsck When the System Reboots
- 5 Fsck in Rescue Mode
- How to Find Deleted Files from Linux Hard Drive?
- Step 1: Select Your Location
- Step 2: Scan Location
- Step 3: Preview & Recover the Files
- Closing Words
- How do I run fsck on root filesystem in Linux?
- Will fsck delete files?
- How do I fix a corrupted superblock in Linux?
- Can you run fsck on a mounted filesystem?
- How do you check if a filesystem is mounted in Linux?
How to Use ‘fsck’ to Repair File System Errors in Linux
Filesystems are responsible for organizing how data is stored and recovered. One way or another, with time, filesystem may become corrupted and certain parts of it may not be accessible. If your filesystem develops such inconsistency it is recommend to verify its integrity.
This can be completed via system utility called fsck (file system consistency check). This check can be done automatically during boot time or ran manually.
In this article, we are going to review the fsck utility and its usage to help you repair disk errors.
When to Use fsck in Linux
There are different scenarios when you will want to run fsck. Here are few examples:
- The system fails to boot.
- Files on the system become corrupt (often you may see input/output error).
- Attached drive (including flash drives/SD cards) is not working as expected.
fsck Available options
Fsck command needs to be run with superuser privileges or root. You can use it with different arguments. Their usage depend on your specific case. Below you will see some of the more important options:
-
- -A – Used for checking all filesystems. The list is taken from /etc/fstab .
- -C – Show progress bar.
- -l – Locks the device to guarantee no other program will try to use the partition during the check.
- -M – Do not check mounted filesystems.
- -N – Only show what would be done – no actual changes are made.
- -P – If you want to check filesystems in parallel, including root.
- -R – Do not check root filesystem. This is useful only with ‘ -A ‘.
- -r – Provide statistics for each device that is being checked.
- -T – Does not show the title.
- -t – Exclusively specify the filesystem types to be checked. Types can be comma separated list.
- -V – Provide description what is being done.
How to Run fsck to Repair Linux File System Errors
In order to run fsck, you will need to ensure that the partition you are going to check is not mounted. For the purpose of this article, I will use my second drive /dev/sdb mounted in /mnt .
Here is what happens if I try to run fsck when the partition is mounted.
![]() Run fsck on Mounted Partition
Run fsck on Mounted Partition
To avoid this unmount the partition using.
Then fsck can be safely ran with.
![]() Run fsck on Linux Partition
Run fsck on Linux Partition
Understanding fsck exit codes
After running fsck, it will return an exit code. These cods can be seen in fsck’s manual by running:
Repair Linux Filesystem Errors
Sometimes more than one error can be found on a filesystem. In such cases you may want fsck to automatically attempt to correct the errors. This can be done with:
The -y flag, automatically “yes” to any prompts from fsck to correct an error.
Similarly, you can ran the same on all filesystems (without root):
How to Run fsck on Linux Root Partition
In some cases, you may need to run fsck on the root partition of your system. Since you cannot run fsck while the partition is mounted, you can try one of these options:
- Force fsck upon system boot
- Run fsck in rescue mode
We will review both situations.
Force fsck Upon System Boot
This is relatively easy to complete, the only thing you need to do is create a file called forcefsck in the root partition of your system. Use the following command:
Then you can simply force or schedule a reboot of your system. During the next bootup, the fsck will be performed. If downtime is critical, it is recommended to plan this carefully, since if there are many used inodes on your system, fsck may take some extra time.
After your system boots, check if the file still exists:
If it does, you may want to remove it in order to avoid fsck on every system boot.
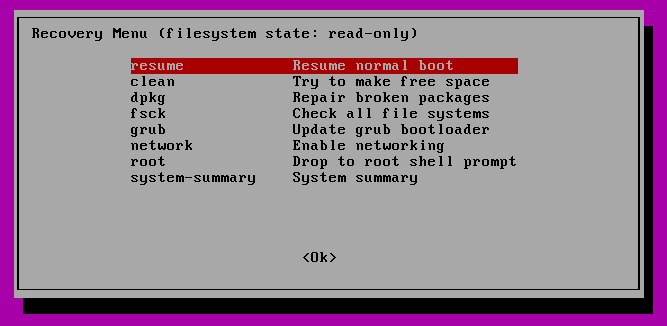
Run fsck in Rescue Mode
Running fsck in rescue mode requires few more steps. First prepare your system for reboot. Stop any critical services like MySQL/MariaDB etc and then type.
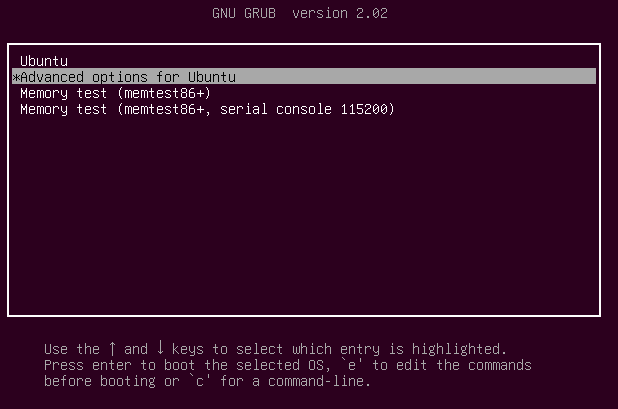
During the boot, hold down the shift key so that the grub menu is shown. Select the “Advanced options”.
![]() Grub Advance Options
Grub Advance Options
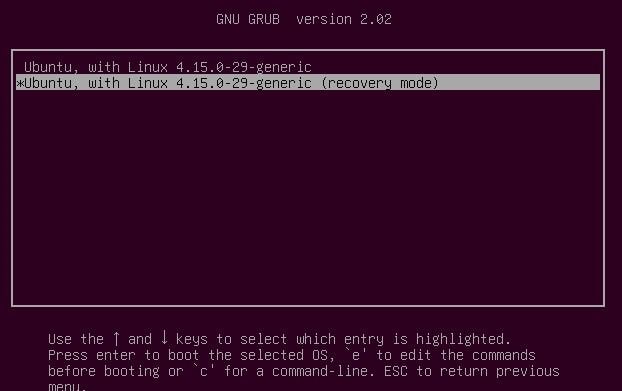
Then choose “Recovery mode”.
![]() Select Linux Recovery Mode
Select Linux Recovery Mode
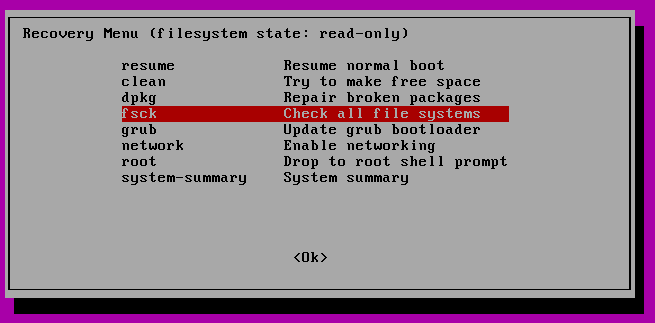
In the next menu select “fsck”.
![]() Select fsck Utility
Select fsck Utility
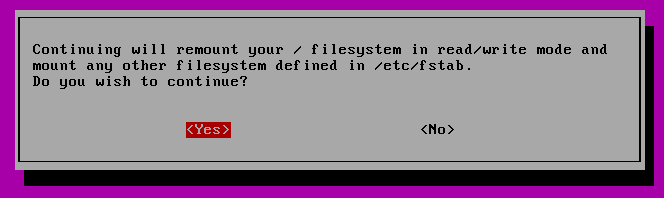
You will be asked if you wish to have your / filesystem remounted. Select “yes” .
![]() Confirm Root Filesystem
Confirm Root Filesystem
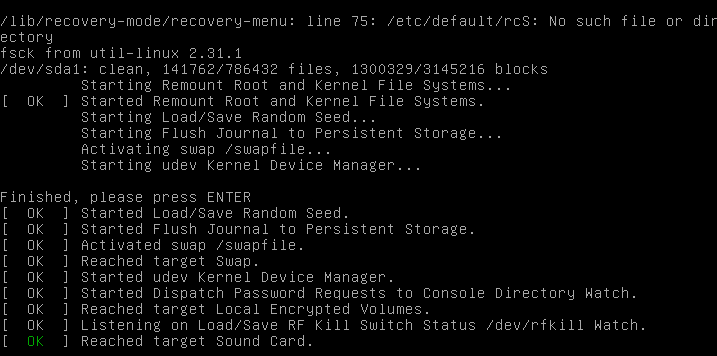
You should see something similar to this.
![]() Running fsck Filesystem Check
Running fsck Filesystem Check
You can then resume to normal boot, by selecting “Resume”.
![]() Select Normal Boot
Select Normal Boot
Conclusion
In this tutorial you learned how to use fsck and run consistency checks on different Linux filesystem. If you have any questions about fsck, please do not hesitate to submit them in the comment section below.
If You Appreciate What We Do Here On TecMint, You Should Consider:
TecMint is the fastest growing and most trusted community site for any kind of Linux Articles, Guides and Books on the web. Millions of people visit TecMint! to search or browse the thousands of published articles available FREELY to all.
If you like what you are reading, please consider buying us a coffee ( or 2 ) as a token of appreciation.

We are thankful for your never ending support.
Источник
Ubuntu Documentation
Filesystems can be corrupted due to unexpected power loss, system crashes and unsafe removal of the drive. After such an incident it is recommended to repair or at least check the filesystem to prevent future data loss.
Sometimes a repair is required in order to mount or modify a filesystem. Even if a check does not report any damage the filesystem might still be marked as вЂdirty’ internally and require a repair.
Check if a filesystem is damaged
Open Disks from the Activities overview.
Select the disk containing the filesystem in question from the list of storage devices on the left. If there is more than one volume on the disk, select the volume which contains the filesystem.
In the toolbar underneath the Volumes section, click the menu button. Then click Check Filesystem… .
Depending on how much data is stored in the filesystem a check may take longer time. Confirm to start the action in the dialog that pops up.
The action will not modify the filesystem but will unmount it if needed. Be patient while the filesystem is checked.
After completion you will be notified whether the filesystem is damaged. Note that in some cases even if the filesystem is undamaged it still may need to be repaired to reset an internal вЂdirty’ marker.
Possible data loss when repairing
If the filesystem structure is damaged it can affect the files stored in it. In some cases these files can not be brought into a valid form again and will be deleted or moved to a special directory. It is normally the lost+found folder in the top level directory of the filesystem where these recovered file parts can be found.
If the data is too valuable to be lost during this process, you are advised to back it up by saving an image of the volume before repairing.
This image can be then processed with forensic analysis tools like sleuthkit to further recover missing files and data parts which were not restored during the repair, and also previously removed files.
Repair a filesystem
Open Disks from the Activities overview.
Select the disk containing the filesystem in question from the list of storage devices on the left. If there is more than one volume on the disk, select the volume which contains the filesystem.
In the toolbar underneath the Volumes section, click the menu button. Then click Repair Filesystem… .
Depending on how much data is stored in the filesystem a repair may take longer time. Confirm to start the action in the dialog that pops up.
The action will unmount the filesystem if needed. The repair action tries to bring the filesystem into a consistent state and moves files which were damaged in a special folder. Be patient while the filesystem is repaired.
After completion you will be notified whether the filesystem could be successfully repaired. In case of success it can be used again in the normal way.
If the filesystem could not be repaired, back it up by saving an image of the volume to be able to retrieve important files later. This can be done by mounting the image read-only or using forensic analysis tools like sleuthkit .
To make use of the volume again it has to be formatted with a new filesystem. All data will be discarded.
Источник
Guide to Repair Linux Disk Using FSCK and Recover Linux Files
Is your Linux system giving you hiccups? Do not fret! Whether it is Linux check disk, Linux repair disk or other functions that you need to run, we have all of it right here!

Theo Lucia
Sep 14, 2021 • Filed to: Answer Hard Drive Problems • Proven solutions
Last night, I ran into disk problems in my Linux system. I have tried my hand at repairing it using tutorials from the internet, but nothing seems to be working for me. Then I stumbled upon a resource, which introduced me to fsck command. Everything changed from there.
Overview of Linux Check Disk
The Linux check disk option checks bad sectors and errors on the drive.
1. What Linux Check Disk Means?
In Linux, the check disk command is represented by fsck, which is an abbreviation for file system consistency check. Simply put, it is a utility that helps a userВ scan the file databaseВ for any existing errors and repairs them if need be. Using a set of built-in tools, it checks the disk and then auto-generates a report of its evaluation. In certain systems, fsck often runs by default, usually, after the system shuts down improperly or after a series of reboots.
The Linux check disk (fsck) is a standard operation in Unix-based operating systems, the likes of which includes Linux and Apple operating systems. For the most part, fsck is activated by the system administrator manually or is automatically used at boot time. It works on the data structures directly, which are stored on the disk. The particular behavior of fsck can differ, but it generally follows a specific protocol for internal operations and give the users a common command-line interface.
2. Causes of Linux Drive Corruption
The Linux drive often gets corrupted to these common causes:
1. Accidental data deletion or some human error: Due to accidental deletion of key data, the Linux drive is often corrupted. This is often due to a lack of understanding or toying with files that you may be unaware of in the system.
2. Infection due to viruses: Malicious software or virus infection could be another cause for the corruption of the drive. It is often due to accessing of compromised websites from where these elements enter the system. It could also be due to access to unknown internet connections.
3. Bad sectors present on the hard drive: Bad blocks on the hard drive could cause drive corruption. It often occurs when the situation has gone from bad to worse.
To your benefit, Live CD of any given Linux Distros can easily detect the drive corruption and allow the users to recover their much-needed data in its original form.
How to Check Linux Disk?
Fsck function is not just used forВ checking the hard driveВ in Linux systems. It can also perform a range of functions that will be examined below. Follow these simple, quick commands and you can execute a range of functions with it.
Smartctl
The modern Linux hard drives come with the S.M.A.R.T function. It is a useful tool, which allows the OS (Linux and Windows) to check up on their health and overall functionality. A fast way to check if your hard drive is equipped with the SMART feature is to extract it from your personal computer and check the information given on the label. You may also check the box it came packaged in.
Install smartmontools
In the case of Linux, there are multiple ways to affirm the S.M.A.R.T status of your hard drive. But the quickest of the lot is probably smartctl. Before looking at how to use this tool, let us first examine how the health of the hard drive is checked with smartctl.
For installing the Smartmontools, you need to open the terminal and follow the given instructions that show on your particular Linux distribution (there are so many).
For Ubuntu:
»Sudo apt install smartmontools’’
For Debian
»Sudo apt-get install smartmontools’’
For Arch Linux
»sudo pacman -S smartmontools’’
Fedora
»sudo dnf install smartmontools’’
OpenSUSE
»sudo zypper install smartmontools’’
As we can see, all of the different Linux distribution systems will display different commands. This is why they are mentioned for your familiarity.
1 Checking the Linux Disk Speed
The ‘dd’command in Linux is used to check the reading and writing performance of the disk on the Linux platform. Let us see how the ‘dd’command is used to check the I/O performance.
Step 1: First, open the shell prompt. You can also login to a remote server if need be.
Step 2: In order to measure the server throughput (writing speed) dd if=/dev/zero of=/tmp/test1.img bs=1G count=1 oflag=dsync
Step 3: The dd command is also used to check the server latency dd if=/dev/zero of=/tmp/test2.img bs=512 count=1000 oflag=dsync
This command finds out simple I/O performance.
2 Checking the Linux Disk for Errors
The ‘fsck’is quite handy in the Linux system as it is used for checking errors in the filesystem. It performs a similar function as ‘chkdsk’in the Windows operating system.
For checking the Linux filesystem for errors, the fsck command comes in handy more than often. To check the error and repair it at the same time, use ‘a’option. Other than that, the ‘y’option can be used in place of ‘a’.
For performing the error check on just one partition, you can run the command from your terminal:
How to Repair Linux Disk?
In the Linux operating system, a powerful command exists, known as ‘fsck’. It is used to repair the file system. Fsck is an abbreviation for the ‘File System Consistency check’. It is very easy to use. All you have to do is open a terminal and write:
This command will check the sda1 partition only. However, this fsck command is unusable on a mounted partition. If you do such a thing, there is a high probability that it can damage the system. To check the home folder that is present on a different partition (for instance, sda2), you should use the following command:
Note: For running the ‘fsck’command, you will need to root/superuser permission.
The ‘fsck’command can also be used to check your external drive, for instance, the SD card or the thumb drive.
umount/dev/sdb1 #thumb drive
When you are unsure about which partition number you need to scan, use this command:
It will list out all the available partitions.
1 Using ‘fsck’to Auto Repair Filesystem
If errors are detected during the filesystem check, use the ‘fsck’command to automatically repair the filesystem with –a flag. For instance, let us look at this instance below:
You can use the –y flag to perform a similar function as well:
2 Repairing Linux Filesystem Errors
At times, you may find more than one error in the filesystem. In cases as such, you can use ‘fsck’to rectify these errors automatically. Type this:
This –y flag will automatically ‘yes’to any given prompts by fsck to correct the error.
Furthermore, you can also use it on all filesystems without root:
3 Running fsck on the Linux Root Partition
At other times, you may need to run the fsck on the root partition of your Linux system. Given that fsck cannot be run when the partition is mounted, you can try this option:
- Use fsck in rescue mode
- Invoke fsck when the system reboots
Let’s look at both situations:
4 Invoke fsck When the System Reboots
This is an easy process to complete and all you need to do is create a file named ‘forcefsck’within the root partition of the system. Use this command:
By doing so, you can schedule a reboot of the system. On the next restart, fsck command will perform its function. You need to be extra careful using this command. If there are many inodes, this command will take its time.
After the system has restarted, check if the file exists:
If the file exists, then you may need to remove this because the fsck command will be executed each time.
5 Fsck in Rescue Mode
There are a few more steps involved in the case of using fsck in rescue mode. Prepare your system for a reboot and halt critical functions like MySQL/MariaDB and type:
When the boot is about to appear, press the shift key so that the grub menu pops open on the screen. Go to the Advanced Options:
Now go to Recovery Mode
Now select fsck
Now you will be given an option if you wish to remount the filesystem. Select yes.
After this, select normal boot and select ‘resume’.
How to Find Deleted Files from Linux Hard Drive?
For most of us, losing data is a source of great worry. Thankfully,В Wondershare RecoveritВ Data RecoveryВ can help you recover more than 1000+ kinds of formats and file types. With Recoverit Data Recovery, you can retrieve lost or deleted in a matter of 3 steps. Let us see how we go about this process:
Step 1: Select Your Location
For recovering the data from your computer, choose a location from where the data was lost. Now, select the desired hard disk shown in the hard disk drives tab. You can also select a location tab for that matter. When you click start, the system will begin scanning the system.

Step 2: Scan Location
The Recoverit software will commence an overall scan of the system. It usually takes a few minutes to be done with it. At other times, it may take a few hours depending on the size of files stored on your system.

While the scanning process is continuing, you may pinpoint the files and halt the scanning system.
Step 3: Preview & Recover the Files
The software allows the users to first preview their recoverable files before clicking on the recovery step. Select the desired file and click the ‘recover’tab to retrieve your files now.

Closing Words
In this guide, we examined how to check disk in Linux for any existing drive corruption, monitoring its speed along with its repair function. The viability of the fsck command cannot be negated. We also examined the usage of fsck and how it operates within the Linux system. When Linux commands are of no avail, use Recoverit to help you get data back. Rest assured, with it, your data is always within your reach.
How do I run fsck on root filesystem in Linux?
Since fsck cannot check the root file system on a computer while the operating system is running, you can run fsck in boot or boot the system in recovery mode. Either of these two practical and fast options will help you get fsck to run on the root filesystem on Linux.
Will fsck delete files?
Generally not, since although fsck can delete files, they are those that have been erased, but still exist in the filesystem. There are cases in which it is mentioned that fsck deletes files, but this is due more to errors in the filesystem or corrupt files that hinder the operation of this program.
How do I fix a corrupted superblock in Linux?
You can restore that superblock. First of all, become superuser. Then you have to change to a directory outside of the corrupted file system, now unmount the file system. Once you did that you must display the superblock values through “newfs -N” command and finally you have to set a new superblock through “fsck” command.
Can you run fsck on a mounted filesystem?
Yes, you can, but this can lead to several serious problems on your disk because fsck is not usually part of the filesystem. There are some very particular exceptions, but it is a process that almost entirely should not be executed on a mounted filesystem so it is recommended to discard this idea, unless you are a professional.
How do you check if a filesystem is mounted in Linux?
There are several ways to do it. One of the most common is by using the command «findmnt.» All you have to do is open the terminal command and type «findmnt,» all mounted filesystems will automatically be displayed along with extra information such as their targets, sources, types and options.
Источник


