- 8 Linux ‘Parted’ Commands to Create, Resize and Rescue Disk Partitions
- How to Install Parted on Linux
- 1. Check Parted Version
- 2. List Linux Disk Partitions
- 3. List or Switch to Different Disk
- 4. Create Primary or Logical Partition in Linux
- 5. Resize Linux Disk Partition
- 6. Delete Linux Partition
- 7. Rescue Linux Disk Partition
- 8 Change Linux Partition Flag
- Conclusion
- If You Appreciate What We Do Here On TecMint, You Should Consider:
- Red Hat Customer Portal
- Log in to Your Red Hat Account
- Red Hat Account
- Customer Portal
- Select Your Language
- How to Resize a Partition using fdisk
- Prerequisites
- Procedure
- More Information
- How to resize active root partition in Linux
- What is Gparted?
- Checking disk space usage in Linux
- Checking disk partition in Linux
- 1) Downloading GParted live ISO image
- 2) Booting the system with GParted live media
- 3) Keyboard selection
- 4) Language selection
- 5) Mode selection (GUI or Command-Line)
- 6) Loaded GParted live screen
- 7) Resizing the active root partition in Linux
- 8) Checking free disk space in the partition
8 Linux ‘Parted’ Commands to Create, Resize and Rescue Disk Partitions
Parted is a famous command line tool that allows you to easily manage hard disk partitions. It can help you add, delete, shrink and extend disk partitions along with the file systems located on them. Parted has gone a long way from when it first came out. Some of it’s functions have been removed, others have been added.
![]() Parted Command to Manage Linux Disk Partitions
Parted Command to Manage Linux Disk Partitions
In this tutorial you will learn the basics of parted and we will show you some practical examples. If you don’t have any previous experience with parted, please be aware that parted writes the changes immediately to your disk, so be careful if you try to modify your disk partitions.
If you plan on testing parted, the better option would be to simply use a virtual machine or old computer/laptop without any valuable information on it. To make modifications on a disk partition it must not be in use. If you need to work on primary partition, you may boot into rescue mode.
Note: You will need to have root access to the machine you will be working on in order to use parted.
How to Install Parted on Linux
On many Linux distributions, parted comes pre-installed. If it is not included in your distro, you can install it with:
Once you have make sure that parted is installed, you can proceed further to check out some real world examples of parted command in the rest of this article.
1. Check Parted Version
Run the following command, you see message similar to the one shown on the image below. Don’t worry if your parted version is different. Unless specified otherwise, parted will use your primary drive, which in most cases will be /dev/sda .
![]() Check Parted Command Version
Check Parted Command Version
If you want to exit parted, simply type:
2. List Linux Disk Partitions
Now that parted is started, let’s list the partitions of the selected hard disk. As mentioned earlier, parted chooses your first drive by default. To see the disk partitions run print .
![]() Check Linux Partitions
Check Linux Partitions
When running print , it will also display the hard disk information and model. Here is example from a real hard disk (not virtual as shown on the image above) :
In the example above, you can see the disk model, capacity sector size and partition table.
3. List or Switch to Different Disk
If you have more than one hard disk, you can easily switch between disks, by using the “ select ” command. In the example below, I will switch from /dev/sda to /dev/sdb which is a secondary drive on my system.
To easily switch between disks you can use:
![]() Select Different Disk
Select Different Disk
Change «X» with the letter of the disk to which you wish to switch.
4. Create Primary or Logical Partition in Linux
Parted can be used to create primary and logical disk partitions. In this example, I will show you how to create primary partition, but the steps are the same for logical partitions.
To create new partition, parted uses “ mkpart “. You can give it additional parameters like «primary» or «logical» depending on the partition type that you wish to create.
Before you start creating partitions, it’s important to make sure that you are using (you have selected) the right disk.
Start by using print:
![]() Show Current Linux Disk
Show Current Linux Disk
As shown on the above image, we are using a virtual drive of 34 GB. First we will give the new disk a label and then create a partition and set a file system on it.
Now the first step is to give the new disk a label name with:
Now create the new partition with mkpart . The listed units are in megabytes (MB). We will create a 10 GB partition starting from 1 to 10000:
![]() Create Primary or Logical Linux Partitions
Create Primary or Logical Linux Partitions
Next, exit parted with «quit» command. We will format our new partition in ext4 file system using mkfs . To make this happen run the following command:
Note: It’s important to select the right disk and partition when executing the above command!
Now let’s verify our results, by printing the partition table on our secondary disk. Under file system column, you should see ext4 or the file system type that you have decided to use for your partition:
![]() Verify Disk Partition Filesystem
Verify Disk Partition Filesystem
5. Resize Linux Disk Partition
Parted includes multiple useful functions and one of them is «resizepart» . As you have probably figured this out by now, «resizepart» helps you resize a partition.
In the example below, you will see how to resize an existing partition. For the purpose of this example, we will be using the earlier created partition.
First you will need to know the number of the partition that you will be resizing. This can be easily found by using «print» :
![]() Find Linux Partition Number
Find Linux Partition Number
In our example, the partition number is «1» . Now run the resizepart command:
You will be asked for the number of the partition that you will resize. Enter it’s number. After that, you will be asked to set the new ending point for this partition. Remember that by default the units are in MB. In our example, we have set the new partition size to 15 GB:
Now verify the results with «print» :
![]() Verify Linux Resize Partition
Verify Linux Resize Partition
6. Delete Linux Partition
The next thing you will learn is how to delete a partition from your hard drive. To do this, you will need to use the «rm» command within parted. To delete a disk partition you will need to know it’s number.
As mentioned earlier, you can easily obtain this number by using «print» . In our example, we will delete the partition with number 1 from our secondary drive /dev/sdb1 :
Verify the results by printing the partitions table:
![]() Delete a Linux Partition
Delete a Linux Partition
7. Rescue Linux Disk Partition
Parted supports a “ rescue» utility that helps you recover a lost partition between a starting and ending point. If a partition is found within that range, it will attempt to restore it.
Here is an example:
8 Change Linux Partition Flag
Using parted, you can change the state of a flag for disk partitions. The supported flags are:
The states can be either «on» or «off» . To change a flag simply run «set» command within parted:
The above command sets lba flag to on for second partition. Verify the results with print :
![]() Change Partition Flag
Change Partition Flag
Conclusion
Parted is a useful and powerful utility that can help you manage your disk partitions in Linux systems. As always, when working with disk partitions you need to be extra careful. It is strongly recommend to go through parted man pages to learn how you can customize it’s output and find more information about its capabilities.
If you have any questions or comments, please do not hesitate to use the comment section below.
If You Appreciate What We Do Here On TecMint, You Should Consider:
TecMint is the fastest growing and most trusted community site for any kind of Linux Articles, Guides and Books on the web. Millions of people visit TecMint! to search or browse the thousands of published articles available FREELY to all.
If you like what you are reading, please consider buying us a coffee ( or 2 ) as a token of appreciation.

We are thankful for your never ending support.
Источник
Red Hat Customer Portal
Log in to Your Red Hat Account
Your Red Hat account gives you access to your profile, preferences, and services, depending on your status.
If you are a new customer, register now for access to product evaluations and purchasing capabilities.
Need access to an account?
If your company has an existing Red Hat account, your organization administrator can grant you access.
Red Hat Account
Customer Portal
For your security, if you’re on a public computer and have finished using your Red Hat services, please be sure to log out.
Select Your Language
How to Resize a Partition using fdisk
Prerequisites
- A created partition that you know the name of. To check the name, run cat /etc/fstab. The first field is the name of the partition. The only way to change a partition size using fdisk is by deleting and recreating it so ensure that the information on the file system is backed up.
- Make sure the partition you are resizing is the last partition on a particular disk.
Disclaimer: The following information has been provided by Red Hat, but is outside the scope of our posted service level agreement and support procedures. The information has been tested however is provided as-is and any configuration settings or installed applications made from the information in this article could make your Operating System unsupported by Red Hat Support Services and non-recoverable. The intent of this article is to provide you with information to accomplish your system needs. Use the information in this article at your own risk.
On disks with a GUID Partition Table (GPT), using the parted utility is recommended, as fdisk GPT support is in an experimental phase.
Procedure
1. Unmount the partition:
2. Run fdisk disk_name.
3. Check the partition number you wish to delete with the p. The partitions are listed under the heading “Device”.
4. Use the option d to delete a partition. If there is more than one, fdisk prompts for which one to delete.
5. Use the option n to create a new partition. Follow the prompts and ensure you allow enough space for any future resizing that is needed. It is possible to specify a set, human-readable size instead of using sectors if this is preferred.
Note: It is recommended to follow fdisk’s defaults as the default values (for example, the first partition sectors) and partition sizes specified are always aligned according to the device properties.
Warning: If you are recreating a partition in order to allow for more room on a mounted file system, ensure you create it with the same starting disk sector as before. Otherwise the resize operation will not work and the entire file system may be lost.
6. Check the partition table to ensure that the partitions are created as required using the p option.
7. Write the changes with the w option when you are sure they are correct.
Important: Errors in this process that are written could cause instability with the selected file system.
8. Run fsck on the partition.
9. Finally, if you need to increase or decrease the file system, refer to the How to Shrink an ext2/3/4 File System with resize2fs, or the How to Grow an ext2/3/4 File System with resize2fs.
If you don’t need to increase or decrease the file system, mount the partition.
More Information
man fdisk
– man page for fdisk, has basic information about what fdisk is and what it supports.
man fstab
– man page for the /etc/fstab file including how to read the table.
The m option within fdisk
– this option lists all the available commands within fdisk.
Источник
How to resize active root partition in Linux
Have you ever had the opportunity to resize an active root partition in Linux? If not, don’t worry, today, we will be discussing it. Disk partitioning is one of the best topics in Linux.
In this article, we will teach you how to resize the active root partition in Linux using the ‘GParted’ tool. Let’s assume you only have 30GB disk and you have configured the entire disk as a single partition while installing the Ubuntu operating system.
Now, you want to create a separate partition from that root partition for another purpose. If yes, you need to resize it. This is not limited to the root partition, and you can resize any partition available in the system.
If you have LVM configured on your system, you do not need to worry about file system resizing, as LVM allows you to resize the file system whenever you need it.
Resizing an active root partition is not a good idea, as it can lead to system crashes if you make a mistake. However, we are going to do this because there is no way to free up the file system.
Note: Make sure you back up important data before performing this operation, as your data can be easily retained in the event of a failure such as a power outage or a system restart during operation.
What is Gparted?
GParted is a free partition manager that enables you to resize, copy, and move partitions without data loss. All features of the GParted application can be used by using the GParted Live bootable image. GParted Live is a cross-platform tool that can be used on Linux, Windows and Mac OS X.
Checking disk space usage in Linux
Active partitions can be found in the Linux system using the df command. The following output clearly shows that we have only one partition with 30GB of space.
Checking disk partition in Linux
Disk partitions in Linux system can be verified in many ways, we will use ‘fdisk’ command to check the disk partitions in the system.
1) Downloading GParted live ISO image
Make sure to copy the latest GParted ISO image from their download page then use the wget command to download it.
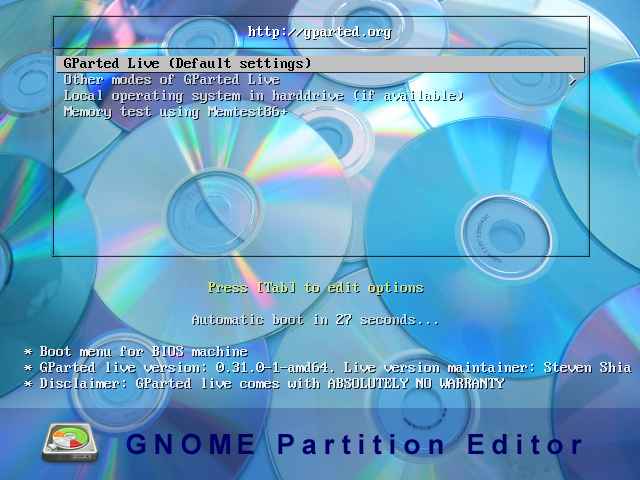
2) Booting the system with GParted live media
Boot your system with a GParted live installation media such as a burned CD/DVD or USB or ISO image. When you boot the system with GParted live media you will get an output similar to the below screen. Choose GParted Live (Default settings) and press Enter .
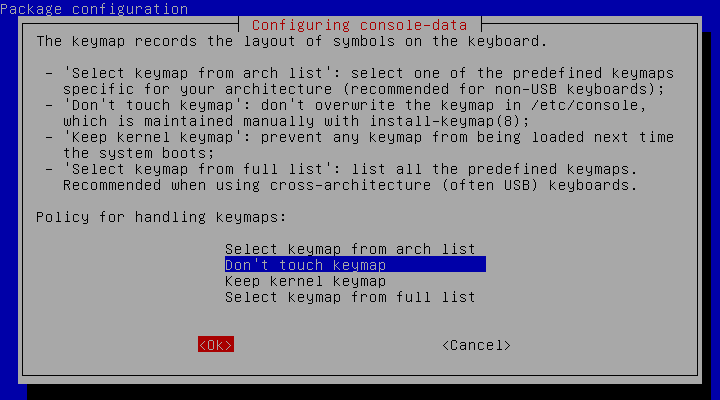
3) Keyboard selection
By default it chooses the second option, and press Ok to proceed:
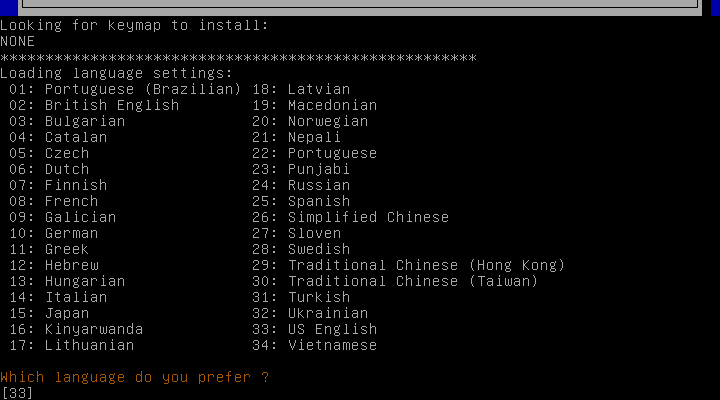
4) Language selection
By default, it chooses 33 for language that represents ‘US English’, and press Enter to proceed:
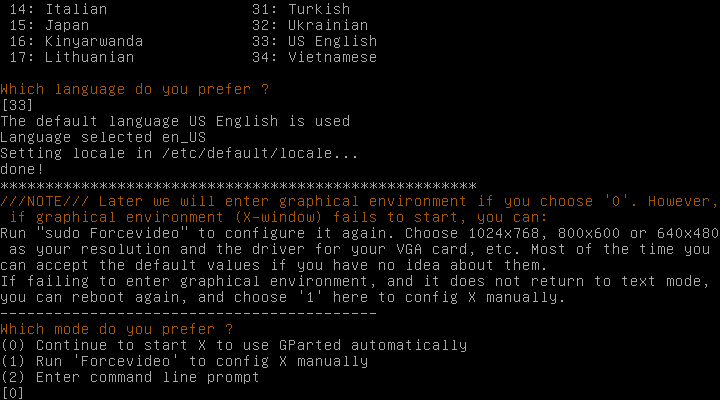
5) Mode selection (GUI or Command-Line)
By default, it selects 0 indicating GUI mode, and press Enter to proceed:
6) Loaded GParted live screen
Now, the GParted live screen is successfully loaded, and it displays the active partitions in the system:
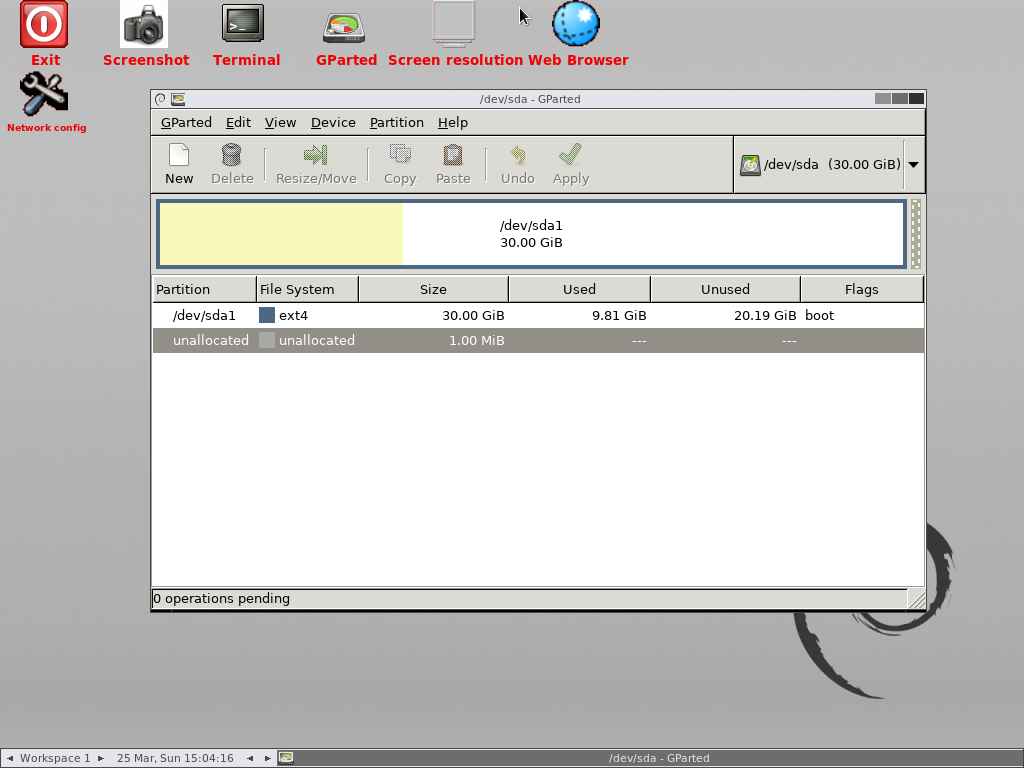
7) Resizing the active root partition in Linux
Select the root partition you want to resize. In this case, we only have one partition that belongs to the root partition, so we choose to resize it.

Press the Resize/Move button to resize the selected partition.
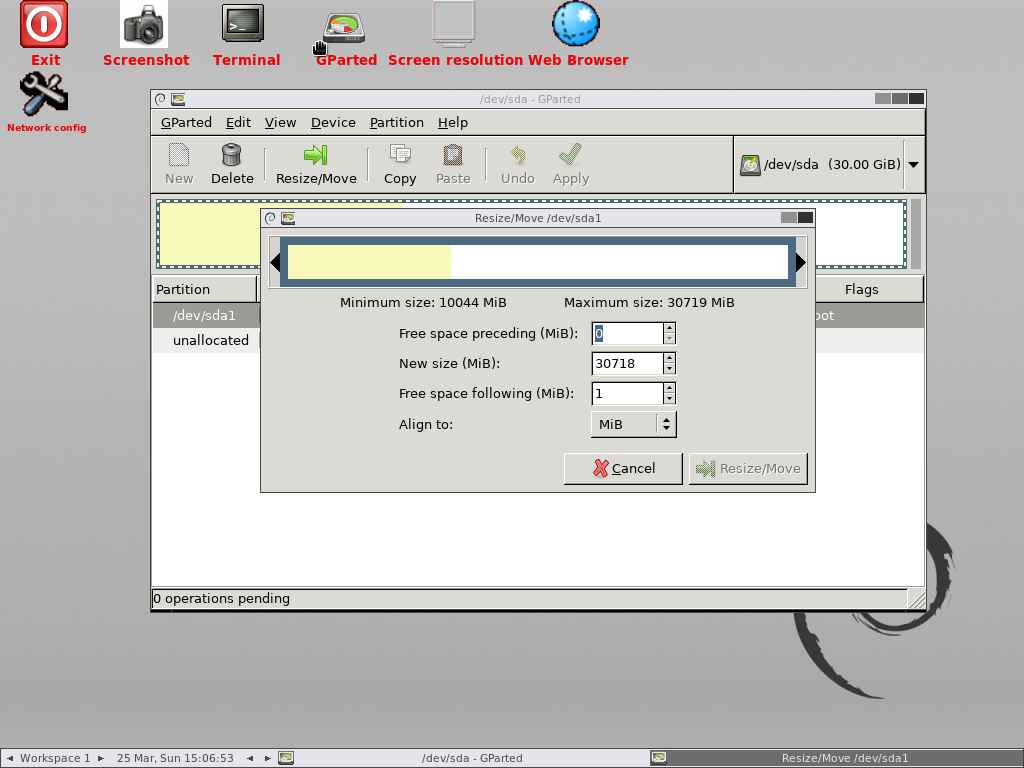
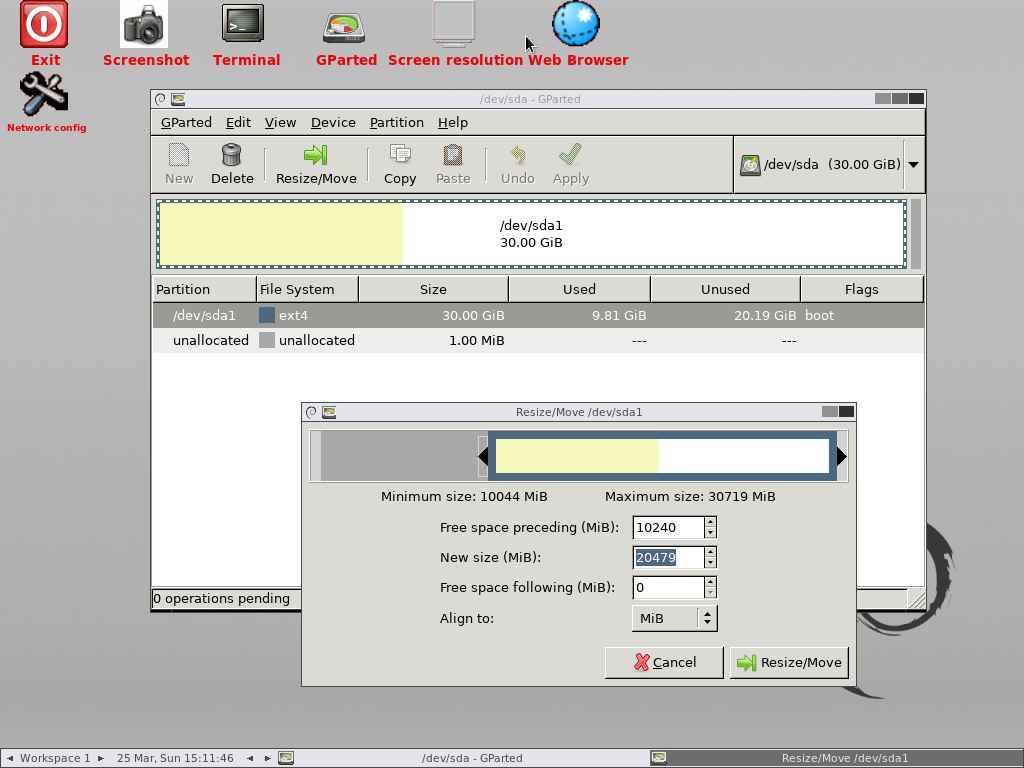
Enter the size that you want to take out from this partition in the first box. If you want to claim 10GB then add 10240MB in the first text box and leave the rest of the boxes as is, and press ‘Resize/Move’ button to proceed.
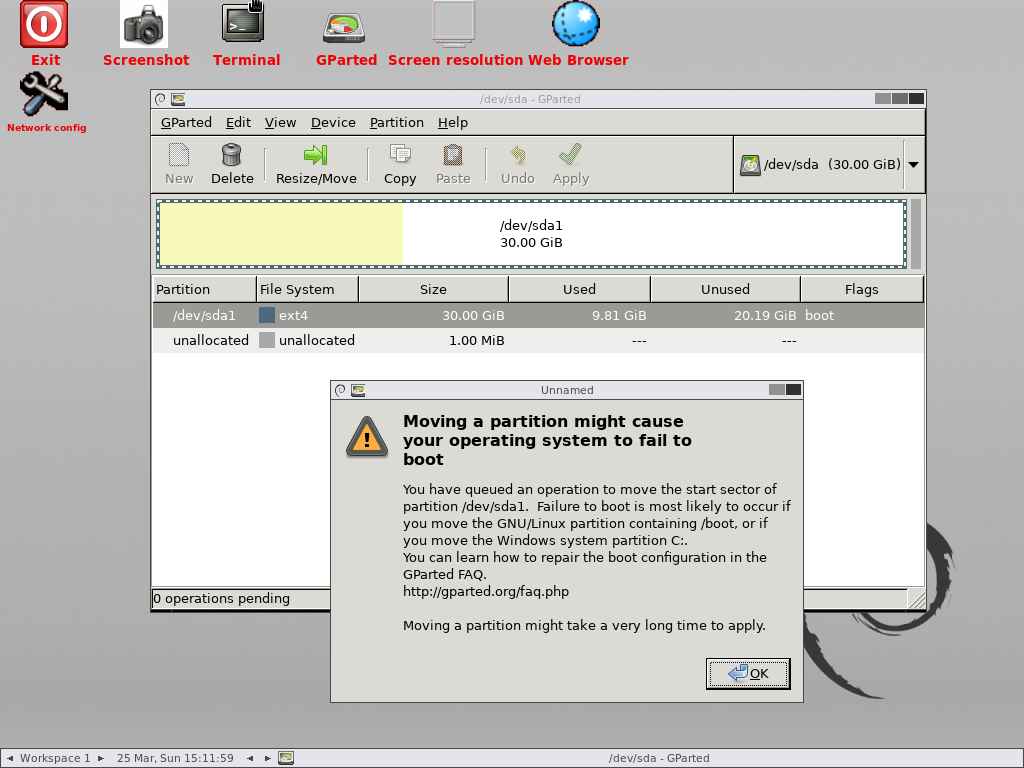
This will prompt you to confirm that the partition will be resized because you are editing the live system partition. Press the ok button to continue:
It has successfully compressed the partition from 30GB to 20GB and also shows 10GB of unallocated disk space:
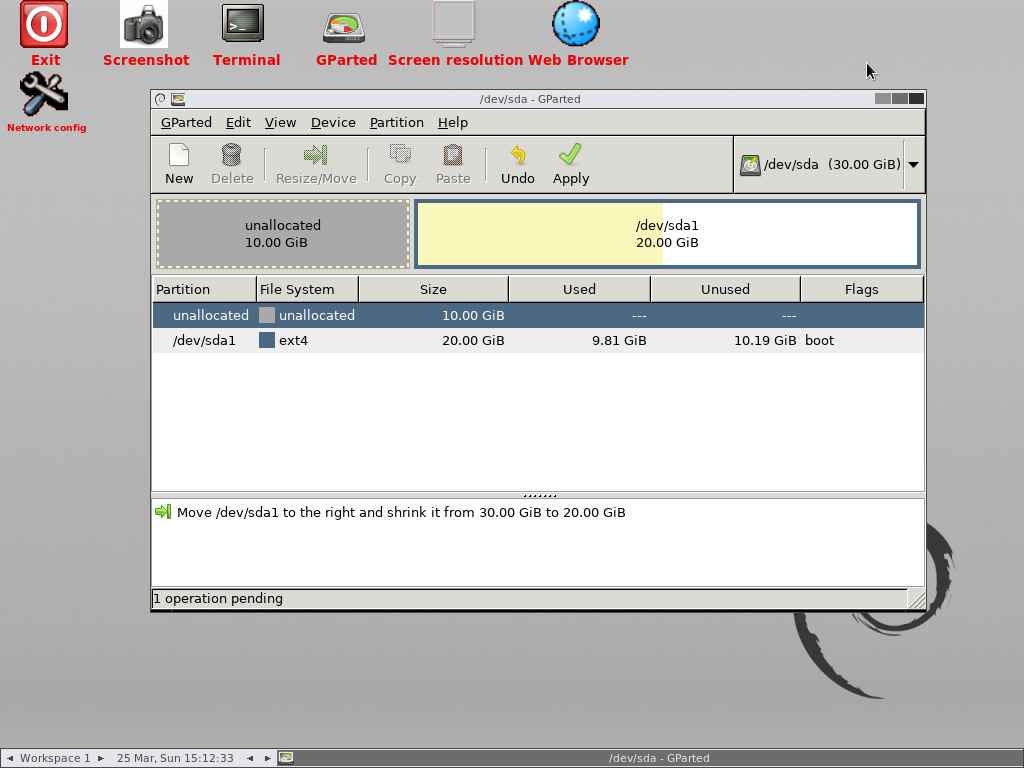
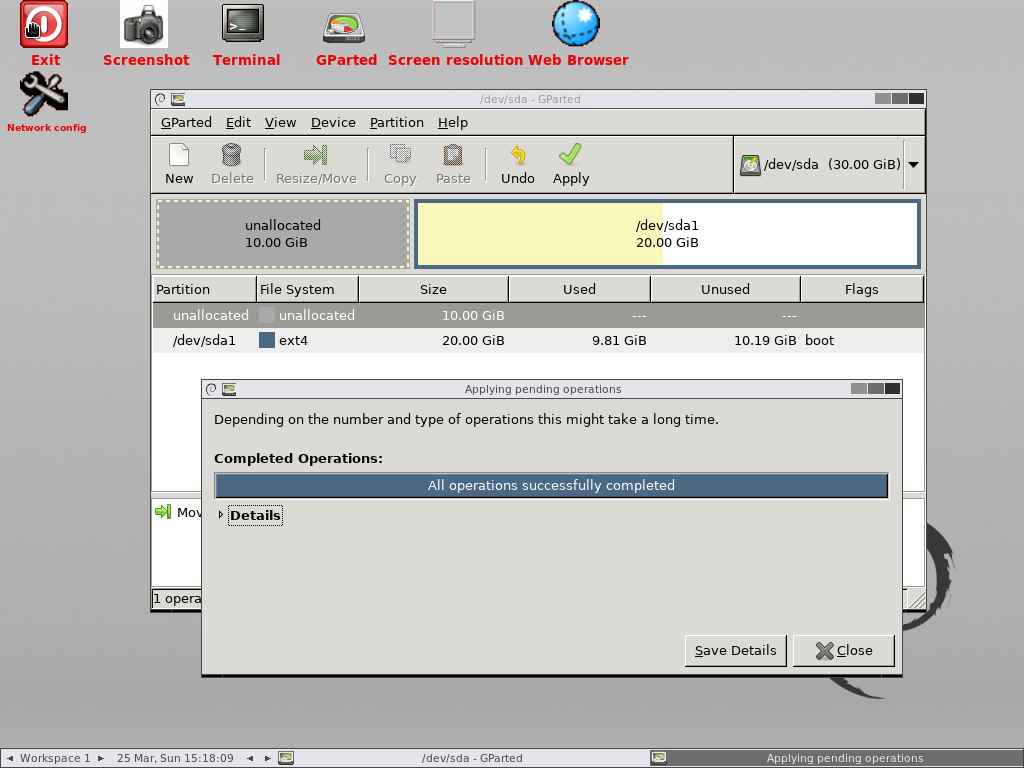
Finally, click Apply button to perform the remaining operations.
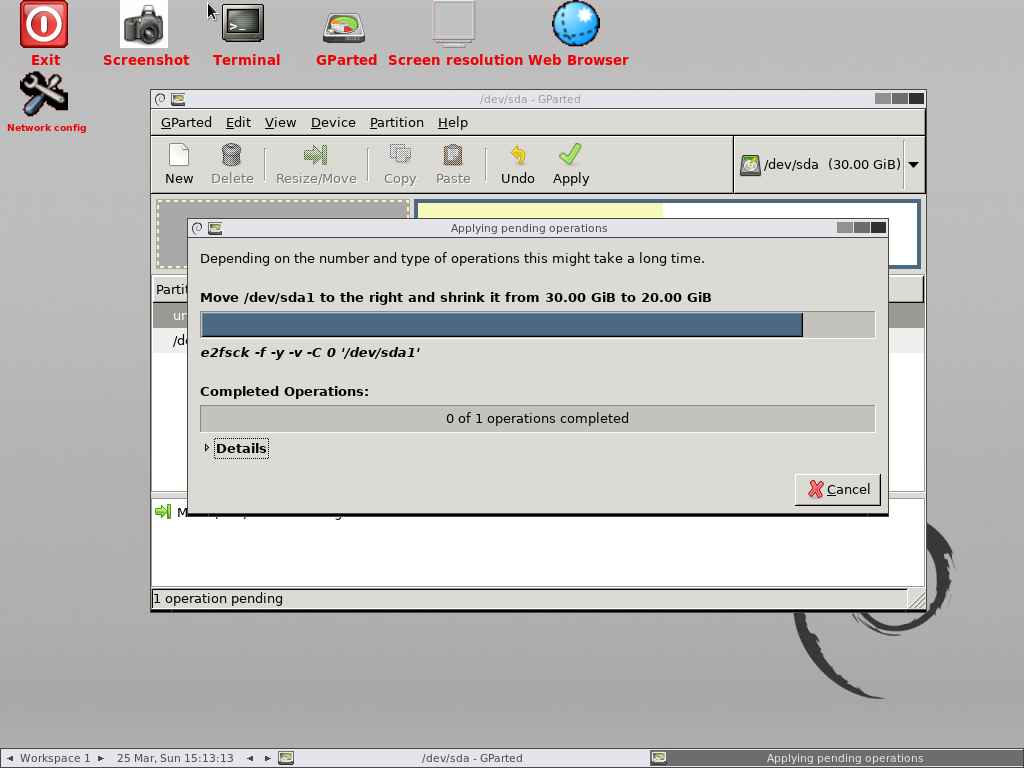
- e2fsck e2fsck is a file system check utility that automatically repair the file system for bad sectors, and I/O errors related to HDD.
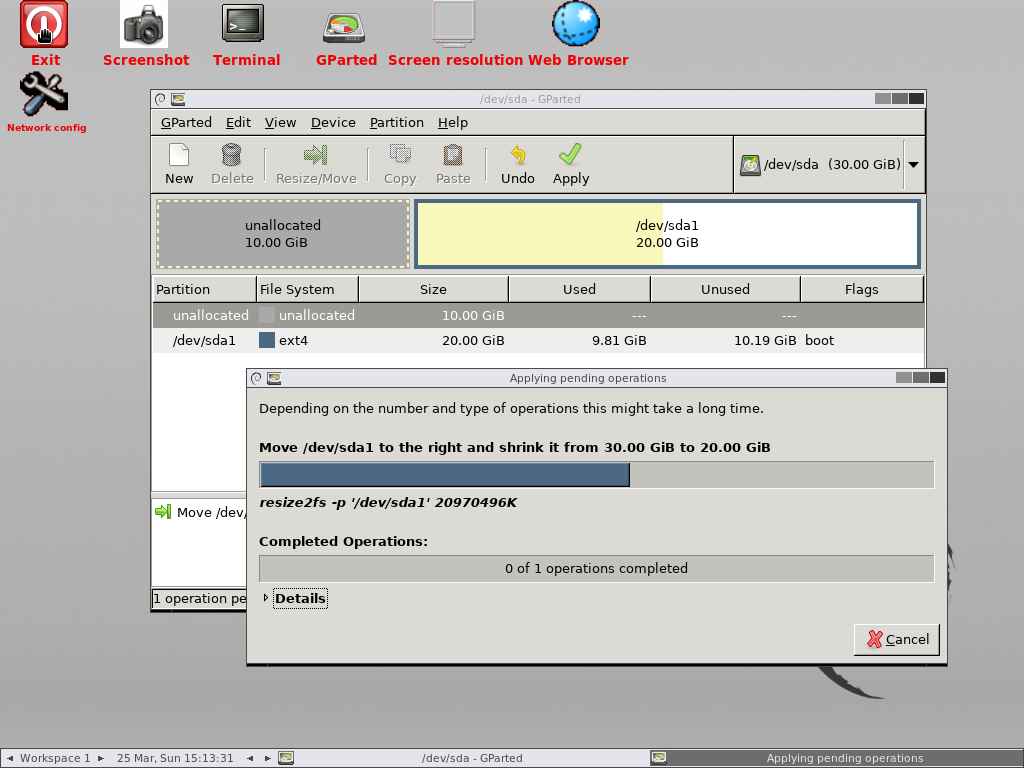
- resize2fs The resize2fs program will resize ext2, ext3, or ext4 file systems. It can be used to enlarge or shrink an unmounted file system located on device.
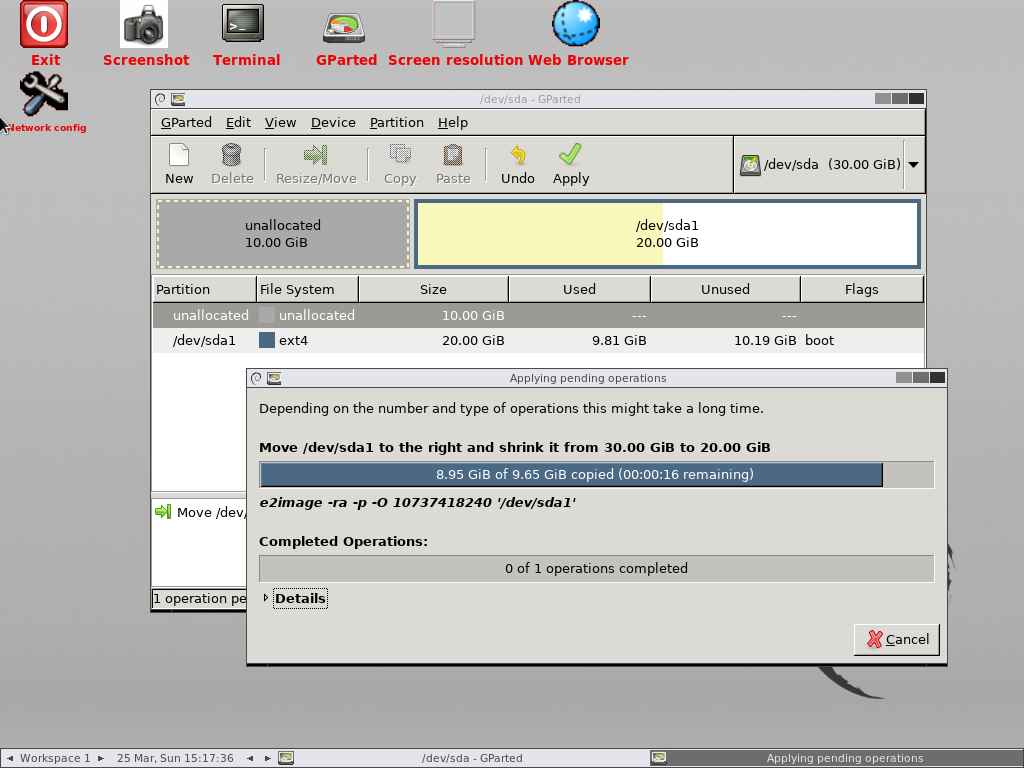
- e2image The e2image program will save critical ext2, ext3, or ext4 filesystem metadata located on device to a file specified by image-file.

e2fsck : The e2fsck is a file system check utility that automatically repairs the file system for bad sectors, and I/O errors related to HDD:
resize2fs: The resize2fs program will resize ext2, ext3, or ext4 file systems. It can be used to enlarge or shrink an unmounted file system located on the device:
e2image : The e2image program will save critical ext2, ext3, or ext4 filesystem metadata located on the device to a file specified by image-file:
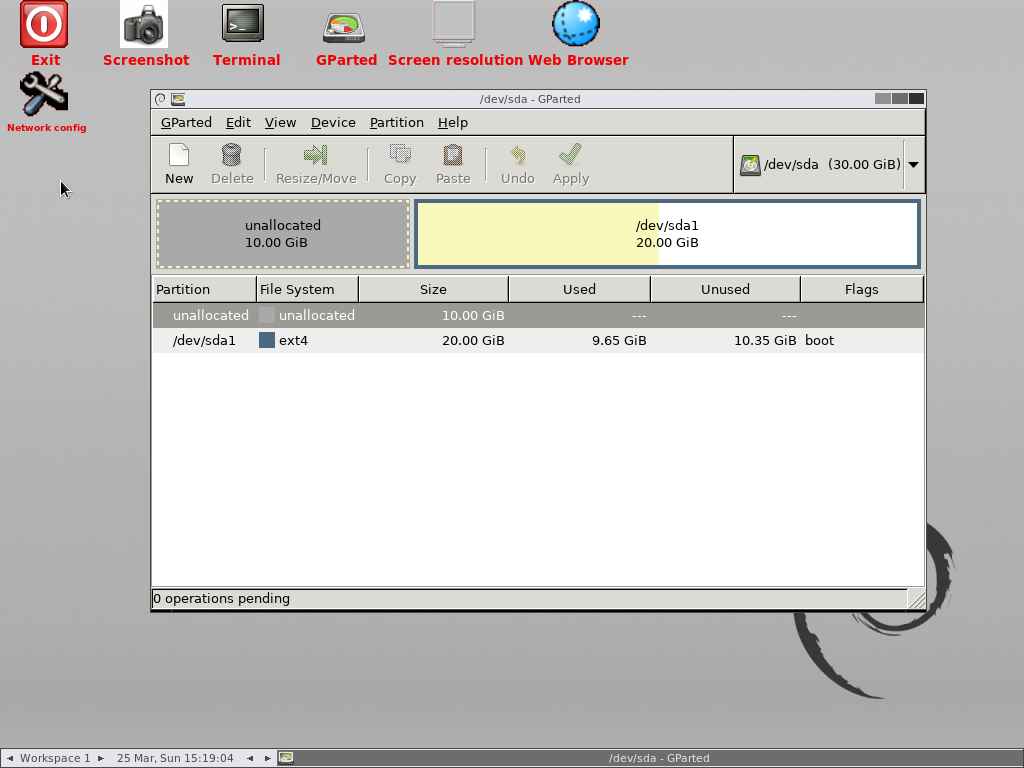
All the operations are now successfully completed. Now click close button to close the dialog box:
Now, I’m able to see 10GB of Unallocated disk partition as shown below:
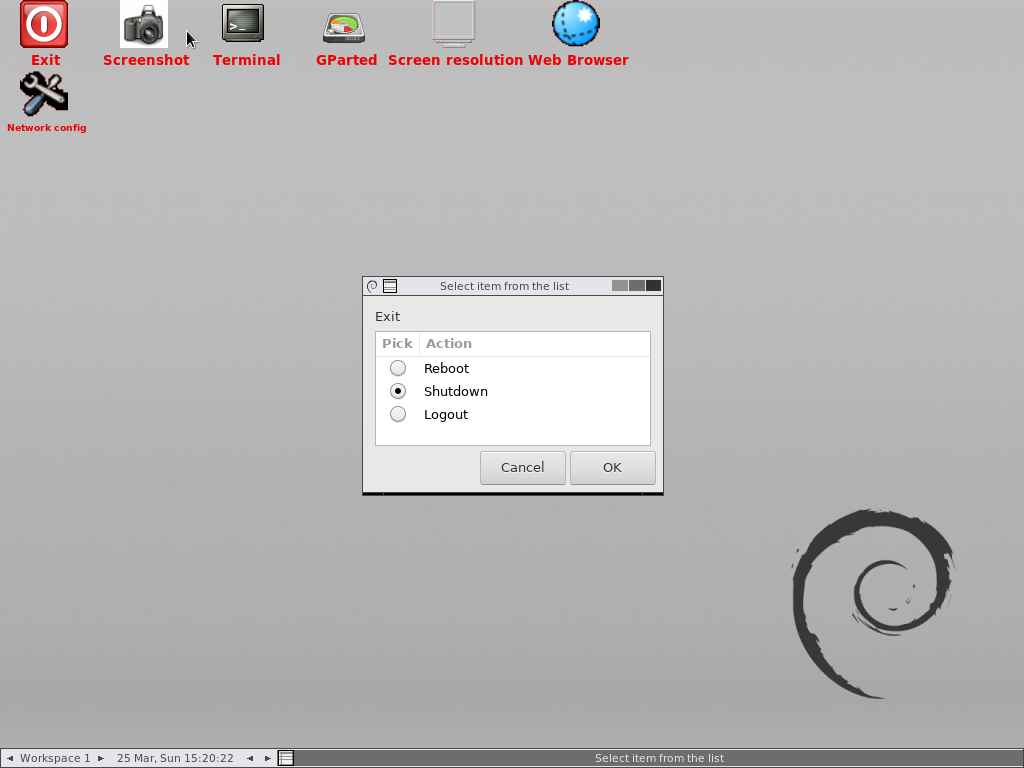
Reboot the system to check this:
8) Checking free disk space in the partition
Login again and use the fdisk command to find the free space available in the given partition. And you should be able to see the 10GB of unallocated disk space in this partition as shown below:
Источник


