- How to install and use Anaconda
- Installing Anaconda
- Starting Spyder
- Starting Jupyter Notebook
- Example notebooks
- Working with course-specific environments
- Step 1 of 3: Update your Anaconda installation
- Step 2 of 3: Import the .yaml file
- Step 3 of 3: Starting Spyder from the correct environment
- Recommendations for teachers
- Debugging Python programs
- Установка Anaconda в Ubuntu
- Установка Anacoda в Ubuntu
- 1. Скачивание и установка программы
- 2. Обновление Anaconda
- 3. Окружения Conda
- 4. Установка пакетов Conda
- Удаление Anaconda
- Выводы
- Guide for Installing and Uninstalling Anaconda in Linux
- What is Anaconda?
- Install Anaconda in Linux
- Step 1: Download the correct version of Anaconda
- Step 2: Installing Anaconda through the command line installer
- Make Anaconda available for other users
- Uninstall Anaconda from Linux
How to install and use Anaconda
We recommend using the Anaconda distribution to install Python, Spyder as your programming environment, and Jupyter Notebook for creating interactive documents.
Installing Anaconda
Make sure to click Install for me only if the installer says: You cannot install Anaconda3 in this location. The Anaconda3 installer does not allow its software to be installed here.
Windows
Linux
Anaconda may also be run from the calcfarm.ntnu.no server, but it is highly recommended to install it on your own computer. Learn how to connect to Calcfarm if you are unable to install Anaconda.
Starting Spyder
The Spyder editor supports interactive testing, debugging, a variable explorer and other nice things.
To start Spyder, first open Anaconda Navigator:
Then, click the Launch button below the Spyder icon on the Navigator Home tab:

Starting Jupyter Notebook
A Jupyter Notebook lets you combine code, explanatory text, mathematics, plots, and more in a single document.
Notebook documents contain the inputs and outputs of your computation, and can serve as a complete computational record of a session, making it easy to share reproducible work.
To start Jupyter Notebook, first open Anaconda Navigator as described in the previous section, then click the Launch button below the Jupyter Notebook icon.
To start using Notebooks, read more about:
Example notebooks
Download the notebook file to open the full, interactive notebook on your own computer, or view a static version of the notebook online:
| Download notebook | View read-only version |
|---|---|
| Introduksjon.ipynb | Introduksjon til bruk av Jupyter med Python |
| IkkeLineareLigninger.ipynb | Numerisk løsning av ikke-lineære ligninger |
Working with course-specific environments
If your course needs other packages than those installed by default, these will be installed in a separate environment, and you’ll need to use that environment for course work. The steps involved are:
Step 1 of 3: Update your Anaconda installation
First, open an Anaconda Prompt:
Then, run the following two commands:
Step 2 of 3: Import the .yaml file
Download the .yaml file from the course home page and save it to your computer.
Open Anaconda Navigator and click the Environments tab in the left menu. Then click Import and select the .yaml file you downloaded.

For more information, refer to Managing environments in the Anaconda documentation.
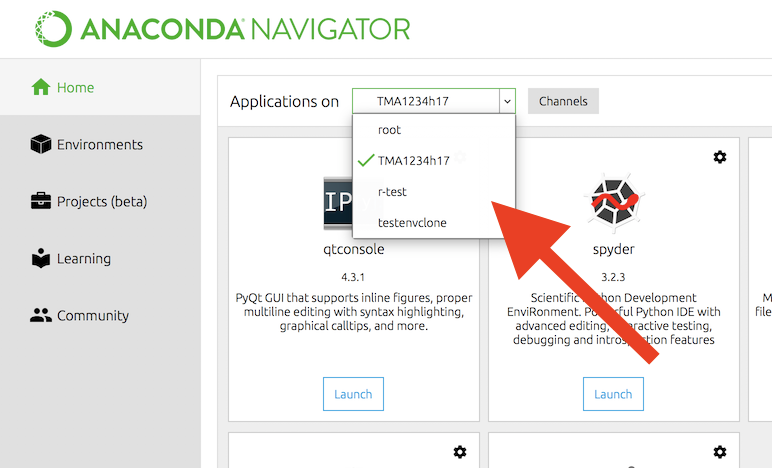
Step 3 of 3: Starting Spyder from the correct environment
To use this environment, you must select it from the drop-down menu in the Home tab before starting Spyder:
Recommendations for teachers
If you are using Python in your course, we recommend that you:
Install Anaconda exactly as described above, and use this version to create exercises. There may be differences between the packages in your «normal» Python installation and those that Anaconda comes with, and you should run exactly the same environment as your students will.
If you need extra packages, do not ask your students to install them using conda or pip commands. Instead,
Debugging Python programs
A short introduction to debugging Python programs in Spyder are available in English and Norwegian:
Источник
Установка Anaconda в Ubuntu
Anaconda — это очень популярный дистрибутив Python, который содержит удобный пакетный менеджер Conda, несколько предустановленных версий Python (2.7, 3.4 и 3.7), а также среду разработки IDLE Spider и множество библиотек, которые очень просто установить. Ещё здесь есть библиотеки для обработки Big Data, прогнозной аналитики и научных вычислений. Также можно всем управлять через графическую утилиту Anaconda Navigator.
В этой статье мы рассмотрим, как скачать и установить Anaconda Python Ubuntu 18.04 с официального сайта программы, а также как подготовить эту платформу к работе.
Установка Anacoda в Ubuntu
1. Скачивание и установка программы
Сначала нужно скачать установщик платформы с официального сайта. На момент написания статьи самая свежая версия программы — 2019.03. Нажмите кнопку Download, а затем выберите операционную систему Linux:

Вы можете скачать программу прямо в браузере или скопировать ссылку для загрузки через wget. Например, для текущей версии команда будет выглядеть так:

Поскольку это достаточно большой файл, после завершения загрузки желательно проверить его по контрольной суме. Найти контрольную сумму загруженного файла можно командой:
Затем её нужно сравнить с сумой, указанной на этой странице для вашей версии программы. Если полученные значения совпадают, значит всё правильно.

Далее запустите полученный скрипт:
На первом шаге установки нажмите Enter, затем наберите yes, чтобы принять лицензионное соглашение:

Далее нужно выбрать папку, куда будет установлена программа:

Затем пойдёт установка Anaconda 3 Ubuntu. Процесс установки займёт некоторое время.

В конце установки программа предложит изменить
/.bashrc таким образом, чтобы Сonda запускалась автоматически при запуске терминала. Если вы не сделали это во время установки, то это можно выполнить потом командой:
conda init bash
Затем выполните следующую команду, чтобы система перечитала настройки:
Теперь вы можете проверить, всё ли работает, выполнив такую команду:

На этом установка Anaconda Ubuntu завершена.
2. Обновление Anaconda
Обновление Anaconda тоже достаточно просто выполнить. Сначала нужно обновить инструмент conda. Для этого выполните:
conda update conda
На вопросы программы отвечайте y. Когда обновление завершится, можно обновить саму Anaconda 3:
conda update anaconda
Аналогично предыдущему пункту, нажмите y, чтобы продолжить обновление.
3. Окружения Conda
Как я уже сказал, Сonda — это пакетный менеджер, а также это менеджер окружений. Вы можете создать несколько окружений с разными версиями Python, а также с разными установленными в них библиотеками. Посмотреть список доступных окружений можно командой:
conda info —envs

Для активации окружения используется команда activate. Например, сделаем активным окружение base:
conda activate base
Также вы можете создать новое окружение с другой версией Python. Например, сделаем окружение с Python 3.5:
conda create —name ptn35env python=3.5
Программа создаст окружение и сообщит, какие пакеты ей надо установить, соглашаемся на установку:

Затем активируем нужное окружение:
conda activate ptn35env

Чтобы деактивировать текущее окружение, используйте команду deactivate:
Чтобы удалить окружение ptn35env, нужно использовать не команду uninstall, а remove:
conda remove —name ptn35env -all
4. Установка пакетов Conda
Посмотреть список установленных пакетов можно командой list:

Чтобы найти нужный пакет, используйте search, например, ищем пакетный менеджер Python — pip:
comda search pip

А для установки пакета используйте install. Например, установим tensorflow:
conda install tensorflow

Удалить пакет можно командой remove:
conda remove tensorflow
Удаление Anaconda
Чтобы удалить Anaconda из своей системы, достаточно выполнить следующие команды:
/.bashrc и удалите оттуда строки, добавленные Anaconda, обычно, находятся между тегами conda initialize:

Затем удалите скрытые папки с дополнительными файлами и конфигурацией платформы:
Выводы
Теперь установка Anaconda в Ubuntu завершена. Вы можете начать пользоваться пакетным менеджером Conda, использовать виртуальные окружения в Python и легко устанавливать пакеты. Мы разобрали только основы использования conda, чтобы изучить программу лучше, читайте официальную документацию.
Источник
Guide for Installing and Uninstalling Anaconda in Linux
What is Anaconda?
Anaconda is a Data Science platform. It aims to simplify development, packaging and deploying packages in certain programming languages. It currently supports Python (2 & 3 both) and R.
Anaconda comes with its own package manager called conda. It’s an alternative to pip, python-native package manager. conda also has a virtual environment (provided by virtualenv in normal python installations).
It includes several packages preinstalled. So all of these in one install is a pretty good deal for developers and sys-admins. Its community is also widespread, which has forums and a lot of documentation for learning and troubleshooting.
Anaconda has two versions:
- Anaconda Enterprise for Business uses. It has great scalability features.
- Anaconda Distribution for individual users, students, data scientists, and professionals. It’s open source.
Note that this article explains the installing and uninstalling of Anaconda Distribution rather than Anaconda Enterprise. Refer to the docs for the Enterprise edition.
Install Anaconda in Linux
Installing Anaconda is a straight forward task just like running those programs in Windows. You get an installer script and then run it.
Let’s see the steps in a little more detail.
Step 1: Download the correct version of Anaconda
Head over to Anaconda official website and download the installer after selecting your OS correctly. Be sure to check which version of Python to be installed and which CPU architecture you have. They are mandatory for the correct working of the program.
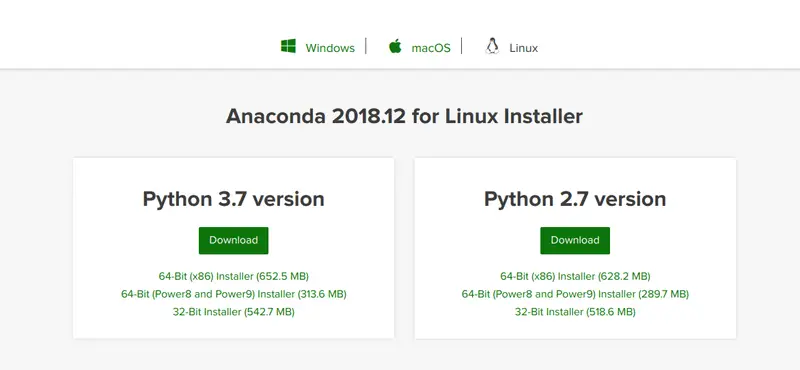 Select your Anaconda version carefully
Optional Step: After downloading, check the hash sum of the downloaded file using md5sum or sha256sum. Verify the hashes with the ones mentioned on this page.
One thing you might notice is that anaconda installer is entirely different from how you normally install a program in Linux. There is no need to extract a tar xz file because it’s just a .sh script file. You can see that from the following screenshots.
 Directory listing showing anaconda installer which is just .sh script file
Installing anaconda is very straight forward. Everything will be done for you.
For example, .bashrc will be edited to extend the PATH environment variable. As of this writing, anaconda installer updates only
/.bashrc of the current user. So if you want to allow other users to access this program, you need to edit /etc/profile.
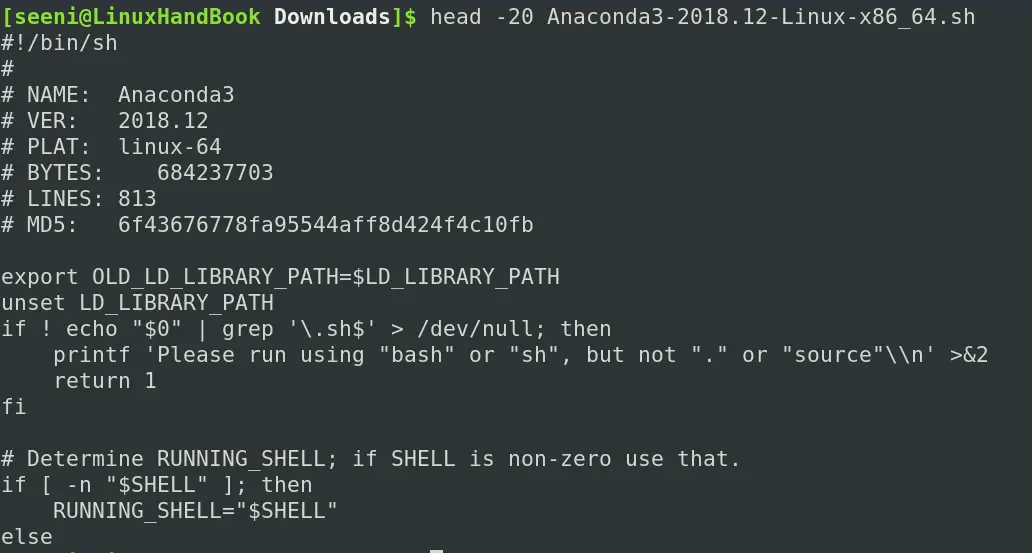 First 20 lines of the anaconda installer
You need not to extract any file or move the installer to places like /usr/local. You just need to run the installer. Installer will itself copy the files to the required location(You can change those too).
Step 2: Installing Anaconda through the command line installer
Run the installer. You can do that by going into the directory where you downloaded Anaconda or by providing the absolute path.
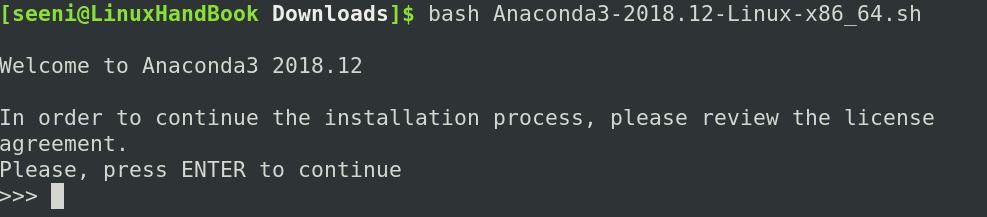 Run Anaconda bash script to start installation
The installer will prompt the following questions regarding installation.
License Agreement – Read through the agreement and proceed if you agree (of course, you do have to agree).
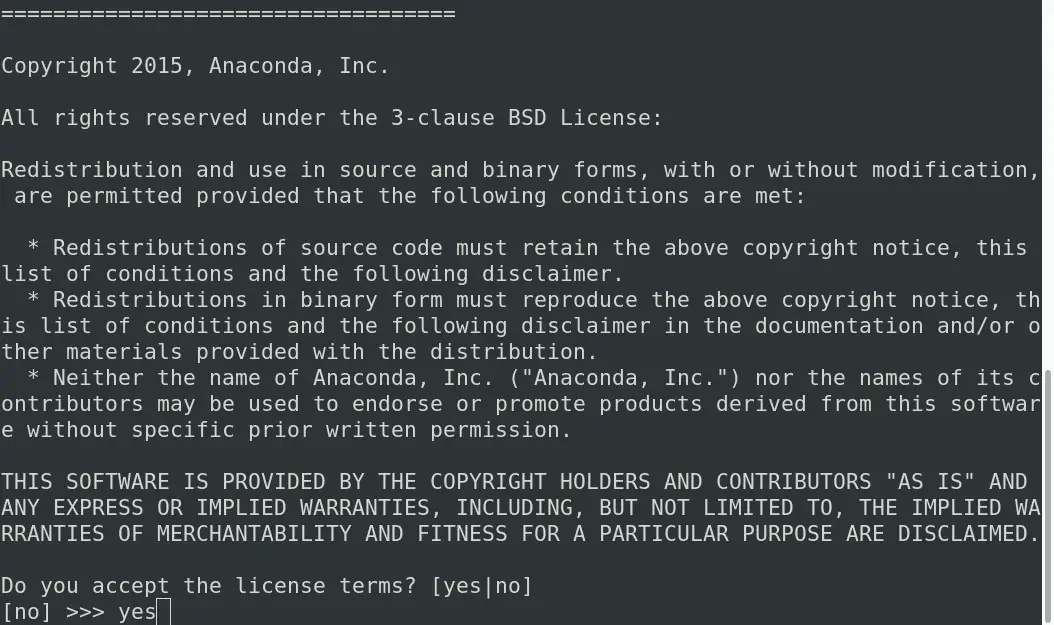 Agree to the license
Install Location – This is the place where anaconda files (i.e., executables) will be installed.
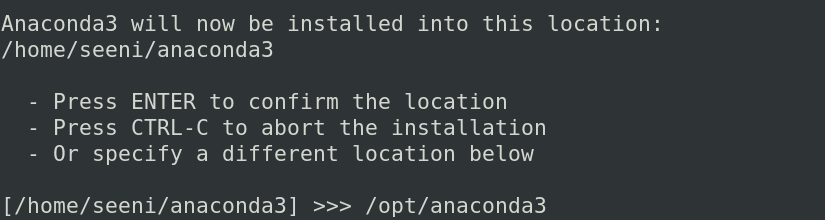 Provide a install location or go with the default
Specify places like /opt/anaconda3 or /usr/local/anaconda3 if you want to make the program available to all users.
You can also specify /home/ /anaconda3 or any other path if you just need to install for the current user.
If you want to share the access to anaconda, make sure that those people also have access to that directory or themselves are sudo users.
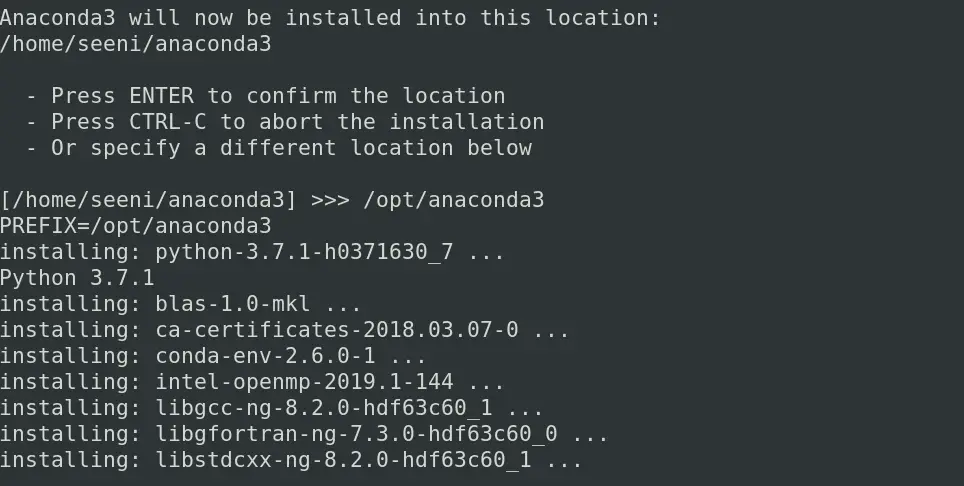 Anaconda is installed in your chosen location
/.bashrc – This is the part where your executables are linked to environment variable PATH. Note that this will initialize
/.bashrc only for the current user. So if you don’t all users to have access, you need to edit /etc/profile. You can find out about how to do that later in this article.
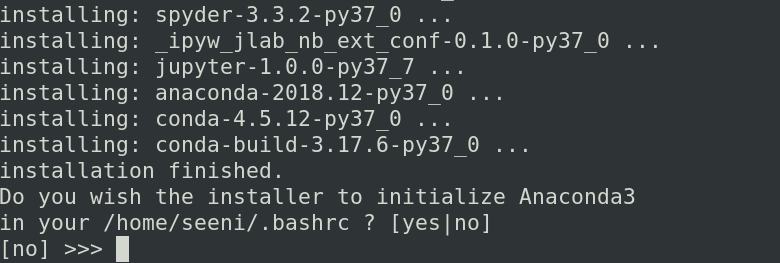 Initialize bashrc for Anaconda
VS code install – It will prompt whether to install VS Code editor or not. Type yes/no based on your preference. Since that is not our focus in this article, I recommend typing “no” and continue with the installation later.
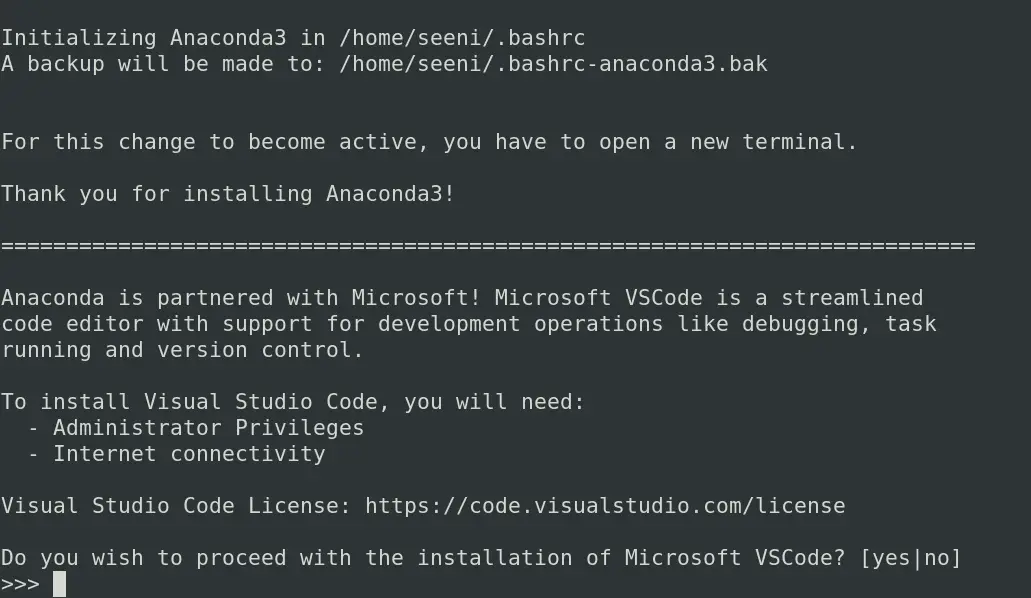 You can install VS Code with Anaconda
Installation is now complete. You will now have conda and anaconda-navigator executables.
Let us check whether they are working. Type conda —version to see the version as follows.
 conda version
Type anaconda-navigator and you’ll see the following window.
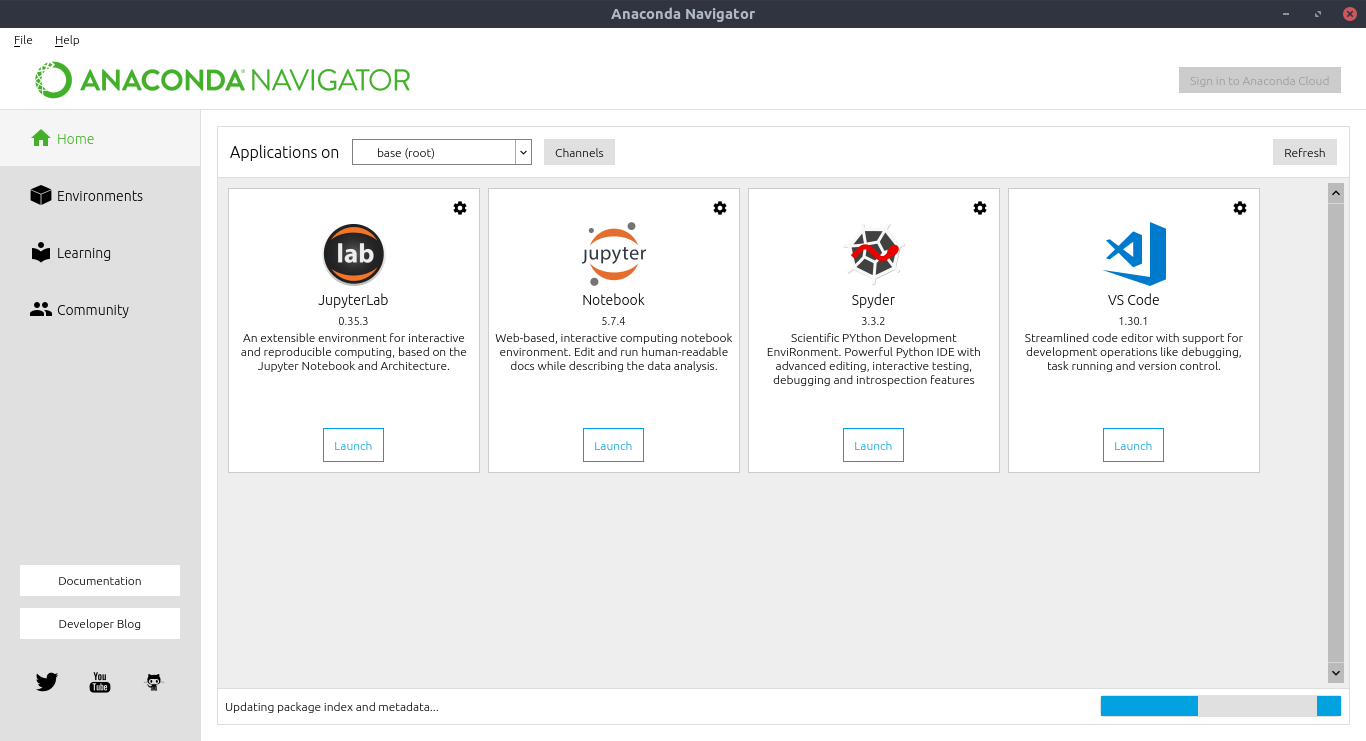 anaconda navigator
The anaconda-navigator is more than an IDE, you use code editor, Jupyter notebooks, terminals and what not. It will increase your productivity manyfold.
Make Anaconda available for other users
As of now, only current user has his/her’s
/.bashrc file edited to link PATH to anaconda executables.
If you want all users to access anaconda, open /etc/profile and add the following line.
If you have installed anaconda other than the above two locations, just the replace /opt/ with the “install-location” where you have installed anaconda.
If you want only certain users to have access, just edit their
/.bashrc file in their home directory by adding the above export PATH line.
After the install is complete, to make changes live immediately run source
/.bashrc. If you have edited /etc/profile then run source /etc/profile &&
Uninstall Anaconda from Linux
You can uninstall Anaconda in two easy steps.
Step 1: Remove the anaconda directory using rm -rf anaconda-install-location. You may refer to this article to know how to remove files and directories in Linux.
For example, if you installed it in the default location, you can use rm -rf
Step 2: Comment or remove the following line from the /etc/profile and
Now the uninstall is complete. Projects created with conda will not be removed unless you have saved them inside anaconda-install-location like /opt/anaconda3/myproject or /home/seeni/anaconda3/myproject.
That’s it
I hope you found this article useful. If you have suggestions or comments, feel free to drop them below. And don’t forget to share it on social media.
Источник


