How to run a makefile in Windows?
I have some demos that I downloaded and they come with a Makefile.win and a Makefile.sgi. How can I run these in Windows to compile the demos?
17 Answers 17
If you have Visual Studio, run the Visual Studio Command prompt from the Start menu, change to the directory containing Makefile.win and type this:
You can also use the normal command prompt and run vsvars32.bat (c:\Program Files (x86)\Microsoft Visual Studio 9.0\Common7\Tools for VS2008). This will set up the environment to run nmake and find the compiler tools.
You can install GNU make with chocolatey, a well-maintained package manager, which will add make to the global path and runs on all CLIs (powershell, git bash, cmd, etc…) saving you a ton of time in both maintenance and initial setup to get make running.
Install the chocolatey package manager for Windows
compatible to Windows 7+ / Windows Server 2003+
Run choco install make
I am not affiliated with choco, but I highly recommend it, so far it has never let me down and I do have a talent for breaking software unintentionally.
Check out cygwin, a Unix alike environment for Windows
Check out GnuWin’s make (for windows), which provides a native port for Windows (without requiring a full runtime environment like Cygwin)
If you have winget, you can install via the CLI like this:
Also, be sure to add the install path to your system PATH :

Here is my quick and temporary way to run a Makefile
- download make from SourceForge: gnuwin32
- install it
- go to the install folder
- copy the all files in the bin to the folder that contains Makefile
- open the cmd(you can do it with right click with shift) in the folder that contains Makefile and run
Plus, you can add arguments after the command, such as

If you install Cygwin. Make sure to select make in the installer. You can then run the following command provided you have a Makefile.
With Visual Studio 2017 I had to add this folder to my Windows 10 path env variable:
There’s also HostX86
If it is a «NMake Makefile», that is to say the syntax and command is compatible with NMake, it will work natively on Windows. Usually Makefile.win (the .win suffix) indicates it’s a makefile compatible with Windows NMake. So you could try nmake -f Makefile.win .
Often standard Linux Makefiles are provided and NMake looks promising. However, the following link takes a simple Linux Makefile and explains some fundamental issues that one may encounter. It also suggests a few alternatives to handling Linux Makefiles on Windows.
I use MinGW tool set which provides mingw32-make build tool, if you have it in your PATH system variables, in Windows Command Prompt just go into the directory containing the files and type this command:

Firstly, add path of visual studio common tools ( c:\Program Files (x86)\Microsoft Visual Studio 14.0\Common7\Tools ) into the system path. To learn how to add a path into system path, please check this website: http://www.computerhope.com/issues/ch000549.htm. You just need to this once.
After that, whenever you need, open a command line and execute vsvars32.bat to add all required visual studio tools’ paths into the system path.
Then, you can call nmake -f makefile.mak
PS: Path of visual studio common tools might be different in your system. Please change it accordingly.

I tried with cygwin & gnuwin, and didn’t worked for me, I guess because the makefile used mainly specific linux code.
What it worked was use Ubuntu Bash for Windows 10. This is a Marvel if you come from MAC as it is my case:
- To install the Ubuntu Bash: https://itsfoss.com/install-bash-on-windows/
- Once in the console, to install make simply type «make» and it gives the instructions to download it.
Extras:
- Useful enable copy / paste on bash: Copy Paste in Bash on Ubuntu on Windows
- In my case the make called Maven, so I have to install it as well: https://askubuntu.com/questions/722993/unable-to-locate-package-maven
- To access windows filesystem C: drive, for example: «cd /mnt/c/»
I tried all of the above. What helps me:
- Download the mingw-get.
- Setup it.
- Add something like this C:\MinGW\bin to environment variables.
- Launch (!important) git bash. Power shell, developer vs cmd, system cmd etc didn’t help.
- Type mingw-get into the command line.
- After type mingw-get install mingw32-make .
Done! Now You might be able to use make-commands from any folder that contains Makefile.

- Download from https://sourceforge.net/projects/gnuwin32/
- Set the variable path in advance setting for recognize in command prompt (C:\Program Files (x86)\GnuWin32\bin)

Install msys2 with make dependency add both to PATH variable. (The second option is GNU ToolChain for Windows. MinGW version has already mingw32-make included.)
Install Git Bash. Run mingw32-make from Git Bash.

I am assuming you added mingw32/bin is added to environment variables else please add it and I am assuming it as gcc compiler and you have mingw installer.
First step: download mingw32-make.exe from mingw installer, or please check mingw/bin folder first whether mingw32-make.exe exists or not, else than install it, rename it to make.exe .
After renaming it to make.exe , just go and run this command in the directory where makefile is located. Instead of renaming it you can directly run it as mingw32-make .
After all, a command is just exe file or a software, we use its name to execute the software, we call it as command.
Make for Windows
Make: GNU make utility to maintain groups of programs
Version
Description
Make is a tool which controls the generation of executables and other non-source files of a program from the program’s source files. Make gets its knowledge of how to build your program from a file called the makefile, which lists each of the non-source files and how to compute it from other files. When you write a program, you should write a makefile for it, so that it is possible to use Make to build and install the program.
Capabilities of Make
- Make enables the end user to build and install your package without knowing the details of how that is done — because these details are recorded in the makefile that you supply.
- Make figures out automatically which files it needs to update, based on which source files have changed. It also automatically determines the proper order for updating files, in case one non-source file depends on another non-source file. As a result, if you change a few source files and then run Make, it does not need to recompile all of your program. It updates only those non-source files that depend directly or indirectly on the source files that you changed.
- Make is not limited to any particular language. For each non-source file in the program, the makefile specifies the shell commands to compute it. These shell commands can run a compiler to produce an object file, the linker to produce an executable, ar to update a library, or TeX or Makeinfo to format documentation.
- Make is not limited to building a package. You can also use Make to control installing or deinstalling a package, generate tags tables for it, or anything else you want to do often enough to make it worth while writing down how to do it.
Homepage
Download
If you download the Setup program of the package, any requirements for running applications, such as dynamic link libraries (DLL’s) from the dependencies as listed below under Requirements, are already included. If you download the package as Zip files, then you must download and install the dependencies zip file yourself. Developer files (header files and libraries) from other packages are however not included; so if you wish to develop your own applications, you must separately install the required packages.
| Description | Download | Size | Last change | Md5sum |
|---|---|---|---|---|
| • Complete package, except sources | Setup | 3384653 | 25 November 2006 | 8ae51379d1f3eef8360df4e674f17d6d |
| • Sources | Setup | 1252948 | 25 November 2006 | b896c02e3d581040ba1ad65024bbf2cd |
| • Binaries | Zip | 495645 | 25 November 2006 | 3521948bc27a31d1ade0dcb23be16d49 |
| • Dependencies | Zip | 708206 | 25 November 2006 | d370415aa924fa023411c4099ef84563 |
| • Documentation | Zip | 2470575 | 25 November 2006 | 43a07e449d4bab3eb3f31821640ecab7 |
| • Sources | Zip | 2094753 | 25 November 2006 | 8bed4cf17c5206f8094f9c96779be663 |
You can also download the files from the GnuWin32 files page.
You can monitor new releases of the port of this package.
Get started: Run your first Windows container
This topic describes how to run your first Windows container, after setting up your environment as described in Get started: Prep Windows for containers. To run a container, you first install a base image, which provides a foundational layer of operating system services to your container. Then you create and run a container image, which is based upon the base image. For details, read on.
Install a container base image
All containers are created from container images. Microsoft offers several starter images, called base images, to choose from (for more details, see Container base images). This procedures pulls (downloads and installs) the lightweight Nano Server base image.
Open a command prompt window (such as the built-in command prompt, PowerShell, or Windows Terminal), and then run the following command to download and install the base image:
If you see an error message that says no matching manifest for unknown in the manifest list entries , make sure Docker isn’t configured to run Linux containers.
After the image is finished downloading—read the EULA while you wait—verify its existence on your system by querying your local docker image repository. Running the command docker images returns a list of installed images.
Here’s an example of the output showing the Nano Server image.
Run a Windows container
For this simple example, a вЂHello World’ container image will be created and deployed. For the best experience, run these commands in an elevated command prompt window (but don’t use the Windows PowerShell ISE—it doesn’t work for interactive sessions with containers, as the containers appear to hang).
Start a container with an interactive session from the nanoserver image by entering the following command in your command prompt window:
After the container is started, the command prompt window changes context to the container. Inside the container, we’ll create a simple вЂHello World’ text file and then exit the container by entering the following commands:
Get the container ID for the container you just exited by running the docker ps command:
Create a new вЂHelloWorld’ image that includes the changes in the first container you ran. To do so, run the docker commit command, replacing with the ID of your container:
When completed, you now have a custom image that contains the hello world script. This can be seen with the docker images command.
Here’s an example of the output:
Finally, run the new container by using the docker run command with the —rm parameter that automatically removes the container once the command line (cmd.exe) stops.
The result is that Docker created a container from the ‘HelloWorld’ image, Docker started an instance of cmd.exe in the container, and the cmd.exe read our file and output the contents to the shell. As the final step, Docker stopped and removed the container.
Run a Windows container using Windows Admin Center
Windows Admin Center can be used to run your containers locally. Specifically, you use the the Containers extension of your Windows Admin Center instance to run the containers. First, open the container host you want to manage, and in the Tools pane, select the Containers extension. Then, select the Images tab inside the Container extension under Container Host.

If your host doesn’t have a base container image, select the Pull option which opens the following:
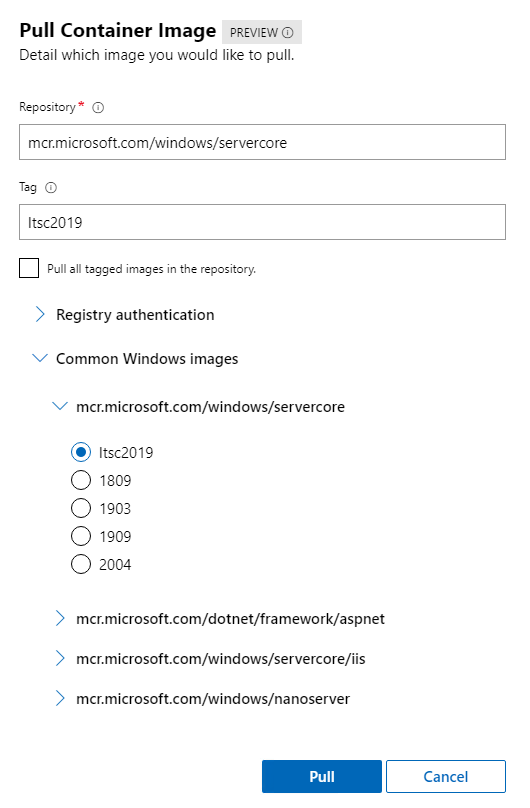
In the Pull Container Image settings, provide the image URL and the tag. If you aren’t certain which image to pull, Windows Admin Center provides a list of common images from Microsoft. You can also provide the credentials to pull an image from a private repository. Once you fill out the necessary information, click Pull. Windows Admin Center will start the pull process on the container host. After the download is complete, you should see the new image on the Images tab.
Select the image you want to run, and click Run.
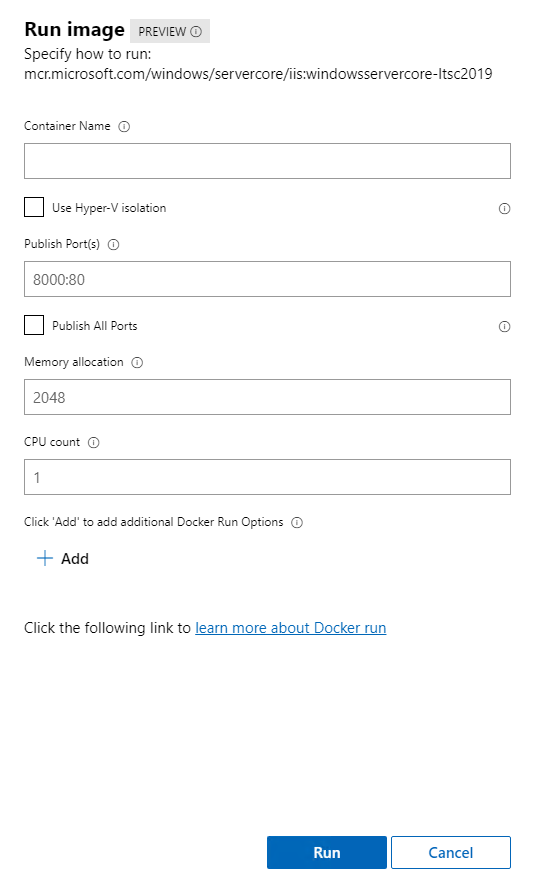
On the Run menu, set up the configuration for the container, such as the container name, the isolation type, which ports to publish, and memory and CPU allocation. Additionally, you can append Docker run commands that are not in the UI, such as -v for persistent volume. For more information on available Docker run parameters, review the documentation.
Once you have finished the configuration for the container, click Run. You can see the status of the running containers on the Containers tab:


