- Start your PC in safe mode in Windows 10
- How to take and save screenshots on Windows 10 [STEP-BY-STEP GUIDE]
- How do I take screenshots on PC?
- Where does Windows 10 save my screenshots?
- Editor’s choice: Use a dedicated tool for screenshots
- 4 quick methods to take screenshots on PC
- Method 1 – Use Print Screen key
- Method 2 – Use Windows Key + PrtScn shortcut
- How can I change my Windows 10 Default «Save As» Location to «Desktop» and remove the extra «Save As» Prompt?
- Replies (7)
- Hard Drive Full? Here’s How to Save Space in Windows 10
- I. Search for Large, Unnecessary Files
- II. Use the Disk Cleanup App
- III. Disable Hibernation
Start your PC in safe mode in Windows 10
Safe mode starts Windows in a basic state, using a limited set of files and drivers. If a problem doesn’t happen in safe mode, this means that default settings and basic device drivers aren’t causing the issue. Observing Windows in safe mode enables you to narrow down the source of a problem, and can help you troubleshoot problems on your PC.
There are two versions of safe mode: Safe Mode and Safe Mode with Networking. Safe Mode with Networking adds the network drivers and services you’ll need to access the Internet and other computers on your network.
Select from the following sections to find out how to start your PC in safe mode from Settings, from the sign-in screen, or from a black or blank screen.
Press Windows logo key + I on your keyboard to open Settings. If that doesn’t work, select the Start button, then select Settings .
Under Advanced startup, select Restart now.
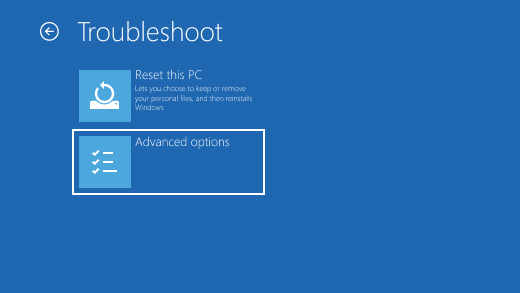
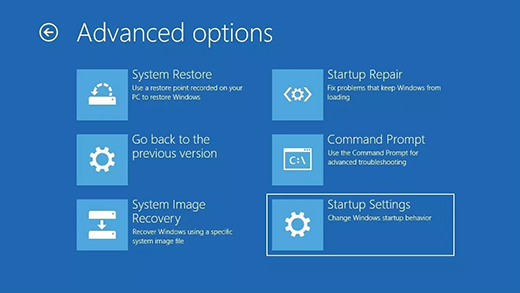
After your PC restarts to the Choose an option screen, select Troubleshoot > Advanced options > Startup Settings > Restart. You may be asked to enter your BitLocker recovery key.


After your PC restarts, you’ll see a list of options. Select 4 or press F4 to start your PC in Safe Mode. Or if you’ll need to use the Internet, select 5 or press F5 for Safe Mode with Networking.
When you can’t open Settings to get into safe mode, restart your device from the Windows sign-in screen.
On the Windows sign-in screen, press and hold the Shift key while you select the Power > Restart .
After your PC restarts to the Choose an option screen, select Troubleshoot > Advanced options > Startup Settings > Restart. You may be asked to enter your BitLocker recovery key.
After your PC restarts, you’ll see a list of options. Select 4 or F4 to start your PC in safe mode. Or if you’ll need to use the Internet, select 5 or F5 for Safe Mode with Networking.
Note: If you’ve encrypted your device, you’ll need your BitLocker key to start in safe mode.
Before you enter safe mode, you need to enter the Windows Recovery Environment (winRE). To do this, you will repeatedly turn your device off, then on:
Hold down the power button for 10 seconds to turn off your device.
Press the power button again to turn on your device.
On the first sign that Windows has started (for example, some devices show the manufacturer’s logo when restarting) hold down the power button for 10 seconds to turn off your device.
Press the power button again to turn on your device.
When Windows restarts, hold down the power button for 10 seconds to turn off your device.
Press the power button again to turn on your device.
Allow your device to fully restart. You will enter winRE.
Now that you are in winRE, you will follow these steps to take you to safe mode:
On the Choose an option screen, select Troubleshoot > Advanced options > Startup Settings > Restart.
After your device restarts, you’ll see a list of options. Select option 5 from the list or press F5 for Safe Mode with Networking.
If you need more info on a black or blank screen error, see Troubleshoot black or blank screen errors.
Notes: If you need to exit safe mode, simply restart your device, or:
Press the Windows logo key + R.
Type msconfig in the Open box and then select OK.
Select the Boot tab.
Under Boot options, clear the Safe boot checkbox.
How to take and save screenshots on Windows 10 [STEP-BY-STEP GUIDE]


- Download Restoro PC Repair Tool that comes with Patented Technologies (patent available here).
- Click Start Scan to find Windows issues that could be causing PC problems.
- Click Repair All to fix issues affecting your computer’s security and performance
- Restoro has been downloaded by 0 readers this month.
Sometimes you need to quickly share a screenshot with someone online. Creating and sharing them is relatively simple, and today we’re going to show you where your screenshots go on Windows 10.
How do I take screenshots on PC?
Creating screenshots on Windows 10 is fairly simple, and it doesn’t even require you to use a complex software application.
You can easily create screenshots on Windows 10 with built-in tools or with dedicated tools, and today we’re going to show you where your screenshots are saved by default on Windows 10.
Where does Windows 10 save my screenshots?
If you haven’t changed your default settings, you should be able to find your screenshots under the following path: C:Users[User]My PicturesScreenshots.
Of course, you can also create a dedicated folder where you can save your screenshots. You can create the folder on your desktop or use a location of your choice.
Furthermore, you can also upload your screenshots if you need to share them with someone. Follow this article to find out more about how to upload screenshots and what tools to use.
Editor’s choice: Use a dedicated tool for screenshots
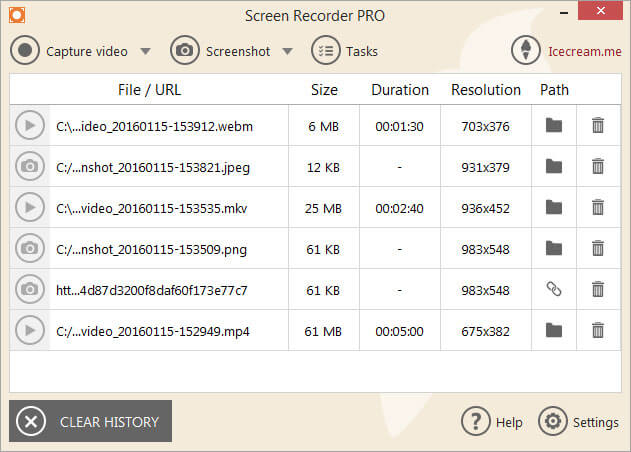
Icecream Screen Recorder is a simple tool, straightforward yet with enough features to accomplish what you want but not confuse you. Keep your screenshots organized, ready to be used right away with this innovative program.
You can save your screenshots straight to your hard drive to the destination of your choosing. And, you will be able to store the screenshots in various file formats.

This software is a viable alternative to typical screen capturing apps that are on the market.
You can easily capture an image in order to highlight particular areas or a specific section.
This tool is ideal if you use multiple browsers during your daily Internet sessions.
Here are just some of its features:
- Project history: you can easily find your past projects
- Screen area selection: select the area you want to be recorded
- Drawing panel: add arrows, lines, and marks to your capture
- You can also record online videos.
- Capture videos with the simple click of a button.
- Change format of the recorded videos
- Schedule screen recording
Icecream Screen Recorder is already the world’s bestseller and you can give it a try for free right now. A fully-functional trial version is available for download.
4 quick methods to take screenshots on PC
Method 1 – Use Print Screen key
This is probably one of the oldest methods of creating screenshots. To create a screenshot simply press the Print Screen or PrtScn key on your keyboard. By pressing this key you’ll create a screenshot of your entire screen.
If you want to create just a screenshot of your current window, you can do so by using Alt + PrtScn shortcut.
By using these shortcuts your screenshot will be saved to your Clipboard. In order to save it to your hard drive, you need to start Paint or any other image editing software and paste the screenshot from the Clipboard by pressing Ctrl + V shortcut.
Although this method is rather simple, we have to warn you that you won’t be able to view any previously made screenshots. Clipboard saves only one entry at the time, and if you accidentally copy something else into Clipboard you’ll remove your screenshot.
If you use this method, it’s recommended to paste the screenshot to your image editor as soon as you can in order not to lose it. By using any image editing tool you can save the screenshot to any folder that you want.
We have to mention that you can somewhat avoid the problem with Clipboard simply by using a clipboard manager tool. These types of tools allow you to view all items that were copied to your Clipboard so you won’t ever lose your unsaved screenshots again.
If you’re having trouble with copy-paste on Windows 10, this complete guide will help you solve any issues with it.
Method 2 – Use Windows Key + PrtScn shortcut
Print Screen shortcut was available in previous versions of Windows, but with Windows 8 Microsoft introduced a new shortcut. In Windows 8 we got Windows Key + PrtScn shortcut, and this one made its way to Windows 10.
We have to mention that some laptops might use a slightly different shortcut, so be sure to check your laptop’s instruction manual for details.
By using this shortcut your screen will become dim for a half second and you’ll hear the shutter sound. This means that you successfully created a screenshot.
How can I change my Windows 10 Default «Save As» Location to «Desktop» and remove the extra «Save As» Prompt?
Whenever I try to save a file I always get an extra «save as» menu that I wouldn’t get with windows 8.
Is there a way to remove this additional prompt that is completely unecessary for ALL of my programs that I save from? I would also like to change the default save location to «Desktop» for all of my software and applications. Basically, I want to click «save as» and then «save» all within a second and know that whatever file or picture I am saving will be saved to my desktop. The things I do at work are very repetative and having to manually change the save location for files every time is quite annoying.
Replies (7)
![]()
Thank you for posting in Microsoft Community.
I understand that you are trying to make Desktop as the default saving location for the files. Before that, I suggest you to answer some questions below to assist you better.
- Through which application are you trying to save the files?
- Are you getting this in File explorer or any other application?
Please post to us with some more clarity to understand the issue better and help you.
1 person found this reply helpful
Was this reply helpful?
Sorry this didn’t help.
Great! Thanks for your feedback.
How satisfied are you with this reply?
Thanks for your feedback, it helps us improve the site.
How satisfied are you with this reply?
Thanks for your feedback.
![]()
I will get the «Save As» prompt that I posted a picture of on my first post when I use Adobe. This prompt is actually really slow and takes about 3 seconds to load up and then I will have to click on Desktop before it gives me the old save as prompt that I use to get in Windows 8 or earlier.
I will get this prompt when I go to «Save As» on any Microsoft Office program, such as Word:
This will default to the «Onedrive», where I will have to doubleclick «This PC» and have to change the directory to Desktop. That takes a few seconds more than necessary.
And I will get the old prompt when I «Save As» in programs like Notepad or Paint:
The «Save As» prompt shown above is the prompt that all programs used to use to save documents. I want all of my programs to use this prompt so that they automatically default to desktop without me having to go through other prompts that waste time.
I didn’t have this issue until I upgraded to windows 10, which means it’s likely an issue with the Onedrive. The Onedrive should NOT be the default save location for people that use Windows 10, it should just be optional rather than shoving it down our throats.
Hard Drive Full? Here’s How to Save Space in Windows 10
Instead of the large but slow mechanical hard disk drives of yesteryear, many laptop users have Solid State Drives (SSDs) and internal eMMC storage units that often cap out at 256GB and can go as low as 32GB. With those kinds of space constraints, it’s easy to boot up one day and find out that your C drive is completely or very nearly full. Fortunately, if you have Windows 10, there are several steps you can take to clear out unnecessary files and gain much-needed free disk space.
I. Search for Large, Unnecessary Files
You may have files hiding in the depths of your storage drive that you don’t need, but which are taking up huge amounts of space. These could be log files, temporary files or installation apps for programs you’ve already installed. Here’s how to find your largest files.
1. Open File Explorer (aka Windows Explorer).

2. Select «This PC» in the left pane so you can search your whole computer. If you only want to look at your C drive, select the C drive instead.
3. Type «size: » into the search box and select Gigantic.
You may have to wait a few minutes for File Explorer to search your whole drive. Wait until the status bar finishes filling the top.
4. Select «details» from the View tab.
5. Click the Size column to sort by largest to smallest.
6. Look through your list of files and delete those you no longer need. If you’re in doubt about what a file does, leave it be or look it up. The last thing you want to do is break a program or erase important data. ISO files, Program installers and temp files are often things you can get rid of.
7. Navigate to the Downloads folder. It’s usually in your Quick Access toolbar.
8. Delete any downloads you no longer need.
II. Use the Disk Cleanup App
Windows 10’s buit-in Disk Cleanup program finds and deletes unnecessary files that the operating system no longer needs. Here’s how to use it.
1. Launch Disk Cleanup. You can find it by searching in the search box.
2. Select Your C drive and click OK.
You’ll have to wait a moment while it scans your drive.
3. Check off all the types of files you want to delete if they aren’t already selected. They can all be safely removed, but some, like the temporary Internet files that make up your browser cache, may serve a purpose. Temporary files are often a particularly large waste of space.
4. Click Ok.
5. Click Delete Files to confirm.
Wait patiently while it deletes the files.
6. Launch Disk Cleanup again, select C drive and click Clean up system files.
7. Select C drive again.
8. Check off all the listed files (if they aren’t already checked) and click Ok. Note that that command erases Downloaded program files and Temporary Internet files so if you want to keep those, uncheck them.
III. Disable Hibernation
By default, your laptop is set to allow hibernation, a state of deep sleep where the contents of your RAM are saved to the hard drive rather than using power in the memory chips themselves.
Unfortunately, for hibernate to work, the system has to keep a large system file called hiberfil.sys that eats up several gigabytes, even when the computer is powered on. If you’re willing to live without hibernation mode, you can save the space.
1. Open a Command prompt as administrator. You can get there by typing cmd into the search box, right-clicking the result and selecting «Run as administrator.»
2. Type powercfg /hibernate off at the prompt and hit Enter.


