- Find Ram Size in Linux Using free And top Commands
- Use /proc/meminfo file to find ram size in Linux
- Use free Command to check RAM size
- The free command options
- Finding free and used ram info using the vmstat command
- The top Command
- GUI system information tool
- Say hello to dmidecode Command
- Related media
- Conclusion
- 17 Ways to check size of physical memory (RAM) in Linux
- What is RAM
- Method-1 : Using free Command
- Method-2 : Using /proc/meminfo file
- Method-3 : Using top Command
- Method-4 : Using vmstat Command
- Method-5 : Using nmon Command
- Method-6 : Using dmidecode Command
- Method-7 : Using hwinfo Command
- Method-8 : Using lshw Command
- Method-9 : Using inxi Command
- Method-10 : Using screenfetch Command
- Method-11 : Using neofetch Command
- Method-12 : Using dmesg Command
- Method-13 : Using atop Command
- Method-14 : Using htop Command
- Method-15 : Using corefreq Utility
- Method-16 : Using glances Command
- Method-17 : Using gnome-system-monitor
- 5 commands to check memory usage on Linux
- Memory Usage
- 1. free command
- 2. /proc/meminfo
- 3. vmstat
- 4. top command
- 5. htop
- RAM Information
- Summary
- 66 thoughts on “ 5 commands to check memory usage on Linux ”
Find Ram Size in Linux Using free And top Commands
Use /proc/meminfo file to find ram size in Linux
| Tutorial details | |
|---|---|
| Difficulty level | Easy |
| Root privileges | Yes |
| Requirements | None |
| Est. reading time | 5m |
The /proc/meminfo file tells you about memory usage on the server. This file is used by the free command and many other Linux commands to display the amount of free and used memory (both physical and swap) on the system as well as the shared memory and buffers used by the kernel. Type the following cat command/less command to view total installed ram and used ram, enter:
$ less /proc/meminfo
OR
$ cat /proc/meminfo
Sample outputs:
Of course, we can use the grep command/egrep command as follows to filter out information:
Use free Command to check RAM size
Free command is a frontend to /proc/meminfo file. It provides more human-readable output to show you the total amount of free and used physical and swap memory in the system, as well as the buffers used by the kernel, run:
$ free -m
OR
$ free -g
Sample outputs:
The free command options
From the free(1) man page:
Hence, we try those options too:
$ free
$ free -m
$ free -g -t -o
$ free -t
$ free -o
Finding free and used ram info using the vmstat command
The vmstat command can display memory statistics including additional information about processes, paging, block IO, traps, and cpu activity. Pass the -s option to the vmstat to show us memory statistics as follows:
$ vmstat -s
Sample outputs:
The top Command
The top command provides a dynamic real-time view of a running system including a quick summary information about RAM, CPU as well as a list of tasks currently being managed by the Linux kernel. Type the following command:
$ top
Sample outputs:
Fig.01: Display Linux RAM Size with the top commad
GUI system information tool
The System Monitor Gnome or KDE application enables you to display basic system information and monitor system processes, usage of system resources, and file systems. You can start System Monitor in the following ways:
Click on System menu > Choose Administration > System Monitor
Alternatively, type the following command:
$ gnome-system-monitor
Sample outputs:
Linux view installed memory with the System Monitor application
- No ads and tracking
- In-depth guides for developers and sysadmins at Opensourceflare✨
- Join my Patreon to support independent content creators and start reading latest guides:
- How to set up Redis sentinel cluster on Ubuntu or Debian Linux
- How To Set Up SSH Keys With YubiKey as two-factor authentication (U2F/FIDO2)
- How to set up Mariadb Galera cluster on Ubuntu or Debian Linux
- A podman tutorial for beginners – part I (run Linux containers without Docker and in daemonless mode)
- How to protect Linux against rogue USB devices using USBGuard
Join Patreon ➔
Say hello to dmidecode Command
The dmidecode command is used for dumping a computer’s DMI (some say SMBIOS) table contents in a human-readable format. This table contains a description of the system’s hardware components, as well as other useful pieces of information such as serial numbers and BIOS revision. Thanks to this table, you can retrieve this information without having to probe for the actual hardware. To see complete information about memory, enter:
$ sudo dmidecode —type memory
Sample outputs:
Related media
This tutorial is also available in a quick video format:
Conclusion
In this tutorial, you learned how to use the various command line and GUI tools amount of free and used memory in the Linux system. See free and vmstat command man page here and here:
man free
man vmstat
man top
man htop
🐧 Get the latest tutorials on Linux, Open Source & DevOps via
Источник
17 Ways to check size of physical memory (RAM) in Linux
Most of the system administrators checks CPU & Memory utilization when they were facing some performance issue.
There is lot of utilities are available in Linux to check physical memory.These commands are help us to check the physical RAM present in system, also allow users to check memory utilization in varies aspect.
Most of us know only few commands and we are trying to include all the possible commands in this article.You may think, why I want to know all these commands instead of knowing some of the specific and routine commands.
Don’t think bad or don’t take in negative way because each one has different requirement and perception so, who’s looking for other purpose then this will very helpful for them.
What is RAM
Computer memory is a physical device which capable to store information temporarily or permanently. RAM stands for Random Access Memory is a volatile memory that stores information used by the operating system, software, and hardware.
Two types of memory is available.
- Primary Memory
- Secondary Memory
Primary memory is the main memory of the computer. CPU can directly read or write on this memory. It is fixed on the motherboard of the computer.
- RAM: Random Access Memory is a temporary memory. This information will go away when the computer is turned off.
- ROM: Read Only Memory is permanent memory, that holds the data even if the system is switched off.
Method-1 : Using free Command
free displays the total amount of free and used physical and swap memory in the system, as well as the buffers and caches used by the kernel. The information is gathered by parsing /proc/meminfo.
Method-2 : Using /proc/meminfo file
/proc/meminfo is a virtual text file that contains a large amount of valuable information about the systems RAM usage.
It reports the amount of free and used memory (both physical and swap) on the system.
Method-3 : Using top Command
Top command is one of the basic command to monitor real-time system processes in Linux. It display system information and running processes information like uptime, average load, tasks running, number of users logged in, number of CPUs & cpu utilization, Memory & swap information. Run top command then hit E to bring the memory utilization in MB.
Method-4 : Using vmstat Command
vmstat is a standard nifty tool that report virtual memory statistics of Linux system. vmstat reports information about processes, memory, paging, block IO, traps, and cpu activity. It helps Linux administrator to identify system bottlenecks while troubleshooting the issues.
Method-5 : Using nmon Command
nmon is a another nifty tool to monitor various system resources such as CPU, memory, network, disks, file systems, NFS, top processes, Power micro-partition and resources (Linux version & processors) on Linux terminal.
Just press m key to see memory utilization stats (cached, active, inactive, buffered, free in MB & free percent)
Method-6 : Using dmidecode Command
Dmidecode is a tool which reads a computer’s DMI (stands for Desktop Management Interface)
(some say SMBIOS – stands for System Management BIOS) table contents and display system hardware information in a human-readable format.
This table contains a description of the system’s hardware components, as well as other useful information such as serial number, Manufacturer information, Release Date, and BIOS revision, etc,.
Print only installed RAM modules.
Sum all the installed RAM modules.
Method-7 : Using hwinfo Command
hwinfo stands for hardware information tool is another great utility that used to probe for the hardware present in the system and display detailed information about varies hardware components in human readable format.
It reports information about CPU, RAM, keyboard, mouse, graphics card, sound, storage, network interface, disk, partition, bios, and bridge, etc,.
Method-8 : Using lshw Command
lshw (stands for Hardware Lister) is a small nifty tool that generates detailed reports about various hardware components on the machine such as memory configuration, firmware version, mainboard configuration, CPU version and speed, cache configuration, usb, network card, graphics cards, multimedia, printers, bus speed, etc.
It’s generating hardware information by reading varies files under /proc directory and DMI table.
Method-9 : Using inxi Command
inxi is a nifty tool to check hardware information on Linux and offers wide range of option to get all the hardware information on Linux system that i never found in any other utility which are available in Linux. It was forked from the ancient and mindbendingly perverse yet ingenius infobash, by locsmif.
inxi is a script that quickly shows system hardware, CPU, drivers, Xorg, Desktop, Kernel, GCC version(s), Processes, RAM usage, and a wide variety of other useful information, also used for forum technical support & debugging tool.
Method-10 : Using screenfetch Command
screenFetch is a bash script. It will auto-detect your distribution and display an ASCII art version of that distribution’s logo and some valuable information to the right.
Method-11 : Using neofetch Command
Neofetch is a cross-platform and easy-to-use command line (CLI) script that collects your Linux system information and display it on the terminal next to an image, either your distributions logo or any ascii art of your choice.
Method-12 : Using dmesg Command
dmesg (stands for display message or driver message) is a command on most Unix-like operating systems that prints the message buffer of the kernel.
Method-13 : Using atop Command
Atop is an ASCII full-screen system performance monitoring tool for Linux that is capable of reporting the activity of all server processes (even if processes have finished during the interval).
It’s logging of system and process activity for long-term analysis (By default, the log files are preserved for 28 days), highlighting overloaded system resources by using colors, etc. It shows network activity per process/thread with combination of the optional kernel module netatop.
Method-14 : Using htop Command
htop is an interactive process viewer for Linux which was developed by Hisham using ncurses library. Htop have many of features and options compared to top command.
Method-15 : Using corefreq Utility
CoreFreq is a CPU monitoring software designed for Intel 64-bits Processors and supported architectures are Atom, Core2, Nehalem, SandyBridge and superior, AMD Family 0F.
CoreFreq provides a framework to retrieve CPU data with a high degree of precision.
Method-16 : Using glances Command
Glances is a cross-platform curses-based system monitoring tool written in Python. We can say all in one place, like maximum of information in a minimum of space. It uses psutil library to get information from your system.
Glances capable to monitor CPU, Memory, Load, Process list, Network interface, Disk I/O, Raid, Sensors, Filesystem (and folders), Docker, Monitor, Alert, System info, Uptime, Quicklook (CPU, MEM, LOAD), etc,.
Method-17 : Using gnome-system-monitor
System Monitor is a tool to manage running processes and monitor system resources. It shows you what programs are running and how much processor time, memory, and disk space are being used. 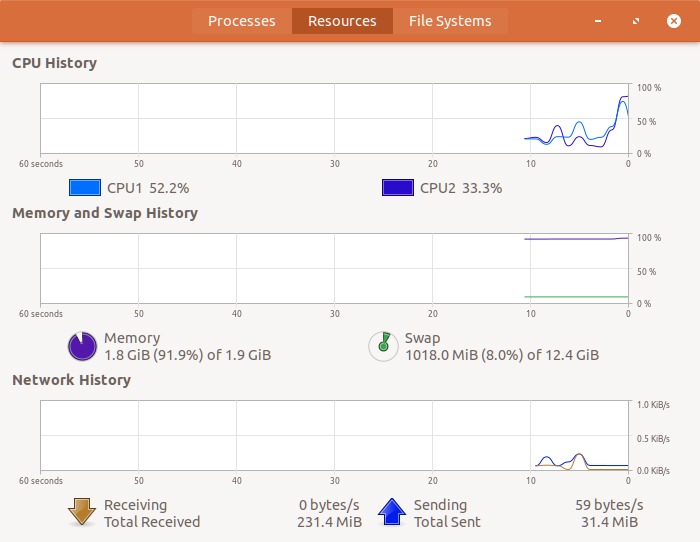
Источник
5 commands to check memory usage on Linux
Memory Usage
On linux, there are commands for almost everything, because the gui might not be always available. When working on servers only shell access is available and everything has to be done from these commands. So today we shall be checking the commands that can be used to check memory usage on a linux system. Memory include RAM and swap.
It is often important to check memory usage and memory used per process on servers so that resources do not fall short and users are able to access the server. For example a website. If you are running a webserver, then the server must have enough memory to serve the visitors to the site. If not, the site would become very slow or even go down when there is a traffic spike, simply because memory would fall short. Its just like what happens on your desktop PC.
1. free command
The free command is the most simple and easy to use command to check memory usage on linux. Here is a quick example
The m option displays all data in MBs. The total os 7976 MB is the total amount of RAM installed on the system, that is 8GB. The used column shows the amount of RAM that has been used by linux, in this case around 6.4 GB. The output is pretty self explanatory. The catch over here is the cached and buffers column. The second line tells that 4.6 GB is free. This is the free memory in first line added with the buffers and cached amount of memory.
Linux has the habit of caching lots of things for faster performance, so that memory can be freed and used if needed.
The last line is the swap memory, which in this case is lying entirely free.
2. /proc/meminfo
The next way to check memory usage is to read the /proc/meminfo file. Know that the /proc file system does not contain real files. They are rather virtual files that contain dynamic information about the kernel and the system.
Check the values of MemTotal, MemFree, Buffers, Cached, SwapTotal, SwapFree.
They indicate same values of memory usage as the free command.
3. vmstat
The vmstat command with the s option, lays out the memory usage statistics much like the proc command. Here is an example
The top few lines indicate total memory, free memory etc and so on.
4. top command
The top command is generally used to check memory and cpu usage per process. However it also reports total memory usage and can be used to monitor the total RAM usage. The header on output has the required information. Here is a sample output
Check the KiB Mem and KiB Swap lines on the header. They indicate total, used and free amounts of the memory. The buffer and cache information is present here too, like the free command.
5. htop
Similar to the top command, the htop command also shows memory usage along with various other details.
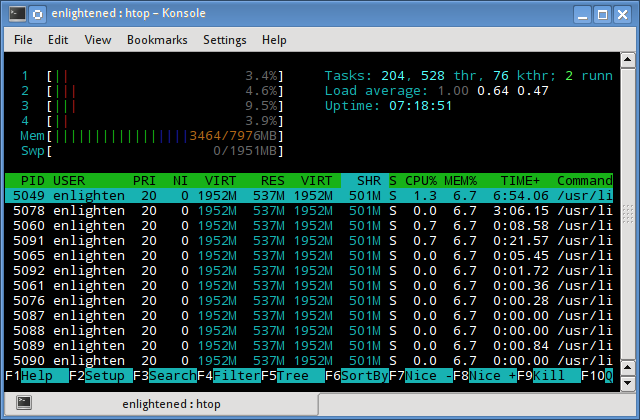
The header on top shows cpu usage along with RAM and swap usage with the corresponding figures.
RAM Information
To find out hardware information about the installed RAM, use the demidecode command. It reports lots of information about the installed RAM memory.
Provided information includes the size (2048MB), type (DDR2) , speed(667 Mhz) etc.
Summary
All the above mentioned commands work from the terminal and do not have a gui. When working on a desktop with a gui, it is much easier to use a GUI tool with graphical output. The most common tools are gnome-system-monitor on gnome and
ksysguard on KDE. Both provide resource usage information about cpu, ram, swap and network bandwidth in a graphical and easy to understand visual output.
A Tech Enthusiast, Blogger, Linux Fan and a Software Developer. Writes about Computer hardware, Linux and Open Source software and coding in Python, Php and Javascript. He can be reached at [email protected] .
66 thoughts on “ 5 commands to check memory usage on Linux ”
You have explained the topic very well. Thanks for sharing a nice article.
Thanks for these commands. It saved a lots of time.
How about explaining what we are looking for? Most people would know these commands. Waste of time.
Please correct the typo in “RAM Information” section. The command for viewing hardware info about RAM is “dmidecode” and not “demidecode”.
And it also requires root privileges.
Источник


