- How to Check What Mac OS Version is Running on a Mac
- How to See What Version of Mac OS is Running and Installed on a Mac
- Why does the version of MacOS software matter?
- Mac OS X Version History & Release Names
- How to See What Version of macOS I Have?
- Why you Need to Know, How to Check macOS Version?
- How to Check OS Version on Mac?
- Conclusion
- What to do before you sell, give away, or trade in your Mac
- Create a backup
- Sign out of iTunes in macOS Mojave or earlier
- Sign out of iCloud
- Sign out of iMessage
- Reset NVRAM
- Optional: Unpair Bluetooth devices that you’re keeping
- Erase your hard drive and reinstall macOS
- Free up storage space on your Mac
- Find out how much storage is available on your Mac
- Manage storage on your Mac
- Store in iCloud
- Optimize Storage
- Empty Trash Automatically
- Reduce Clutter
- Where to find the settings for each feature
- Other ways that macOS helps automatically save space
- How to free up storage space manually
How to Check What Mac OS Version is Running on a Mac

Have you ever needed to know which version of Mac OS was on a computer? For some users the answer may be never, but others may need to know exactly what version of Mac OS system software is running on a particular Mac. Typically the need to know which MacOS version is on a Mac is necessary for learning about compatibility with software or a specific feature, but it can also be helpful to know what version of Mac OS is installed for troubleshooting purposes and other reasons too. While many Mac users will immediately know what release and version of system software is running on their computer, others users may not know this information.
This tutorial will show you how to easily find out what version of Mac OS system software is running on a Mac, including what the major release name is as well as the specific version of MacOS system software.
How to See What Version of Mac OS is Running and Installed on a Mac
- From anywhere on the Mac, look in the upper left corner for the Apple menu and click that
From the Apple menu choose “About This Mac”
The Mac system overview panel will appear on screen, showing what Mac OS release and version is installed on the computer
In the this screenshot example, the “About This Mac” screen on that particular Mac is running “macOS Mojave” as the major release, and the specific version of MacOS Mojave that is running is 10.14.2.
In the screenshot below, “About This Mac” shows the Mac running “OS X El Capitan” as the major release, and the specific system software version is 10.11.6.
• Bonus tip: You can also get the Mac OS build number from the same screen. Simply click on the version number at the About This Mac screen, a hexadecimal code next to the version will appear showing that specific software release build number. The build number can be helpful for more advanced users to know, but is generally not necessary information for average Mac users.
• Bonus tip 2: The About This Mac screen also easily allows you to find when a Mac model was made and built.
• Bonus tip 3: You can also find the Mac serial number from the About This Mac screen.
• Bonus tip 4: If you’re inclined to use the Terminal, you can also get Mac OS system information and version from the command line if needed.
• Bonus tip 5: The solution here will show you how to get the current Mac OS version, but if you have an installer file somewhere you might be wondering which version is contained within that system installer. You can find out what Mac OS system software version is contained within a MacOS Installer application by following these steps.
Why does the version of MacOS software matter?
Some users may be wondering why the MacOS software version even matters, and why would they care to know it in the first place. But knowing the system software version can be helpful for many reasons, including for:
- Feature existence or compatibility
- App compatibility
- Accessory support or compatibility
- Troubleshooting procedures
- Installing, reinstalling, and updating Mac OS
- If you’re using a Combo Update to update Mac OS system software
Major new releases of Mac OS are available from the Mac App Store, whereas software updates to an existing release can be found from the Software Update control panel, or the Updates tab of the Mac App Store.
Mac OS X Version History & Release Names
For those interested in some history, you might like to know that Mac OS has been labeled with various naming conventions, with each major Mac OS release having a distinct name as well. For the initial nine releases, Mac OS versions were labeled after wild cats, while the releases after that are named after locations and places in the state of California.
The current and historical Mac OS names and versions are as follows:
- Mac OS X 10.0 Cheetah
- Mac OS X 10.1 Puma
- Mac OS X 10.2 Jaguar
- Mac OS X 10.3 Panther
- Mac OS X 10.4 Tiger
- Mac OS X 10.5 Leopard
- Mac OS X 10.6 Snow Leopard
- OS X 10.7 Lion
- OS X 10.8 Mountain Lion
- OS X 10.9 Mavericks
- OS X 10.10 Yosemite
- OS X 10.11 El Capitan
- MacOS 10.12 Sierra
- MacOS 10.13 High Sierra
- MacOS 10.14 Mojave
Prior to the modern “Mac OS X” naming convention, Mac system software was labeled as ‘Mac OS’ and also as ‘System’, but those earlier versions had completely different underlying architecture. Modern Mac OS versions are built atop a BSD unix core, whereas the much older releases from the pre-OSX era were not.
For what it’s worth, accessing the “About This Mac” screen from the Apple menu goes way back to old school Mac OS releases as well, so if you dig up an Apple Macintosh SE/30 from an attic you can find the system software version on those old Macs the same way too.
Obviously this applies to the Mac, but if you have an iPhone or iPad you can check what iOS version is running on iOS devices through Settings.
Источник
How to See What Version of macOS I Have?

Sometimes there are situations when the user needs to know, what version of macOS do I have? Typically, the need for this information arises when installing programs, or if the device is running a beta version or when filling out an error report sent by Apple.
By following the instructions below, you can easily determine which version is running on macOS.
Why you Need to Know, How to Check macOS Version?
This data may be needed when installing software that, for example, does not support older versions of OS X or early macOS. Also, this information is important for beta testers who need to check which build of the beta version of the OS is installed on the device. In addition, when filling out a bug report on the form, you must specify the macOS version so that Apple can initiate and fix the problem.
How to Check OS Version on Mac?
- On the computer desktop, in the menu bar, click on the Apple symbol;
- Select “About This Mac”;

- Select “Overview” section;
- The macOS version is displayed right under the “macOS” heading.

Conclusion
Keep in mind that the OS version and build number should not be confused. Even if the macOS version numbers are the same, the assembly numbers for Macs may vary. For example, after buying a new Mac, users may notice that with the same version of the OS, the build number may differ from those installed on other computers. It just means that a newer version of the assembly is installed on the new Macs. If the build is already out of date, you can update it using the Updates tab in the Mac App Store.
It’s the best time to ask questions and give us your feedback in comments.
Hi there! My Name is Vincent Lago! My goal is to share insightful reviews, guides, and manuals for people looking to know more about current solutions for Apple hardware and OS. I have years of technological background knowledge including owning a custom iMacs & PCs which was using for different types of business. And now, I want to share my experience with you.
Источник
What to do before you sell, give away, or trade in your Mac
Back up your data, then restore to factory settings by turning off certain features and services, erasing your Mac, and reinstalling macOS.
Moving to a new Mac? Before taking these steps, you can use Migration Assistant to move your files from the old Mac to your new Mac.
Create a backup
Make sure that you have a current backup of your important files. Learn how to back up your Mac.
Sign out of iTunes in macOS Mojave or earlier
If you’re using macOS Mojave or earlier, open iTunes. From the menu bar at the top of the screen or iTunes window, choose Account > Authorizations > Deauthorize This Computer. Then enter your Apple ID and password and click Deauthorize.
Learn more about deauthorizing computers used with your iTunes account.
Sign out of iCloud
If you’re using macOS Catalina or later, choose Apple menu > System Preferences, then click Apple ID. Select Overview in the sidebar, then click Sign Out.
If you’re using macOS Mojave or earlier, choose Apple menu > System Preferences, click iCloud, then click Sign Out.
You will be asked whether to keep a copy of your iCloud data on this Mac. You can click Keep a Copy, because you’re erasing your Mac later. Your iCloud data remains in iCloud and on any other devices that are signed in to iCloud with your Apple ID.
Sign out of iMessage
If you’re using OS X Mountain Lion or later, open the Messages app, then choose Messages > Preferences from the menu bar. Click iMessage, then click Sign Out.
Reset NVRAM
Shut down your Mac, then turn it on and immediately press and hold these four keys together: Option, Command, P, and R. Release the keys after about 20 seconds. This clears user settings from memory and restores certain security features that might have been altered.
Optional: Unpair Bluetooth devices that you’re keeping
If your Mac is paired with a Bluetooth keyboard, mouse, trackpad, or other Bluetooth device that you plan to keep, you can unpair it. This optional step prevents accidental input when the Mac and device have separate owners but remain in Bluetooth range of each other.
If you’re unpairing Bluetooth input devices from a desktop computer such as an iMac, Mac mini, or Mac Pro, you must plug in a USB keyboard and mouse to complete the remaining steps in this article.
To unpair a Bluetooth device, choose Apple menu > System Preferences, then click Bluetooth. Move your pointer over the device that you want to unpair, then click the remove (x) button next to the device name.
Erase your hard drive and reinstall macOS
The best way to restore your Mac to factory settings is to erase your hard drive and reinstall macOS.
After macOS installation is complete, the Mac restarts to a setup assistant that asks you to choose a country or region. To leave the Mac in an out-of-box state, don’t continue setup. Instead, press Command-Q to shut down the Mac. When the new owner turns on the Mac, the setup assistant guides them through the setup process.
No matter the model or condition, we can turn your device into something good for you and good for the planet: Learn how to trade in or recycle your Mac with Apple Trade In.
Источник
Free up storage space on your Mac
Save space by storing your content in iCloud or using built-in tools to find and remove large or unneeded files.
The Optimized Storage features of your Mac help you save storage space by storing your content in iCloud and making it available on demand:
- When storage space is needed, files, photos, movies, email attachments, and other files that you seldom use are stored in iCloud automatically.
- Each file stays right where you last saved it, and downloads when you open it.
- Files that you’ve used recently remain on your Mac, along with optimized versions of your photos.
If you haven’t yet upgraded to macOS Sierra or later, learn about other ways to free up storage space.
Find out how much storage is available on your Mac
Choose Apple menu > About This Mac, then click Storage. Each segment of the bar is an estimate of the storage space used by a category of files. Move your pointer over each segment for more detail.
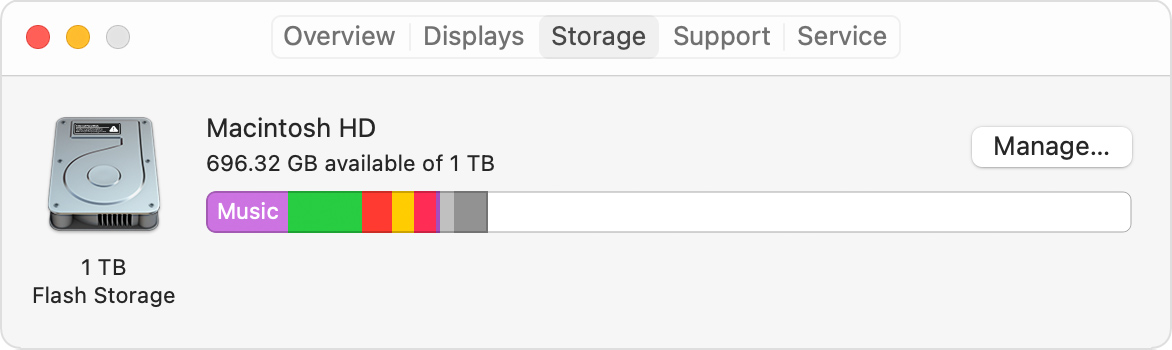
Click the Manage button to open the Storage Management window, pictured below.
Manage storage on your Mac
The Storage Management window offers recommendations for optimizing your storage. If some recommendations are already turned on, you will see fewer recommendations.
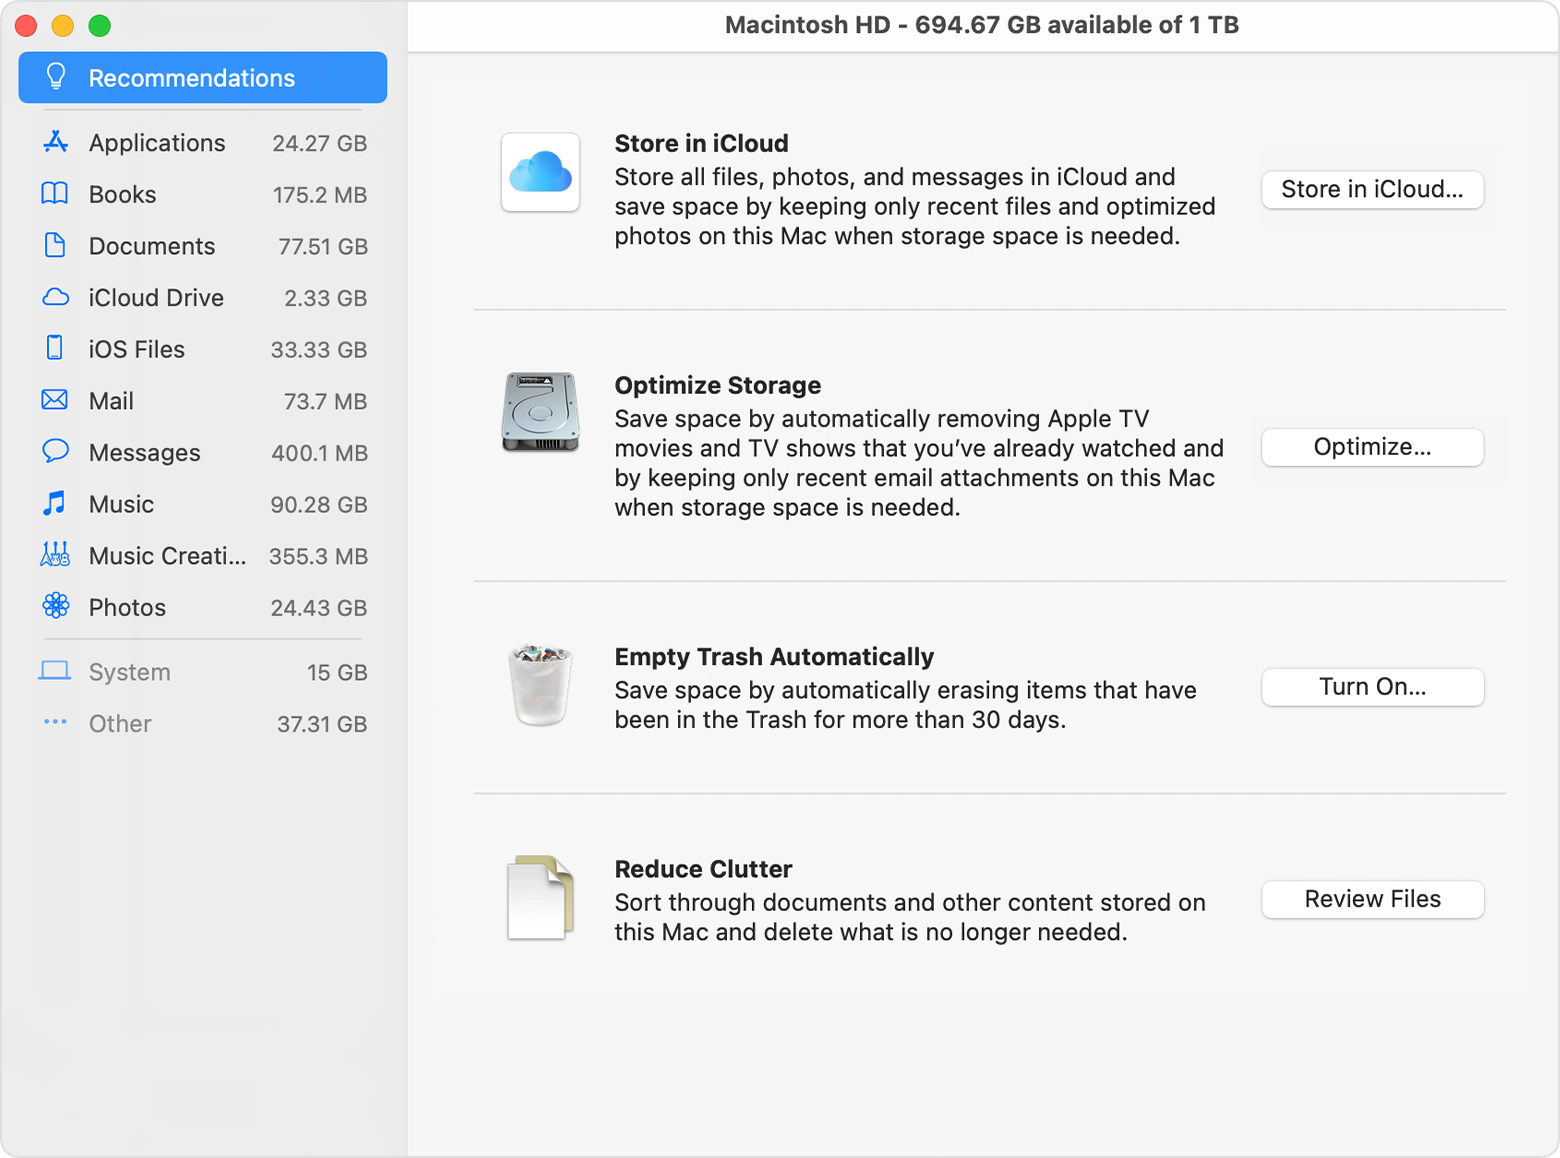
Store in iCloud
Click the Store in iCloud button, then choose from these options:
- Desktop and Documents. Store all files from these two locations in iCloud Drive. When storage space is needed, only the files you recently opened are kept on your Mac, so that you can easily work offline. Files stored only in iCloud show a download icon , which you can double-click to download the original file. Learn more about this feature.
- Photos. Store all original, full-resolution photos and videos in iCloud Photos. When storage space is needed, only space-saving (optimized) versions of photos are kept on your Mac. To download the original photo or video, just open it.
- Messages. Store all messages and attachments in iCloud. When storage space is needed, only the messages and attachments you recently opened are kept on your Mac. Learn more about Messages in iCloud.
Storing files in iCloud uses the storage space in your iCloud storage plan. If you reach or exceed your iCloud storage limit, you can either buy more iCloud storage or make more iCloud storage available. iCloud storage starts at 50GB for $0.99 (USD) a month, and you can purchase additional storage directly from your Apple device. Learn more about prices in your region.
Optimize Storage
Click the Optimize button to save space by automatically removing watched movies and TV shows. When storage space is needed, movies or TV shows that you purchased from Apple and already watched are removed from your Mac. Click the download icon next to a movie or TV show to download it again.
Your Mac will also save space by keeping only recent email attachments on this Mac when storage space is needed. You can manually download any attachments at any time by opening the email or attachment, or saving the attachment to your Mac.
Optimizing storage for movies, TV shows, and email attachments doesn’t require iCloud storage space.
Empty Trash Automatically
Empty Trash Automatically permanently deletes files that have been in the Trash for more than 30 days.
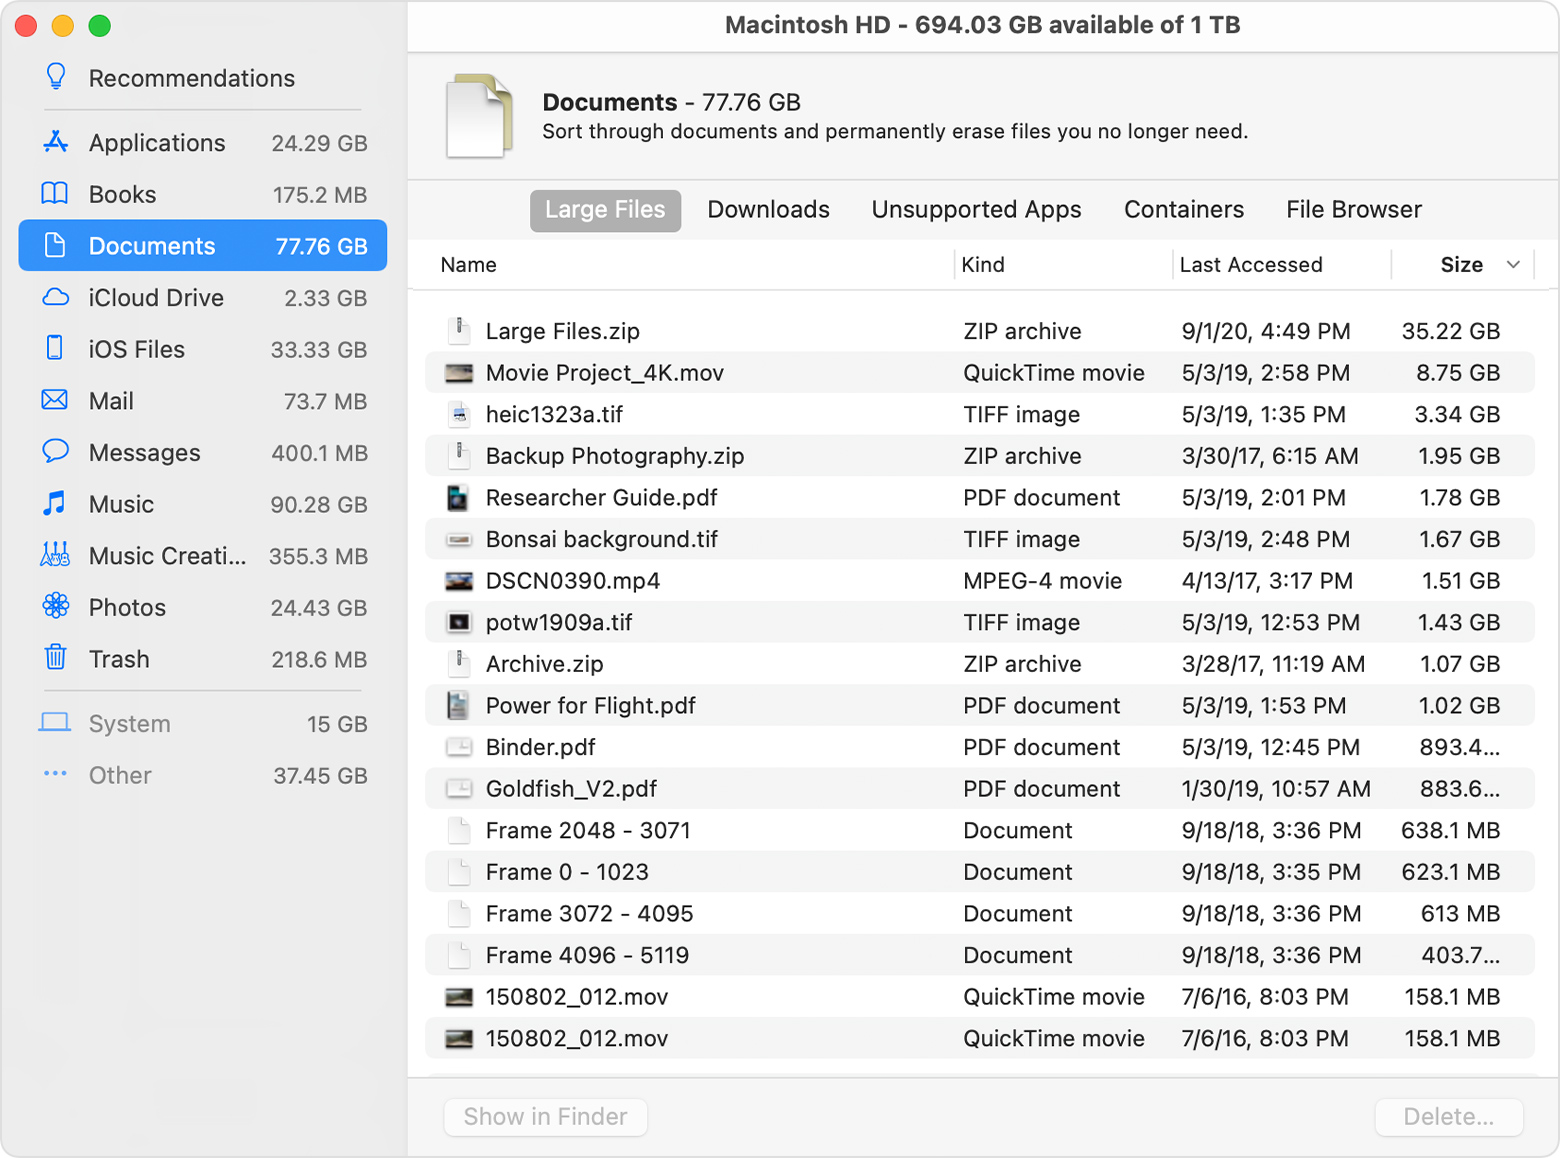
Reduce Clutter
Reduce Clutter helps you identify large files and files you might no longer need. Click the Review Files button, then choose any of the file categories in the sidebar, such as Applications, Documents, Music Creation, or Trash.
You can delete the files in some categories directly from this window. Other categories show the total storage space used by the files in each app. You can then open the app and decide whether to delete files from within it.
Where to find the settings for each feature
The button for each recommendation in the Storage Management window affects one or more settings in other apps. You can also control those settings directly within each app.
- If you’re using macOS Catalina or later, choose Apple menu > System Preferences, click Apple ID, then select iCloud in the sidebar: Store in iCloud turns on the Optimize Mac Storage setting on the right. To turn off iCloud Drive entirely, deselect iCloud Drive.
- If you’re using macOS Mojave or earlier, choose Apple menu > System Preferences, click iCloud, then click Options next to iCloud Drive. Store in iCloud turns on the Desktop & Documents Folders and Optimize Mac Storage settings.
- In Photos, choose Photos > Preferences, then click iCloud. Store in iCloud selects iCloud Photos and Optimize Mac Storage.
- In Messages, choose Messages > Preferences, then click iMessage. Store in iCloud selects Enable Messages in iCloud.
- If you’re using macOS Catalina or later, open the Apple TV app, choose TV > Preferences from the menu bar, then click Files. Optimize Storage selects “Automatically delete watched movies and TV shows.”
- In you’re using macOS Mojave or earlier, open iTunes, choose iTunes > Preferences from the menu bar, then click Advanced. Optimize Storage selects “Automatically delete watched movies and TV shows.”
- In Mail, choose Mail > Preferences from the menu bar, then click Accounts. In the Account Information section on the right, Optimize Storage sets the Download Attachments menu to either Recent or None.
Empty Trash Automatically: From the Finder, choose Finder > Preferences, then click Advanced. Empty Trash Automatically selects “Remove items from the Trash after 30 days.”
Other ways that macOS helps automatically save space
With macOS Sierra or later, your Mac automatically takes these additional steps to save storage space:
- Detects duplicate downloads in Safari, keeping only the most recent version of the download
- Reminds you to delete used app installers
- Removes old fonts, languages, and dictionaries that aren’t being used
- Clears caches, logs, and other unnecessary data when storage space is needed
How to free up storage space manually
Even without using the Optimized Storage features described in this article, you can take other steps to make more storage space available:
- Music, movies, and other media can use a lot of storage space. Learn how to delete music, movies, and TV shows from your device.
- Delete other files that you no longer need by moving them to the Trash, then emptying the Trash. The Downloads folder is good place to look for files that you might no longer need.
- Move files to an external storage device.
- Compress files.
- Delete unneeded email: In the Mail app, choose Mailbox > Erase Junk Mail. If you no longer need the email in your Trash mailbox, choose Mailbox > Erase Deleted Items.
Источник


