- How to select or highlight multiple files and folders
- Select all the files or folders in the current directory
- «Select all» with shortcut keys
- «Select all» using menus
- Mouse drag and select multiple files or folders
- Select multiple files or folders grouped together
- Select multiple files or folders that are not grouped together
- How to select without using the mouse
- Other tips
- What can be done once the files or folders are highlighted?
- 5 Ways to See All User Accounts Existing on Windows 10
- Way 1: See all user accounts from the login screen
- Way 2: See all user accounts using Control Panel
- Way 3: See all user accounts using Computer Management tool
- Way 4: See all user accounts using Command Prompt
- Way 5: See a list of all user accounts using Windows Password Refixer
- How do I view all the users on a Windows computer? (5 ways)
- Quick Steps:
- 1. How to see users using the Windows command line (PowerShell & CMD list users)
- 2. How to use PowerShell to get all users on a computer
- 3. How to see the list of all user accounts in Computer Management
- 4. How to see the list of active user accounts using the Control Panel
- 5. How to see the list of active user accounts on the Windows sign-in screen
- Did you find many hidden user accounts on your Windows PC?
How to select or highlight multiple files and folders
When working with Microsoft Windows, macOS, (or any operating system with a GUI), you may want to select multiple files to copy, delete, or move them all at once. The following sections describe different methods of selecting multiple files or folders.
Select all the files or folders in the current directory
«Select all» with shortcut keys
In most operating systems and programs, the shortcut key Ctrl + A ( Command + A on macOS) selects all available text in the current text area, or all files in a file navigator window.
«Select all» using menus
In Windows 8 or Windows 10, the File/Edit/View menu is not available in File Explorer. Use Ctrl + A instead.
- Open a folder or directory in File Explorer or My Computer.
- Click Edit in the menu bar at the top of the window.
- Click Select All on the drop-down menu.
Once the files or folders are highlighted, right-click one of the highlighted files or folders to view available options to cut, copy, or delete. For additional help and information, see the below section on what can be done after the files or folders are highlighted.
Mouse drag and select multiple files or folders

You can click-and-drag a box around the files or folders you want to select. Doing so selects all files and folders within that box, as shown in the animated picture.
To do this, click and hold your left mouse button on the top-left portion of where you want to start highlighting. Next, drag the box until the last file or folder is highlighted. Once the files are selected, they can be copied, cut, or dragged to another window to move them. They can also be dragged to the Trash/Recycle Bin to be deleted.
Once the files or folders are highlighted, right-click one of the highlighted files or folders to view available options, including cut, copy, or delete. For additional help and information, see the below section on what can be done after the files or folders are highlighted.
Select multiple files or folders grouped together
- Click the first file or folder, and then press and hold the Shift key.
- While holding Shift , click the last file or folder.
See the other tips section on how you can select grouped and non-grouped files or folders at the same time.
Once the files or folders are highlighted, right-click one of the highlighted files or folders to view available options to cut, copy, or delete. For additional help and information, see the below section on what can be done after the files or folders are highlighted.
Select multiple files or folders that are not grouped together
- Click the first file or folder, and then press and hold the Ctrl key.
- While holding Ctrl , click each of the other files or folders you want to select.
See the other tips section on how you can select grouped and non-grouped files at the same time.
Once the files or folders are highlighted, right-click one of the highlighted files or folders to view available options to cut, copy, or delete. For additional help and information, see the below section on what can be done after the files or folders are highlighted.
How to select without using the mouse
- Press Windows key + E to open File Explorer.
- Press Tab until you’re in the section of the window containing the files or folders you want to select.
- Use the arrow keys to move to the file or folder you want to select.
- You can select more than one file or folder by holding down the Shift key and use the arrow keys highlight them.
Once the files or folders are highlighted, press the shortcut key Ctrl + X to cut or Ctrl + C to copy, or press the Delete key to delete. For additional help and information, see the below section on what can be done after the files or folders are highlighted.
Other tips
You can use a combination of selecting multiple files or folders and single files or folders at the same time by following the steps below.
- Click the first file or folder you want to select.
- Hold down the Shift key, select the last file or folder, and then let go of the Shift key.
- Hold down the Ctrl key and click any other file(s) or folder(s) you would like to add to those already selected.
Holding Ctrl and clicking a file or folder a second time deselects the file or folder.
What can be done once the files or folders are highlighted?
After the files or folders are highlighted, they can be copied, moved, deleted, or compressed into a single archive file.
5 Ways to See All User Accounts Existing on Windows 10
Occasionally for some reason, you may want to view a full list of all user accounts that exist on Windows 10. Now, this page introduces five ways you can see all user accounts on Windows 10.
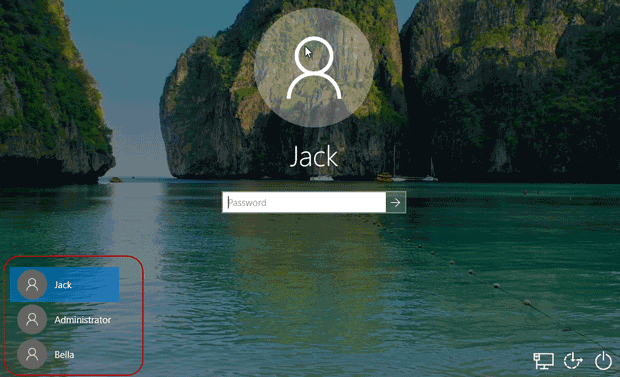
Way 1: See all user accounts from the login screen
All active user accounts on Windows 10 display in a list in the lower left corner of the login screen. You can see all of them when you are at the login screen. But the disabled or hidden user accounts won’t display here.
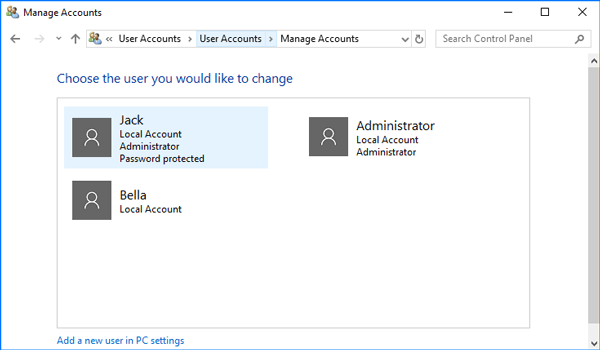
Way 2: See all user accounts using Control Panel
Open the Control Panel in Windows 10, and go to User Accounts > User Accounts > Manage Another Accounts.
Then from here, you can see all user accounts that exist on your Windows 10, except those disabled and hidden ones.
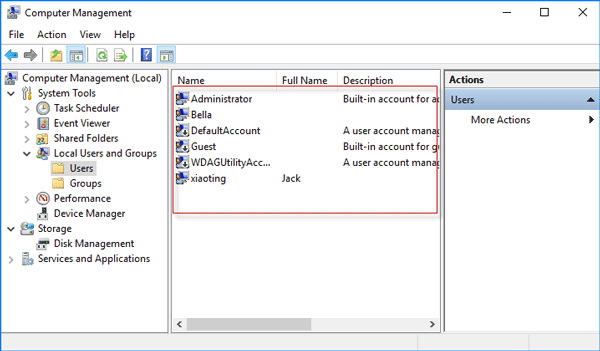
Way 3: See all user accounts using Computer Management tool
Step 1: Right-click on This PC and select Manage from the context menu to open Computer Management.
Step 2: Expand System Tools > Local Users and Groups, and then select the Users folder, so that it will list all user accounts existing on your Windows 10, including the disabled or hidden accounts. Furthermore, you can double-click on each user’s name to see its properties if you want.
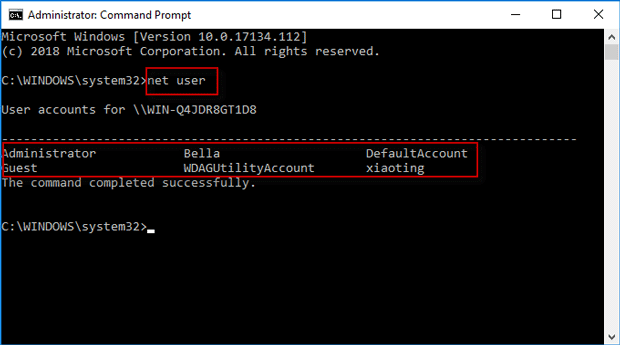
Way 4: See all user accounts using Command Prompt
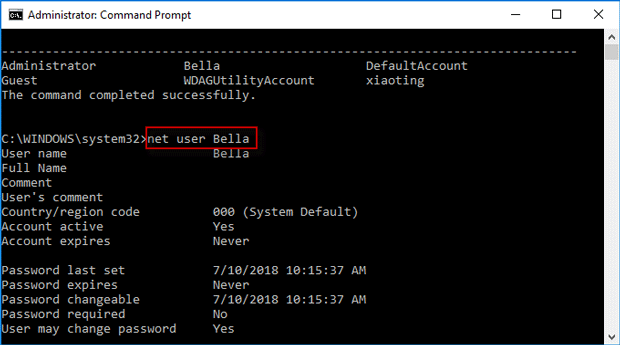
Step 2: Type in the command: net user, and then press Enter key so that it will display all user accounts existing on your Windows 10, including the disabled and hidden user accounts. They are arranged from left to right, top to down.
Step 3: If you want to view detailed information or properties about a specific user account, just type in the command: net user username, for example, net user Bella, and press Enter key. Then the window displays detailed information and properties about that user account, such as its full name, account active state, if the password is required or not, and so on.
Way 5: See a list of all user accounts using Windows Password Refixer
Beyond that, you can also see the list of all existing user accounts using the third-party Windows Password Refixer tool. It would be helpful especially when you can’t log on to Windows 10 or even can’t start Windows 10 normally.
Tips: Windows Password Refixer is a Windows password reset tool designed to primarily help users to reset Windows password. But it also has two other valuable features, allowing you to view all user accounts existing on Windows and create a new admin account for Windows.
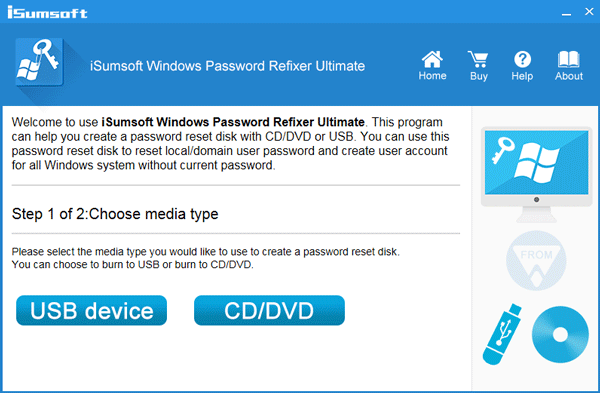
Step 1: If you just want to use this tool to view a list of all user accounts that exist on your Windows 10, you can download the Windows Password Refixer tool free on any computer and install it on that computer.
Step 2: Once you have it installed, launch it, and then follow the on-screen instructions to burn it to a USB device or CD/DVD flash drive to create a boot disk.
Step 3: Connect the boot disk to your Windows 10 computer and start/restart it from the boot disk (USB or CD flash drive). If you have no idea how to do that, refer to this page: How to boot a computer from a USB drive, or How to boot a computer from a CD/DVD flash drive.
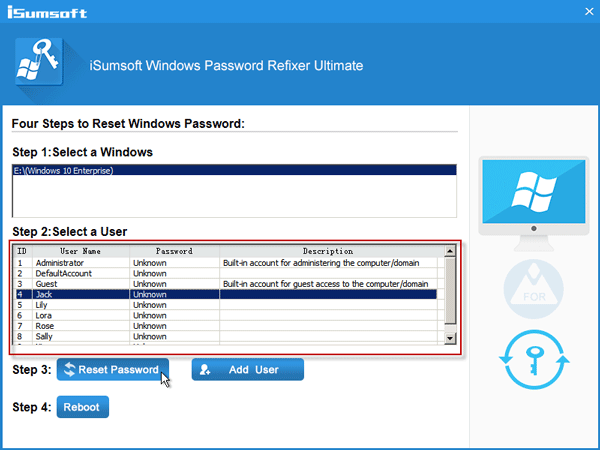
Step 4: If you boot your computer from that boot disk correctly, Windows Password Refixer should work and appear on your screen. It displays Windows 10 running on your computer and shows a full list of all user accounts existing on your Windows 10, including the disabled and hidden user accounts.
Conclusion: The first two methods allow you to view all active user accounts on Windows 10, while the last three methods allow you to view the full list of all user accounts that exist on Windows 10, including the disabled and hidden user accounts.
How do I view all the users on a Windows computer? (5 ways)
Sometimes, you may need to extract a list of all the user accounts on a Windows computer. Or you may want to know the hidden user accounts that exist alongside your user account. To help you out, we compiled a list of five methods that you can use to see all the users, including the hidden ones created by Windows or third-party apps that you installed. Here they are:
Quick Steps:
- Open CMD or PowerShell.
- Type net user, and press Enter.
- Net user lists the users that have accounts configured on a Windows PC, including hidden ones or disabled user accounts.
NOTE: This guide covers Windows 10, Windows 7, and Windows 8.1. If you don’t know the Windows version that you have, read How to tell what Windows I have (11 ways).
1. How to see users using the Windows command line (PowerShell & CMD list users)
This method works both in the Command Prompt and PowerShell. Open the command-line app that you prefer, type net user, and press Enter. Net user lists the users that have accounts configured on a Windows PC, including hidden ones or disabled user accounts. The user accounts are listed by their internal names that Windows uses behind the scenes, not by their full display name that you see when you sign in to Windows.
Run net user to make Windows CMD show users
You can also have the net user list stored in a text file that opens in Notepad or any other text editor. Type net user > filename.txt, and a file with the name you provided is created under “C:\Users\Your User Name.”
Save the net list of users to a file using net user > filename.txt
If you want to export the CMD list of users to a text file that’s saved in a location you choose, enter net user > “path\filename.txt” and press Enter.
Export the CMD list of users to a file at a specified location
A neat trick is using this command to find information about a specific user account: type net user username and press Enter. Windows then displays helpful information about that user account, like when the password was set the last time, when it expires (if it’s set to expire), the groups it’s a part of, and more.
Getting details about a user account in CMD, using the net user command
If you want to know more about this command and all its parameters, go to this documentation page: Net user.
2. How to use PowerShell to get all users on a computer
Besides the net user command, here’s another command that you can use in PowerShell to view all users in Windows 10 or previous versions: Get-WmiObject Win32_UserAccount -filter “LocalAccount=True” | Select-Object Name,FullName,Disabled.
Get-WmiObject Win32_UserAccount -filter “LocalAccount=True” | Select-Object Name,FullName,Disabled
Alternatively, if you use Windows 10, you can also run the simpler get-localuser command, as pointed out by one of our readers.
Using PowerShell to get all users on a computer
3. How to see the list of all user accounts in Computer Management
Another method that displays all user accounts, including hidden users or disabled ones, involves using Computer Management. Open Computer Management, and go to “Local Users and Groups -> Users.” On the right side, you get to see all the user accounts, their names as used by Windows behind the scenes, their full names (or the display names), and, in some cases, also a description.
Windows list of users displayed in Computer Management
Double-click or double-tap on a user account to learn more about its properties and settings, including the user groups that it is part of.
4. How to see the list of active user accounts using the Control Panel
A method that is less geeky but which also displays less information involves opening the Control Panel. After you start it, go to “User accounts” or “User Accounts and Family Safety,” depending on the Windows version that you have.
The User Accounts entry from the Control Panel
Then, click or tap on User accounts.
Opening the User Accounts settings
Now you see your user account, information about it, and several links. Click or tap the link that says “Manage another account.”
Manage another account
Now you see the active, not-hidden user accounts in Windows, whether they are local accounts, administrators, etc.
Control Panel shows the list of users on a Windows computer
With this method, you cannot see hidden or disabled user accounts.
5. How to see the list of active user accounts on the Windows sign-in screen
The obvious and most straightforward method is to look at the sign-in screen just before you log into Windows. You should see all the active (not hidden) user accounts that exist in Windows on this screen. If you are using Windows 10, this list is shown in the bottom-left corner of the sign-in screen.
Windows 10 list of users shown on the sign-in screen
If you are using Windows 7, all active user accounts are displayed front and center.
Windows 7 list of users shown on the sign-in screen
The same is true when using the Windows 8.1 sign-in screen.
Windows 8.1 list of users shown on the sign-in screen
The downside of this method is that you cannot see hidden or disabled user accounts.
Did you find many hidden user accounts on your Windows PC?
We highly recommend trying the first three methods for identifying all the user accounts that exist on your Windows computer or device. You may be surprised to see that some of your apps created hidden user accounts that you had no idea existed. Before closing this tutorial, share in a comment whether you found hidden user accounts on your PC and how many of them were there. We are curious to know.


