- Connect to a VPN in Windows 10
- Create a VPN profile
- Connect to a VPN
- How to setup a VPN at home on Windows 10
- 5 Best VPNs we recommend
- How do I setup a VPN at home on Windows 10?
- Accept incoming connections on your home PC
- Configure router settings
- Check firewall settings
- How to set up a VPN in Windows
- When and how to use the VPN client built into Windows.
- Step by step: How to set up a VPN in Windows 10
- Step-by-step: How to set up a VPN in Windows 7
Connect to a VPN in Windows 10
Whether it’s for work or personal use, you can connect to a virtual private network (VPN) on your Windows 10 PC. A VPN connection can help provide a more secure connection and access to your company’s network and the internet, for example, when you’re working from a coffee shop or similar public place.
Create a VPN profile
Before you can connect to a VPN, you must have a VPN profile on your PC. You can either create a VPN profile on your own or set up a work account to get a VPN profile from your company.
Before you start:
If it’s for work, look for VPN settings or a VPN app on your company’s intranet site while you’re at work, or contact your company’s support person.
If it’s for a VPN service you subscribe to for personal use, visit the Microsoft Store to see if there’s an app for that service, then go to the VPN service’s website to see if the VPN connection settings to use are listed there.
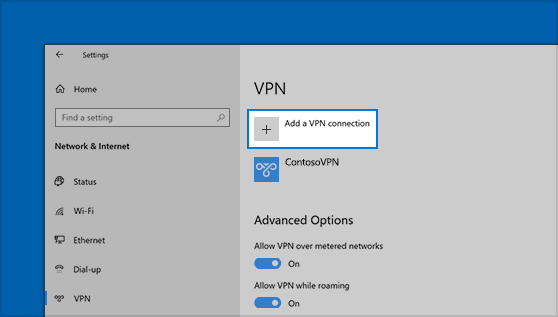
Select the Start button, then select Settings > Network & Internet > VPN > Add a VPN connection.
In Add a VPN connection, do the following:
For VPN provider, choose Windows (built-in).
In the Connection name box, enter a name you’ll recognize (for example, My Personal VPN). This is the VPN connection name you’ll look for when connecting.
In the Server name or address box, enter the address for the VPN server.
For VPN type, choose the type of VPN connection you want to create. You’ll need to know which kind of VPN connection your company or VPN service uses.
For Type of sign-in info, choose the type of sign-in info (or credentials) to use. This might be a username and password, one-time password, certificate, or a smart card if you’re connecting to a VPN for work. Enter your username and password in the respective boxes (if required).
If you need to edit the VPN connection info or specify additional settings, such as proxy settings, choose the VPN connection and then select Advanced options.
Connect to a VPN
When you have a VPN profile, you’re ready to connect.
On the far right of the taskbar, select the Network icon (either or ).
Select the VPN connection you want to use, then do either of the following depending on what happens when you select the VPN connection:
If the Connect button displays under the VPN connection, select Connect.
If the VPN section in Settings opens, select the VPN connection there, then select Connect.
If you’re prompted, enter your username and password or other sign-in info.
When connected, the VPN connection name will display Connected underneath it. To see if you’re connected to the VPN while you’re doing things on your PC, select the Network icon (either or ) on the far right of the taskbar, then see if the VPN connection says Connected.
How to setup a VPN at home on Windows 10

- Setting up a VPN server on your home PC is a great way to remotely access your Windows 10 computer from any device in the world.
- You don’t need to install any software to turn your device into a VPN server. All you need is a router that supports port forwarding.
- To learn all the tips and tricks of Microsoft’s OS, visit our Windows 10 area.
- Check out our VPN Troubleshooting Hub to fix any VPN problems.

Transforming your Windows 10 PC into a VPN server to setup a VPN at home is an excellent way to stay in touch with your files and applications, no matter where you are.
For example, you can access files through the VPN from the office if you forgot to copy an important work document or need to check up on torrent downloads. It’s equally important to share files from your office to your home PC or laptop.
More importantly, it’s a much safer option than resorting to remote access software tools, which are susceptible to various vulnerabilities.
Our step-by-step guide below shows you the exact steps to setup a VPN at home on Windows 10. The best part about it is that you don’t need to install any additional software programs to make everything operational. You just need a router that supports port forwarding.
5 Best VPNs we recommend
| 79% Off + 2 free Months |  Check offer! Check offer! | |
| 83% Off (2.25$/Month) + 3 free Months | Check offer! | |
| 68% Off + 1, 12 or 24 free Months (random prize) | Check offer! | |
| 83% Off (2.21$/Month) + 3 free Months | Check offer! | |
| 76% (2.83$) on 2 Years plan | Check offer! |
How do I setup a VPN at home on Windows 10?
Accept incoming connections on your home PC
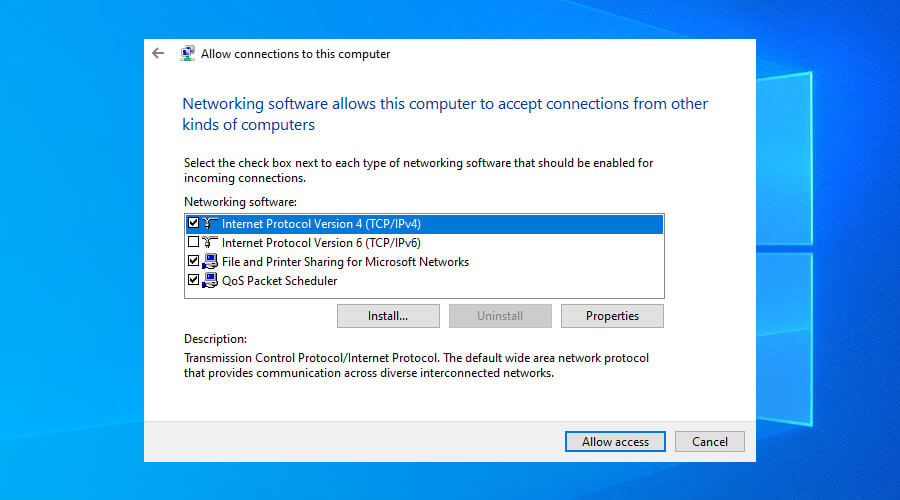
- Right-click the Windows 10 Start button.
- Go to Network Connections >Change adapter options.
- Press Alt key, open the File menu, and click New Incoming Connection.
- Choose the user accounts* allowed to remotely access your PC.
- Proceed to the next step and activate Through the Internet.
- Click Next and don’t change the Network software configuration.
- Click Allow access.
Although Windows 10 provides you with the hostname and recommends to make a copy of it, this won’t be necessary for remote connections over the Internet (only for LAN connections).
If you made any mistakes during the setup, you can edit the connection properties by right-clicking Incoming Connections and selecting Properties. For example, you can go back anytime to allow more user accounts or remove the permissions of existing users.
*To ensure your computer’s security, it’s recommended to create a new user account that only you will know. Make sure to generate a random and secure password that can’t be hacked. To easily keep track of your user credentials, use a password manager.
Configure router settings
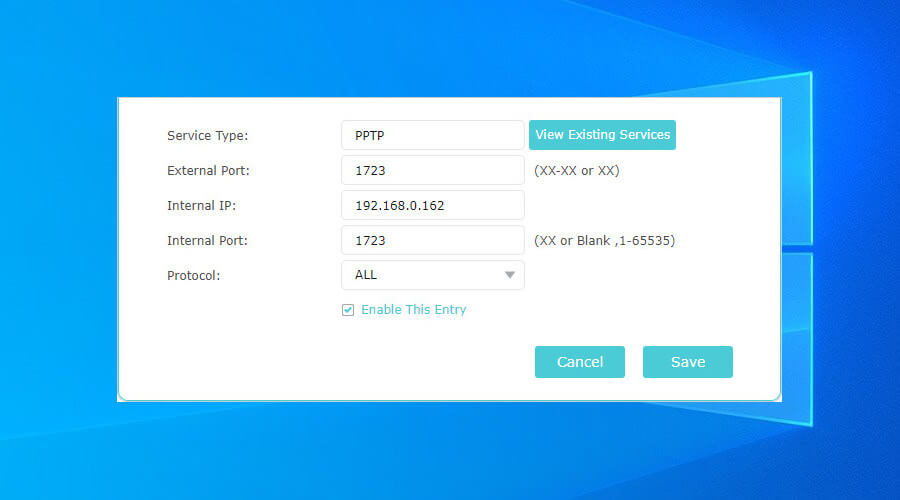
- Press Ctrl + R, type cmd, and press Enter.
- Type ipconfig and hit Enter.
- Select your IPv4 address and press Enter to copy it.
- Log in to your router administration panel.
- Set up a new rule to enable port forwarding.
- Pick the PPTP protocol.
- Paste the IPv4 address you copied earlier.
- Set 1723 over TCP as the internal and external port.
- Make sure that PPTP passthrough is enabled.
If your networking device supports custom firmware, check out the best router software for Windows 10.
Check firewall settings
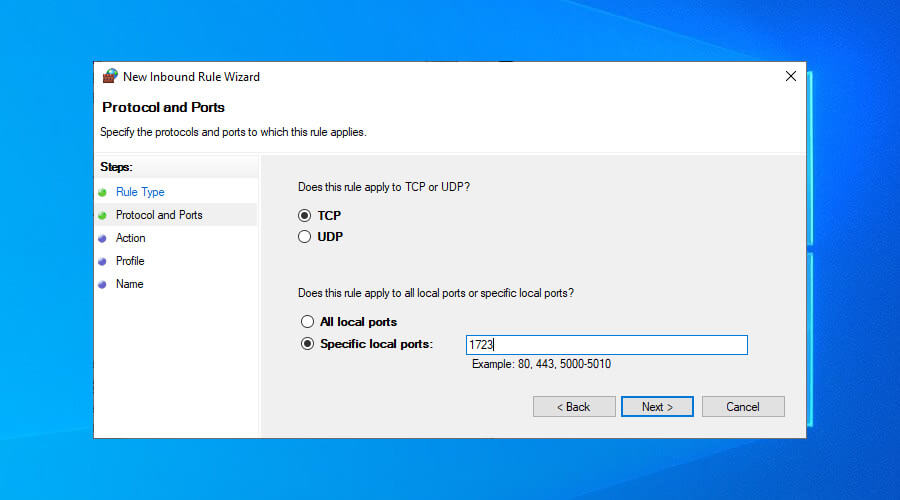
- Press Start, type firewall, press Enter.
- Click Advanced settings and go to Inbound Rules.
- Press New Rule in the Actions panel on the left side.
- Set Rule Type to Port and select TCP.
- Select Specific local ports and write 1723.
- Make sure to Allow the connection.
- Set any rule name and press Finish.
Your home VPN server is now ready. To test it, use another PC to create a VPN connection and connect to your home PC using the correct credentials (username and password with the PPTP protocol). Once you’re in, you can access files through the VPN, copy, edit or rename data, and more.
In conclusion, figuring out how to setup a VPN at home on Windows 10 is the first step toward turning your home PC into a VPN server. It enables you to remotely connect from any computer and gain access to your personal data.
It’s not necessary to install additional software. However, PPTP is a weak protocol with low security. We suggest upgrading to router firmware that supports OpenVPN configurations. Then you can install a free OpenVPN client on any device to remotely access your home VPN server.
How to set up a VPN in Windows
When and how to use the VPN client built into Windows.


By Mark Shea, Ian Paul
Today’s Best Tech Deals
Picked by PCWorld’s Editors
Top Deals On Great Products
Picked by Techconnect’s Editors
VPN (virtual private network) technology lets a computer using a public internet connection join a private network by way of a secure “tunnel” between that machine and the network. This protects the data from being seen or tampered with by bad actors. The two most common use cases are consumer VPN services that allow individuals to surf privately from home or a public setting, and business-oriented solutions that allow employees to securely connect to a corporate network remotely.
Now that so many people are thrust into working from home due to the coronoavirus pandemic, we’ve confirmed that this procedure is up-to-date and working as described. You may want to check out our guide on working from home as well, with tech tips and general setup considerations from our extensive personal experience in home offices.
For the most part, VPN connections are handled by custom software such as the many consumer VPN services we’ve reviewed, or by third-party generic software such as the OpenVPN client or Cisco AnyConnect.
The best overall VPN
Another option that’s generally supported by most virtual private networks is to use Microsoft’s built-in VPN client. This is useful when some VPNs don’t provide their own client or if you want to use a VPN protocol not supported by your VPN’s client such as IKEv2.
The downside to using the built-in client is that you have to select a specific server to use as opposed to jumping between different locations the way you can with a commercial VPN service. On the other hand, most employer-supplied VPNs will offer a limited number of servers you can connect to, which makes using this client ideal.
Step by step: How to set up a VPN in Windows 10
Step 1 Click on the Cortana search bar or button on the taskbar and type vpn.
Step 2 The top choice should be Change virtual private networks (VPN). Alternatively, open the Settings app and go to Network & Internet > VPN.
Windows 10’s built-in VPN client settings.
Step 3 At the top of the VPN screen in the Settings app, click Add a VPN connection.
Windows 10’s built-in VPN client configuration window.
Step 4 In the screen that appears, enter the details for your VPN connection. Under “VPN provider” click on the drop-down menu, and select Windows (built-in). This will also change “VPN type” to Automatic, and “Type of sign-in info” to User name and password.
Step 5 Next fill out the “Connection name” and “Server name or address.” These vary based on your VPN provider—whether a third-party service or an employer. For this example, we’re using Acevpn, a clientless VPN service that supports various connection types such as IKEv2, L2TP, and PPTP.
Step 6 Scroll down this screen and you’ll see a spot to enter your username and password for the VPN—again provided by your VPN service. Once the information is entered, click Save, and close the Settings app.
An IKEv2 VPN connection ready to go in Windows 10.
Step 7 Click the Wi-Fi icon in the system tray on your taskbar, and select your newly created VPN connection, which should be right at the top of the list. It should automatically start to connect, and if all goes well the connection process should happen relatively quickly.
The above process works for the easier VPN connection types such as PPTP and L2TP, but if you want to use IKEv2 that requires installing a root certificate from your VPN provider. Keep in mind that not every service supports IKEv2 so using this method depends greatly on your VPN service provider or employer.
Regardless, here’s how it works on Windows 10.
First, download your VPN provider’s IKEv2 certificate to your desktop or somewhere else that’s convenient. Next, double-click on the certificate file and a security warning pops-up. Click Open.
On the next window that opens click Install certificate.
Windows 10’s Certificate Import Wizard.
Now we’ve arrived at the Certificate Import Wizard. Select the Local Machine radio button and click Next.
On the next screen make sure to select the radio button labeled Place all certificates in the following store, and click Browse.
A smaller window opens with a folder tree. Select Trusted Root Certification Authorities and then click OK. Now we’re back at the Certificate Import Wizard window. From here click Next.
The hard part is over. On the next screen click Finish and then OK in the smaller window.
Now that the certificate is installed we can set up the IKEv2 VPN using the same step-by-step instructions above. Just make sure that you select IKEv2 under “VPN type,” and then use the server name, address, and username and password provided by your service provider.
Once you’ve connected to the VPN, check to see that your VPN is working by visiting IPleak.net. You should see an IP address, and DNS servers that are different from your non-VPN state. If you don’t, there are a number of potential causes that we can’t go into here. Your best bet is to check with your company’s IP department or the support service of your VPN.
However, one easy and common fix for IKEv2 problems is to right-click on your Wi-Fi or ethernet icon in the system tray, and select Open Network and Sharing Center from the context menu. When the Control Panel opens click Change adapter settings on the left side, then right-click the name of your VPN connection and go to Properties > Internet Protocol Version 4 (TCP/IPv4) > Properties > Advanced. > IP Settings. Check “Use default gateway on remote network” and click OK. Close up all the windows and try IP Leak again.
Step-by-step: How to set up a VPN in Windows 7
Step 1 Click the Start button. In the search bar, type vpn and then select Set up a virtual private network (VPN) connection.
Step 2 Enter the IP address or domain name of the server to which you want to connect. If you’re connecting to a work network, your IT administrator can provide the best address.
Step 3 If you want to set up the connection, but not connect, select Don’t connect now; otherwise, leave it blank and click Next.
Step 4 On this next screen, you can either put in your username and password, or leave it blank. You’ll be prompted for it again on the actual connection. Click Connect.
Step 5 To connect, click on the Windows network logo on the lower-right part of your screen; then select Connect under “VPN Connection.”
Step 6 In the “Connect VPN Connection” box, enter the appropriate domain and your login credentials; then click Connect.
Step 7 If you can’t connect, the problem could be due to the server configuration. (There are different types of VPNs.) Check with your network administrator to see what kind is in use—such as PPTP—then, on the “Connect VPN Connection” screen, select Properties.
Step 8 Navigate to the Security tab and select the specific “Type of VPN” from the drop-down list. You may also have to unselect Include Windows logon domain under the Options tab. Then click OK and Connect.
It takes a little work, but setting up a VPN using the Windows built-in client is relatively quick, and as a user it’s a helpful skill to have.


