- How to Setup and Configure TFTP Server on Windows 10
- Prerequisites:
- Remote Access or Local Access
- Setting up the TFTP Server
- Using the TFTP Server
- Installing TFTP Client
- Configuring Firewall to Allow TFTP
- Transferring Files using TFTP
- Install Windows Admin Center
- Determine your installation type
- Install on Windows 10
- Install on Windows Server with desktop experience
- Install on Server Core
- Upgrading to a new version of Windows Admin Center
- Updating the certificate used by Windows Admin Center
- Windows Setup Command-Line Options
- /1394Debug
- /AddBootMgrLast
- /BitLocker
- /BusParams
- /ConfigFile
- /CompactOS
- /Compat
- /CopyLogs
- /Debug
- /DiagnosticPrompt
- /DynamicUpdate
- /EMSPort
- /Finalize
- /ImageIndex
- /InstallDrivers
- /InstallFrom
- /InstallLangPacks
- /MigNEO
- /MigrateDrivers
- /NetDebug
- /NoReboot
- /Priority
- /PostOOBE
- /PostRollback
- /Quiet
- /ReflectDrivers
- /ResizeRecoveryPartition
- /ShowOOBE
- /SkipFinalize
- /Telemetry
- /TempDrive
- /Unattend
- /Uninstall
- /USBDebug
- /WDSDiscover
- /WDSServer
How to Setup and Configure TFTP Server on Windows 10
A TFTP Server is basically used to transfer files between systems that are connected over a network. TFTP, also known as Trivial File Transfer Protocol, is an internet software utility that you can use to send or receive a file from a remote system. The protocol is very basic and doesn’t provide much security to the files that are being transferred.
We all know the Windows Homegroup that lets you share files over a network without any great hurdle. However, it has been removed from Windows 10 in the v1803 update due to which alternate resolutions are required. A quick workaround would be to use a TFTP Server, it’s simple and easy to set up. In this article, we’ll be using the SolarWinds TFTP Server (download here) which is pretty easy to use and it lets you transfer files with reliability and at a fast speed over a network. We also recommend using SolarWinds TFTP Server since they are a specialist company, specifically developing softwares and solutions for large organisations to help manage there networks, systems and IT infrastructure.
Prerequisites:
Before we get into the essence of the article and show you how to set up your TFTP server, there are certain things that you will be requiring. Here’s what you need —
- Administrator account: If you are not using an administrator account, you will not be to set up a TFTP Server on your system. Therefore, please make sure you are logged in as an administrator.
- SolarWinds TFTP Server: In order to set up a TFTP server, you will have to download the TFTP Server utility from SolarWinds. You can download it from here. Once you have downloaded the .zip file, extract it to your Desktop and then just go through the straight forward installation.
- Port Forwarding: To allow remote access to your TFTP server you will need to forward UDP Port 69 to the IP address on your network from your router in order to allow users from outside your network access the server. However, if remote connection is not needed, then you do not need to forward ports.
Once you have met all the requirements, you are ready to setup the server.
Remote Access or Local Access
If you have decided to allow access to the TFTP server from outside your local network such as your Home or Office or anywhere else, you will need to ensure that you use a Static IP or have your Dynamic IP added to the white list, by default the TFTP server allows All IP Address to send and receive files along with Port Forwarded. You can add IP Range to allow multiple IPs or a shortened range to allow one device only as well.
IP Configuration for Solarwinds TFTP
Setting up the TFTP Server
To setup the server, please follow the given instructions:
- First of all, run the SolarWinds TFTP Server utility by going to the Start Menu and searching for TFTP Server.
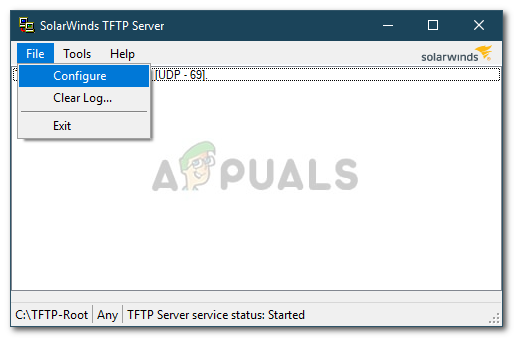
- Once it loads up, click on File and then select Configure.
 SolarWinds TFTP Server File Menu
 - Now, if you want the server to appear in the Windows System Tray, click the ‘Add TFTP Server to Windows System Tray’.
- Afterward, you will have to choose the Server Root Directory. This is where all the received files will be saved. Also, if you want to send over some files, you will have to copy the files to this directory first. Click on Browse and choose a location of your choice. Changing the Server Root Directory
- Next, switch to the Security tab to apply some restrictions.
- If you only want to send files, click Send files. If you only want to receive files, click Receive files. In case you want to do both, make sure the ‘Send and Receive files’ box is checked. Selecting Transfer Types
- Thanks to the SolarWinds TFTP Server utility, you can add in some extra security by allowing certain IP address to send and receive files. If you wish to do this, check the ‘Only allow the following IP address to send/receive files’ and then click Add.
- Enter the range of the IP addresses and click OK. Allowed Range of IP Addresses
- Finally, click OK to close the configuration window.
 SolarWinds TFTP Server File Menu
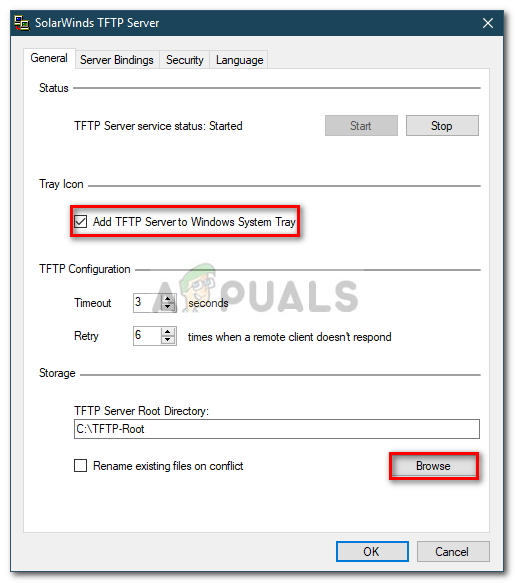 Changing the Server Root Directory
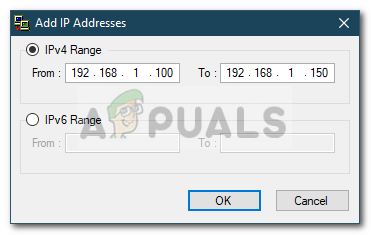 Allowed Range of IP Addresses
That is it, you have successfully configured and setup your TFTP Server.
Using the TFTP Server
Now that you have setup a TFTP server, you might be wondering how to send or receive files using the TFTP server. Don’t worry, we are going to illustrate the procedure here.
Port Forward – To start it off, you will first have to make sure to forward the port number 69 if you want systems outside the network to access it. Port forwarding is usually different for different firmware, therefore, we can’t cover them all. However, to give you the basic insight, you will have to access your router’s control panel, go to Advanced Setup and locate NAT or Port Forward. There, just make a new entry and forward the UDP port 69 on your ipv4 address.
Please note that if you don’t intend to transfer files remotely, you do not have to forward any ports.
Installing TFTP Client
The next step would be to install the TFTP Client on the remote or local system. To install the TFTP client, do the following:
- Go to the Start Menu and open up the Control Panel.
- Navigate to Programs and features and then on the left-hand side, click ‘Turn Windows features on or off’.
- Scroll down and locate TFTP Client. Check the box. Installing TFTP Client
- Click OK to install the client.
- Wait for it to complete.
 Installing TFTP Client
Remember that this has to be on the system which isn’t running the server.
Configuring Firewall to Allow TFTP
After you have installed the TFTP client on your system, you will either have to turn off Windows Firewall or add an exception for the TFTP connections. Here’s how to do it:
- Go to the Start Menu and open up the Control Panel.
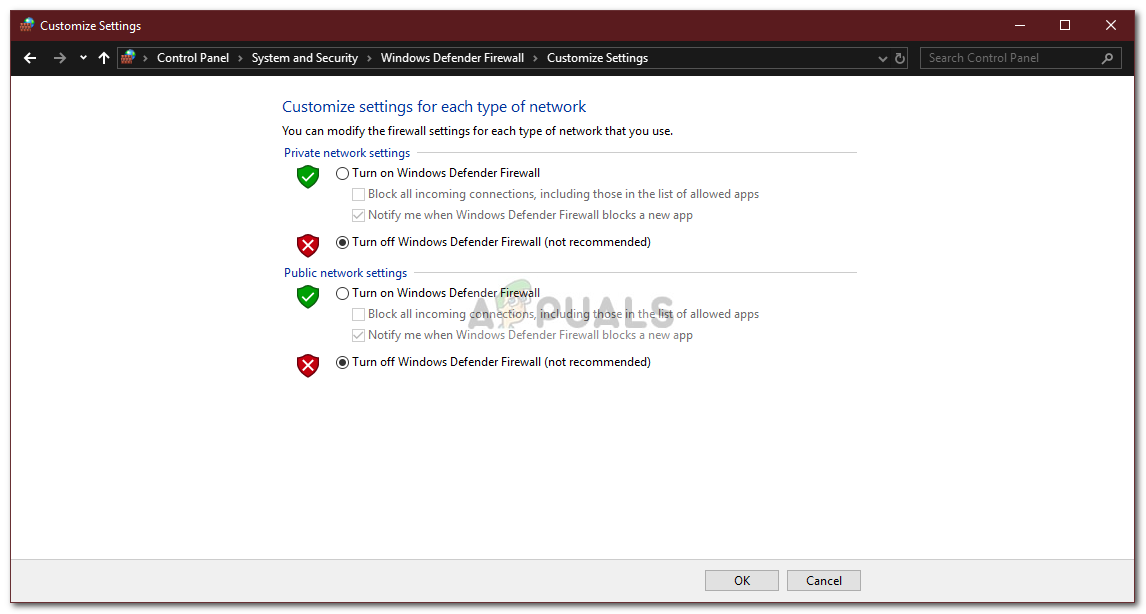
- Change the View by to Large Icons and then select Windows Defender Firewall.
- To turn off Windows Defender Firewall, click on ‘Turn Windows Defender on or off’.
- Check the ‘Turn off Windows Defender Firewall’ under both the settings and click OK. Turning off Windows Defender Firewall
- If you don’t want to turn off Windows Firewall, you can just add an exception for the TFTP connections. To do this, click on ‘Allow an app or feature through Windows Defender Firewall’ on the Windows Firewall settings window.
- Click ‘Change settings’ to be able to add an exception.
- Now, click on Allow another app and then hit Browse.
- Search for TFTP.exe in the Windows system32 directory. Select it and click Open.
- Check both the Private and Public boxes and then click OK. Allowing TFTP Through Firewall
 Turning off Windows Defender Firewall
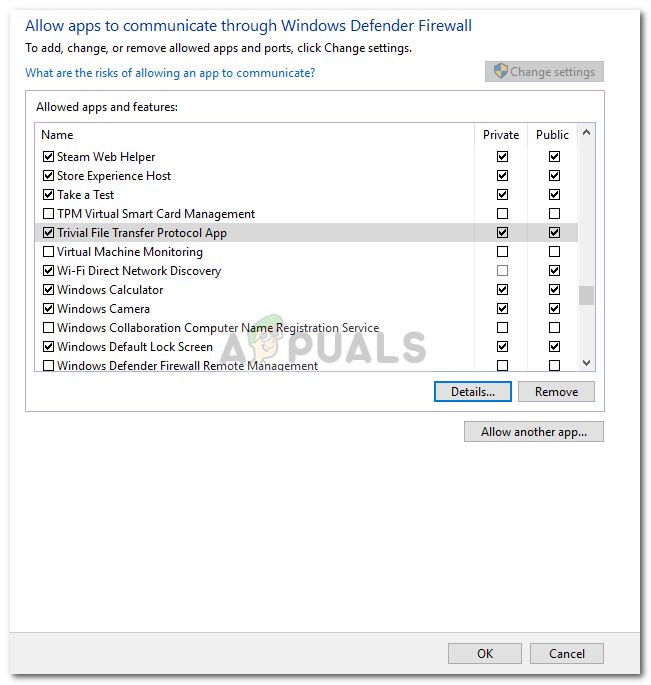 Allowing TFTP Through Firewall
Transferring Files using TFTP
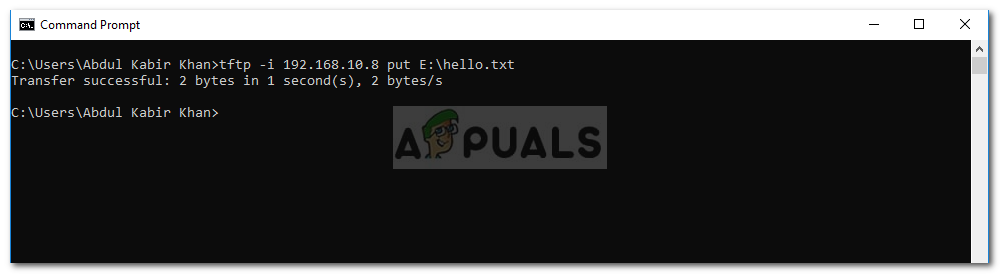
Finally, after installing the TFTP client and forwarding UDP port 69, you are ready to transfer files remotely or locally. To do this, make sure the server is running and then follow the given instructions:
- Press Windows Key + R to open Run.
- Type in ‘cmd’ to open up the command prompt.
- Before you transfer the files, make sure that the files that you want to send are in the Server Root Directory.
- Now, if you want to receive a file, you will have to use the GET parameter. In case you want to send a file, you will just have to use the PUT parameter. The command goes as follows:
- An example would be the following: Sending a File Using TFTP
- If you want to receive a file, then the command will go as follows:
 Sending a File Using TFTP
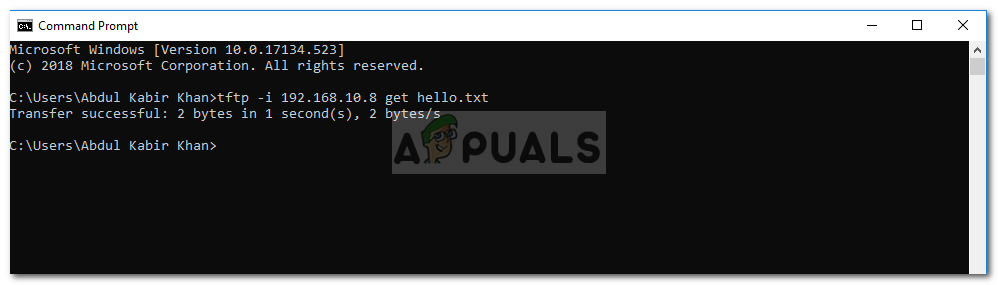 Receiving a File Using TFTP
If you want to transfer files remotely, you will have to specify the public IP address in the command prompt followed by the port. An example would be:
Install Windows Admin Center
Applies to: Windows Admin Center, Windows Admin Center Preview
This topic describes how to install Windows Admin Center on a Windows PC or on a server so that multiple users can access Windows Admin Center using a web browser.
Determine your installation type
Review the installation options which includes the supported operating systems. To install Windows Admin Center on a VM in Azure, see Deploy Windows Admin Center in Azure.
Install on Windows 10
When you install Windows Admin Center on Windows 10, it uses port 6516 by default, but you have the option to specify a different port. You can also create a desktop shortcut and let Windows Admin Center manage your TrustedHosts.
Modifying TrustedHosts is required in a workgroup environment, or when using local administrator credentials in a domain. If you choose to forego this setting, you must configure TrustedHosts manually.
When you start Windows Admin Center from the Start menu, it opens in your default browser.
When you start Windows Admin Center for the first time, you’ll see an icon in the notification area of your desktop. Right-click this icon and choose Open to open the tool in your default browser, or choose Exit to quit the background process.
Install on Windows Server with desktop experience
On Windows Server, Windows Admin Center is installed as a network service. You must specify the port that the service listens on, and it requires a certificate for HTTPS. The installer can create a self-signed certificate for testing, or you can provide the thumbprint of a certificate already installed on the computer. If you use the generated certificate, it will match the DNS name of the server. If you use your own certificate, make sure the name provided in the certificate matches the machine name (wildcard certificates are not supported.) You are also given the choice to let Windows Admin Center manage your TrustedHosts.
Modifying TrustedHosts is required in a workgroup environment, or when using local administrator credentials in a domain. If you choose to forego this setting, you must configure TrustedHosts manually
Once the install is complete, open a browser from a remote computer and navigate to URL presented in the last step of the installer.
Automatically generated certificates expire 60 days after installation.
Install on Server Core
If you have a Server Core installation of Windows Server, you can install Windows Admin Center from the command prompt (running as Administrator). Specify a port and SSL certificate by using the SME_PORT and SSL_CERTIFICATE_OPTION arguments respectively. If you’re going to use an existing certificate, use the SME_THUMBPRINT to specify its thumbprint.
Installing Windows Admin Center will restart the WinRM service, which will sever all remote PowerShells sessions. It is recommended that you install from a local Cmd or PowerShell. If you are installing with an automation solution that would be broken by the WinRM service restarting, you can add the parameter RESTART_WINRM=0 to the install arguments, but WinRM must be restarted for Windows Admin Center to function.
Run the following command to install Windows Admin Center and automatically generate a self-signed certificate:
Run the following command to install Windows Admin Center with an existing certificate:
Don’t invoke msiexec from PowerShell using dot-slash relative path notation (like, .\ .msi ). That notation isn’t supported, the installation will fail. Remove the .\ prefix or specify the full path to the MSI.
Upgrading to a new version of Windows Admin Center
You can update non-preview versions of Windows Admin Center by using Microsoft Update or by manually installing.
Your settings are preserved when upgrading to a new version of Windows Admin Center. We don’t officially support upgrading Insider Preview versions of Windows Admin Center — we think it’s better to do a clean install — but we don’t block it.
Updating the certificate used by Windows Admin Center
When you have Windows Admin Center deployed as a service, you must provide a certificate for HTTPS. To update this certificate at a later time, re-run the installer and choose change .
Windows Setup Command-Line Options
The following command-line options are available for WindowsВ Setup (setup.exe). Beginning with Windows 10, version 1607, you can use a setupconfig file as an alternative to passing parameters to Windows Setup on a command line. For more information, see Windows Setup Automation Overview.
/1394Debug
Enables kernel debugging over an IEEE 1394 (FireWire) port while Windows is running and during the WindowsPE configuration pass of Windows Setup.
| Configuration | Applicable |
|---|---|
| Setup.exe started from WinPE | Yes |
| Setup.exe started from Windows 10 | No |
| setupconfig.ini files used for feature updates | No |
Remarks
The default value for is 1. specifies the baud to use when Windows transfers data during debugging. The default value is 19200, but can also be set to 57600 or 115200.
/AddBootMgrLast
Instructs Windows Setup to add the Windows Boot Manager as the last entry in the UEFI firmware boot order.
| Configuration | Applicable |
|---|---|
| Setup.exe started from WinPE | Yes |
| Setup.exe started from Windows 10 | No |
| setupconfig.ini files used for feature updates | No |
Remarks
This option is only supported on UEFI PCs running Windows PE 4.0 or later.
Performs an automated upgrade to Windows 10 or Windows 8.1 volume license editions only.
| Parameter | Description |
|---|---|
| Clean | Performs a clean install of Windows |
| DataOnly | Performs an upgrade of Windows, saving only data (and not apps.) If the data-only installation option is not available due to compatibility checks, Windows Setup will exit silently and log an exit code. |
| Upgrade | Performs an upgrade of Windows saving apps and data. If the upgrade installation option is not available, or the user needs to resolve an app compatibility issue, Windows Setup will exit silently and log an exit code. |
| NoAutoEit | Not used in Windows 10. In Windows 8.1, if an error is found, Windows Setup does not exit, but instead stops and stays on the Windows Setup screen until the user addresses the issue. The installation from that point on is attended. |
| PerformDU | Not used in Windows 10. In Windows 8.1, Windows Setup checks for Dynamic Updates for Windows Setup |
| Configuration | Applicable |
|---|---|
| Setup.exe started from WinPE | No |
| Setup.exe started from Windows 10 | Yes |
| setupconfig.ini files used for feature updates | No |
Remarks
When /Auto is used, an unattend file cannot be used. When /Auto is used, Windows Setup consumes ei.cfg, and checks compatibility issues before starting the installation. If ei.cfg is malformed, Windows Setup exits silently and logs an exit code. See Windows Setup Exit Codes below. When /Auto is used, only the following customizations of the Windows image are supported. This is not a change in Windows Setup support policy but instead a clarification:
- Applying a cumulative (quality) update
- Applying updates to the servicing stack necessary to complete the feature update (see Servicing stack updates for more information)
- Applying updates to Setup.exe binaries or other files that Setup uses for feature updates
- Appling updates for the «safe operating system» (SafeOS) that is used for the Windows recovery environment
- Adding or removing languages
- Adding or removing Features on Demand
For clarity, when /Auto is used, Windows Setup does not support upgrades nor clean installs to a Windows image that has been customized by adding / removing / changing applications, settings nor drivers.
When /Auto is used, Windows Setup will upgrade using the \sources\install.wim Windows image. Using Dism /Export-Image, this image can be used as a source image for exporting a new image using the /Compress:recovery option. This exported image must be named install.esd for Windows Setup to use it instead of install.wim. You must also remove install.wim from \sources. You should only export to install.esd if you want to reduce the Windows image size. The exported image will be smaller, but will not be mountable.
/BitLocker
Specifies the BitLocker status during upgrades.
| Parameter | Description |
|---|---|
| AlwaysSuspend | BitLocker is always suspended during an upgrade. |
| TryKeepActive | Attempts an upgrade without suspending BitLocker. If the upgrade fails, Windows Setup will suspend BitLocker and complete the upgrade. This is the default behavior if the /BitLocker option is not specified. |
| ForceKeepActive | Enables upgrading without suspending BitLocker. If the upgrade can’t be completed because BitLocker is active, the upgrade will fail. |
| Configuration | Applicable |
|---|---|
| Setup.exe started from WinPE | No |
| Setup.exe started from Windows 10 | Yes |
| setupconfig.ini files used for feature updates | Yes |
/BusParams
Specifies the PCI address of a 1394, USB, or NET debug port.
| Configuration | Applicable |
|---|---|
| Setup.exe started from WinPE | Yes |
| Setup.exe started from Windows 10 | No |
| setupconfig.ini files used for feature updates | No |
Remarks
The bus, device, and function numbers must be in decimal format. For more info, see Setting Up Kernel Debugging with USB 2.0.
/ConfigFile
Specifies the location to the setupconfig file.
| Parameter | Description |
|---|---|
| Local file path or UNC network path to a folder that contains the Windows Setup configuration file. |
| Configuration | Applicable |
|---|---|
| Setup.exe started from WinPE | No |
| Setup.exe started from Windows 10 | Yes |
| setupconfig.ini files used for feature updates | No |
Remarks
If you include an option on the command line and the same option in the setupconfig file, the setupconfig file option and value has precedence.
/CompactOS
Specifies whether to use the Compact OS feature to save hard drive space.
| Parameter | Description |
|---|---|
| Enable | Windows Setup installs Windows using compressed system files. |
| Disable | Windows Setup installs Windows using uncompressed system files. |
| Configuration | Applicable |
|---|---|
| Setup.exe started from WinPE | No |
| Setup.exe started from Windows 10 | Yes |
| setupconfig.ini files used for feature updates | Yes |
Remarks
By default, Windows Setup determines whether to use this feature automatically. To learn more about Compact OS, see Compact OS, single-instancing, and image optimization.
/Compat
Instructs Windows Setup how to handle compatibility scans and messages.
| Parameter | Description |
|---|---|
| IgnoreWarning | Windows Setup completes installation, ignoring any dismissible compatibility messages. |
| ScanOnly | Windows Setup runs through compatibility scans, and then exits (without completing the installation) with an exit code to indicate if any compatibility concerns are present. Windows Setup will return 0xC1900210 if no concerns are found. Windows Setup will return 0xC1900208 if compatibility concerns are found. |
This command works with other switches. To run Windows Setup in the background without any UI:
To ignore common disclaimers in the UI, for example, language changes:
Often an IT Pro will look at the compat XML if Windows Setup finds compatibility issues. Use /CopyLogs to collect Windows Setup logs:
| Configuration | Applicable |
|---|---|
| Setup.exe started from WinPE | No |
| Setup.exe started from Windows 10 | Yes |
| setupconfig.ini files used for feature updates | Yes only with /Compat IgnoreWarning |
Remarks
This option is available in Windows 10.
If you launch Windows Setup with /Compat ScanOnly:
- If it does not find any compatibility issue, it will return MOSETUP_E_COMPAT_SCANONLY (0xC1900210)
- If it finds actionable compatibility issues, like Apps, it will return MOSETUP_E_COMPAT_INSTALLREQ_BLOCK (0xC1900208)
- If it finds that the Mig-Choice selected is not available, it will return MOSETUP_E_COMPAT_MIGCHOICE_BLOCK (0xC1900204)
- If it finds that machine is not eligible for Windows 10, it will return MOSETUP_E_COMPAT_SYSREQ_BLOCK (0xC1900200)
- If it finds that machine does not have enough free space to install, it will return MOSETUP_E_INSTALLDISKSPACE_BLOCK (0xC190020E)
/CopyLogs
Windows Setup will copy or upload compressed logs upon failure to the specified location assuming machine/user has permission and network access to location.
| Parameter | Description |
|---|---|
| Local file path or UNC network paths. |
| Configuration | Applicable |
|---|---|
| Setup.exe started from WinPE | No |
| Setup.exe started from Windows 10 | Yes |
| setupconfig.ini files used for feature updates | Yes |
Remarks
Accepted parameters are local file paths and UNC network paths. Execution runs in the system context, so it may not have permissions to copy to locations that require user permissions.
/Debug
Enables kernel debugging over a communications (COM) port when Windows is running, and during the WindowsPE configuration pass of Windows Setup.
| Parameter | Description |
|---|---|
| Specifies the debugging port. The default value is 1. | |
| Specifies the baud to use when Windows transfers data during debugging. The default setting is 19200, but can also be set to 57600 or 115200. |
| Configuration | Applicable |
|---|---|
| Setup.exe started from WinPE | Yes |
| Setup.exe started from Windows 10 | No |
| setupconfig.ini files used for feature updates | No |
/DiagnosticPrompt
Specifies that the Command Prompt is available during Windows Setup.
| Parameter | Description |
|---|---|
| Enable | The Command Prompt can be accessed by pressing Shift+F10 during Windows Setup. |
| Disable | The Command Prompt is not available during Windows Setup. The Command Prompt wil not be available while offline and OOBE phases are running. This is the default setting. |
| Configuration | Applicable |
|---|---|
| Setup.exe started from WinPE | No |
| Setup.exe started from Windows 10 | Yes |
| setupconfig.ini files used for feature updates | Yes |
Remarks
This option is available in Windows 10, Version 1703.
/DynamicUpdate
Specifies whether Windows Setup will perform Dynamic Update operations (search, download, and install updates).
| Parameter | Description |
|---|---|
| Enable | Dynamic Update operations are performed. |
| Disable | Dynamic Update operations are not performed. |
| NoDrivers | Dynamic Update operations are performed except driver acquisition. |
| NoDriversNoLCU | Dynamic Update operations are performed except driver and latest cumulative update acquisition. |
| NoLCU | Dynamic Update operations are performed except latest cumulative update acquisition. |
| Configuration | Applicable |
|---|---|
| Setup.exe started from WinPE | No |
| Setup.exe started from Windows 10 | Yes |
| setupconfig.ini files used for feature updates | Yes for Microsoft Update (MU) based feature updates; Yes for Unified Updated Platform (UUP) based feature updates only when /DynamicUpdate NoDrivers is specified |
Remarks
NoDrivers, NoLCU and NoDriversNoLCU are new for Windows 10, version 2004. When NoDrivers, NoLCU or NoDriversNoLCU is specified, Dynamic Update operations will be performed but drivers and/or the latest cumulative update acquisition will not be performed. /DynamicUpdate can be used with /SkipFinalize to control Dynamic Update operations; /DynamicUpdate is ignored when used with /Finalize.
/EMSPort
Enables or disables Emergency Management Services (EMS) during Windows Setup and after the server operating system has been installed.
| Parameter | Description |
|---|---|
| COM1 | Enables EMS over COM1. Supported for x86 systems only. |
| COM2 | Enables EMS over COM2. Supported for x86 systems only. |
| UseBIOSSettings | uses the setting that the BIOS specifies. For x86 systems, Windows uses the value from the Serial Port Console Redirection (SPCR) table. If no SPCR table or EFI console device path is specified in the BIOS, Windows disables EMS. |
| Off | Disables EMS. If EMS is disabled in Windows Setup, you can later enable EMS by modifying the boot settings. |
| Specifies the baud to use when Windows transfers data during debugging. The default value is 19200, but it can also be set to 57600 or 115200. |
| Configuration | Applicable |
|---|---|
| Setup.exe started from WinPE | Yes |
| Setup.exe started from Windows 10 | No |
| setupconfig.ini files used for feature updates | No |
/Finalize
Instructions Windows Setup to finish previously started update operations on the down-level OS, followed by an immediate reboot to start the offline phase.
| Configuration | Applicable |
|---|---|
| Setup.exe started from WinPE | No |
| Setup.exe started from Windows 10 | Yes |
| setupconfig.ini files used for feature updates | No |
Remarks
This option is new for Windows 10, version 2004. /Finalize should not be specified with the /NoReboot option. Windows Setup will return error MOSETUP_E_FINALIZE_RESUME_FAILURE (0xC1900132) if /Finalize is called and the device is not in the proper state to resume after running /SkipFinalize. See /SkipFinalize.
/ImageIndex
Instructions Windows Setup which OS image to install from install.wim if multiple images may be applicable.
| Configuration | Applicable |
|---|---|
| Setup.exe started from WinPE | Yes |
| Setup.exe started from Windows 10 | Yes |
| setupconfig.ini files used for feature updates | Yes for Microsoft Update (MU) based feature updates; No for Unified Updated Platform (UUP) based feature updates |
Remarks
If multiple images are applicable, Windows Setup will prompt the user to select. If multiple images are applicable and Windows Setup is invoked with /Quiet, Windows Setup will fail with error MOSETUP_E_NO_MATCHING_INSTALL_IMAGE (0xC1900215). This may occur when the product key specified using /PKey applies to multiple OS images.
/InstallDrivers
Adds .inf-style drivers to the new Windows 10 installation.
| Parameter | Description |
|---|---|
| Local file path or UNC network path to a folder that contains .inf files. |
| Configuration | Applicable |
|---|---|
| Setup.exe started from WinPE | No |
| Setup.exe started from Windows 10 | Yes |
| setupconfig.ini files used for feature updates | Yes |
Remarks
This option is new for Windows 10. The driver .inf can be in a folder within the specified location. The command will recurse through the specified location.
/InstallFrom
Specifies a different Install.wim file to use during Windows Setup.
| Parameter | Description |
|---|---|
| The path of the .wim file to install. |
This option also be used with split image files (.swm). Select the first split image file in the series
| Configuration | Applicable |
|---|---|
| Setup.exe started from WinPE | No |
| Setup.exe started from Windows 10 | Yes |
| setupconfig.ini files used for feature updates | No |
Remarks
This enables you to use a single preinstallation environment to install multiple versions of Windows images. For example, you can use a 32-bit version of Windows Setup to deploy a 64-bit Windows image. You can also use an answer file for cross-platform deployments. For more information, see “Creating a WIM for Multiple Architecture Types” in Windows Setup Supported Platforms and Cross-Platform Deployments
/InstallLangPacks
Adds language packs (lp.cab) to the new Windows 10 installation.
| Parameter | Description |
|---|---|
| Local file path or UNC network path to a folder that contains .inf files. |
| Configuration | Applicable |
|---|---|
| Setup.exe started from WinPE | No |
| Setup.exe started from Windows 10 | Yes |
| setupconfig.ini files used for feature updates | Yes for Microsoft Update (MU) based feature updates; No for Unified Updated Platform (UUP) based feature updates |
Remarks
This option is new for Windows 10. The language packs can be in a folder within the specified . The command installs all lp.cab files and language capabilities such as text-to-speech recognition, in the folder and subfolders at the specified . Language capabilities may have be dependent on other language capabilities. For example, Text-to-speech is dependent on the Basic component of the same language. Language capabilities should not be renamed within . See Language and region Features on Demand (FOD). In Windows 10, version 1903 and later, install failures will cause Windows Setup to fail and rollback.
Instructs Windows Setup to copy alternate files from an alternate location. This option instructs Windows Setup to look in the alternate location first, and, if files are present, to use them instead of the files from the default location.
| Parameter | Description |
|---|---|
| Name and the location of the folder that contains the replacement files and can be any local drive location. UNC paths are not supported. |
Examples
To copy an updated C:\Program Files\Messenger\Msmsgs.exe file into the Windows installation, create the following folder structure on the Pro\Sources$OEM$$Progs\Messenger\Msmsgs.exe installation source by using the Setup command:
If you replace a file that Windows file protection protects, you must also copy the updated file to the local sources to be installed with Windows. For example, you may copy the file to the C:\Windows\i386 folder. The file name must be the same as the name that is used in Windows Setup. For example, add the following file and folder structure to your $OEM$ directory: Pro\sources$OEM$$$\i386\msmsgs.ex_. If you use files that are not on an installation share, you must specify the folder name. In this example the is C:\additional_files, where C:\additional_files is your customized $OEM$ directory. For example: C:\additional_files$$\i386\msmsgs.ex_.
If you change resources in your replacement files, you must add the updated Multilanguage User Interface (MUI) files to the installation.
| Configuration | Applicable |
|---|---|
| Setup.exe started from WinPE | Yes |
| Setup.exe started from Windows 10 | No |
| setupconfig.ini files used for feature updates | No |
Remarks
You must know where the files will be installed on the Windows installation. All the additional files must be copied to an $OEM$ folder in your installation sources or in the . The $OEM$ structure provides a representation of the destination installation disk:
- $OEM$\$1 maps to %SYSTEMDRIVE%, which could be drive C.
- $OEM$\$$ maps to %WINDIR%, which could be C:\windows.
- $OEM$\$progs maps to the program files directory.
- $OEM$\$docs maps to the user’s My Documents folder.
/MigNEO
Tells Windows Setup to perform an upgrade of Windows without additional offline phase optimizations.
| Configuration | Applicable |
|---|---|
| Setup.exe started from WinPE | No |
| Setup.exe started from Windows 10 | Yes only with /Auto Upgrade | DataOnly |
| setupconfig.ini files used for feature updates | Yes only with /Auto Upgrade | DataOnly |
Remarks
NEO stands for Non-event Objective, a multi-release effort to reduce feature update offline time, including a single reboot for most users. This option is available in Windows 10, version 1803 and later.
/MigrateDrivers
Instructs Windows Setup whether to migrate the drivers from the existing installation during the upgrade.
| Configuration | Applicable |
|---|---|
| Setup.exe started from WinPE | No |
| Setup.exe started from Windows 10 | Yes |
| setupconfig.ini files used for feature updates | Yes |
Remarks
You can specify All or None. By default, Windows Setup decides which is best for each individual driver based on the install choice. You can use this switch with /InstallDrivers, though it’s not required.
/NetDebug
Enables kernel debugging over the network.
Syntax
/NetDebug:hostip= ,port= ,key= [,nodhcp][,busparams= ]
| Parameter | Description |
|---|---|
| IP address of the host computer. | |
| Port of the host computer. | |
| Password to set up a secure connection. | |
| Bus number, device number, and function number of an adapter for a specific PCI bus device.. |
| Configuration | Applicable |
|---|---|
| Setup.exe started from WinPE | Yes |
| Setup.exe started from Windows 10 | No |
| setupconfig.ini files used for feature updates | No |
Remarks
Use hostip to identify the IP address of the host computer. Use port to identify the port. The default start port is 49152, and the default end port is 65535. Use key to provide a password to set up a secure connection. Use nodhcp to avoid using a DHCP connection. (optional). Use busparams to select the bus number, device number, and function number of an adapter for a specific PCI bus device. (optional). For additional details, see Setting Up Kernel-Mode Debugging over a Network Cable Manually.
/NoReboot
Instructs Windows Setup not to restart the computer after the down-level phase of Windows Setup completes.
| Configuration | Applicable |
|---|---|
| Setup.exe started from WinPE | No |
| Setup.exe started from Windows 10 | Yes |
| setupconfig.ini files used for feature updates | No |
Remarks
This option is new for Windows 10. The /NoReboot option enables you to execute additional commands before Windows restarts. This option suppresses only the first reboot. The option does not suppress subsequent reboots.
Supplies Windows Setup with the specific product key.
| Configuration | Applicable |
|---|---|
| Setup.exe started from WinPE | No |
| Setup.exe started from Windows 10 | Yes |
| setupconfig.ini files used for feature updates | Yes |
Remarks
This option is new for Windows 10.
/Priority
Tells Windows Setup to increase the thread priority from low to normal for feature updates through Windows Update.
| Parameter | Description |
|---|---|
| Normal | Windows Setup will execute with normal thread priority. |
| Low | Windows Setup will execute with low thread priority. |
| Configuration | Applicable |
|---|---|
| Setup.exe started from WinPE | No |
| Setup.exe started from Windows 10 | Yes |
| setupconfig.ini files used for feature updates | Yes |
Remarks
This option is available in Windows 10, version 1709 and later. Low priority is new for Windows 10, version 2004. Media based installations already run at Normal priority by default but can be decreased to Low priority.
/PostOOBE
After Windows Setup is complete, run a script.
Syntax
/PostOOBE [\setupcomplete.cmd]
| Parameter | Description |
|---|---|
| Local file path or UNC network path to a file named setupcomplete.cmd or to a folder that contains setupcomplete.cmd. |
Path to folder that contains a script with the name setupcomplete.cmd. setupcomplete.cmd is copied to $Windows.
BT to be run after OOBE.
| Configuration | Applicable |
|---|---|
| Setup.exe started from WinPE | No |
| Setup.exe started from Windows 10 | Yes |
| setupconfig.ini files used for feature updates | Yes |
Remarks
This option is available in Windows 10.
/PostRollback
Instructs Windows Setup to run a script if the feature update fails to install and rolls back the changes, or if the user chooses to uninstall the feature update and go back to a previous version of Windows.
Syntax
/PostRollback [/PostRollbackContext
| Parameter | Description |
|---|---|
| Local file path or UNC network path to a file named setuprollback.cmd, or to a folder that contains setuprollback.cmd. |
| Configuration | Applicable |
|---|---|
| Setup.exe started from WinPE | No |
| Setup.exe started from Windows 10 | Yes |
| setupconfig.ini files used for feature updates | Yes |
Remarks
This option is available in Windows 10. /PostRollbackContext option is available in Windows 10, version 1803 and later. The /PostRollbackContext option allows you to specify whether the script runs in the context of the System account or the account of the signed in user. By default, updates from media run setuprollback.cmd in user context, which requires the first user who logs in post-upgrade to have administrator rights. For updates from Windows Update, setuprollback.cmd runs in system context, regardless of the rights of the first logged-in user. Windows Setup will copy setuprollback.cmd to $Windows.
BT to be run after OOBE.
/Quiet
This will suppress any Windows Setup user experience including the rollback user experience.
| Configuration | Applicable |
|---|---|
| Setup.exe started from WinPE | No |
| Setup.exe started from Windows 10 | Yes |
| setupconfig.ini files used for feature updates | No |
Remarks
This option is available in Windows 10.
/ReflectDrivers
Specifies the path to a folder that contains encryption drivers for a computer that has third-party encryption enabled.
| Parameter | Description |
|---|---|
| Local file path or UNC network path to a folder that contains .inf files. |
| Configuration | Applicable |
|---|---|
| Setup.exe started from WinPE | No |
| Setup.exe started from Windows 10 | Yes |
| setupconfig.ini files used for feature updates | Yes |
Remarks
This option is available in Windows 10, version 1607. Make sure that contains only a minimal set of encryption drivers. Having more drivers than necessary can negatively impact upgrade scenarios.
/ResizeRecoveryPartition
Specifies whether it’s OK to resize the existing Windows Recovery Environment (Windows RE) partition or create a new one during installation.
>
| Parameter | Description |
|---|---|
| Enable | During installation, Windows can resize the existing Windows RE tools partition or create a new one if needed. |
| Disable | Windows does not resize the existing Windows RE tools partition or create a new one during installation. |
| Configuration | Applicable |
|---|---|
| Setup.exe started from WinPE | Yes |
| Setup.exe started from Windows 10 | Yes |
| setupconfig.ini files used for feature updates | Yes |
/ShowOOBE
Specifies whether the user is required to interactively complete the out of box experience (OOBE).
| Parameter | Description |
|---|---|
| Full | Requires the user to interactively complete the out of box experience (OOBE). |
| None | Skips OOBE and selects the default settings. |
| Configuration | Applicable |
|---|---|
| Setup.exe started from WinPE | No |
| Setup.exe started from Windows 10 | Yes |
| setupconfig.ini files used for feature updates | Yes |
Remarks
This option is available in Windows 10.
/SkipFinalize
Instructions setup to start update operations on the down-level OS without initiating a reboot to start the offline phase.
| Configuration | Applicable |
|---|---|
| Setup.exe started from WinPE | No |
| Setup.exe started from Windows 10 | Yes |
| setupconfig.ini files used for feature updates | No |
Remarks
This option is available in Windows 10, version 2004. /SkipFinalize will prepare the update without committing. This allows for the commit to be completed using /Finalize followed by an immediate reboot of the device. This is the preferred approach to pending the update as the /NoReboot option will commit the changes but suppress the first reboot to allow for additional tasks. /SkipFinalize will not automatically instruct Windows Setup to run silently on the down-level OS while the computer is in use. Use /Quiet to suppress the Windows Setup user experience, and /Priority Low to prevent user impact. /SkipFinalize should not be specified with the /NoReboot option. See /Finalize.
/Telemetry
Specifies whether Windows Setup should capture and report installation data.
| Parameter | Description |
|---|---|
| Enable | Windows Setup captures and reports installation data. |
| Disable | Windows Setup does not capture and report installation data. |
| Configuration | Applicable |
|---|---|
| Setup.exe started from WinPE | No |
| Setup.exe started from Windows 10 | Yes |
| setupconfig.ini files used for feature updates | Yes |
/TempDrive
Instructs Windows Setup to put temporary installation files on the specified partition.
| Parameter | Description |
|---|---|
| The partition to copy installation files to during Windows Setup. |
| Configuration | Applicable |
|---|---|
| Setup.exe started from WinPE | No |
| Setup.exe started from Windows 10 | Yes |
| setupconfig.ini files used for feature updates | Yes |
Remarks
This option is available in Windows 10, version 1607. For an upgrade, the /TempDrive option affects only the placement of temporary files. The operating system is upgraded in the partition from which you run the setup.exe file.
/Unattend
Enables you to use an answer file with Windows Setup.
| Parameter | Description |
|---|---|
| The file path and file name of the unattended Windows Setup answer file. |
| Configuration | Applicable |
|---|---|
| Setup.exe started from WinPE | Yes |
| Setup.exe started from Windows 10 | No |
| setupconfig.ini files used for feature updates | No |
Remarks
This is known as an unattended installation. You must specify a value for . Windows Setup applies the values in the answer file during installation. When /Unattend is used, /Auto cannot be used.
/Uninstall
Determines whether Windows will include controls that allow the user to go back to the previous operating system.
| Parameter | Description |
|---|---|
| Enable | Windows Setup includes controls that allow the user to go back to the previous operating system. |
| Disable | Windows Setup does not includes controls that allow the user to go back to the previous operating system. |
| Configuration | Applicable |
|---|---|
| Setup.exe started from WinPE | No |
| Setup.exe started from Windows 10 | Yes |
| setupconfig.ini files used for feature updates | Yes |
Remarks
This option is available in Windows 10.
/USBDebug
Sets up debugging on a USB port.
| Parameter | Description |
|---|---|
| The name of the computer to debug. |
| Configuration | Applicable |
|---|---|
| Setup.exe started from WinPE | Yes |
| Setup.exe started from Windows 10 | No |
| setupconfig.ini files used for feature updates | No |
Remarks
Debug data is effective on the next reboot.
/WDSDiscover
Specifies that the Windows Deployment Services (WDS) client should be in discover mode.
Examples
To start the WDS client in dynamic discover mode, run the following command:
| Configuration | Applicable |
|---|---|
| Setup.exe started from WinPE | Yes |
| Setup.exe started from Windows 10 | No |
| setupconfig.ini files used for feature updates | No |
Remarks
If you do not specify /WDSServer WDS searches for a server.
/WDSServer
Specifies the name of the Windows Deployment Services (WDS) server that the client should connect to.
| Parameter | Description |
|---|---|
| The name of the Windows Deployment Services server. |
Examples
To start the Windows Deployment Services client in static discover mode, run the following command:
| Configuration | Applicable |
|---|---|
| Setup.exe started from WinPE | Yes |
| Setup.exe started from Windows 10 | No |
| setupconfig.ini files used for feature updates | No |
Remarks
To use this setting, you must also use the /WDSDiscover option. can be an IP address, a NetBIOS name, or a fully qualified domain name (FQDN).


