- How to Shade Easily With Layer Blend Modes
- Know Basic Lighting Theory
- The Color Swatch Method
- Traditional Palette Colors vs. Photoshop Colors
- Picking the Wrong Color Swatches
- Shade With Layer Blend Modes
- How to Organize Your Layers
- The Sequence of Steps for Shading
- The Sketch
- Establish Base Tones
- Painting Shadows
- Blending the Sketch
- Incorporating Highlights
- Color Effects & Additional Light Sources
- Finish Shading on Normal Mode
- Conclusion
- How to Install Window Shades
- Getting the Right Fit
- How to Hang Rollers
How to Shade Easily With Layer Blend Modes
Wouldn’t you love to learn the incredible art of shading? There are many ways you can accomplish shading, but today I’ll break down one method that makes the whole process much easier by incorporating Layer Blend Modes. Let’s get started!
Know Basic Lighting Theory
The tips I’ll be showing you focus on the application of shading specifically when it comes to painting in Adobe Photoshop, so it’s important to have at least a basic understanding of light and shadow theory.
 Notice how I rotated the original reference to a position I liked better. Then I quickly make a note of the direction where the light source is coming from to help understand the light and shadow.
Feel free to also follow along with my painting by downloading this Rose stock from Envato Market. Photo references bring the actual theories to life by putting examples of real lighting conditions in front of you. So take advantage of them whenever you can!
The Color Swatch Method
Normally when people paint, whether it’s traditionally or digitally, they start off with a few different swatches. When you pick color swatches, you basically decide on an overall color scheme before you begin painting.
For instance, for this lovely rose sketch, these would be some swatches I would use.
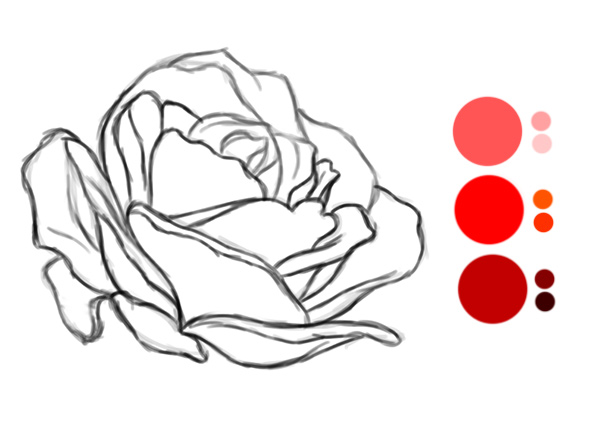 Here I have separated the swatches into different categories for highlights, mid-tones, and shadows. Keep in mind, however, that we won’t actually need these swatches for the method we’re using!
If I wanted to create this painting using these color swatches, I would probably put them on a separate layer at the top of my panel to make sure I always had the swatches available.
Traditional Palette Colors vs. Photoshop Colors
From a traditional standpoint, the main reason why we do this is because we’re limited to the number of colors available to us. So if you only have three colors to paint with, unfortunately, that’s the full scope of your palette.
 While traditional artists are limited in what colors they can use, Photoshop has a full range of hues and shades you can incorporate into any painting.
But as you enter the world of digital painting, you have every imaginable color right at your fingertips. Digest this realization as best as you can, because having this many colors is both a blessing and a curse.
Although you don’t ever have to worry about running out of one particular color, you might still run into trouble if you pick the wrong color swatches.
Picking the Wrong Color Swatches
It’s hard to know whether the color swatches you choose are the best fit for your painting. And if you pick colors right out the gate that don’t work well together, you’re in big trouble.
 Here’s an example of choosing color swatches that don’t fit the sketch very well. The colors are murky and darker than they should be, but if you’ve already committed to these colors you might not realize they’re a bad fit until it’s too late.
What usually happens, especially with beginners, is that you get to a point when you finally realize the colors are all wrong. Because you’ve gotten so far, you probably won’t start over, but you also don’t know how to fix the problem, so all your efforts become just another scrapped study.
Shade With Layer Blend Modes
Today I’d like to help you bypass your dependence on color swatches by showing you a method that is much easier. For simplicity’s sake, I’ll just call it the Blend Mode Method.
This method allows you to paint the base tones, mid-tones, and highlights, all without ever having to worry about choosing the right colors.
How to Organize Your Layers
I don’t know about you, but I have major commitment issues. There’s simply no way I’ll paint on just one layer. Quite frankly, I find it scary and intimidating.
But if you want to avoid a messy Layers panel, there is one great way to organize your layers as you paint. This is especially important to this shading process.
First things first, start with the sketch layer above any other colors. Then create a base tone with a flat color on a layer separate from the sketch.

Next, create a new layer and dedicate it to the shadows. Set the appropriate blend mode, and Right-Click the layer to Set as a Clipping Mask. Now recreate the last step, this time dedicating a new layer to highlights.
 Avoid messy paintings by setting new layers as Clipped Masks to your base color.
By painting on these clipped layers, you’ll be able to stay «within the lines» of the initial base color. Continue adding more layers whenever you like to further develop the shading.
The Sequence of Steps for Shading
Now let’s walk through the steps of this technique with a real-life example.
Your standard shading is broken down into three different steps: base tones, shadows, and highlights. Here is the general sequence of steps I took to paint a study of this lovely rose.
The Sketch
Since this study will just be used to understand shading, create the initial sketch by quickly tracing your reference using a Hard Round Brush.

Establish Base Tones
The base tone is pretty much just the first flat color you’ll put on the canvas, so all you need to do is keep the Blend Mode set to Normal.
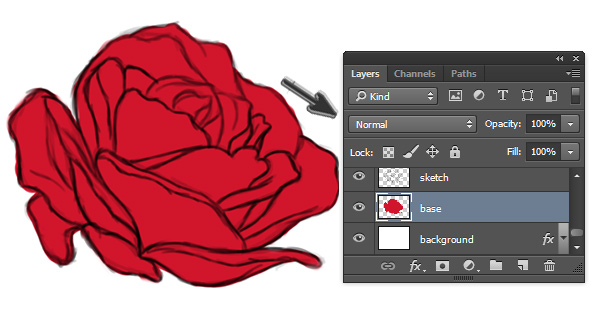
Here I started with a rich red color using a Hard Round Brush to completely fill in the sketch.
Painting Shadows
Now for the magic! The key to painting shadows without color swatches is to utilize blend modes that create a darker effect over your base colors. On one of your clipped layers, set the Blend Mode to Multiply and use the Eyedropper Tool (E) to set the Foreground Color to the same red from the base.
 Even though I’m still painting with the original red color from the base, the shadow applies a darker color to the painting because I have it on a new layer set to Multiply.
As you begin painting shadow on this new layer, notice how a much darker color is applied because it’s being multiplied onto the original color. If you want an even darker color, use the Eyedropper Tool (E) to pick up the darker shade that’s on the canvas. You can also duplicate the layer to achieve a deeper tone.
Although I prefer Multiply, you might want to experiment with these other Blend Modes that help to darken areas for the perfect shadow:
- Darken
- Color Burn
- Linear Burn
Blending the Sketch
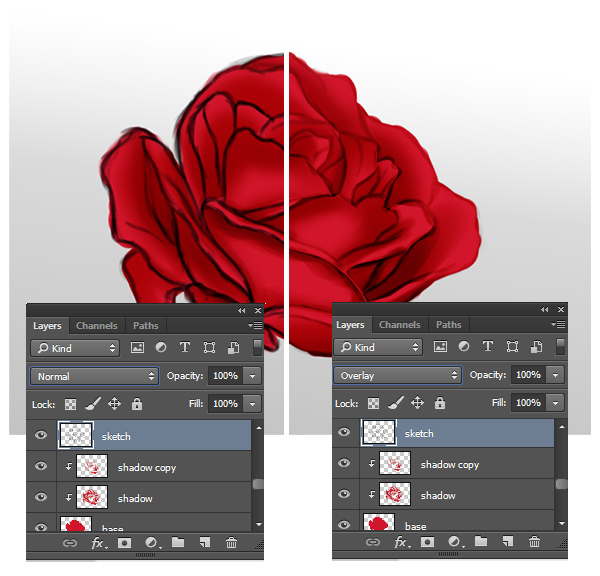
If you want to strive for realism, you have to eventually eliminate the harsh black lines from your sketch. You could paint over each line to cover them individually, but the process would be unnecessarily long. An alternative way to do this is by setting your sketch to Overlay or Soft Light. Instantly, the sketch blends into the painting for a more realistic look!
Incorporating Highlights
Highlights can really make or break a painting. In fact, feeling as if your painting is missing something can be a good indicator that you need to highlight. Do this easily by setting the Blend Mode to Linear Dodge (Add). Just like before, use the Eyedropper Tool (E) to pick up colors from nearby areas to begin painting highlights. Instantly the applied color is much brighter because of the mode that’s been chosen.
 To paint highlights, set the Foreground Color to nearby colors using the Eyedropper Tool. You’ll rarely have to open Color Picker with this method.
Color Effects & Additional Light Sources
Environmental light and additional light sources tend to affect the color scheme of our paintings more than we realize. This, in turn, also affects the shading. To incorporate some interesting effects, experiment with color on a New Layer set to either Color Dodge or Overlay.
 A little goes a long way. Experiment with different colors and blend modes for the effect you desire.
To make the rose appear warmer, I concentrated a light shade of orange towards the top petals.
Finish Shading on Normal Mode
Eventually, it’s always a good idea to finish your painting using layers set to Normal. Since all the colors you need are already on the canvas, you can use those same colors to clean up any areas that still need work. This is why the Eyedropper Tool (E) comes in handy, because you’ll rarely have to get new colors from the Color Picker.

Here is the final study. Although I never picked colors specifically for the shadows or highlights, I was still able to achieve them using a variety of Blend Modes. And to intensify the colors even more, I quickly adjusted them with Color Balance.
Conclusion
Color swatches are great for traditional art, but aren’t completely necessary for digital paintings. You can achieve incredible shading by just utilizing Layer Blend Modes.
I hope this article has showed you the remarkable versatility of Photoshop. Even if you aren’t that advanced in technique, you can always depend on it to help make the process much easier.
Let me know if you have any questions in the comments below! And for more digital painting tips, check out these articles:
How to Install Window Shades
Window shades have evolved from being simply utilitarian objects that offer privacy and control the amount of natural light that comes in through the window to being part of the decor of a room. They come in such an amazing array of sizes, colors, patterns and fabrics that it is easy to find one that fits a specific room in the house.
Window shades in the living room control the intensity of light and keep carpets, upholstery and hardwood floors from fading, while a more opaque shade in a bedroom is used both for privacy and to keep sunlight from glaring into the room. It is even possible for a homeowner to install their own custom blinds and window shades. By installing window shades yourself, you have the ability to save in costs and fit them exactly the way you prefer.
Getting the Right Fit
The challenge with a window shade is that it must be cut to the exact measurements of every window. Even if the homeowner thinks that every window in their home is the same size, there may be tiny variations that need to be taken into account. If the shade is even slightly too wide for the roller, they can’t furl the right way. If they are too narrow, they’ll allow light to leak in at the edges. Because of this, it is a good idea to have the shades and rollers cut to precisely the right size.
Most shades are hung with brackets found on the jamb just above the window. These should be measured from one jamb to the other with a metal tape measure. When the dimensions are sent to the manufacturer, they will allow for the bracket clearance. If the shades are going to be hung from the ceiling or from the outside of the window frame, the homeowner should mark where the brackets will go, measure accurately and send these dimensions to the manufacturer under the listing outside bracket mounting, or OBM. Make sure that the marks are not erased so that you’ll know the brackets need to be installed there. The shade should be 12 inches longer than the window, measured from the windowsill to the brackets. This allows for roll-over.
Rollers and shades can be made to fit by the homeowner if they’re too large for the window. Simply use a saw to cut the roller to the right length, which would be the distance from one bracket to the other. Take the metal cap off the end of the roller, insert the pin, and use a hammer to tap it carefully in place. The homeowner should make sure to only work with the correct end of the roller and not cut off the spring by accident.
Shades can also be cut to measure as long as the homeowner has a steady hand and access to a large surface. If the shades are laminated with fabric the homeowner buys themselves, they will need to be trimmed anyway.
How to Hang Rollers
Once everything has been measured and ordered, installing roller shades is an easy task. First, take down all other draperies and blinds. Then, make sure that all hardware, including screws and brackets, are at hand.
With a metal tape, re-measure the shade width provided and compare that to the opening. The measurement provided at time of order is the exact width of the shade – outside edge of bracket to outside edge of the other bracket. With a pencil, mark the total width of the shade as shown on the order form onto the mounting area – these marks are where the outside edges of the brackets will align. With a screw gun, install your first bracket and make sure that it’s square. Then, install the other bracket aligning the outside edge to the other pencil mark. If a bracket isn’t level, install a shim between the head jamb and the bracket, then check to make sure everything’s level again. Use a utility knife to trim the excess shim.
With the brackets are level and fully installed, push in the spring loaded pivot end of the shade into the center hole of the bracket. While keeping tension on the pivot side, lower down the clutch or motor side into the other bracket – you will see that there are two teeth that will drop into the bracket
By following these tips, you are set for success in installing your window shades on your own.


