- How to create an icon in Windows 10 [Full Guide]
- How to make a custom icon in Windows 10?
- 1. Create an icon with Paint 3D
- Design the icon
- Customize your icon with stickers
- Customize your icon with 3D objects
- 2. How do I convert a JPEG to an icon in Windows 10?
- 3. How to add new icons to the desktop
- Windows 10 Show Desktop Icon
- Create Your Own Windows 10 Show Desktop Icon
- Create Your Own Show Desktop Icon – Part b)
- How to Show “My Computer” (This PC) on the Desktop in Windows 10
- Steps to Display “My Computer” on Windows 10
- Pin My Computer Icon to Start Menu and Start List in Windows 10
- You Can Read Next
- How to Uninstall/Disable Cortana in Windows 10?
- How to Fix System Thread Exception Not Handled Error in Windows 10
- Top 7 Best Free Antivirus for Windows 10 and 8.1 in 2021
- What is ss2svc32.exe in Windows? Is it a Virus? Can I Remove It?
- Tips for Protecting the Security of your Windows Device in 2021
- 5 Ways to Auto Shutdown Windows 10 Computer
- 80 thoughts on “How to Show “My Computer” (This PC) on the Desktop in Windows 10”
How to create an icon in Windows 10 [Full Guide]

- Adding your own unique icon designs to the desktop is a great way to customize Windows 10 .
- This article provides guidelines for designing your own desktop icons with Paint 3D.
- Our Graphics & Design section includes a plethora of graphics design software guides.
- Look no further than our How-To Hub for many more Windows 10 software guides.
Windows 10 displays shortcuts on its desktop with icons, which are a big aspect of the platform’s themes.
If you fancy giving Windows a bit of a makeover, customizing desktop icons is a good way to do it. You can create your own custom icons for desktop shortcuts.
All you’ll need to set up your own icons is one art (or graphic) design application.
Windows 10 includes the Paint and Paint 3D design apps. You can set up new icons with either software. However, Paint 3D is the better-equipped package as it enables users to add 3D shapes and stickers to their icons.
How to make a custom icon in Windows 10?
1. Create an icon with Paint 3D
Set up the canvas
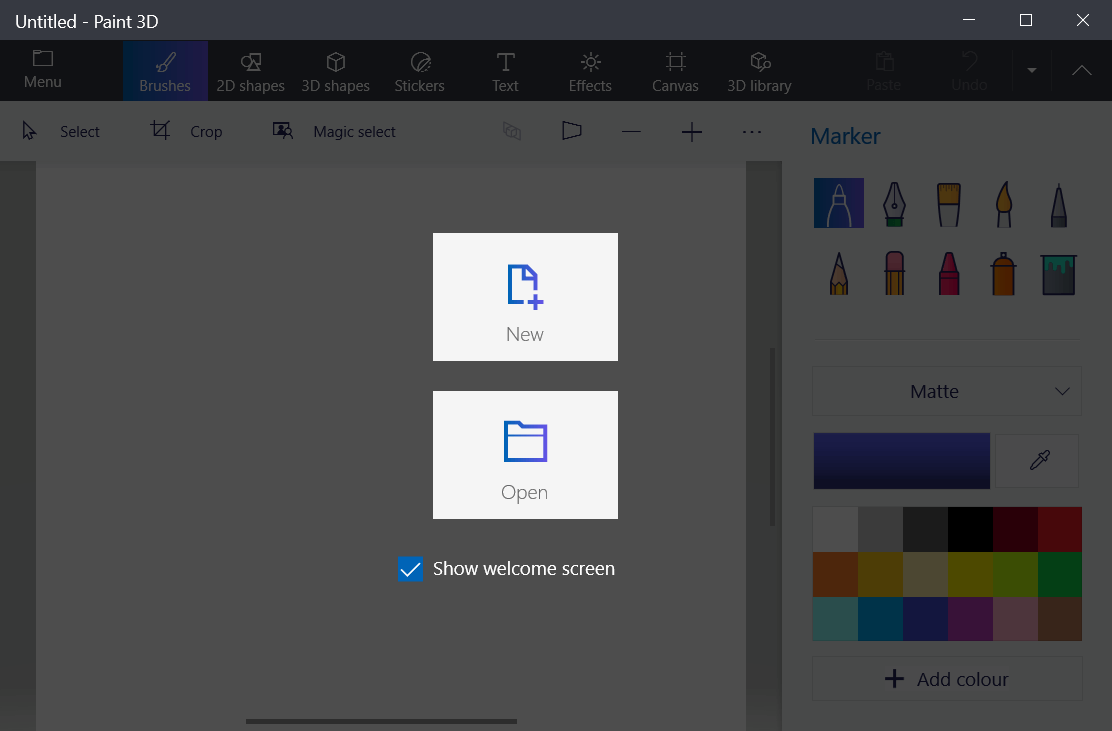
- First, click the Start button.
- Click Paint 3D on the Start menu’s software index.
- Click New in Paint 3D.

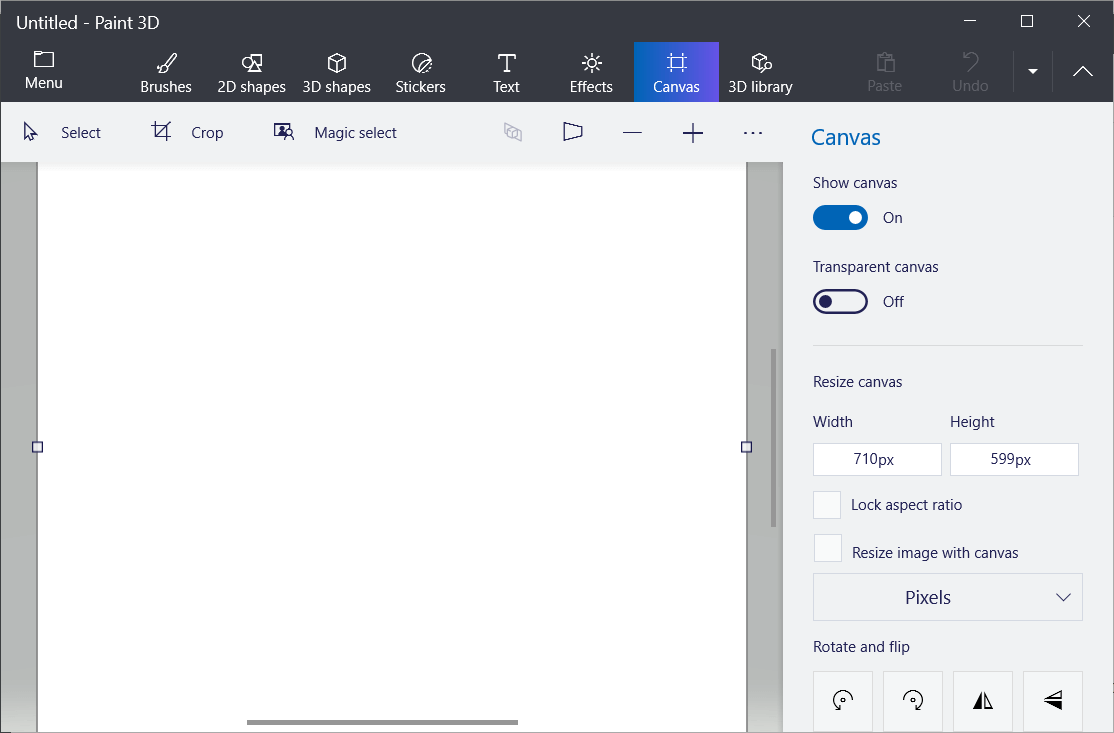
- Select Canvas to open the options shown directly below.
- Enter 32 in both the Width the Height boxes to resize the canvas to 32 x 32.
- Roll your mouse wheel to zoom in on, and expand the canvas.
- Toggle the Transparent canvas option on.
Design the icon
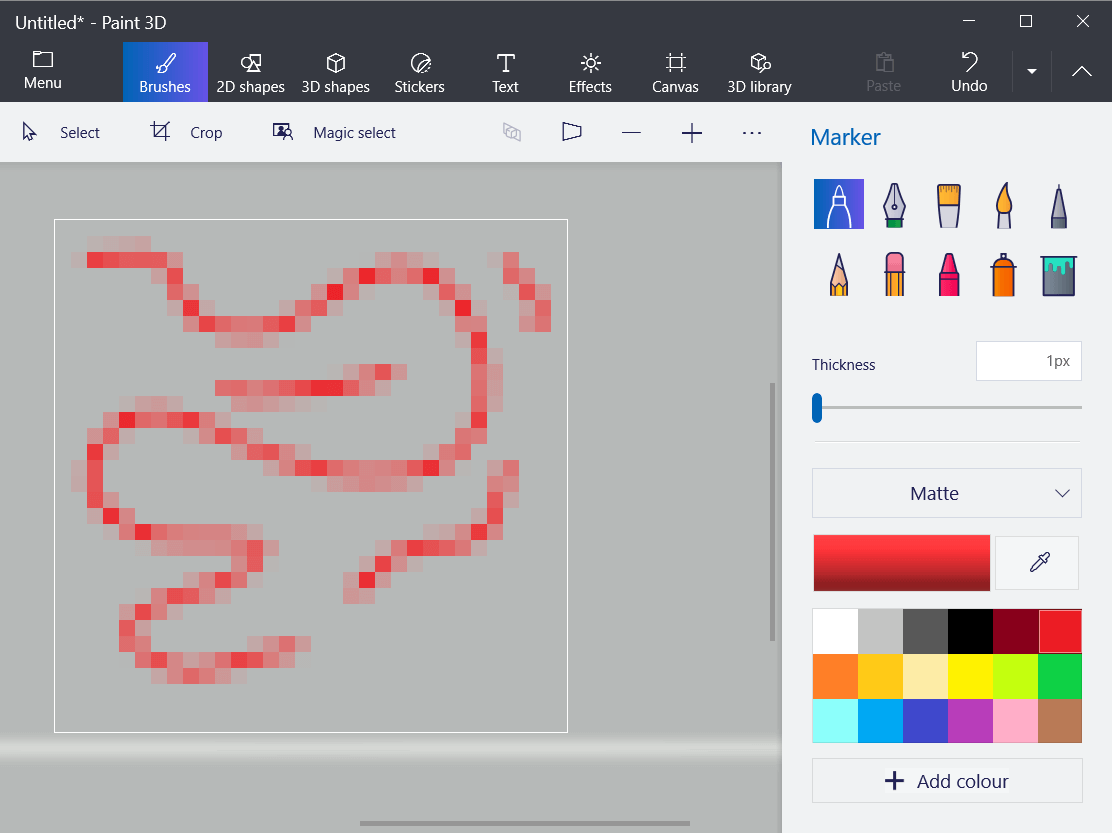
- You can draw a picture on your icon’s canvas by selecting Brushes. You’ll need to select Marker or Pixel Pen at a 1 px weighting.
- To add lines and two-dimensional shapes, select the 2D shapes tab. Then select a line, curve, or shape option there.
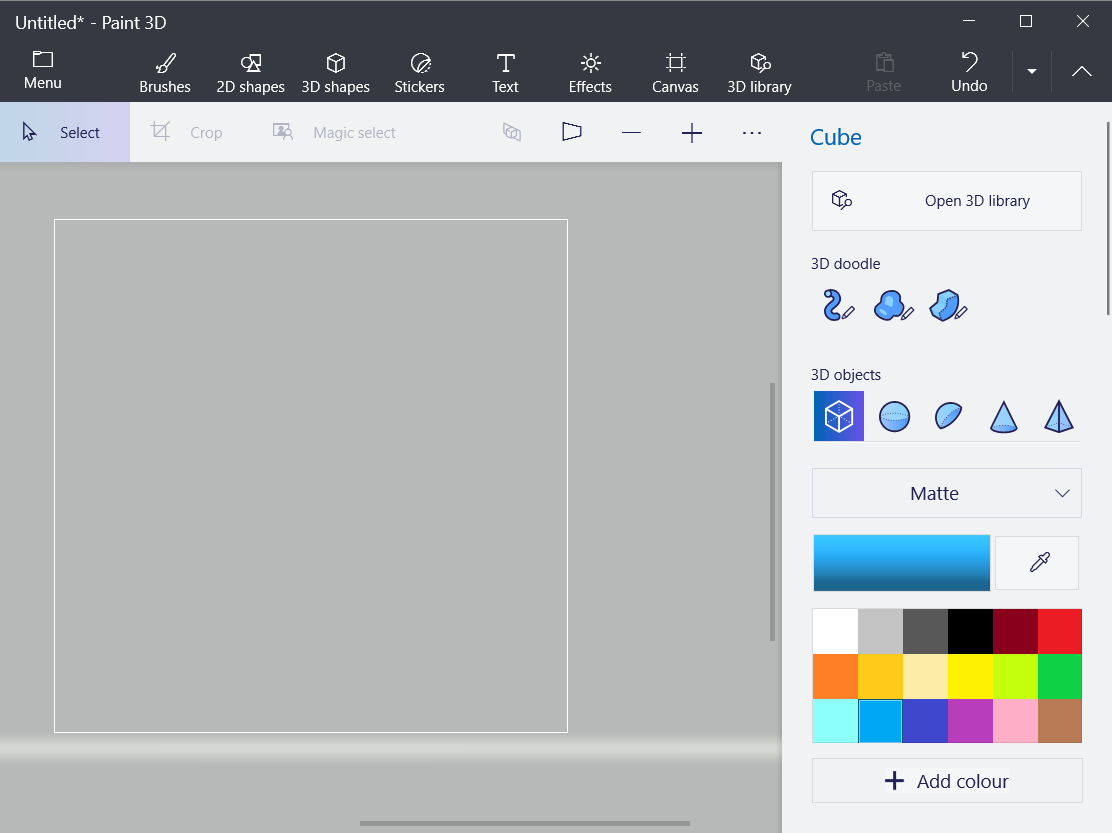
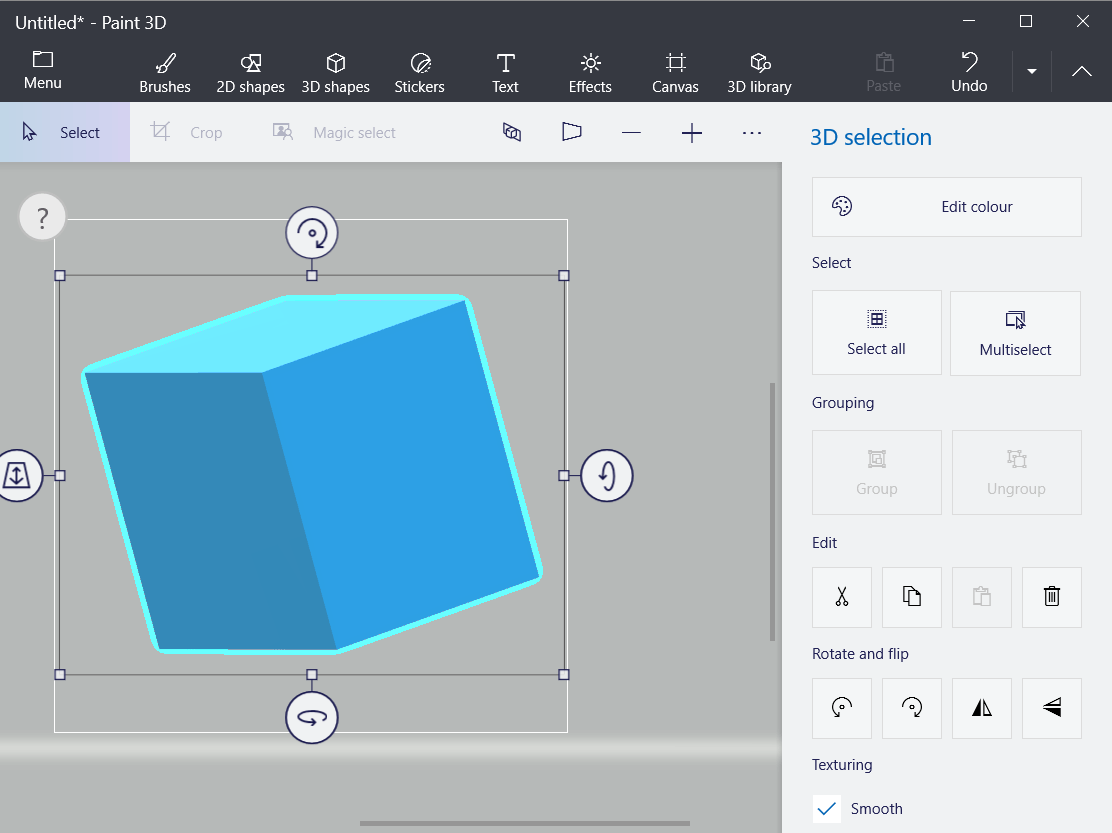
- Paint 3D’s 3D shapes tab includes a variety of options for adding three-dimensional shapes and models to your icon. Click 3D shapes to open that tab.
- Select a 3D object or model option on the sidebar. Then hold the left mouse button and drag the cursor right to expand the selected shape so it fits within your icon’s canvas.
- Click the shape on the canvas to open its rotation options as in the shot directly below.
Customize your icon with stickers
- Paint 3D also includes a relatively small collection of stickers you can utilize for icons. Click the Stickers tab.
- Select a sticker for the icon.
- Click outside the icon‘s canvas area on the left of the window to add the selected sticker.
- Left-click the top right corner of the sticker, and drag the mouse left to shrink the picture to fit within the canvas.
- Select the image and hold the mouse button to drag it into the canvas.
- Press the Make 3D button to apply a 3D effect. You can rotate the sticker much the same as 3D shapes.
- You can click Custom stickers >Add stickers to select downloaded clip art for your icons.

Customize your icon with 3D objects
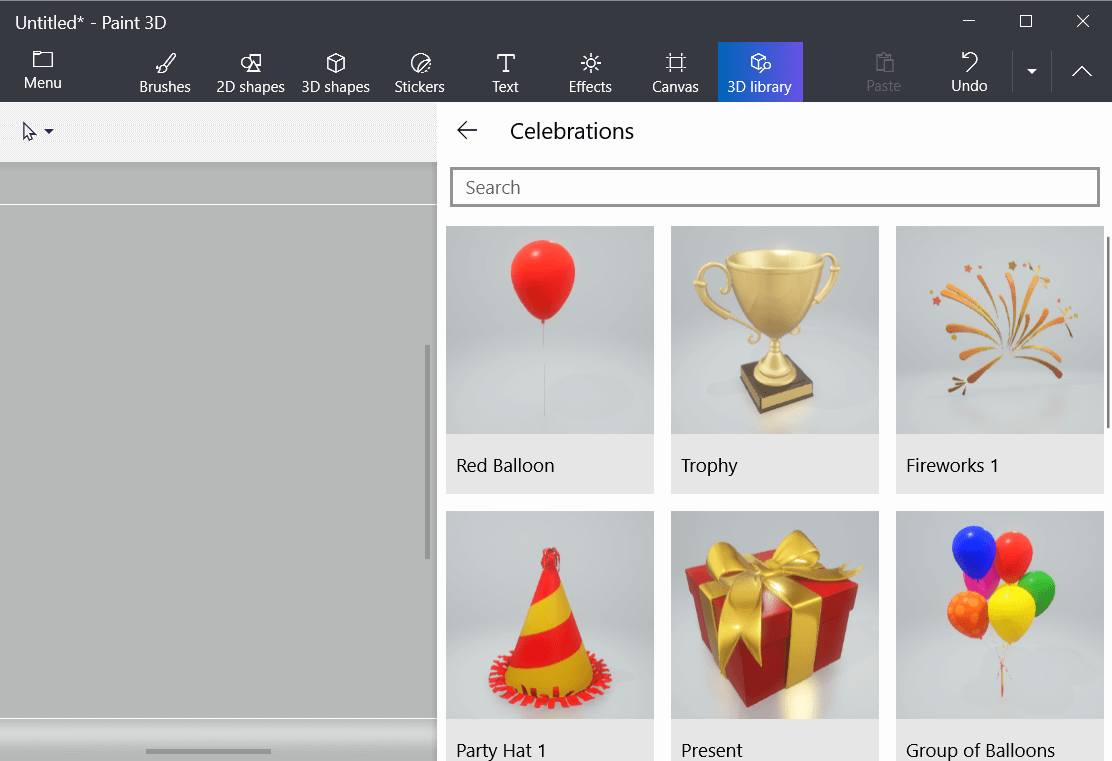
- Paint 3D also has a collection of 3D images you can add to your icons. Click 3D library to browse through the various image categories.
- Click an image to add it to your canvas.
- You’ll probably need to greatly scale down the selected image to fit it within your icon’s canvas. To scale down an image, click its top right corner, hold the left mouse button, and drag the cursor left.
Save the icon design as an image
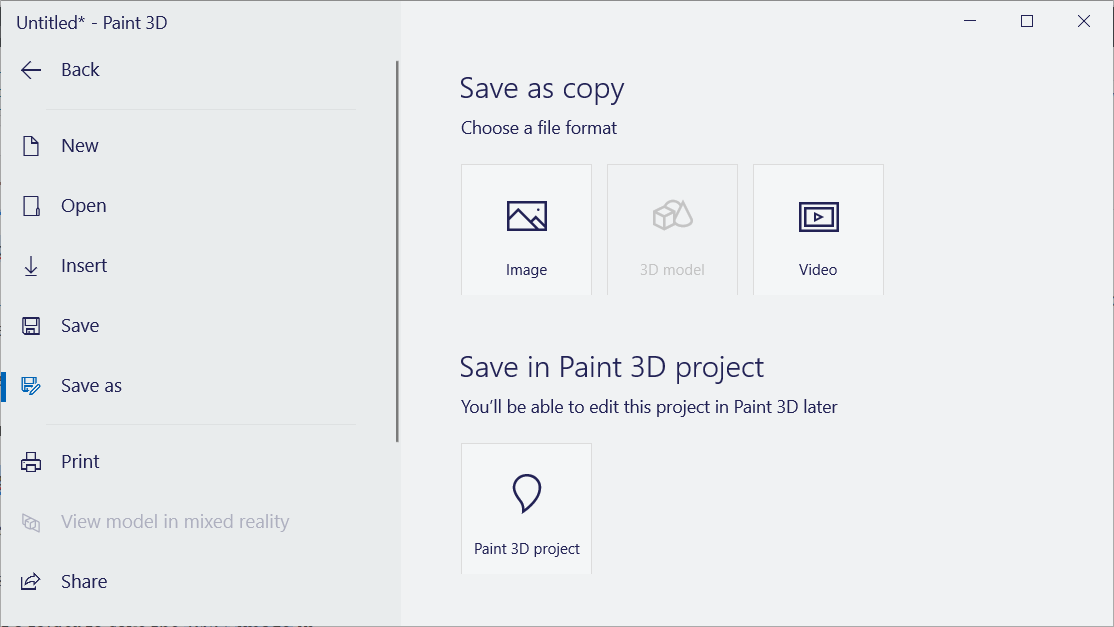
- When you’ve finished your icon design, click Menu >Save As >Image.
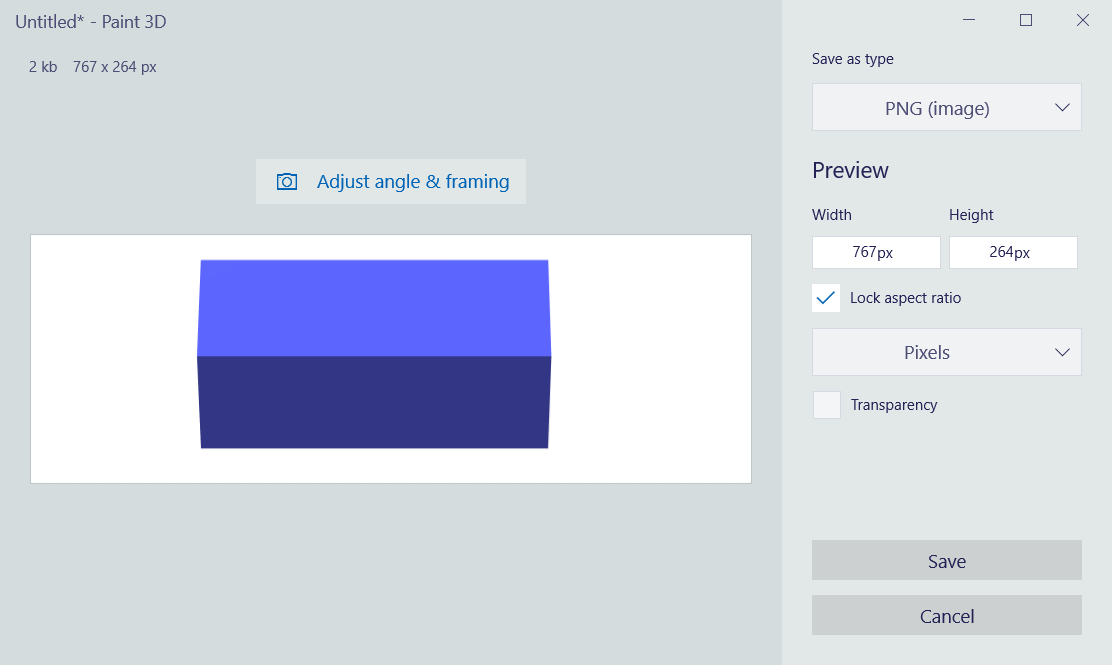
- If you added a 3D model to your icon, an image preview will open as in the snapshot directly below. Select PNG on the Save as type menu.
- Press the Save button.
- Select a folder to save the PNG image in.
- Select 2D – PNG as the file format.
- Enter a title for the image, and click the Save option.
2. How do I convert a JPEG to an icon in Windows 10?
- You can convert PNG, JPEG, and JPG files to icons at the Online-Convert website. So, open that website’s Online image convert page in a browser.
- Click Choose files to select the icon PNG you set up in Paint 3D.
- Press the Start conversion button.
- Then click the Download button.

3. How to add new icons to the desktop
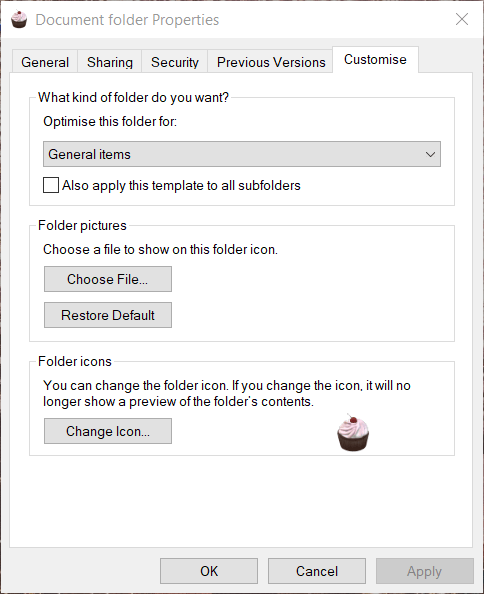
- Now you can add your new icon to the Windows 10 desktop. To do so, right-click a shortcut icon already on the desktop and select Properties.
- Select the Customize tab on the window that opens.
- Press the Change Icon button.
- Click the Browse button on the Change Icon window.
- Then select your ICO file in the folder it downloaded to.
- Click the Open button.
- Click OK on the Change Icon window.
- Finally, select the Apply option.
- Click OK to exit the window.
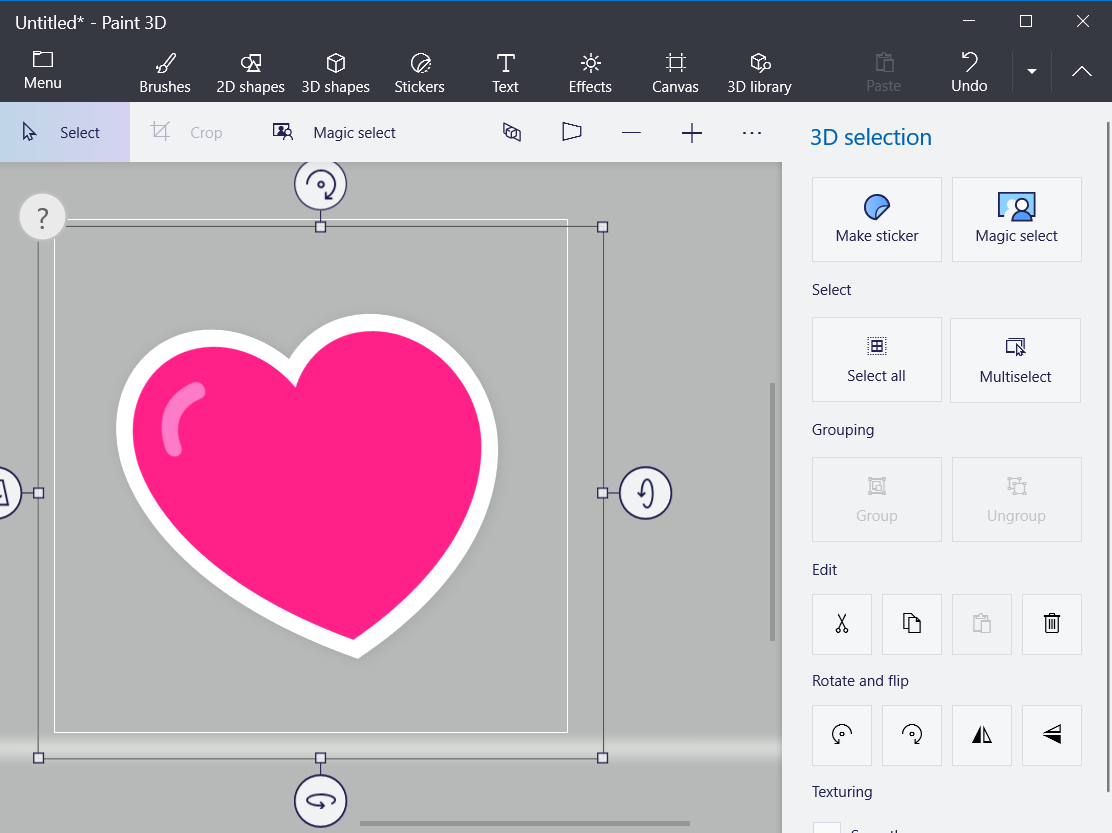
- Now your custom icon will have replaced the original one on the desktop. The heart icon in the snapshot below was one set up with Paint 3D.
So, that’s how you can set up your own custom icons with Paint 3D.
You can also design your own icon sets with numerous icon maker software.
Our icon maker guide provides details for Windows 10’s best icon maker software.
Windows 10 Show Desktop Icon
In this quick tutorial I’ll show you how to create a Windows 10 show desktop icon. My previous article on how to do this dates from the pre-Windows 10 era, so I decided to polish up the instructions, create new screenshots to illustrate the process and deliver an up-to-date guide for your Windows 10 operating system.
Just to make sure that we are on the same page about what the show desktop icon actually is, it’s the little icon that sits on the Windows taskbar, usually not far from the start button, that allows you to go directly to your desktop with one single click. No matter how many windows you have open, one click on the show desktop button will minimize them all and take you immediately to your desktop.
Up until Windows XP, the show desktop icon would always be there, unless you had deliberately removed it.
Not so with Windows 10 (as a matter of fact, neither with Windows 7 or 8)
Create Your Own Windows 10 Show Desktop Icon
Before we get started, allow me to point out that there are a few other shortcuts to showing the desktop besides the Windows 10 show desktop icon. You may or may not know about these, but many people switch to one of these alternative methods once they know about it and then quickly forget the show desktop icon altogether. Additional advantage being that the space in their taskbar can be used for other, more useful shortcuts.
The first alternative for the show desktop icon that I would like to bring to your attention is the keyboard combination Windows key + d.
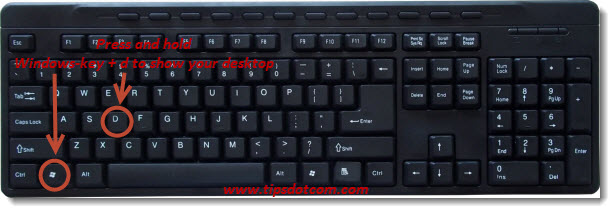
This keyboard combination will toggle between your desktop and your active window.
If you prefer to have something to click on rather than using a keyboard combination, you can also use the small vertical square all the way on the right on your taskbar.
If you click there, you will also go directly to your desktop.
Then, there is of course the method of using your right mouse button on an empty spot on your taskbar and selecting “Show the desktop”. That will obviously also take you straight away to your desktop, but it requires two clicks rather than one. Insignificant as this may seem, this might indeed lower your general perception of working speed on your computer.
Create Your Own Show Desktop Icon – Part b)
Ok, with that out of the way, let’s walk you through the steps of creating an authentic, fully functional show desktop icon.
Again, there are a few different methods that you can use to accomplish this.
The first method would be to download this small file that I have prepared here for you (simply click on the link).
Your browser will show a message similar to this:
Click save to continue. The image just above is Internet Explorer 11 on Windows 10. If you’re using Microsoft Edge, you might see a message that the download has completed, prompting you to open the file. You should then indeed open the file to proceed. If you’re using yet another browser, prompts may be a little different.
The point is to save the file on your local hard drive and open the folder where you saved it. Don’t worry if all this is too confusing for you, you can always use the second method to create your Windows 10 show desktop icon.
Continuing with the Internet Explorer 11 screenshot from above, this would be the notification you would see when your download is ready.
The “Open folder” button will take you directly to the downloaded file.
Next, right-click on the file and select “Extract all”.
Make sure the checkbox next to “Show extracted files when complete” is selected and click the extract button.
Now you will get a new window with your show desktop icon ready. You can now drag and drop this icon directly between your existing icons on your taskbar.
Or you can right-click the icon and select “Pin to taskbar”.
Once the Windows 10 show desktop icon is sitting on your taskbar, you can click and drag it to move it to another location if you want.
You can now use this icon to show your desktop no matter how many windows you have open.
Right-click on an empty spot on your desktop and select “New” and then “Shortcut”.
In the next screen, type (or copy/paste) the following line of text:
In the “Type a name for this shortcut” field, type “Show Desktop” (without the quotes) and click finish.
A new show desktop icon will appear on your desktop. Click it with your right mouse button and select properties.
In the properties window of your shortcut, click the “Change icon” button.
Pick a suitable icon for your new show desktop icon and click ok. In the properties window, click ok once again.
Now you’ll have a new show desktop icon on your desktop. Right-click your new icon and select “Pin to taskbar”.
Your new icon will appear on your taskbar, ready to be used. You can drag and drop it to rearrange the order of your icons in your taskbar.
I hope this tutorial has helped you in creating your own Windows 10 show desktop icon. Feel free to let me know in the commenting section below if it did 🙂
If you’ve enjoyed this article or found it useful, I’d appreciate it if you’d let me know by clicking the Like (or Share) button below. Thank you!
How to Show “My Computer” (This PC) on the Desktop in Windows 10
If you are searching for the “My Computer” icon on Windows 10 desktop, you will probably not find it except someone manually added it. It is one of the favourites and useful icon for all Windows users.
Follow the steps to show/display the missing “My Computer” (This PC) icon in the Windows 10 desktop. We have covered the identical steps for Windows 8.1/7.
This is an essential icon to access the local drives, USB disks, CD/DVD drives, and other files. Definitely, you will be surprised by not seeing this most frequently used icon on Windows Operating Systems. Nothing to worry, it is hidden and we need to enable it.
Steps to Display “My Computer” on Windows 10
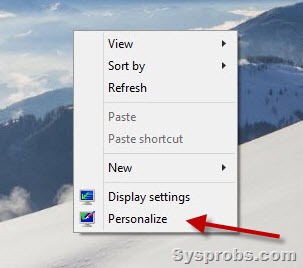
1) Right-click on the empty space of the desktop. Click on ‘Personalize’.
2) In Windows 10, it will take to the settings app. Click ‘Themes’ in the Personalization settings and ‘Go to desktop icon settings’ shown below.
In Windows 8.1, you will get the classic control panel to customize the icon set.
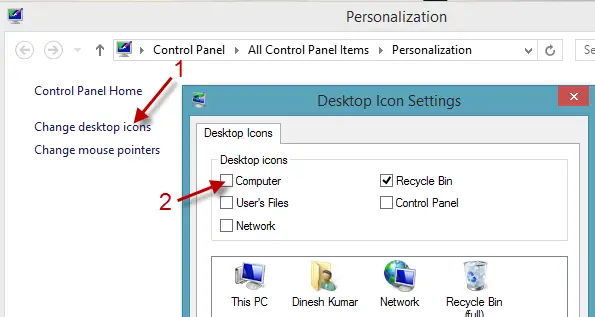
Tick the ‘Computer’ to show it on the desktop. Luckily the ‘Recycle Bin’ is already ticked, if you can’t see the Recycle Bin or it is missing from the Windows 10 desktop, this is the first place you have to check and enable it.
3) Now the ‘This PC’ or ‘My Computer’ icon would appear on the desktop.
To change This PC (Computer) name on Windows 10, you can follow this guide.
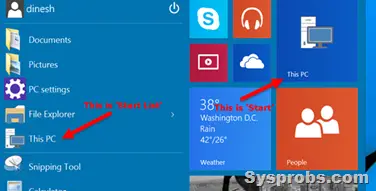
Pin My Computer Icon to Start Menu and Start List in Windows 10
As you know, start menu returned in Windows 10. By default, My Computer icon is not included in the start menu. You can follow the below method to pin it (This PC) icon to start menu and list.
4) Right-Click on the ‘This PC’ icon after you have enabled it to display on the desktop. Select Pin to Start List or Start.
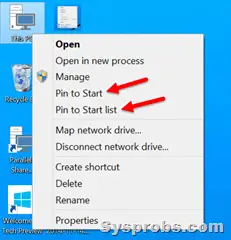
So, this is what happens when you select ‘Start’ and ‘Start List’.
If you want to hide all icons from the desktop in Windows 10, here is the way.
Right Click on the empty space in desktop, select View and remove ‘Show desktop icons’ to hide all icons from the desktop. You can enable back to show all icons on the desktop again.
Hope this guide is helpful in displaying My Computer and Recycle Bin icons on Windows 10 Desktop and start list.
Dinesh
Dinesh is the founder of Sysprobs and written more than 400 articles. Enthusiast in Microsoft and cloud technologies with more than 15 years of IT experience.
You Can Read Next
![]()
How to Uninstall/Disable Cortana in Windows 10?
![]()
How to Fix System Thread Exception Not Handled Error in Windows 10
![]()
Top 7 Best Free Antivirus for Windows 10 and 8.1 in 2021
![]()
What is ss2svc32.exe in Windows? Is it a Virus? Can I Remove It?
![]()
Tips for Protecting the Security of your Windows Device in 2021
![]()
5 Ways to Auto Shutdown Windows 10 Computer
80 thoughts on “How to Show “My Computer” (This PC) on the Desktop in Windows 10”
Still I cannot see my desktop icons. The screen showing is locked and unable to press right click. Desktop files are there in C drive but showing on screen. It is showing only quick links and useful tools.
my computer shutdown not warking
This is so great. This was the clearest instruction I have ever had for anything. And it was exactly as you said and now my “pc” is on the desk and as soon as I post this, I will tack it to the bottom. THANK YOU.
Worked for me. Thank you.
Suddenly ‘This PC’ disappeared. In the themes/desktop icon section, Computer is checked (along with Recycle Bin). I can check/uncheck all the other icons (including This PC). Apply shows/hides appropriate icons, except for the Computer icon. It refuses to appear on the desk top. BTW Win 10.
I have rebooted, checked/unchecked, etc. I can not get the computer icon to show on desktop. Am I heading into the registry to find issue? If so, where?
thank you very much it was great support
Thanks it is useful. I got it…………..
Solved the problem. Steps were very easy to comprehend. Thanks.
Tried so many suggestions and none worked. But yours DID. Fabulous. Thank you, thank you. You may publish my unsolicited name and address.
dinocerutt@aol.com.
Dino Cerutti
I can’t seem to find my problem anywhere. I have a new Dell (almost one year old now) with the most recent update of Windows 10. Everything was fine until I noticed that when I clicked on the Document folder (This PC) it took me to a second Document folder and THEN it went to all my documents. Trying to make things better (one of the worst things I ever do) I moved all the documents up to the higher level Document folder. (Can’t remember what I did with the document folder I moved everything OUT of!) Later on I realized that the only things not getting backed up by my account with iDrive was the Documents (they’d previously been there and always got backed up before I moved them). So in order to get them backed up, they are now sitting in my User account but they are the only things not showing up in This PC. I am going crazy trying to figure this out. Can you help?


