- Advanced startup options (including safe mode)
- Repair Your Computer
- Safe Mode
- Start your PC in safe mode in Windows 10
- How to Start Windows 7 in Safe Mode
- Easy, 5-minute-or-less process!
- How to Start Windows 7 in Safe Mode
- How to starting windows in safe mode
- Windows 95
- Windows 98/ME
- Windows XP
- Windows Vista
- Windows 7
- Windows 8
- Windows 10
- Problems that can occur by forcing Safe Mode using the System Configuration Utility
- Conclusion
- Users who read this also read:
Advanced startup options (including safe mode)
The Advanced Boot Options screen lets you start Windows in advanced troubleshooting modes. You can access the menu by turning on your computer and pressing the F8 key before Windows starts.
Some options, such as safe mode, start Windows in a limited state, where only the bare essentials are started. If a problem doesn’t reappear when you start in safe mode, you can eliminate the default settings and basic device drivers and services as possible causes. Other options start Windows with advanced features intended for use by system administrators and IT professionals. For more information, go to the Microsoft website for IT professionals.
Repair Your Computer
Shows a list of system recovery tools you can use to repair startup problems, run diagnostics, or restore your system. This option is available only if the tools are installed on your computer’s hard disk. If you have a Windows installation disc, the system recovery tools are located on that disc.
Safe Mode
Starts Windows with a minimal set of drivers and services.
To start in safe mode:
Remove all floppy disks, CDs, and DVDs from your computer, and then restart your computer. Click the Start button , click the arrow next to the Shut Down button (or the arrow next to the Lock button), and then click Restart.
Do one of the following:
If your computer has a single operating system installed, press and hold the F8 key as your computer restarts. You need to press F8 before the Windows logo appears. If the Windows logo appears, you’ll need to try again by waiting until the Windows logon prompt appears, and then shutting down and restarting your computer.
If your computer has more than one operating system, use the arrow keys to highlight the operating system you want to start in safe mode, and then press F8.
On the Advanced Boot Options screen, use the arrow keys to highlight the safe mode option you want, and then press Enter.
Log on to your computer with a user account that has administrator rights.
Safe Mode with Networking. Starts Windows in safe mode and includes the network drivers and services needed to access the Internet or other computers on your network.
Safe Mode with Command Prompt. Starts Windows in safe mode with a command prompt window instead of the usual Windows interface. This option is intended for IT professionals and administrators.
Enable Boot Logging. Creates a file, ntbtlog.txt, that lists all the drivers that are installed during startup and that might be useful for advanced troubleshooting.
Enable low-resolution video (640×480). Starts Windows using your current video driver and using low resolution and refresh rate settings. You can use this mode to reset your display settings. For more information, see Change your screen resolution.
Last Known Good Configuration (advanced). Starts Windows with the last registry and driver configuration that worked successfully.
Directory Services Restore Mode. Starts Windows domain controller running Active Directory so that the directory service can be restored. This option is intended for IT professionals and administrators.
Debugging Mode. Starts Windows in an advanced troubleshooting mode intended for IT professionals and system administrators.
Disable automatic restart on system failure. Prevents Windows from automatically restarting if an error causes Windows to fail. Choose this option only if Windows is stuck in a loop where Windows fails, attempts to restart, and fails again repeatedly.
Disable Driver Signature Enforcement. Allows drivers containing improper signatures to be installed.
Start Windows Normally. Starts Windows in its normal mode.
Start your PC in safe mode in Windows 10
Safe mode starts Windows in a basic state, using a limited set of files and drivers. If a problem doesn’t happen in safe mode, this means that default settings and basic device drivers aren’t causing the issue. Observing Windows in safe mode enables you to narrow down the source of a problem, and can help you troubleshoot problems on your PC.
There are two versions of safe mode: Safe Mode and Safe Mode with Networking. Safe Mode with Networking adds the network drivers and services you’ll need to access the Internet and other computers on your network.
Select from the following sections to find out how to start your PC in safe mode from Settings, from the sign-in screen, or from a black or blank screen.
Press Windows logo key + I on your keyboard to open Settings. If that doesn’t work, select the Start button, then select Settings .
Under Advanced startup, select Restart now.
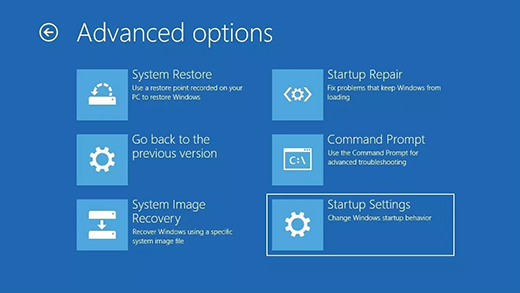
After your PC restarts to the Choose an option screen, select Troubleshoot > Advanced options > Startup Settings > Restart. You may be asked to enter your BitLocker recovery key.


After your PC restarts, you’ll see a list of options. Select 4 or press F4 to start your PC in Safe Mode. Or if you’ll need to use the Internet, select 5 or press F5 for Safe Mode with Networking.
When you can’t open Settings to get into safe mode, restart your device from the Windows sign-in screen.
On the Windows sign-in screen, press and hold the Shift key while you select the Power > Restart .
After your PC restarts to the Choose an option screen, select Troubleshoot > Advanced options > Startup Settings > Restart. You may be asked to enter your BitLocker recovery key.
After your PC restarts, you’ll see a list of options. Select 4 or F4 to start your PC in safe mode. Or if you’ll need to use the Internet, select 5 or F5 for Safe Mode with Networking.
Note: If you’ve encrypted your device, you’ll need your BitLocker key to start in safe mode.
Before you enter safe mode, you need to enter the Windows Recovery Environment (winRE). To do this, you will repeatedly turn your device off, then on:
Hold down the power button for 10 seconds to turn off your device.
Press the power button again to turn on your device.
On the first sign that Windows has started (for example, some devices show the manufacturer’s logo when restarting) hold down the power button for 10 seconds to turn off your device.
Press the power button again to turn on your device.
When Windows restarts, hold down the power button for 10 seconds to turn off your device.
Press the power button again to turn on your device.
Allow your device to fully restart. You will enter winRE.
Now that you are in winRE, you will follow these steps to take you to safe mode:
On the Choose an option screen, select Troubleshoot > Advanced options > Startup Settings > Restart.
After your device restarts, you’ll see a list of options. Select option 5 from the list or press F5 for Safe Mode with Networking.
If you need more info on a black or blank screen error, see Troubleshoot black or blank screen errors.
Notes: If you need to exit safe mode, simply restart your device, or:
Press the Windows logo key + R.
Type msconfig in the Open box and then select OK.
Select the Boot tab.
Under Boot options, clear the Safe boot checkbox.
How to Start Windows 7 in Safe Mode
Easy, 5-minute-or-less process!
:max_bytes(150000):strip_icc()/tim-fisher-5820c8345f9b581c0b5a63cf.jpg)
:max_bytes(150000):strip_icc()/ryanperiansquare-de5f69cde760457facb17deac949263e-180a645bf10845498a859fbbcda36d46.jpg)
Starting Windows 7 in Safe Mode is an excellent next step when starting Windows normally is not possible. Safe Mode only starts the most important Windows 7 processes, so depending on the problem you’re having, you might be able to troubleshoot or even fix the problem from here.
Not using Windows 7? See How Do I Start Windows in Safe Mode? for specific instructions for your version of Windows.
How to Start Windows 7 in Safe Mode
:max_bytes(150000):strip_icc()/how-to-start-windows-7-in-safe-mode-2624540-8dcb12e3e8b641b48a462691e3768105.png)
As of January 2020, Microsoft is no longer supporting Windows 7. We recommend upgrading to Windows 10 to continue receiving security updates and technical support.
To begin entering Windows 7 Safe Mode, turn on or restart your PC.
Just before the Windows 7 splash screen appears, press the F8 key to enter Advanced Boot Options.
:max_bytes(150000):strip_icc()/safe-mode-windows-7-1-58070bcb3df78cbc28bd3c64.jpg)
You should now see the Advanced Boot Options screen. If not, you may have missed the short window of opportunity to press F8 in the previous step and Windows 7 is probably now continuing to boot normally, assuming it’s able to. If this is the case, just restart your computer and try pressing F8 again.
Once you’re in the Advanced Boot Options, you are presented with three variations of Windows 7 Safe Mode you can enter. Using the arrow keys on your keyboard, highlight either Safe Mode, Safe Mode with Networking, or Safe Mode with Command Prompt and press Enter.
- Safe Mode: This is the default option and is usually the best choice. This mode will load only the absolute minimum processes necessary to start Windows 7.
- Safe Mode with Networking: This option loads the same processes as Safe Mode but also includes those that allow the networking functions in Windows 7 to work. You should choose this option if you think you might need to access the internet or your local network while troubleshooting in Safe Mode.
- Safe Mode with Command Prompt: This version of Safe Mode also loads a minimum set of processes but starts the Command Prompt instead of Windows Explorer, the usual user interface. This is a valuable option if the Safe Mode option didn’t work.
:max_bytes(150000):strip_icc()/safe-mode-windows-7-2-58070bd23df78cbc28bd478f.jpg)
Wait for the Windows 7 files to load. The minimum system files necessary to run Windows 7 will now load. Each file being loaded will be displayed on the screen.
If Safe Mode freezes here, document the last Windows 7 file being loaded, then search the internet for troubleshooting advice.
:max_bytes(150000):strip_icc()/safe-mode-windows-7-3-58070bcf3df78cbc28bd4352.jpg)
You don’t need to do anything here, but this screen could provide a good place to start troubleshooting if your computer is experiencing very serious problems and Safe Mode won’t completely load.
To start Windows 7 in Safe Mode, you must log on with an account that has administrator permissions. If you’re not sure if any of your personal accounts have administrator privileges, log in using your own account and see if that works.
:max_bytes(150000):strip_icc()/safe-mode-windows-7-4-57c769173df78c71b656c198.jpg)
If you’re not sure what the password is to an account with administrator access, see How to Find the Administrator Password in Windows for more information.
Entry into Windows 7 Safe Mode should now be complete. Make any changes you need to make and then restart the computer. Assuming there are no remaining problems preventing it, the computer should boot to Windows 7 normally after a restart.
:max_bytes(150000):strip_icc()/safe-mode-windows-7-5-58070bcd3df78cbc28bd3fea.jpg)
As you can see in the screenshot above, it’s very easy to identify if a Windows 7 computer is in Safe Mode. The text «Safe Mode» will always appear in each corner of the screen when in this special diagnostic mode of Windows 7.
How to starting windows in safe mode
Windows Safe Mode is a way of booting up your Windows operating system in order to run administrative and diagnostic tasks on your installation. When you boot into Safe Mode the operating system only loads the bare minimum of software that is required for the operating system to work. This mode of operating is designed to let you troubleshoot and run diagnostics on your computer. Windows Safe Mode loads a basic video drivers so your programs may look different than normal.
For Win98/ME, XP, Vista and Windows 7 there are two methods of booting into Safe Mode, while 95 and 2000 only have one. We will describe these methods below:
F8 — By pressing the F8 key right when Windows starts, usually right after you hear your computer beep when you reboot it, you will be brought to a menu where you can choose to boot into safe mode. If it does not work on the first try, reboot and try again as you have to be quick when you press it. I have found that during boot up right after the computer shows you all the equipment , memory, etc installed on your computer, if you start lightly tapping the F8 key you will usually be able to get to the desired menu.
System Configuration Utility — You can use the System Configuration Utility, or MSCONFIG, found in Windows 98, ME, XP, Windows Vista, and Windows 7 to make Windows boot into Safe Mode on the next reboot. We will go into specific details in the sections below. Please note, that you should not force your computer to boot into Safe Mode using the System Configuration Utility if you suspect you are infected with malware as the malware may corrupt keys required to boot into Safe Mode. You can read more about this here.
Windows 95
Windows 95 can only boot into Safe Mode using the F8 method as it does not have a System Configuration Utility.
Using the F8 Method:
- Restart your computer.
- When the machine first starts it will generally list some equipment that is installed in your machine, amount of memory, hard drives installed etc. When it is finished with that it will say «Starting Windows 95». Immediately after seeing «Starting Windows 95» press the F8 key.
- You will now be presented with a menu. Select the option for Safe Mode using the arrow keys.
- Then press enter on your keyboard to boot into Safe Mode.
- Do whatever tasks you require and when you are done reboot to boot back into normal mode.
Windows 98/ME
NOTE: Windows ME may look slightly different than what is shown in the images below. You should still have no problem following along.
Using the F8 Method:
- Restart your computer.
- When the machine first starts again it will generally list some equipment that is installed in your machine, amount of memory, hard drives installed etc. At this point you should gently tap the F8 key repeatedly until you are presented with a menu.
- When you have the menu on the screen. Select the option for Safe Mode using the arrow keys.
- Then press enter on your keyboard to boot into Safe Mode.
- Do whatever tasks you require and when you are done reboot to boot back into normal mode.
Using the System Configuration Tool Method:
Step 1: Close all programs so that you have nothing open and are at the desktop.
Step 2: Click on the Start button then click on Run.
Step 3: In the Run field type msconfig as shown in the image below.
Figure 1. Starting Msconfig
Step 4: Press the OK button and the System Configuration Utility will start up. You will then see a screen similar to Figure 2 below.
Figure 2. SCU Startup Screen
Step 5: You should now press the Advanced button designated by the red box in the figure above and you will see a screen similar to figure 3 below.
Figure 3. Advanced Options
Step 6: Place a check mark in the checkbox labeled «Enable Startup Menu» designated by the red box in Figure 3 above. Then press the OK button and then the OK button again. Windows 98/ME will now prompt if you would like to reboot as shown in Figure 4 below.
Figure 4. Confirm Reboot
Step 7: Press the Yes button and your computer will restart into Safe Mode.
Step 8: When the computer boots up perform what diagnostic or troubleshooting tasks you require.
Step 9. When you are finished with these tasks, complete steps 1-7 again, but in Step 6 this time uncheck the checkbox labeled «Enable Startup Menu».
Step 10: Reboot the computer back into normal mode.
Windows 2000
Windows 2000 can only boot into Safe Mode using the F8 method as it does not have a System Configuration Utility.
Using the F8 Method:
- Restart your computer.
- When the machine first starts again it will generally list some equipment that is installed in your machine, amount of memory, hard drives installed etc. When that is completed it will start loading Windows.
- When you see the screen that has a black and white bar at the bottom stating «Starting Windows», tap the F8 key repeatedly until you get to the Windows 2000 Advanced Options Menu
- At this menu use the arrow keys to select the Safe Mode option, which is usually the first in the list.
- Press the enter key.
- Your computer will continue booting, but now will boot into Safe Mode.
- Do whatever tasks you require and when you are done reboot to boot back into normal mode.
Windows XP
Using the F8 Method:
- Restart your computer.
- When the machine first starts again it will generally list some equipment that is installed in your machine, amount of memory, hard drives installed etc. At this point you should gently tap the F8 key repeatedly until you are presented with a Windows XP Advanced Options menu.
- Select the option for Safe Mode using the arrow keys.
- Then press enter on your keyboard to boot into Safe Mode.
- Do whatever tasks you require and when you are done reboot to boot back into normal mode.
Using the System Configuration Tool Method:
Note: If you are having trouble entering Safe Mode via the F8 method, you should not use this method to force it to startup into safe mode. For reasons why, you should read this.
Step 1: Close all programs so that you have nothing open and are at the desktop.
Step 2: Click on the Start button then click on Run.
Step 3: In the Run field type msconfig as shown in the image below.
Figure 4. Starting Msconfig
Step 4: Press the OK button and the System Configuration Utility will start up. You will then see a screen similar to Figure 5 below.
Figure 5. Starting the System Configuration Utility
Step 5: Click on the tab labeled «BOOT.INI» which is designated by the red box in Figure 5 above. You will then be presented with a screen similar to Figure 6 below.
Figure 6. BOOT.INI Tab
Step 6: Put a check mark in the checkbox labeled «/SAFEBOOT» designated by the red box in Figure 6 above. Then press the OK button. After pressing the button you will be presented with a confirmation box as shown in Figure 7 below.
Figure 7. Confirm Reboot
Step 7: Press the Restart button and let the computer reboot. It will now boot up into Safe Mode.
Step 8: When the computer boots up do what diagnostic or troubleshooting tasks that you need to do.
Step 9. When are finished with your tasks, complete steps 1-7 again, but in Step 6 this time uncheck the checkbox labeled «/SAFEBOOT». Then click on the General tab and set it for Normal startup.
Step 10: Reboot the computer back into normal mode.
Windows Vista
Using the F8 Method:
- Restart your computer.
- When the computer starts you will see your computer’s hardware being listed. When you see this information start to gently tap the F8 key repeatedly until you are presented with the Windows Vista Advanced Boot Options.
- Select the Safe Mode option using the arrow keys.
- Then press the enter key on your keyboard to boot into Vista Safe Mode.
- When Windows starts you will be at a typical logon screen. Logon to your computer and Vista will enter Safe mode.
- Do whatever tasks you require, and when you are done, reboot to go back into normal mode.
Using the System Configuration Tool Method:
Note: If you are having trouble entering Safe Mode via the F8 method, you should not use this method to force it to startup into safe mode. For reasons why, you should read this.
- Close any running programs and open Windows so you are back at the desktop.
- Click on the Start ( ) button.
- In the Start Menu Search Box (
 ) type msconfig and press enter on your keyboard.
 - The System Configuration utility will open and you will see a screen similar to the one below.
 ) type msconfig and press enter on your keyboard.
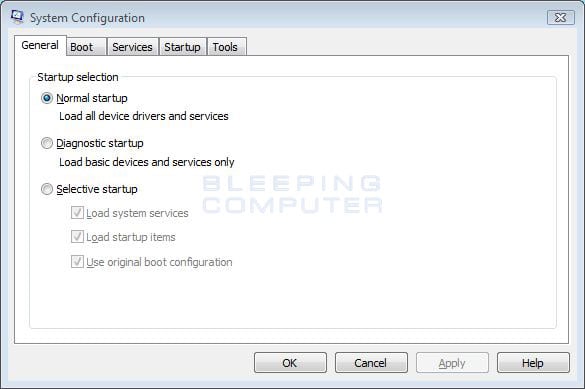
Figure 8. Vista System Configuration Utility
Click on the Boot tab.
You will now be at the Boot options screen as shown below.
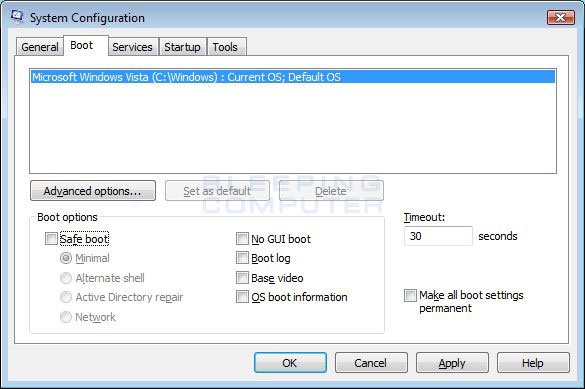
Figure 9. Vista Boot tab in the System Configuration utility
Put a check mark in the checkbox labeled Safe boot

Figure 10. Restart Prompt
Click on the Restart button to reboot your computer.
Windows 7
Using the F8 Method:
- Restart your computer.
- When the computer starts you will see your computer’s hardware being listed. When you see this information start to gently tap the F8 key on your keyboard repeatedly until you are presented with the Windows 7 Advanced Boot Options screen as shown in the image below.
Using the System Configuration Tool Method:
Note: If you are having trouble entering Safe Mode via the F8 method, you should not use this method to force it to startup into safe mode. For reasons why, you should read this.
- Close any running programs and open Windows so you are back at the desktop.
- Click on the Start ( ) button.
- In the Start Menu Search Box type msconfig as shown in Figure 12 below.
 ) button.
 Then press enter on your keyboard.
The System Configuration utility will open and you will see a screen similar to the one below.
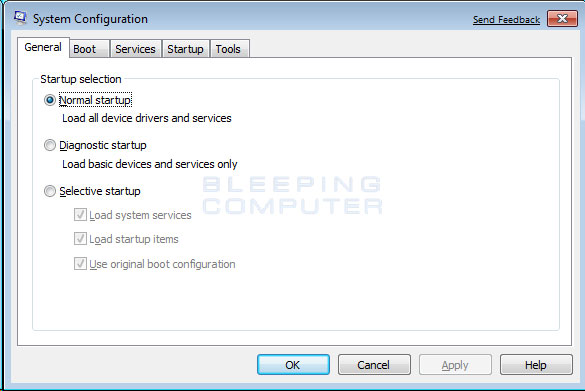
Figure 13. Windows 7 System Configuration Utility
Click on the Boot tab.
You will now be at the Boot screen as shown below.
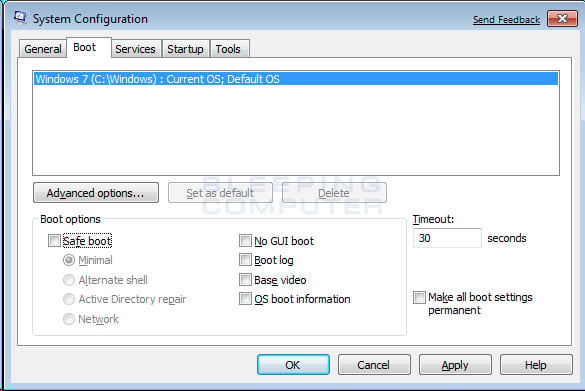
Figure 14. Windows 7 Boot tab in the System Configuration utility
Put a check mark in the checkbox labeled Safe boot
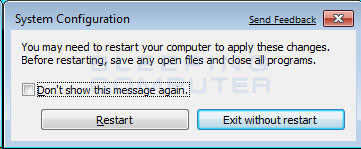
Figure 15. Restart Prompt
Click on the Restart button to reboot your computer.
Windows 8
For a detailed tutorial on how to boot Windows 8 into Safe Mode, please see this tutorial: How to start Windows 8 in Safe Mode
Using the Advanced startup options method:
- From the Windows Start screen, type Advanced startup and when the search results appear, click on the Settings category and then click on the Advanced startup options search option.
- When the Settings screen opens, scroll down and click on the Restart now button under the Advanced Startup category and your computer will restart.
- When the Advance startup menu appears, click on the Troubleshoot option.
- Then click on the Advanced Options button.
- Finally click on the Startup Settings option and then click on the Restart button. Your computer will now restart again.
- When you get to the Startup Settings screen, press the number for the Safe Mode option you wish to use.
- Do whatever tasks you require, and when you are done, reboot to go back into normal mode.
Using the System Configuration Tool Method:
Note: If you are having trouble entering Safe Mode via the Advanced Startup menu, you should not use this method to force it to startup into safe mode. For reasons why, you should read this.
- Go to the Windows Start screen and type msconfig. When the msconfig search results appears, click on it.
The System Configuration utility will open and you will see a screen similar to the one below.
Click on the Boot tab.
You will now be at the Boot screen as shown below.
Put a check mark in the checkbox labeled Safe boot
Click on the Restart button to reboot your computer.
Windows 10
For a detailed tutorial on how to boot Windows 10 into Safe Mode, please see this tutorial: How to Start Windows 10 in Safe Mode with Networking
- Press the Ctrl+Alt+Delete keys a the same time to enter the Windows security screen.
- While holding down the Shift key, click on the Power button ( ) and then click on Restart.
- When Windows 10 restarts, you will be at the Choose an Option screen as shown below. At this screen, click on the Troubleshoot button to access the Troubleshoot options.
- At the Troubleshoot screen, click on the Advanced Options button to open the advanced options screen.
- At the Advanced Options screen, click on the Startup Settings option. This will open the Startup Settings screen.
- At the Startup Settings screen, click on the Restart button. Windows will now restart.
- After restarting you will be shown a Startup Settings screen. At this screen you should press the number 5 key on your keyboard to enter Safe Mode with Networking.
- Your computer will now reboot. Once rebooted, you will be at a login prompt. Login to access Safe mode with Networking.
Problems that can occur by forcing Safe Mode using the System Configuration Utility
It is possible to make your computer continuously boot up into safe mode using the System Configuration utility as described above. The program does this by changing your boot.ini file, the settings file that configures your computer’s boot sequence, and adding the /safeboot argument to your operating systems startup line. An example of this can be seen below.
| Original | [operating systems] multi(0)disk(0)rdisk(0)partition(2)\WINDOWS=»Microsoft Windows XP Professional» /FASTDETECT /NOEXECUTE=OPTIN |
| After using MsConfig.exe | [operating systems] multi(0)disk(0)rdisk(0)partition(2)\WINDOWS=»Microsoft Windows XP Professional» /FASTDETECT /NOEXECUTE=OPTIN /safeboot:minimal |
When you are done using safe mode, you would then run the System Configuration utility again and uncheck the /Safeboot option, thus removing the /safeboot argument from the boot.ini file, and allowing your computer to boot up normally.
On a computer that is operating properly this is normally not a problem. Unfortunately, though, a new trick that some of the more recent malware are using is to delete certain Windows Registry keys so that your computer can not properly boot into safe mode. It is in these situations that using the System Configuration utility to boot into safe mode can cause the computer to become inoperable for many users.
This is because once you set the computer to boot into Safe Mode using /Safeboot, it will continuously attempt to start Safe Mode until the /safeboot argument is removed from the boot.ini. Since the malware is not allowing us to actually boot into safe mode, you have no way of getting to a point where you can run the System Configuration utility again to uncheck the /Safeboot option. Thus, you are stuck with a computer constantly attempting to get into safe mode and not being able to do so.
If a situation like this has happened to you it is possible to fix this problem by renaming your boot.ini file. The first step would be to use a boot disk to start your computer. If your computer does not have a floppy disk, then you can typically boot off the Windows CD that came with your computer in order to access the Windows Recovery Console. More information about the Windows Recovery Console can be found here. Once booted to a command prompt, you would simply rename your C:\Boot.ini file to another name like C:\Boot.ini.bak. The command to rename the file at the command prompt is:
ren C:\Boot.ini Boot.ini.bak
Once the file is renamed, you can then remove the boot disk and reboot your computer to get back to normal mode. When booting up after the rename, do not be surprised if you see an error stating that you do not have a valid Boot.ini file. When you get back to normal Windows mode, you can then rename C:\Boot.ini.bak to C:\Boot.ini and run Msconfig again to remove the /safeboot flag.
Conclusion
It is not uncommon when people are helping you troubleshoot your computer that they tell you to enter Safe Mode. With this tutorial you should now know how to enter Safe Mode when it is required.
If you have any questions please feel free to post them in our tech support forums.
Users who read this also read:
How to remove a Trojan, Virus, Worm, or other Malware
If you use a computer, read the newspaper, or watch the news, you will know about computer viruses or other malware. These are those malicious programs that once they infect your machine will start causing havoc on your computer. What many people do not know is that there are many different types of infections that are categorized in the general category of Malware.

How to automatically repair Windows Vista using Startup Repair
Windows Vista comes with a rich feature set of diagnostic and repair tools that you can use in the event that your computer is not operating correctly. These tools allow you to diagnose problems and repair them without having to boot into Windows. This provides much greater flexibility when it comes to fixing problems that you are not able to resolve normally. This guide focuses on using the .

How to start Windows 8 in Safe Mode
Safe Mode is a Windows mode that uses only the most basic drivers and programs that are required to start Windows. This mode will also not launch any programs that are set to start automatically when Windows starts. This makes Safe Mode is very useful for diagnosing hardware driver problems and computer infections in Windows 8. It can also be useful when you want to uninstall a program or delete a .
How to Start Windows 10 in Safe Mode with Command Prompt
Windows Safe Mode with Command Prompt is a special startup mode that allows you to access Windows in a stripped down session where many drivers are not loaded, there is no networking, and the desktop is not loaded. From this mode, you can perform fixes, diagnostics, or any other task that you could normally do from a command prompt.
How to see hidden files in Windows
By default Windows hides certain files from being seen with Windows Explorer or My Computer. This is done to protect these files, which are usually system files, from accidentally being modified or deleted by the user. Unfortunately viruses, spyware, and hijackers often hide there files in this way making it hard to find them and then delete them.


