- How to Stream from Linux to Your TV
- HDMI Cable
- Chromecast
- Chromecast using Google Chrome
- Chromecast Using VLC media player
- Chromecast Using Terminal
- Screen Share Using Ubuntu’s ‘Media Sharing’
- Conclusion
- About the author
- Zeeman Memon
- How-to: Stream on Linux
- Create your own video streaming server with Linux
- Set up a basic live streaming server on a Linux or BSD operating system.
- Subscribe now
- Getting started
- Setting up a Linux server
- stream-server_profilesetup.png
- stream-server_config.png
- Setting up a BSD server
- stream-server_streamingconfig.png
- stream-server_modules.png
- stream-server_webroot.png
- Set up your streaming software
- Broadcasting with OBS
- stream-server_autoconfig.png
- stream-server_streamkey.png
- stream-server_metrics.png
- Viewing your stream
- stream-server_livevideo.png
- Where to go next?
How to Stream from Linux to Your TV
Knowing how to stream from your computer to your TV comes in handy when you want to stream your media – pictures, video, music, or videogames – on the big screen, rather than on your small computer or laptop screen.Luckily, you can stream your media from Linux to your TV! In this article, we will teach you how to do exactly that.
HDMI Cable
This is one of the easiest ways to stream from Linux to a TV. Most smart and non-smart TV sets come with HDMI, or High-Definition Multimedia Interface, ports. With these cables, you can easily stream from your Linux OS to your TV.
These HDMI cables vary in length. Typically, they are of 2-3m in length. They do not cost much, and are very straightforward to install and use.
To link your Linux OS to your TV using an HDMI cable, follow these steps:
- Connect HDMI to both TV and your laptop.
- Press the Input list option on your TV remote.
- Choose the HDMI option.
Note: It could be any one of the HDMI 1, HDMI 2, or HDMI 3 selections, depending on the port number into which you plugged the HDMI cable.
Chromecast
Google Chromecast is a device that can be plugged into any TV. After you have configured the device, it allows you to cast media from your phone or computer to the TV screen. Chromecast is a small and portable tool which allows you to stream media or cast your entire desktop screen on a TV.
If Chromecast is not available in your local market, consider buying alternatives, such as the Xiaomi Mi Box S, which comes with built-in Chromecast.
Ways to use Chromecast are discussed below:
Chromecast using Google Chrome
Step 1: Open Google Chrome and click on the 3 dots in the top right corner.
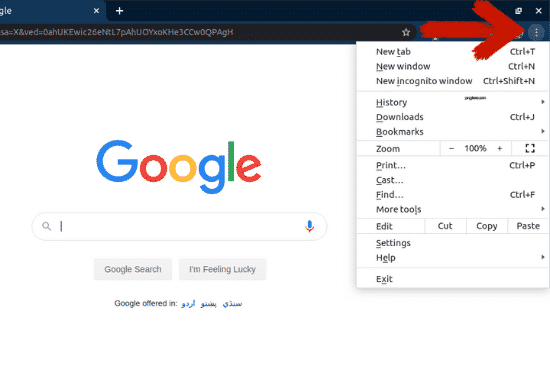
Step 2: Select the “Cast…” option.
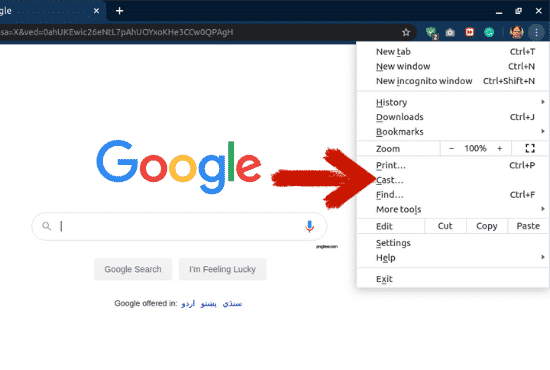
Step 3: From the “Cast…” tab, select which device to which you wish to cast your screen. By clicking the “Sources” option, you can decide whether you want to cast the current tab, your entire desktop, or a file to the device.
After following these steps, your screen or file will be cast to the connected device.
Chromecast Using VLC media player
VLC media player is one of the most popular media players in the market. VLC media player is open-source and you can use this program to play your audio and video files.
If you are playing a file on this program and you wish to cast it to your TV screen, that will not be a problem. This is because the VLC media player supports Chromecast. You can cast your file to the TV in a few easy steps.
Step 1: Open the file in VLC media player that you wish to cast to your TV screen.
Step 2: Click “Playback.”
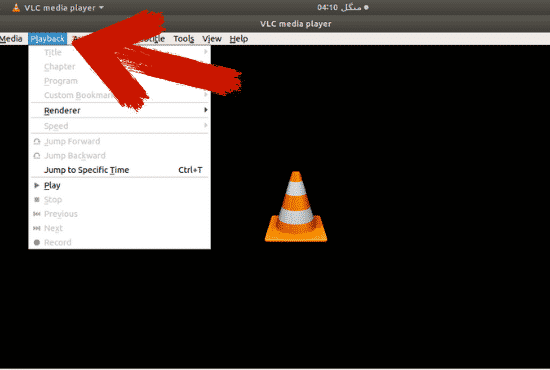
Step 3: Click “Renderer” and select the device to which you wish to cast your file.
Chromecast Using Terminal
You can use your terminal to cast your files to a TV. You may cast local files or YouTube videos.
Step 1: Open your terminal
Step 2: Install mkchromecast. I already have this installed, and you can install it using the following terminal command:
Step 3: Enter the below command to see a list of available networks. In the top right corner, you will be able to see a new Chromecast icon. Click the icon and select your TV.
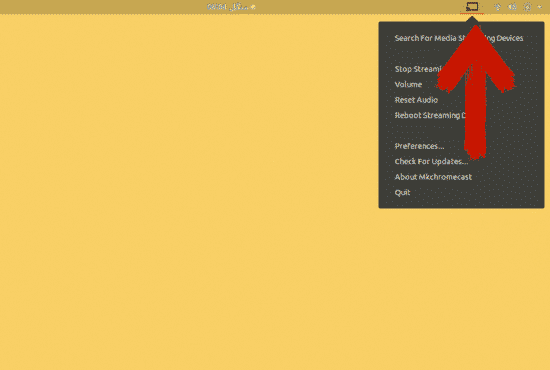
If you are unable to see any devices, select the “Search for Media Streaming Devices” option.
Step 4: To cast media to the selected device, use the following commands:
For local files:
You may replace “/home/videos/cast.mp4” with the path of your own local video file.
For YouTube videos:
Instead of “link,” paste the video URL you wish to cast to the device.
Screen Share Using Ubuntu’s ‘Media Sharing’
Using Media Sharing, you may view the files located on your desktop on a smart TV.
In previous versions, to share your screen to a TV, you had to use third-party tools – but no longer. As of Ubuntu 19.10, Ubuntu comes with a built-in feature that allows you to share your files.
To do this, follow these steps:
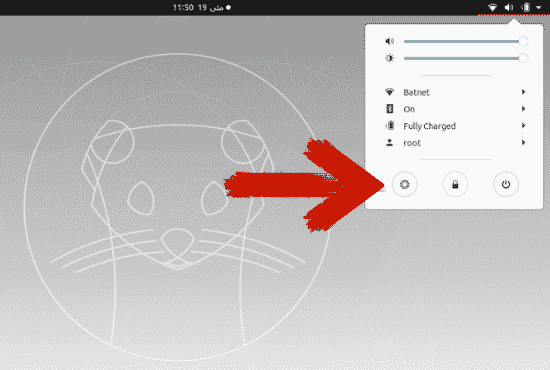
Step 1: Open settings.
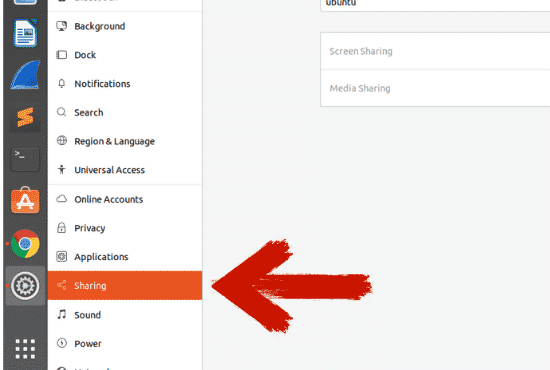
Step 2: Scroll down and click “Sharing.”
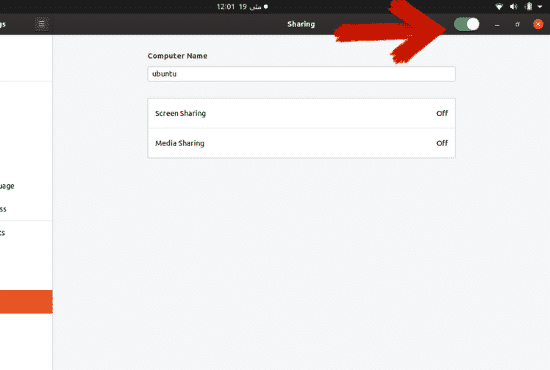
Step 3: Click the slider in the top right corner to enable sharing.
Step 4: Click “Media Sharing.” Click the slider to turn it on. Select the network through which you intend to share the media.
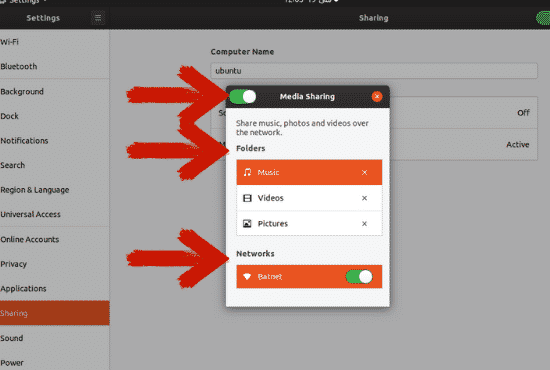
You Music, Videos, and Pictures folders are shared by default. You may remove a directory by pressing the cross icon and add a directory by pressing the plus icon and then choosing the directory of your choice.

Conclusion
There are several methods through which you can stream your Linux desktop on your TV or some other device. Some of these methods require external hardware, while others do not. Some methods require a third-party tool to stream your desktop to the TV if you have not yet updated past Ubuntu 19.10.
Chromecast comes with several features, but is not available in every country. The HDMI cable method is a simple and better option compared to other methods, but it requires you to always be within a 2-3 metre range of the television, which can be a hassle when your TV and computer are not in the same room.
That leaves us with the media share option that came with the Ubuntu 19.10 update. If you have not upgraded already, all you need to do is upgrade your Ubuntu to reap these benefits without having to purchase additional hardware.
About the author
![]()
Zeeman Memon
Hi there! I’m a Software Engineer by degree, Blogger by skills who loves to write about tech, develop websites & do SEO. You can reach out to me on LinkedIn.
Источник
How-to: Stream on Linux
New Member
MOD EDIT: OBS is now available for Linux, see install instructions here: https://github.com/jp9000/obs-studio/blob/master/INSTALL
Hello, so I am one of those who are waiting for Linux version of OBS, however until such time that it is realesed we have an alternative that I will share with you here.
What you will need libav-tools :
1) sudo apt-get install libav-tools // OR
2) I do believe it is in the default repositories, search for it in your software centre.
Once that is done you only need a small script (please note I am not the original creator of this script, I have only added/modified it a bit):
Ok I will try and break down the script and explain a few things:
INRES = in resolution — what resolution should it record at? — Typically this should be the same resolution as your game/screen or close to it.
OUTRES = out resolution — what resolution should it give viewers? — This should also be close to what in resolution you are using.
FPS = Pretty self explainatory, this is the FPS which it will target for the rtmp stream.
QUAL = This one is very important and you will have to play around with it yourself depending on your hardware slow = more CPU usage, but better quality gain || fast = less CPU usage, worse quality — here are some examples of presets with avconv:
ultrafast | superfast | veryfast | faster | fast | placebo | medium | slow | slower | veryslow
Additionally, you can also get a list by doing so:
cat /usr/share/avconv/*.avpreset
STREAM_KEY = This actually just uses the command cat to grab the live_key from a file (which you must create), or you could simply put the live_key direcly inside the streaming program — up to you. Here is an example of the .twitch_key file:
live_0123456789_abcdefghijklmnp
To find your live-key go to: http://www.twitch.tv/broadcast OR http://www.justin.tv/broadcast/adv_other for justin.tv
Next up is the avconv part, really all you may want to change here are:
-threads how many threads does your CPU have? I have an quad-core processor so for me it is 4.
-qscale quality scale — I do believe this goes from 1-10 where 1 is the lowest quality.
-b audio bitrate.
-bufsize video buffer size.
-minrate minimum bitrate for video.
-maxrate maximum bitrate for video.
-ac number of audio channels.
Example of bitrate/buffer size: 1024k, 2048k, 3072k, 4096k, 5120k and so on. You may want to set a higher value if you have a high upload speed (I have 10mbit so I have set mine to 8mbit).
In advance sorry for grammatical errors, English is not my mother tongue. I might add/explain better and fix layout — right now it is really late though and I will go to sleep. There are several other guides out there that are based upon the same method as this, however some uses an old script which no longer works. This has been tested and works on Kubuntu and Ubuntu.
Also, please use the manual (search by holding shift and pressing /):
man avconv
Oh I forgot, you will need to give the script execute permissions:
sudo chmod +x SCRIPTNAME HERE
Источник
Create your own video streaming server with Linux
Set up a basic live streaming server on a Linux or BSD operating system.

Subscribe now
Get the highlights in your inbox every week.
Live video streaming is incredibly popular—and it’s still growing. Platforms like Amazon’s Twitch and Google’s YouTube boast millions of users that stream and consume countless hours of live and recorded media. These services are often free to use but require you to have an account and generally hold your content behind advertisements. Some people don’t need their videos to be available to the masses or just want more control over their content. Thankfully, with the power of open source software, anyone can set up a live streaming server.
Getting started
In this tutorial, I’ll explain how to set up a basic live streaming server with a Linux or BSD operating system.
This leads to the inevitable question of system requirements. These can vary, as there are a lot of variables involved with live streaming, such as:
- Stream quality: Do you want to stream in high definition or will standard definition fit your needs?
- Viewership: How many viewers are you expecting for your videos?
- Storage: Do you plan on keeping saved copies of your video stream?
- Access: Will your stream be private or open to the world?
This project uses the Real-Time Messaging Protocol (RTMP) to handle audio and video streaming. There are other protocols available, but I chose RTMP because it has broad support. As open standards like WebRTC become more compatible, I would recommend that route.
It’s also very important to know that «live» doesn’t always mean instant. A video stream must be encoded, transferred, buffered, and displayed, which often adds delays. The delay can be shortened or lengthened depending on the type of stream you’re creating and its attributes.
Setting up a Linux server
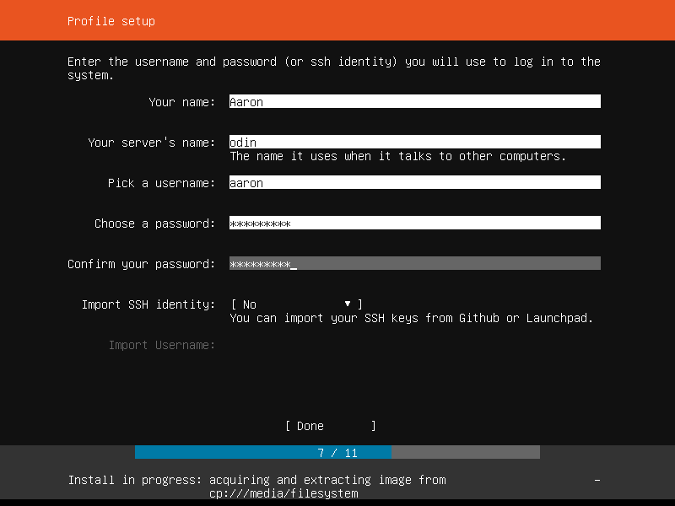
You can use many different distributions of Linux, but I prefer Ubuntu, so I downloaded the Ubuntu Server edition for my operating system. If you prefer your server to have a graphical user interface (GUI), feel free to use Ubuntu Desktop or one of its many flavors. Then, I fired up the Ubuntu installer on my computer or virtual machine and chose the settings that best matched my environment. Below are the steps I took.
Note: Because this is a server, you’ll probably want to set some static network settings.
stream-server_profilesetup.png
After the installer finishes and your system reboots, you’ll be greeted with a lovely new Ubuntu system. As with any newly installed operating system, install any updates that are available:
This streaming server will use the very powerful and versatile Nginx web server, so you’ll need to install it:
Then you’ll need to get the RTMP module so Nginx can handle your media stream:
Adjust your web server’s configuration so it can accept and deliver your media stream.
Scroll to the bottom of the configuration file and add the following code:
stream-server_config.png
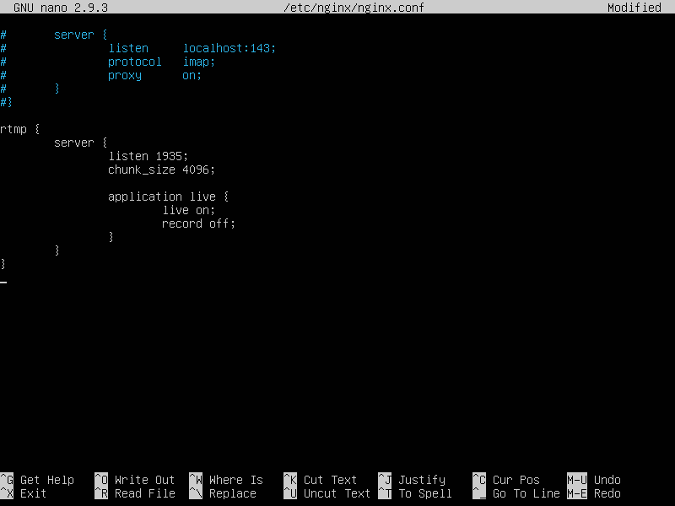
Save the config. Because I’m a heretic, I use Nano for editing configuration files. In Nano, you can save your config by pressing Ctrl+X, Y, and then Enter.
This is a very minimal config that will create a working streaming server. You’ll add to this config later, but this is a great starting point.
However, before you can begin your first stream, you’ll need to restart Nginx with its new configuration:
Setting up a BSD server
If you’re of the «beastie» persuasion, getting a streaming server up and running is also devilishly easy.
Head on over to the FreeBSD website and download the latest release. Fire up the FreeBSD installer on your computer or virtual machine and go through the initial steps and choose settings that best match your environment. Since this is a server, you’ll likely want to set some static network settings.
After the installer finishes and your system reboots, you should have a shiny new FreeBSD system. Like any other freshly installed system, you’ll likely want to get everything updated (from this step forward, make sure you’re logged in as root):
I install Nano for editing configuration files:
This streaming server will use the very powerful and versatile Nginx web server. You can build Nginx using the excellent ports system that FreeBSD boasts.
First, update your ports tree:
Browse to the Nginx ports directory:
And begin building Nginx by running:
You’ll see a screen asking what modules to include in your Nginx build. For this project, you’ll need to add the RTMP module. Scroll down until the RTMP module is selected and press Space. Then Press Enter to proceed with the rest of the build and installation.
Once Nginx has finished installing, it’s time to configure it for streaming purposes.
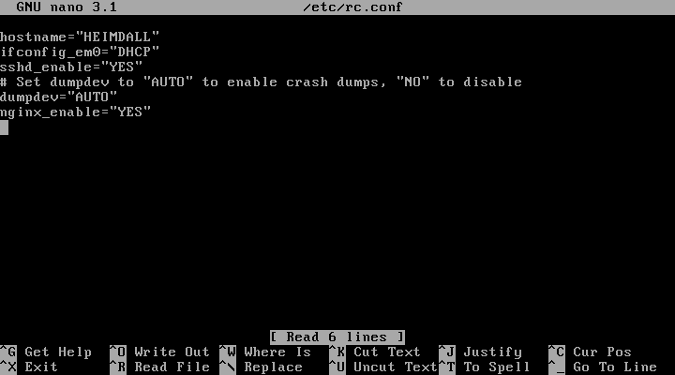
First, add an entry into /etc/rc.conf to ensure the Nginx server starts when your system boots:
Add this text to the file:
stream-server_streamingconfig.png
Next, create a webroot directory from where Nginx will serve its content. I call mine stream:
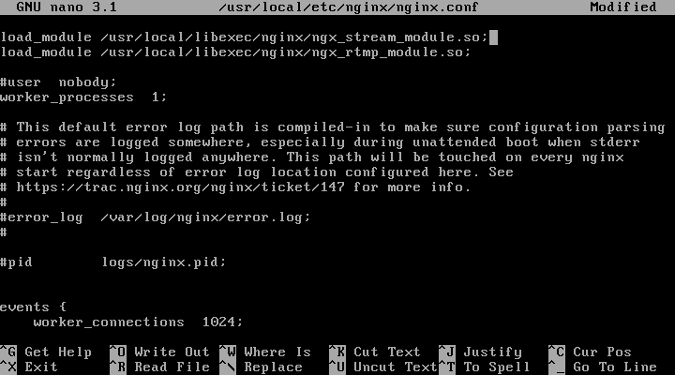
Now that you have created your stream directory, configure Nginx by editing its configuration file:
Load your streaming modules at the top of the file:
stream-server_modules.png
Under the Server section, change the webroot location to match the one you created earlier:
stream-server_webroot.png
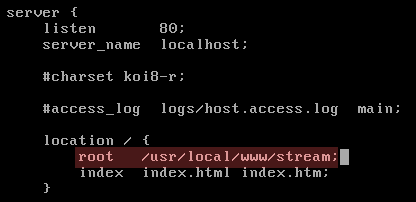
And finally, add your RTMP settings so Nginx will know how to handle your media streams:
Save the config. In Nano, you can do this by pressing Ctrl+X, Y, and then Enter.
As you can see, this is a very minimal config that will create a working streaming server. Later, you’ll add to this config, but this will provide you with a great starting point.
However, before you can begin your first stream, you’ll need to restart Nginx with its new config:
Set up your streaming software
Broadcasting with OBS
Now that your server is ready to accept your video streams, it’s time to set up your streaming software. This tutorial uses the powerful and open source Open Broadcast Studio (OBS).
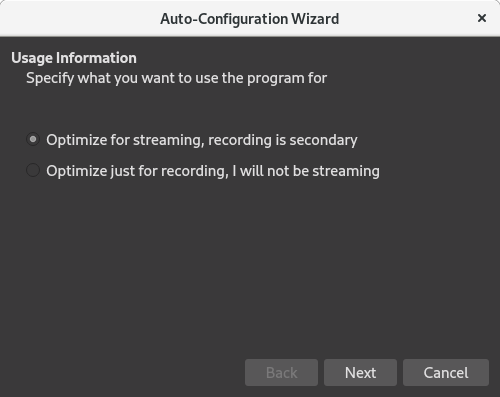
Head over to the OBS website and find the build for your operating system and install it. Once OBS launches, you should see a first-time-run wizard that will help you configure OBS with the settings that best fit your hardware.
stream-server_autoconfig.png
OBS isn’t capturing anything because you haven’t supplied it with a source. For this tutorial, you’ll just capture your desktop for the stream. Simply click the + button under Source, choose Screen Capture, and select which desktop you want to capture.
Click OK, and you should see OBS mirroring your desktop.
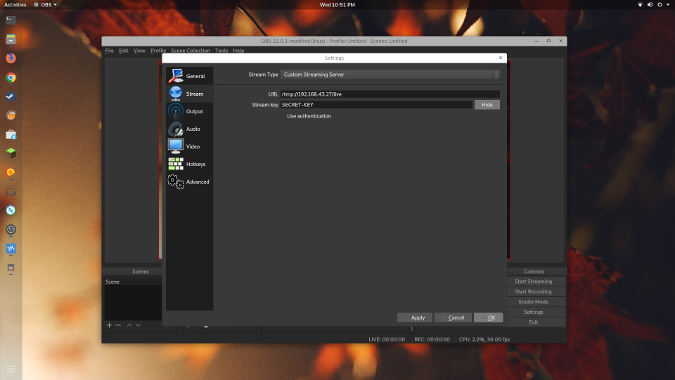
Now it’s time to send your newly configured video stream to your server. In OBS, click File > Settings. Click on the Stream section, and set Stream Type to Custom Streaming Server.
In the URL box, enter the prefix rtmp:// followed the IP address of your streaming server followed by /live. For example, rtmp://IP-ADDRESS/live.
Next, you’ll probably want to enter a Stream key—a special identifier required to view your stream. Enter whatever key you want (and can remember) in the Stream key box.
stream-server_streamkey.png
Click Apply and then OK.
Now that OBS is configured to send your stream to your server, you can start your first stream. Click Start Streaming.
If everything worked, you should see the button change to Stop Streaming and some bandwidth metrics will appear at the bottom of OBS.
stream-server_metrics.png

If you receive an error, double-check Stream Settings in OBS for misspellings. If everything looks good, there could be another issue preventing it from working.
Viewing your stream
A live video isn’t much good if no one is watching it, so be your first viewer!
There are a multitude of open source media players that support RTMP, but the most well-known is probably VLC media player.
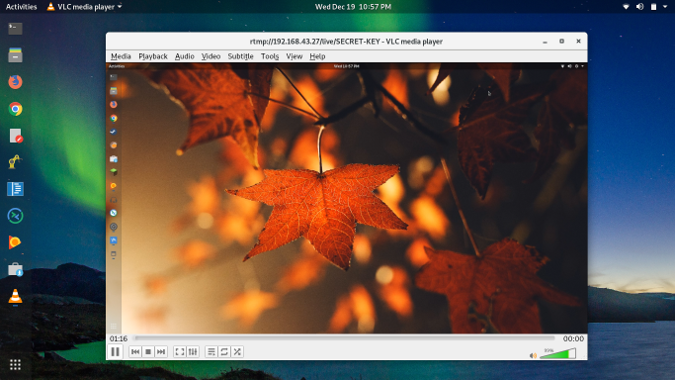
After you install and launch VLC, open your stream by clicking on Media > Open Network Stream. Enter the path to your stream, adding the Stream Key you set up in OBS, then click Play. For example, rtmp://IP-ADDRESS/live/SECRET-KEY.
You should now be viewing your very own live video stream!
stream-server_livevideo.png
Where to go next?
This is a very simple setup that will get you off the ground. Here are two other features you likely will want to use.
Limit access: The next step you might want to take is to limit access to your server, as the default setup allows anyone to stream to and from the server. There are a variety of ways to set this up, such as an operating system firewall, .htaccess file, or even using the built-in access controls in the RTMP module.
Record streams: This simple Nginx configuration will only stream and won’t save your videos, but this is easy to add. In the Nginx config, under the RTMP section, set up the recording options and the location where you want to save your videos. Make sure the path you set exists and Nginx is able to write to it.
The world of live streaming is constantly evolving, and if you’re interested in more advanced uses, there are lots of other great resources you can find floating around the internet. Good luck and happy streaming!
Источник


