- Manage the input and display language settings in Windows 10
- Switch between languages using the Language bar
- Using the Language bar to Switch Keyboard Layouts
- I don’t see the Language bar
- How to change system language on Windows 10
- How to change default system language on Windows 10
- Disable language sync
- Change language settings
- Change region settings
- More Windows 10 resources
- The Dell XPS 15 is our choice for best 15-inch laptop
- Halo: MCC’s live service elements make it better, not worse
- Microsoft’s Surface Duo is not ‘failing up’
- These are the best PC sticks when you’re on the move
Manage the input and display language settings in Windows 10
To manage all aspects of the input and display language settings on your Windows 10 device, use the following methods.
To switch the keyboard layout you’re using in Windows 10, press and hold the Windows key and then repeatedly press the Spacebar to cycle through all your installed keyboards. (If this doesn’t do anything, it means you have only one installed.)
You can also select the language abbreviation on the far right of the taskbar and then choose the language or input method you want to use.
Note: In the input field, press Windows +period (.) to access the emoji keyboard, if your language supports this.
If you can’t find the keyboard layout you want, you may have to add a new keyboard.
Adding an input language lets you set a language-preference order for websites and apps, as well as change your keyboard language.
Select the Start button, then select Settings > Time & Language > Language.
Under Preferred languages, select the language that contains the keyboard you want, and then select Options.
Select Add a keyboard and choose the keyboard you want to add. If you don’t see the keyboard you want, you may have to add a new language to get additional options. If this is the case, go on to step 4.
Return to the Language settings page, and select Add a language.
Choose the language you want to use from the list, and then select Next.
Review any language features you want to set up or install, and select Install.
The display language you select changes the default language used by Windows features like Settings and File Explorer.
Select the Start button, then select Settings > Time & Language > Language.
Choose a language from the Windows display language menu.
If a language is listed under Preferred languages but doesn’t appear on the Windows display language list, you’ll first need to install its language pack (if it’s available).
Select the Start button, then select Settings > Time & Language > Language.
Choose a language from the Add a language list under Preferred languages, and then select Options.
Select Download from the Download language pack option.
After the language pack is installed, select Back .
Choose a language from the Windows display language menu.
If you receive an «Only one language pack allowed» or «Your Windows license supports only one display language» message, you have a single language edition of Windows 10. Here’s how to check your Windows 10 language edition:
Select the Start button, select Settings > About, and then scroll down to the Windows specification section.
If you see Windows 10 Home Single Language next to Edition, you have a single language edition of Window 10, and you can’t add a new language unless you purchase an upgrade to either Windows 10 Home or Windows 10 Pro.
Select the Start button, then select Settings > Time & Language > Language.
Under Preferred languages, select the language you want to remove, and then click Remove.
To remove an individual keyboard, select the language in question (see step 2), select Options, scroll down to the Keyboards section, select the keyboard you want to remove, and click Remove.
Switch between languages using the Language bar
After you enable the keyboard layout for two or more languages in the Windows operating system, you can use the Language bar to switch between languages that use different keyboard layouts.
Note: If you just want to insert a few symbols or foreign characters, and you only type in languages with a Latin alphabet, such as English or Spanish, you can insert symbols without switching to a different keyboard layout.
For more information about adding additional editing languages and keyboard layouts see Change the language Office uses in its menus and proofing tools.
Using the Language bar to Switch Keyboard Layouts
When you switch a language by using the Language bar, the keyboard layout changes to the keyboard for that language.
Use the Language bar when you:
Want to switch between languages with a Latin alphabet, such as English, Spanish, or French, and a language with a non-Latin alphabet, such as Arabic or Chinese.
Want to switch between languages with a non-Latin alphabet, such as Greek or Russian.
Prefer to use native keyboard layouts when you type in different languages that have a Latin alphabet.
After you have enabled the keyboard language that you want, open your document and place the cursor in the document where you want to start to type text in a different language.
Click the language icon  on the Language bar, which should appear on your task bar near where the clock is, and then click the language that you want to use.
Keyboard shortcut: To switch between keyboard layouts, press Alt+Shift.
Note: The icon is just an example; it shows that English is the language of the active keyboard layout. The actual icon shown on your computer depends on the language of the active keyboard layout and version of Windows.
If you have set up more than one keyboard layout for a single language, you can switch between layouts by clicking the keyboard layout icon on the Language bar and then clicking the keyboard layout that you want to use. The name on the indicator changes to reflect the active keyboard layout.
Repeat steps 1 and 2 to switch between different languages.
I don’t see the Language bar
In most cases, the Language bar automatically appears on your desktop or in the taskbar after you enable two or more keyboard layouts in the Windows operating system. You cannot see the Language bar if it is hidden or only one keyboard layout is enabled in the Windows operating system.
If you don’t see the Language bar, do the following to check to see if the Language bar is hidden:
In Windows 10 and Windows 8
Press the Windows logo key and type Control to search for the Control Panel app.
Click Control Panel.
Under Clock, Language, and Region, click Change input methods.
Click Advanced settings.
Under Switching input methods, select the Use the desktop language bar when it’s available check box, and then click Options.

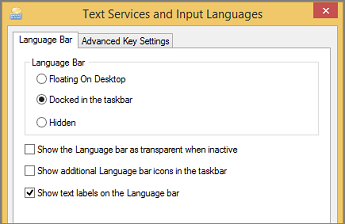
In the Text Services and Input Languages dialog box, click the Language Bar tab, and make sure that either the Floating On Desktop or the Docked in the taskbar option is selected.
Click Start, and then click Control Panel.
Under Clock, Language, and Region, click Change keyboard or other input methods.
In the Region and Language dialog box, click Change keyboards.
In the Text Services and Input Languages dialog box, click the Language Bar tab.
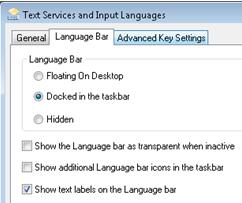
Under Language Bar, check if the Hidden option is selected. If it is, select either Floating on Desktop or Docked in the taskbar.
In Windows Vista
Click Start, and then click Control Panel.
Under Clock, Language, and Regional Options, click Change keyboard or other input methods.
In the Regional and Language Options dialog box, click Change keyboards.
In the Text Services and Input Languages dialog box, click the Language Bar tab.
Under Language Bar, check if the Hidden option is clicked. If it is, click either Floating on Desktop or Docked in the taskbar.
How to change system language on Windows 10
 Source: Windows Central
On Windows 10, the initial setup process offers you the option to set the default language. However, if you made a mistake or using a device already configured, you don’t have to struggle with the incorrect settings when your requirements are different.
If you have to change your device’s language settings, you can complete this task using the Settings app without reinstalling Windows 10.
In this Windows 10 guide, we’ll walk you through the steps to change your device’s system default language.
How to change default system language on Windows 10
If you’re using a computer with the incorrect language configuration, it’s unnecessary to reinstall Windows 10. You only need to adjust a few settings to set the appropriate language.
Disable language sync
On Windows 10 configured with a Microsoft account, the language preferences will sync across devices. In the case that you only need the settings on one computer, it’s recommended to disable the option to sync the language settings before making any changes to prevent the new configuration from overwriting the settings on your other devices.
To stop syncing the language preferences on Windows 10, use these steps:
- Open Settings.
- Click on Accounts.
- Click on Sync your settings.
Under the «Individual sync settings» section, turn off the Language preferences toggle switch.
 Source: Windows Central
Once you complete the steps, you can change the language settings without affecting your other devices.
Change language settings
To change the system default language, close running applications, and use these steps:
- Open Settings.
- Click on Time & Language.
- Click on Language.
Under the «Preferred languages» section, click the Add a language button.
 Source: Windows Central
Select the language package from the result.
Source: Windows Central
Check the Set as my display language option.
Source: Windows Central
Click the Yes, sign out now button.
Source: Windows Central
After you complete the steps, the display language will change across the entire Windows 10 experience, including the Sign-in screen, Settings app, File Explorer, Desktop, apps, browser, and websites you visit. Depending on your new settings, Windows 10 may prompt you to review your privacy settings again.
Change region settings
In the case that you are adjusting the Windows 10 language because you’re now in a different region, you’ll also need to change the region settings.
To change the local region settings on Windows 10, use these steps:
- Open Settings.
- Click on Time & Language.
- Click on Region.
Use the «Country or region» drop-down menu to select the current location (if applicable).
Source: Windows Central
Under the «Related settings» section, click the Administrative language settings option on the right side.
 Source: Windows Central
Under the «Language for non-Unicode programs» section, click the Change system locale button.
![]() Source: Windows Central
Source: Windows Central
Select the new system local by specifying the new language.
![]() Source: Windows Central
Source: Windows Central
In the «Administrative» tab, click the Copy settings button.
![]() Source: Windows Central
Source: Windows Central
Under the «Copy your current settings to» section, check the Welcome screen and system accounts and New user accounts options.
 Source: Windows Central
Once you complete the steps, the computer will now use the correct region settings.
Typically, users never have to worry about changing or installing additional languages. However, the ability to change language-related settings may come in handy for organizations working with people that need to use different preferences. It’s also a useful feature to match the local settings if you relocate to another region or when buying a new device that ships from a different country.
The only caveat about changing the region settings is that you may lose access to Cortana, and the Microsoft Store may show different contents depending on the region you specified.
More Windows 10 resources
For more helpful articles, coverage, and answers to common questions about Windows 10, visit the following resources:
![]()
The Dell XPS 15 is our choice for best 15-inch laptop
For a lot of people, a 15-inch laptop is a perfect size that offers enough screen for multitasking, and in a lot of cases, some extra performance from powerful hardware. We’ve rounded up the best of the best at this size.
![]()
Halo: MCC’s live service elements make it better, not worse
Halo: The Master Chief Collection is more popular than ever, but some fans don’t agree with the live service approach 343 Industries has taken with it. Here’s why those elements are, at the end of the day, great for the game and for Halo overall.
![]()
Microsoft’s Surface Duo is not ‘failing up’
Microsoft announced this week that it was expanding Surface Duo availability to nine new commercial markets. While Surface Duo is undoubtedly a work in progress, this is not a sign of a disaster. It’s also doesn’t mean that Surface Duo is selling a ton either. Instead, the reason for the expansion is a lot more straightforward.
![]()
These are the best PC sticks when you’re on the move
Instant computer — just add a screen. That’s the general idea behind the ultra-portable PC, but it can be hard to know which one you want. Relax, we have you covered!


