- Как обновить VS Code на Ubuntu?
- Visual Studio Code on Linux
- Installation
- Debian and Ubuntu based distributions
- RHEL, Fedora, and CentOS based distributions
- openSUSE and SLE-based distributions
- AUR package for Arch Linux
- Nix package for NixOS (or any Linux distribution using Nix package manager)
- Installing .rpm package manually
- Updates
- Node.js
- Setting VS Code as the default text editor
- xdg-open
- Debian alternatives system
- Windows as a Linux developer machine
- Windows Subsystem for Linux
- Next steps
- Common questions
- Azure VM Issues
- Debian and moving files to trash
- Conflicts with VS Code packages from other repositories
- «Visual Studio Code is unable to watch for file changes in this large workspace» (error ENOSPC)
- I can’t see Chinese characters in Ubuntu
- Package git is not installed
- The code bin command does not bring the window to the foreground on Ubuntu
- Cannot install .deb package due to «/etc/apt/sources.list.d/vscode.list: No such file or directory»
- Cannot move or resize the window while X forwarding a remote window
- Using the custom title bar
- Broken cursor in editor with display scaling enabled
- Repository changed its origin value
- Get started using Visual Studio Code with Windows Subsystem for Linux
- Install VS Code and the Remote WSL extension
- Update your Linux distribution
- Open a WSL project in Visual Studio Code
- From the command-line
- From VS Code
- Extensions inside of VS Code Remote
- Install Git (optional)
- Install Windows Terminal (optional)
- Additional Resources
Как обновить VS Code на Ubuntu?
Я скачал zip-версию VS Code для Ubuntu (64-битную версию) и смог запустить ее в течение некоторого времени. Некоторые расширения были также установлены.
Как я могу эффективно обновить эту установку VS Code? Одна вещь, о которой я могу думать, это просто скачать новый zip и распаковать его в то же место, просто сохранив старую папку «extensions».
Если я использую .deb версию, будет ли необходим тот же процесс (загружать новый .deb каждый раз, когда происходит обновление?)
Это работает для меня:
Добавьте эти два шага в вызываемый исполняемый скрипт bash, auto-update-vscode и вы можете просто запустить его из своей оболочки в любое время, когда VS Code скажет, что он устарел.
Владимир С. опубликовал правильное решение, хотя он и не ссылался напрямую на раздел, в котором был ответ. Прямая ссылка здесь: https://code.visualstudio.com/updates/v1_10#_miscellaneous
Для тех, кто предпочитает не нажимать, вот официальное решение от Microsoft:
Дистрибутивы на основе Debian и Ubuntu
Самый простой способ установки для дистрибутивов на основе Debian / Ubuntu — это загрузить и установить пакет .deb (64-битный) либо через графический центр программного обеспечения, если он доступен, либо через командную строку с помощью:
Установка пакета .deb автоматически установит репозиторий apt и ключ подписи, чтобы включить автоматическое обновление с использованием обычного механизма обновления системы (apt update). Обратите внимание, что 32-битные и .tar.gz двоичные файлы также доступны на странице загрузки.
Хранилище и ключ также можно установить вручную с помощью следующего скрипта:
Затем обновите кеш пакета и установите пакет, используя:
Вам не нужно загружать пакет вручную. Вы можете просто сделать:
В истинном стиле MS они решили назвать пакет просто code . Так что скачайте последний .deb и:
Конфигурация, установленные расширения и даже используемая в данный момент папка сохраняются.
Есть два PPA, размещенных на github и opensuse. Вы можете использовать https://github.com/tagplus5/vscode-ppa до того, как у VSCode появится официальный PPA.
Следуйте инструкциям ниже:
Загрузите последнюю версию кода Visual Studio в виде пакета .deb.
Установите GDebi Package Installer (если не установлен).
Затем удалите код Visual Studio (более старая версия), открыв его пакет .deb (который вы загрузили ранее) с помощью программы установки пакетов GDebi, а затем нажмите «Удалить пакет».
Затем откройте пакет .deb последней версии кода Visual Studio с помощью программы установки пакетов GDebi, нажмите «Установить пакет» и установите последнюю версию кода Visual Studio.
Все ваши конфигурации (установленные пакеты и другие настройки) в коде Visual Studio, которые вы делали ранее, будут автоматически восстановлены даже после выполнения описанной выше процедуры. Так что вам не нужно беспокоиться об установке пакетов снова. Вы найдете эти настройки и пакеты автоматически в последней установленной вами версии.
Обновление с помощью этой процедуры не приводит к удалению / очистке файлов конфигурации кода Visual Studio, и поэтому все ваши конфигурации в коде Visual Studio восстанавливаются.
Эта процедура работает и для других редакторов кода, таких как Sublime Text 3 и Atom. Я сам проверил и проверил это.
Источник
Visual Studio Code on Linux
Installation
See the Download Visual Studio Code page for a complete list of available installation options.
By downloading and using Visual Studio Code, you agree to the license terms and privacy statement.
Debian and Ubuntu based distributions
The easiest way to install Visual Studio Code for Debian/Ubuntu based distributions is to download and install the .deb package (64-bit), either through the graphical software center if it’s available, or through the command line with:
Note that other binaries are also available on the VS Code download page.
Installing the .deb package will automatically install the apt repository and signing key to enable auto-updating using the system’s package manager. Alternatively, the repository and key can also be installed manually with the following script:
Then update the package cache and install the package using:
RHEL, Fedora, and CentOS based distributions
We currently ship the stable 64-bit VS Code in a yum repository, the following script will install the key and repository:
Then update the package cache and install the package using dnf (Fedora 22 and above):
Or on older versions using yum :
Due to the manual signing process and the system we use to publish, the yum repo may lag behind and not get the latest version of VS Code immediately.
Visual Studio Code is officially distributed as a Snap package in the Snap Store:

You can install it by running:
Once installed, the Snap daemon will take care of automatically updating VS Code in the background. You will get an in-product update notification whenever a new update is available.
Note: If snap isn’t available in your Linux distribution, please check the following Installing snapd guide, which can help you get that set up.
Learn more about snaps from the official Snap Documentation.
openSUSE and SLE-based distributions
The yum repository above also works for openSUSE and SLE-based systems, the following script will install the key and repository:
Then update the package cache and install the package using:
AUR package for Arch Linux
To get more information about the installation from the AUR, please consult the following wiki entry: Install AUR Packages.
Nix package for NixOS (or any Linux distribution using Nix package manager)
There is a community maintained VS Code Nix package in the nixpkgs repository. In order to install it using Nix, set allowUnfree option to true in your config.nix and execute:
Installing .rpm package manually
The VS Code .rpm package (64-bit) can also be manually downloaded and installed, however, auto-updating won’t work unless the repository above is installed. Once downloaded it can be installed using your package manager, for example with dnf :
Note that other binaries are also available on the VS Code download page.
Updates
VS Code ships monthly and you can see when a new release is available by checking the release notes. If the VS Code repository was installed correctly, then your system package manager should handle auto-updating in the same way as other packages on the system.
Note: Updates are automatic and run in the background for the Snap package.
Node.js
Node.js is a popular platform and runtime for easily building and running JavaScript applications. It also includes npm, a Package Manager for Node.js modules. You’ll see Node.js and npm mentioned frequently in our documentation and some optional VS Code tooling requires Node.js (for example, the VS Code extension generator).
If you’d like to install Node.js on Linux, see Installing Node.js via package manager to find the Node.js package and installation instructions tailored to your Linux distribution. You can also install and support multiple versions of Node.js by using the Node Version Manager.
To learn more about JavaScript and Node.js, see our Node.js tutorial, where you’ll learn about running and debugging Node.js applications with VS Code.
Setting VS Code as the default text editor
xdg-open
You can set the default text editor for text files ( text/plain ) that is used by xdg-open with the following command:
Debian alternatives system
Debian-based distributions allow setting a default editor using the Debian alternatives system, without concern for the MIME type. You can set this by running the following and selecting code:
If Visual Studio Code doesn’t show up as an alternative to editor , you need to register it:
Windows as a Linux developer machine
Another option for Linux development with VS Code is to use a Windows machine with the Windows Subsystem for Linux (WSL).
Windows Subsystem for Linux
With WSL, you can install and run Linux distributions on Windows. This enables you to develop and test your source code on Linux while still working locally on a Windows machine. WSL supports Linux distributions such as Ubuntu, Debian, SUSE, and Alpine available from the Microsoft Store.
When coupled with the Remote — WSL extension, you get full VS Code editing and debugging support while running in the context of a Linux distro on WSL.
See the Developing in WSL documentation to learn more or try the Working in WSL introductory tutorial.
Next steps
Once you have installed VS Code, these topics will help you learn more about it:
- Additional Components — Learn how to install Git, Node.js, TypeScript, and tools like Yeoman.
- User Interface — A quick orientation to VS Code.
- User/Workspace Settings — Learn how to configure VS Code to your preferences through settings.
Common questions
Azure VM Issues
I’m getting a «Running without the SUID sandbox» error?
You can safely ignore this error.
Debian and moving files to trash
If you see an error when deleting files from the VS Code Explorer on the Debian operating system, it might be because the trash implementation that VS Code is using is not there.
Run these commands to solve this issue:
Conflicts with VS Code packages from other repositories
Some distributions, for example Pop!_OS provide their own code package. To ensure the official VS Code repository is used, create a file named /etc/apt/preferences.d/code with the following content:
«Visual Studio Code is unable to watch for file changes in this large workspace» (error ENOSPC)
When you see this notification, it indicates that the VS Code file watcher is running out of handles because the workspace is large and contains many files. Before adjusting platform limits, make sure that potentially large folders, such as Python .venv , are added to the files.watcherExclude setting (more details below). The current limit can be viewed by running:
The limit can be increased to its maximum by editing /etc/sysctl.conf (except on Arch Linux, read below) and adding this line to the end of the file:
The new value can then be loaded in by running sudo sysctl -p .
While 524,288 is the maximum number of files that can be watched, if you’re in an environment that is particularly memory constrained, you may want to lower the number. Each file watch takes up 1080 bytes, so assuming that all 524,288 watches are consumed, that results in an upper bound of around 540 MiB.
Arch-based distros (including Manjaro) require you to change a different file; follow these steps instead.
Another option is to exclude specific workspace directories from the VS Code file watcher with the files.watcherExclude setting. The default for files.watcherExclude excludes node_modules and some folders under .git , but you can add other directories that you don’t want VS Code to track.
I can’t see Chinese characters in Ubuntu
We’re working on a fix. In the meantime, open the application menu, then choose File > Preferences > Settings. In the Text Editor > Font section, set «Font Family» to Droid Sans Mono, Droid Sans Fallback . If you’d rather edit the settings.json file directly, set editor.fontFamily as shown:
Package git is not installed
This error can appear during installation and is typically caused by the package manager’s lists being out of date. Try updating them and installing again:
The code bin command does not bring the window to the foreground on Ubuntu
Running code . on Ubuntu when VS Code is already open in the current directory will not bring VS Code into the foreground. This is a feature of the OS which can be disabled using ccsm .
Under General > General Options > Focus & Raise Behaviour, set «Focus Prevention Level» to «Off». Remember this is an OS-level setting that will apply to all applications, not just VS Code.
Cannot install .deb package due to «/etc/apt/sources.list.d/vscode.list: No such file or directory»
This can happen when sources.list.d doesn’t exist or you don’t have access to create the file. To fix this, try manually creating the folder and an empty vscode.list file:
Cannot move or resize the window while X forwarding a remote window
If you are using X forwarding to use VS Code remotely, you will need to use the native title bar to ensure you can properly manipulate the window. You can switch to using it by setting window.titleBarStyle to native .
Using the custom title bar
The custom title bar and menus were enabled by default on Linux for several months. The custom title bar has been a success on Windows, but the customer response on Linux suggests otherwise. Based on feedback, we have decided to make this setting opt-in on Linux and leave the native title bar as the default.
The custom title bar provides many benefits including great theming support and better accessibility through keyboard navigation and screen readers. Unfortunately, these benefits do not translate as well to the Linux platform. Linux has a variety of desktop environments and window managers that can make the VS Code theming look foreign to users. For users needing the accessibility improvements, we recommend enabling the custom title bar when running in accessibility mode using a screen reader. You can still manually set the title bar with the Window: Title Bar Style ( window.titleBarStyle ) setting.
Broken cursor in editor with display scaling enabled
Due to an upstream issue #14787 with Electron, the mouse cursor may render incorrectly with scaling enabled. If you notice that the usual text cursor is not being rendered inside the editor as you would expect, try falling back to the native menu bar by configuring the setting window.titleBarStyle to native .
Repository changed its origin value
If you receive an error similar to the following:
Use apt instead of apt-get and you will be prompted to accept the origin change:
Источник
Get started using Visual Studio Code with Windows Subsystem for Linux
Visual Studio Code, along with the Remote — WSL extension, enables you to use WSL as your full-time development environment directly from VS Code. You can:
- develop in a Linux-based environment
- use Linux-specific toolchains and utilities
- run and debug your Linux-based applications from the comfort of Windows while maintaining access to productivity tools like Outlook and Office
- use the VS Code built-in terminal to run your Linux distribution of choice
- take advantage of VS Code features like Intellisense code completion, linting, debug support, code snippets, and unit testing
- easily manage your version control with VS Code’s built-in Git support
- run commands and VS Code extensions directly on your WSL projects
- edit files in your Linux or mounted Windows filesystem (for example /mnt/c) without worrying about pathing issues, binary compatibility, or other cross-OS challenges
Install VS Code and the Remote WSL extension
Visit the VS Code install page and select the 32 or 64 bit installer. Install Visual Studio Code on Windows (not in your WSL file system).
When prompted to Select Additional Tasks during installation, be sure to check the Add to PATH option so you can easily open a folder in WSL using the code command.
Install the Remote Development extension pack. This extension pack includes the Remote — WSL extension, in addition to the Remote — SSH, and Remote — Containers extensions, enabling you to open any folder in a container, on a remote machine, or in WSL.
In order to install the Remote-WSL extension, you will need the 1.35 May release version or later of VS Code. We do not recommend using WSL in VS Code without the Remote-WSL extension as you will lose support for auto-complete, debugging, linting, etc. Fun fact: this WSL extension is installed in $HOME/.vscode/extensions (enter the command ls $HOME\.vscode\extensions\ in PowerShell).
Update your Linux distribution
Some WSL Linux distributions are lacking libraries that are required by the VS Code server to start up. You can add additional libraries into your Linux distribution by using its package manager.
For example, to update Debian or Ubuntu, use:
To add wget (to retrieve content from web servers) and ca-certificates (to allow SSL-based applications to check for the authenticity of SSL connections), enter:
Open a WSL project in Visual Studio Code
From the command-line
To open a project from your WSL distribution, open the distribution’s command line and enter: code .
From VS Code
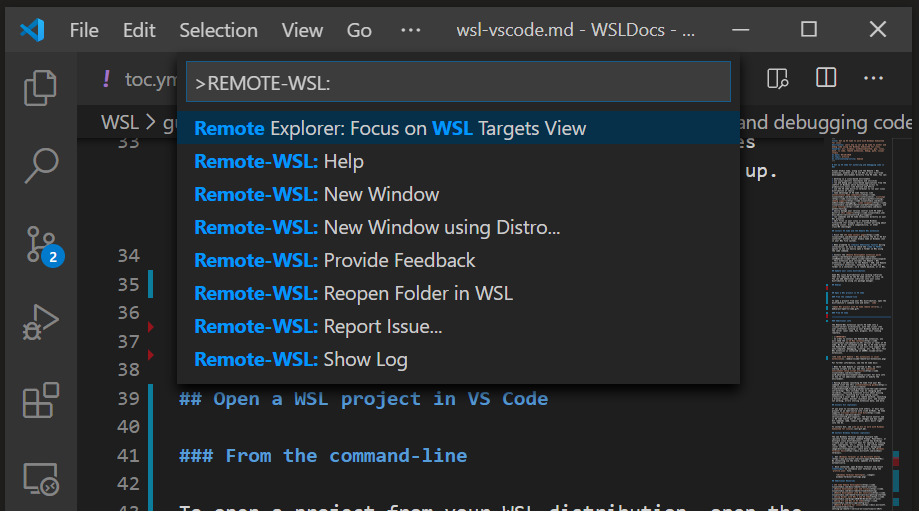
You can also access more VS Code Remote options by using the shortcut: CTRL+SHIFT+P in VS Code to bring up the command palette. If you then type Remote-WSL you will see a list of the VS Code Remote options available, allowing you to reopen the folder in a remote session, specify which distribution you want to open in, and more.
Extensions inside of VS Code Remote
The Remote-WSL extension splits VS Code into a “client-server” architecture, with the client (the user interface) running on your Windows machine and the server (your code, Git, plugins, etc) running remotely.
When running VS Code Remote, selecting the ‘Extensions’ tab will display a list of extensions split between your local machine and your WSL distribution.
Installing a local extension, like a theme, only needs to be installed once.
Some extensions, like the Python extension or anything that handles things like linting or debugging, must be installed separately on each remote WSL distributions. VS Code will display a warning icon вљ , along with a green «Install in WSL» button, if you have an extension locally installed that is not installed on your WSL Remote.

For further information, see the VS Code docs:
When VS Code Remote is started in WSL, no shell startup scripts are run. See this advanced environment setup script article for more info on how to run additional commands or modify the environment.
Having problems launching VS Code from your WSL command line? This troubleshooting guide includes tips on changing path variables, resolving extension errors about missing dependencies, resolving Git line ending issues, installing a local VSIX on a remote machine, launching a browser window, blocker localhost port, web sockets not working, errors storing extension data, and more.
Install Git (optional)
If you plan to collaborate with others, or host your project on an open-source site (like GitHub), VS Code supports version control with Git. The Source Control tab in VS Code tracks all of your changes and has common Git commands (add, commit, push, pull) built right into the UI.
Install Windows Terminal (optional)
The new Windows Terminal enables multiple tabs (quickly switch between Command Prompt, PowerShell, or multiple Linux distributions), custom key bindings (create your own shortcut keys for opening or closing tabs, copy+paste, etc.), emojis вє, and custom themes (color schemes, font styles and sizes, background image/blur/transparency). Learn more in the Windows Terminal docs.
Get Windows Terminal in the Microsoft Store: By installing via the store, updates are handled automatically.
Once installed, open Windows Terminal and select Settings to customize your terminal using the profile.json file.
Additional Resources
A few additional extensions you may want to consider include:
- Keymaps from other editors: These extensions can help your environment feel right at home if you’re transitioning from another text editor (like Atom, Sublime, Vim, eMacs, Notepad++, etc).
- Settings Sync: Enables you to synchronize your VS Code settings across different installations using GitHub. If you work on different machines, this helps keep your environment consistent across them.
- Debugger for Chrome: Once you finish developing on the server side with Linux, you’ll need to develop and test the client side. This extension integrates your VS Code editor with your Chrome browser debugging service, making things a bit more efficient.
—>
Источник


