- How to run Android apps in Windows
- Bluestacks emulator
- Dual booting
- Android-x86
- Samsung’s Link to Windows
- Surface Duo and Microsoft’s Emulator
- Using Windows 10? Here’s how to run Android apps on your PC
- What’s required to run Android apps on your Windows 10 PC?
- How to run Android apps on your Windows 10 PC
- 4 Free Ways to Run Android Apps on Your PC
- Mirror Your Phone With Windows
- Run Your Favorite Apps With BlueStacks
- Emulate Full Android Experience With Genymotion
- Run Android Directly on Your PC With Android-x86
How to run Android apps in Windows
When it comes to app selection, few platforms rival Android. Unfortunately, getting apps from your phone or tablet to your Windows PC isn’t as straightforward as simply installing desktop software. To help make the process easier, however, we’ve put together a comprehensive guide on what software and utilities you need to install Android apps on almost any Windows machine. This way, you can enjoy the best Android apps and best Android games on the big screen.
If you’re running a Chromebook, we’ve also put together a dedicated guide on how to install Android apps on Chrome OS.
Bluestacks emulator

The Bluestacks App Player is one of the most popular and robust Android emulators around, allowing you to run 32-bit and 64-bit games and apps for Android 7.1.2 (Nougat) on your Windows desktop.
It’s free to use, and you can easily toggle emulation settings and launch apps using the custom-designed interface. “Layercake” technology uses hardware accelerators to improve the performance of Android games running on Windows-based machines.
If you have a Twitch or similar account and a PC with more than 8GB of RAM, you can even broadcast Android apps and games using the Bluestacks “stream mode” and OBS Studio. However, users may want to enable AMD-V or Intel VT-x within the BIOS for optimal performance, if available.
Bluestacks offers an optional subscription ($4 per month or $40 per year) that enables premium support, disables advertisements, includes wallpapers, and more. It’s also now compatible with the Galaxy Store, allowing you to use and play apps purchased through Samsung’s app store.
Here’s how to install Bluestacks to your computer:
Step 1: Download the installer from the official Bluestacks website.
Step 2: Launch the install application and choose the storage location for the app and data files. Unfortunately, you can’t change the Bluestacks directory — it will install on your boot drive by default.
Step 3: Once Bluestacks installs, launch it and enter your Google and/or Samsung account credentials. You’ll need this info to log in to the Google Play Store and Galaxy Store and access your Android app library.
Dual booting
There’s an alternative to emulation that gives you newer versions of Android, but the setup is a bit more involved. It’s called “dual booting,” and it effectively transforms your Windows computer into an Android device. You’ll gain the option to boot into Android when you switch on your computer, and Android will work just like it does on your smartphone or tablet.
However, getting started is not as simple as installing native Android. Because computer hardware — processors, graphics cards, and hard drives — must be added to Android by a third-party developer, you’ll need to find a custom distribution that supports your machine.
Android-x86

Android-x86 brings Android to x86-based PCs with AMD and Intel processors. What’s interesting about this project is that users can install any flavor of Android, whether it’s the now-stale Donut (v1.6) or the more recent Pie (v9). The project even offers builds of LineageOS (cm-x86) that can run on x86-based processors.
For those seeking a more recent Android build, Android-x86 9.0-r2 was the latest release at the time of this publication. Based on Android-9.0.0_r54, it fixed an audio issue on the Surface 3 and another one regarding booting into UEFI mode. Contributors are currently working on a version based on Android 10, although the project hasn’t released anything new since May 2020.
Though customizations to the Android operating system are minimal, the Android-x86 team did add some meaningful tweaks to give your Android install a desktop-like interface. It comes with features like a new Taskbar launcher and the ability to launch apps in resizable windows rather than just full-screen.
Android-x86 also lets you customize Android to your liking. You can install third-party themes, home screens, and more without having to worry about whether or not they will play nicely together.
To use Android-x86, your PC must have:
- An AMD or Intel processor.
- 2GB or more RAM.
- 4GB or more disk space.
- An available USB port.
If your PC meets the requirements, you will need these three tools:
- A blank USB drive.
- Android-x86 downloaded to your PC
- UNetbootin downloaded to your PC.
Now let’s get started:
 Kevin Parrish/Digital Trends
Step 1: Find and open UNetbootin and click the Three Dots button to the far right of Diskimage.
Step 2: Locate and select the downloaded ISO file.
Step 3: At the bottom next to Type, select USB Drive from the list, and then click OK.
Wait for UNetbootin to copy and install Android-x86 to your flash drive.
Step 4: Reboot your computer. This may require you to hit a specific key to prevent Windows 10 from loading, like ESC or F12. A screen should appear allowing you to select Boot to the Boot Device Selection.
Step 5: Select your flash drive.
Step 6: From the UNetbootin menu, select Install Android-x86 to Hard Disk.
Step 7: Select the partition — or location — to which you want to install Android-x86. The program will ask if you plan to format the disk. If you’re unsure, don’t.
Step 8: Select Yes to install GRUB and then select Yes again.
Step 9: A prompt asks if you want to “make system r/w,” which enables Android-x86 to read and write data to your hard drive. Select Yes.
Step 10: Reboot your computer for the second time. Once installed, use the Google Play Store to install Android apps as you wish.
Samsung’s Link to Windows

Microsoft’s Your Phone app allows Android phone owners to send and receive texts from their Windows PC without using their mobile devices. Users can also access their phone’s photos from Windows 10 and see phone-related notifications in the Action Center.
Samsung takes this cool relationship one step further with Link to Windows. This technology now provides two services: Phone Screen and Apps. With the former, you’re essentially streaming a Samsung phone’s screen to an interactive window on your PC. With Apps, you’re streaming individual apps rather than mirroring the phone’s entire screen.
However, all Android apps remain on the Samsung phone. Moreover, this method requires the Windows 10 PC and Samsung Android phone to be on the same local network. Microsoft provides a list of compatible Samsung phones here — not all Samsung phones support Link to Windows.
Finally, this method requires the Windows 10 November 2019 Update (at the very least) to work properly. All Samsung phones must have Android 9 or newer.
Step 1: Open the Your Phone app or download it from the Microsoft Store if it’s not installed.
Step 2: Sign in to your Microsoft Account.
Step 3: Move to the Samsung phone. Swipe down on the Quick Panel and tap Link to Windows. If it doesn’t appear in the Quick Panel, download it from the Google Play Store — it’s typically integrated into newer Samsung phones.
Step 4: If other Microsoft apps are already signed in, you won’t need to do it again on your phone. If not, sign in manually.
Step 5: Allow permissions when prompted.
Step 6: The Samsung phone and Windows 10 should begin synchronizing. When complete, tap the blue Allow button on the Samsung phone’s screen to allow the pairing.
If successful, the Samsung phone will display a switch that’s toggled on — tap it to disconnect at any time. The screen also lists the connected PC’s name and the Microsoft Account login name.
Step 6: With the Your Phone app open in Windows 10, click the Gear (settings) icon in the bottom-left corner.
Step 7: Verify that the Display My Phone Screen option is on.
Step 8: Select the Phone Screen or Apps option on the left to begin.
Surface Duo and Microsoft’s Emulator

The Surface Duo is a high-tech piece of equipment that first came out on September 10, 2020. This dual-screen device is a folding Android smartphone that operates on a Qualcomm Snapdragon 855 SoC.
Microsoft created the Duo SDK Preview, which developers and fans can download, to get ready for the incoming Surface Duo . The preview lets you install an Android emulator, which mimics the look of the dual-screen Duo layout integrated with Android Studio on your computer.
If you feel ready to try out this preview feature, it’s an excellent chance to use the Duo software to run and test Android apps on your Windows computer. If this sounds up your alley, you can download this emulator for free right here . Check it out and see how everything operates and what the layout would look like.
Using Windows 10? Here’s how to run Android apps on your PC
Access multiple Android apps side-by-side on your Windows 10 device, thanks to an update to the Your Phone app available for Samsung Galaxy phones.

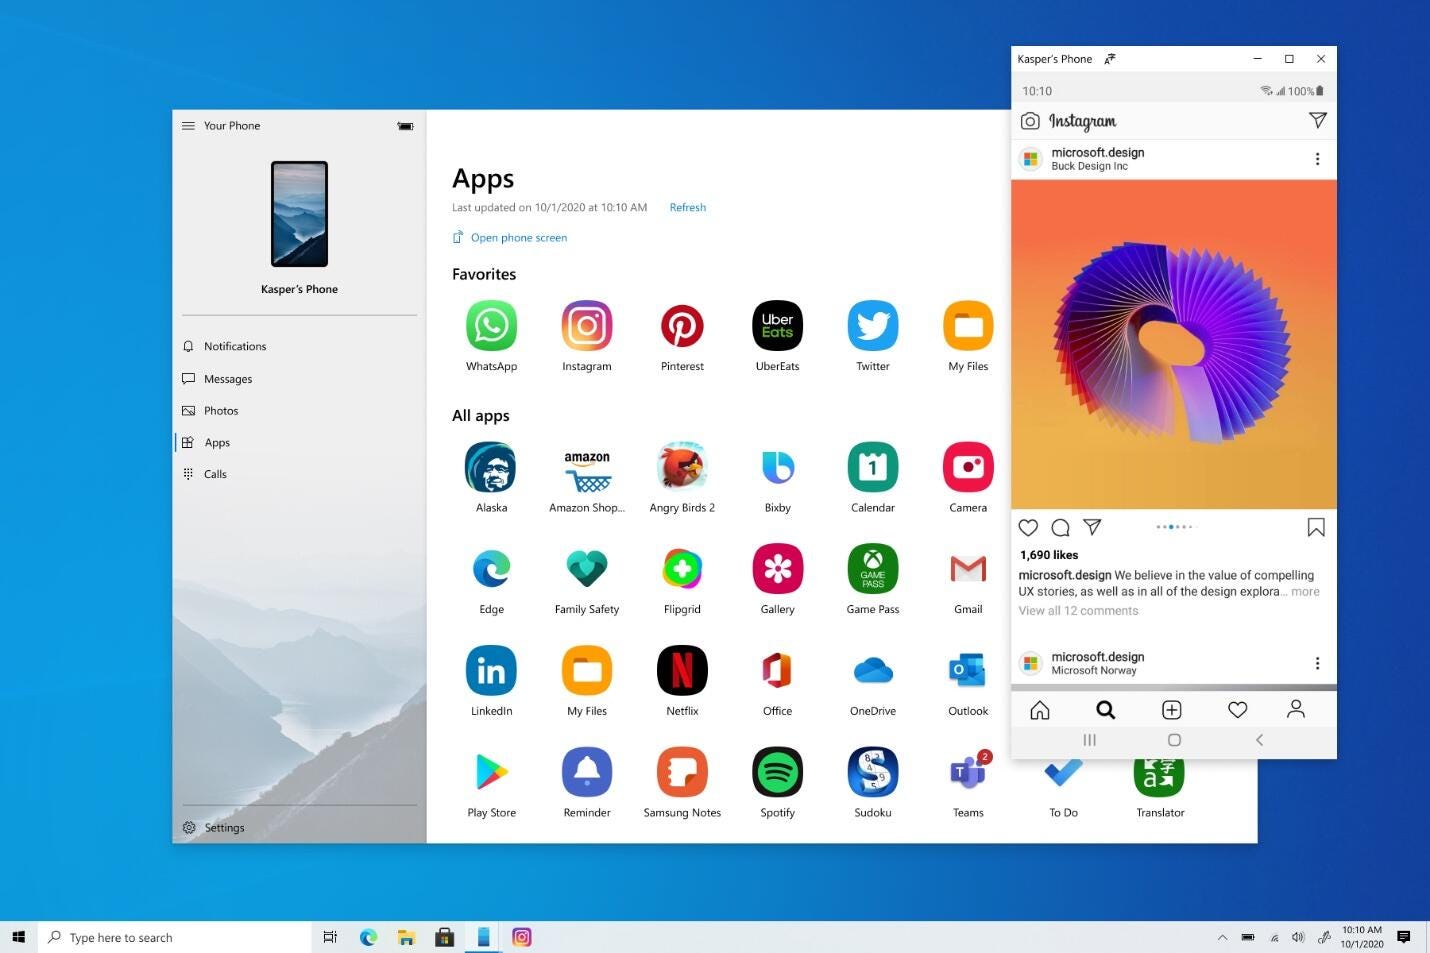
An update to the Your Phone app means certain Android phones can now run apps on Windows 10 PCs.
Certain Android phone users can now access Android mobile apps directly from their Windows 10 ($170 at Best Buy) PC, thanks to an update to the Your Phone app that Microsoft rolled out to the general public in August. And if you’re part of the Windows Insider program, the latest Windows 10 build released Nov. 11 will let you run multiple Android mobile apps side by side on your Windows 10 PC and supported Samsung devices.
The update, first announced during the Samsung Unpacked event on Aug. 5, lets you pin your favorite Android mobile apps to the Taskbar or Start menu on your computer for quick and easy access. The apps will open in separate windows from the Your Phone app, letting you use them basically the same way you would on your phone — even if the Your Phone app isn’t open. The latest Windows 10 build lets you search for your previously pinned apps from within your Start app list, without needing to install the apps on your desktop or sign into them again.
Get more out of your tech
With many people still working from home due to the coronavirus pandemic , the ability to access phone apps on a larger desktop or laptop screen, with a mouse, pen or touchscreen, could help with multitasking.
Though the feature is generally available now, at this point it’s available only for Samsung Galaxy phones . Find the full list of supported phones on Microsoft’s support site.
What’s required to run Android apps on your Windows 10 PC?
Other than a Samsung Galaxy phone (at least for now), you’ll need a PC running the Windows 10 October 2019 Update or later. Check what version you’re running on your PC by going to Settings > Updates & Security > Check for update. (If you need to upgrade, you can still download Windows 10 for free .)
You’ll also need the latest version of the Your Phone app, and Link to Windows. On your phone, you’ll need to be running Android 9.0 or greater, with the Link to Windows integration.
Finally, your phone and computer must be on the same Wi-Fi network for the feature to work.
Read more on TechRepublic: Windows 10: A cheat sheet
How to run Android apps on your Windows 10 PC
Once you have everything you need and your phone and computer are connected, the Your Phone app window should appear on your desktop. To open your Android apps on your desktop:
- Click the Apps shortcut from the menu on the left. You’ll see a list of all the apps on your phone.
- Click the app you want from the list, and it will open in a separate window on your PC.
Note that not every app will work with your mouse or keyboard, but many will.
And here are a few more tips for interacting with your mobile apps on your desktop with your mouse and keyboard, according to Microsoft:
- Single click will behave the same as any single touch/tap interaction.
- Right click anywhere on your phone screen to navigate to the previous page.
- Click and hold will behave the same as a tap/hold interaction.
- Click and hold and drag to select content.
- Mouse scroll to move between pages vertically or horizontally.
4 Free Ways to Run Android Apps on Your PC
Want to use Android apps on a PC? There are plenty of good, free ways to emulate Android right on your computer, including the Your Phone app, BlueStacks, Genymotion, and Android-x86. Let’s take a look.


Ever wish you could run an Android app or game on your PC so you weren’t relegated to a tiny phone screen? Or maybe you need to test a feature on Android, but don’t have an Android device handy. Here are four free ways to run Android (and its apps) on your computer.
Mirror Your Phone With Windows
For apps installed on your phone, you don’t need anything fancy to get Android on your PC. The Windows Your Phone app provides the ability to mirror the screen of many Samsung phones to your PC, with access to most of your apps through a simple desktop window. Just follow our instructions on connecting your phone to Windows, then choose the Phone Screen option in the sidebar to mirror your device.
Microsoft is working on expanding this feature even further, with the ability to pin Android apps on your taskbar and launch them individually, as long as your phone and computer are connected. At the time of writing, this feature is available in Windows 10’s Insider Previews and is slowly rolling out to the general public.
This isn’t always the ideal solution. If you’re looking to play games, this may come with some delay and graphical blurriness, and you won’t be able to easily share files from your PC directly to an app in Android. But for quick access to Android apps you already have installed, it definitely works in a pinch.
Run Your Favorite Apps With BlueStacks
If you’re just looking to run a couple apps and don’t need the emulator to look like Android, you should try BlueStacks. Over the years, it’s become the best Android app emulator around, and it’s packed with features that ensure your apps and games run smoothly. Since it uses virtualization to emulate Android, you’ll want to jump into your computer’s BIOS and enable Intel VT-x or AMD-V, if your computer supports it, for best performance.
Download and install BlueStacks as you would any other Windows or Mac application. It’ll take up about 2GB of space on your computer (plus any apps you download), and when it launches, you’ll be greeted with its customized home screen. It doesn’t mimic a traditional Android launcher, but you do get access to the Play Store to download any apps you want—they’ll appear on BlueStacks’ home screen and on your Windows desktop as their own shortcuts. Just double-click an icon to run the app in question.
BlueStacks is great for apps that don’t have corresponding desktop apps, but the emulator really shines when it comes to games. BlueStacks comes with built-in mappings for your mouse and keyboard, which you can customize to the touch controls you find on different Android games.
You can also adjust the resolution, DPI, FPS, and amount of CPU or RAM allocated to the emulator, ensuring you get the best balance between speed and graphical fidelity. (This is particularly useful given that BlueStacks is fairly resource-intensive, as many virtual machines are.)
BlueStacks does, unfortunately, come with some ads and clutter, but it’s not as intrusive as it once was, and it’s a small price to pay for the functionality you get—especially considering it uses Android 7.1 as its base, which is higher than most alternatives on the market.
Emulate Full Android Experience With Genymotion
If you’re looking to explore the Android operating system itself—rather than individual apps—Genymotion is a decent emulator. Its main product is designed for developers and costs money to use, but there is a free version of the software you can download for personal use; you just need to create an account on the website first.
Genymotion uses VirtualBox to emulate Android, so you’ll either need to have VirtualBox installed on your PC or download the version with VirtualBox bundled. Install it like you would any other Windows program, ensuring you select the version for «Personal Use» during the wizard. (And like BlueStacks, you’ll want to enable Intel VT-x or AMD-V from your computer’s BIOS if you have it.)
When you start Genymotion, it’ll present you with a list of device templates you can install—this determines the screen resolution, Android version, and resources allotted to the emulator. Install the template you want and double-click it to enter Android. You’ll be able to navigate around the home screen, launch apps, and emulate certain events like GPS location.
Note that you’ll start with a very barebones version of Android that doesn’t even come with many of Google’s apps or modern features, though you can add the Play Store by clicking the «Open Gapps» icon in the sidebar to install it. Also, no matter which template you choose, you won’t get any custom versions of Android—picking the Samsung Galaxy S10 template, for example, won’t get you Samsung’s One UI. It just determines the resolution and specs of the virtual machine. (Genymotion does support Android versions from 4.4 all the way up to 10.0, though.)
Genymotion works well for exploring Android’s settings and other built-in features, though I wouldn’t necessarily use it to run individual apps, as it just doesn’t integrate as well with your PC as something like BlueStacks. If Genymotion doesn’t suit your needs, Google’s official Android software development kit also comes with an Android emulator, though setup is a bit more complex, so I wouldn’t recommend it for most users.
Run Android Directly on Your PC With Android-x86
If you’re looking for something a bit more full-featured, the Android-x86 project gets you as close as you can get to true Android on your PC. Android-x86 is an open-source project that ports Android to the x86 platform, allowing you to run it on your computer instead of an ARM-based phone or tablet.
To run Android-x86, you have a couple of options. If you want to run Android on its own, as a desktop operating system for your PC, you can download it as an ISO disc image and burn it to a USB drive with a program like Rufus. Then, insert that USB drive into the PC in question, reboot, and enter the boot menu (usually by pressing a key like F12 during the boot process).
By booting from your Android-x86 USB drive, you’ll either be able to run Android in a live environment—without having any effect on your PC—or install it to your PC’s hard drive for permanent usage (and better performance).
Alternatively, if you want to run Android-x86 on top of your existing operating system, you can download the disc image and run it inside VirtualBox. This is, again, a bit more advanced if you aren’t familiar with VirtualBox, but our guide to running Windows on a Mac can get you acquainted with the process.
The official site has some tips for getting Android-x86 up and running in a virtual machine as well. It’s more work than using something like BlueStacks, but it’s also closer to pure Android, which is a nice perk.


