- Set up and use iCloud for Windows
- Before you begin
- Set up iCloud for Windows
- Download and share your photos
- Share your photos
- See your files and folders with iCloud Drive
- Keep your apps up to date
- On your PC
- How to Jailbreak iOS Device on My Windows
- What Should You Prepare Before Jailbreaking?
- Step-by-Step Guide on How to Jailbreak on Windows
- Step 1. Burn the checkn1x ISO file to the USB flash drive
- Step 2. Start to Jailbreak with checkN1x
- Remove iCoud Activation Lock On iOS Device
- Xcode for Windows: Develop iOS Apps on PC
- Xcode for Windows: What & Why
- Rent a Mac in the Cloud
- Learn how to code iOS apps
Set up and use iCloud for Windows
With iCloud for Windows, the photos, documents, and bookmarks on your PC are updated automatically on your Apple devices.
Before you begin
Make sure that you set up iCloud on your iPhone, iPad, or iPod touch or Mac and that you’re signed in with your Apple ID. Then follow the steps below to download and set up iCloud for Windows.
Want to access iCloud’s latest features? See the recommended system requirements. iCloud requires an Internet connection. iCloud might not be available in all areas and features vary. If you use a Managed Apple ID, iCloud for Windows isn’t supported.

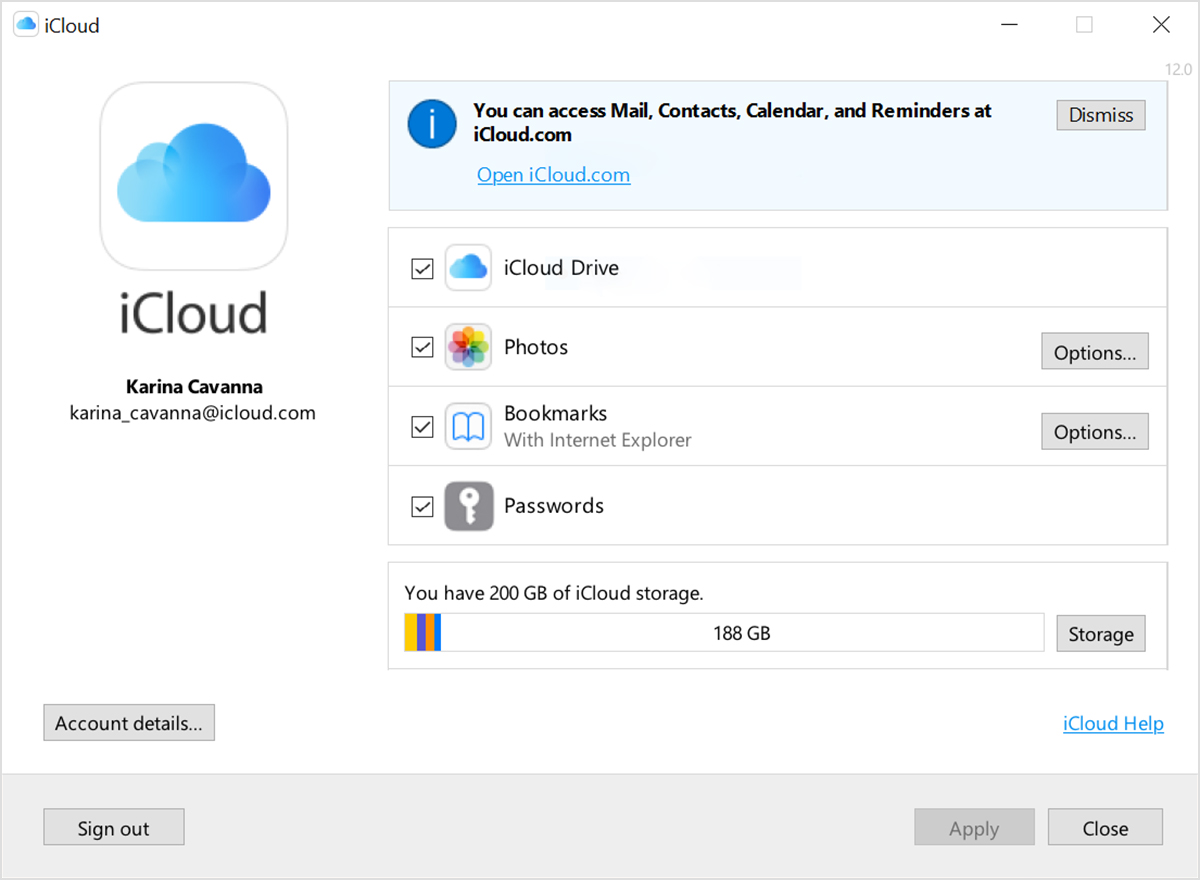
Set up iCloud for Windows
- Download iCloud for Windows on your PC.
- Windows 10: Go to the Microsoft Store to download iCloud for Windows.
- Earlier versions of Windows*: Download iCloud for Windows from apple.com.
- If it doesn’t install automatically, go to File Explorer and open iCloud Setup.
- Restart your computer.
- Make sure iCloud for Windows is open. If it doesn’t open automatically, go to Start, open Apps or Programs, and open iCloud for Windows.
- Enter your Apple ID to sign in to iCloud.
- Choose the features and content that you want to keep up to date across your devices.

- Click Apply.
Download and share your photos
When you turn on Photos, iCloud for Windows creates a Photos folder in File Explorer called iCloud Photos. iCloud Photos uploads new photos and videos that you add to the iCloud Photos folder on your PC so you can see them in the Photos app on your iPhone, iPad, iPod touch, and Mac, and on iCloud.com. New photos and videos you take automatically download from iCloud Photos.
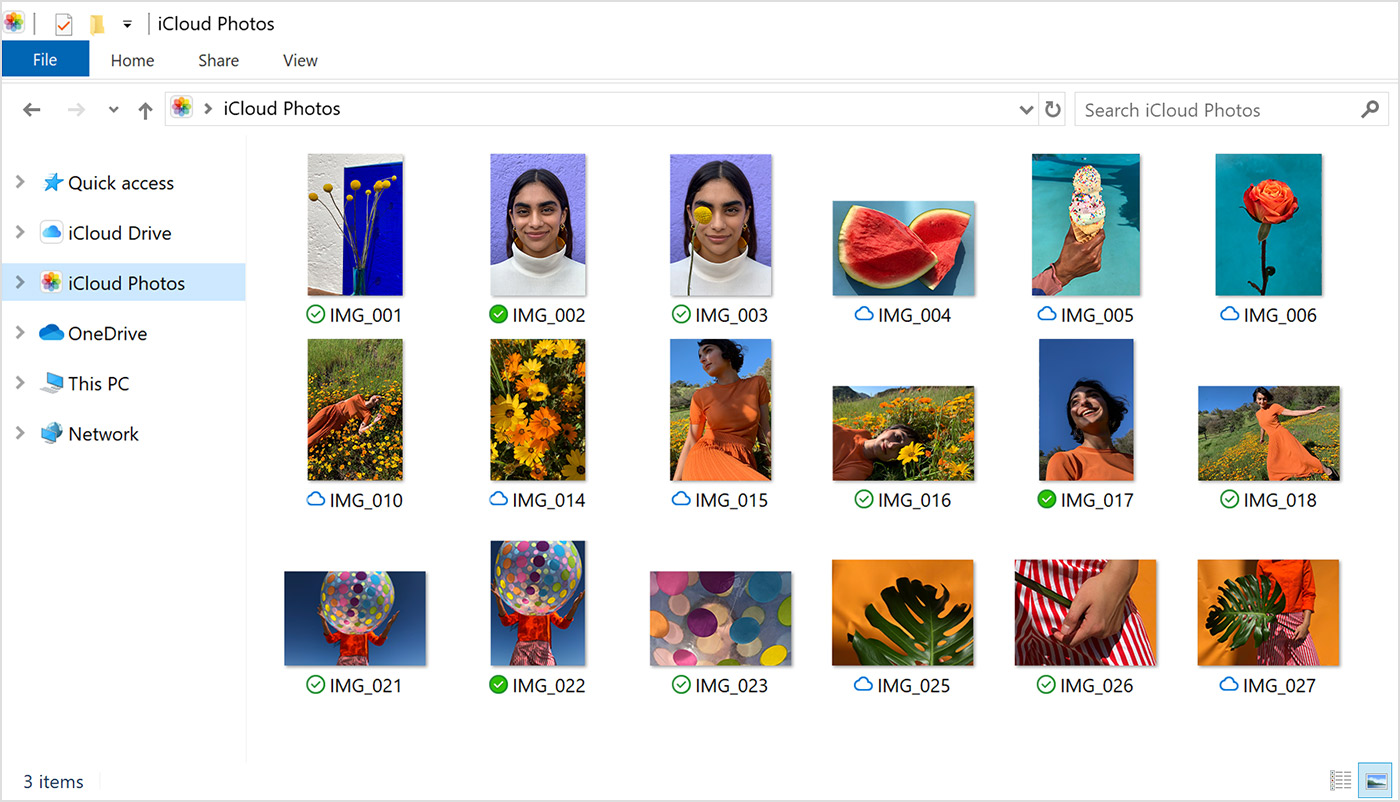
Share your photos
You can also share your photos. Shared Albums lets you view, share, and comment on the photos and videos you share with other people. And if you use the latest version of iCloud for Windows, you can pin photos to keep them local to your device. When you unpin them, they upload to iCloud instead.
See your files and folders with iCloud Drive
When you turn on iCloud Drive, iCloud for Windows creates an iCloud Drive folder in File Explorer. You can find documents that you’ve stored in iCloud in this folder. When you create a file on your PC and save it to the iCloud Drive folder, it also appears on your other devices.
If you want to work on files with friends or colleagues, you can share individual files or create a shared folder to share a group of files. You can also pin files and folders so you can use them offline, and easily check the status of a download or shared file. In iCloud for Windows 12, you can find and recover files deleted from iCloud Drive in the past 30 days in Recently Deleted in iOS, iPadOS, or iCloud.com, in Trash in macOS, and in Recycle Bin in Windows. If you use Delete or Delete All in Recently Deleted or empty the Trash in macOS, files aren’t recoverable. If you don’t see the files you wish to restore, you can recover files deleted within the last 30 days at iCloud.com.
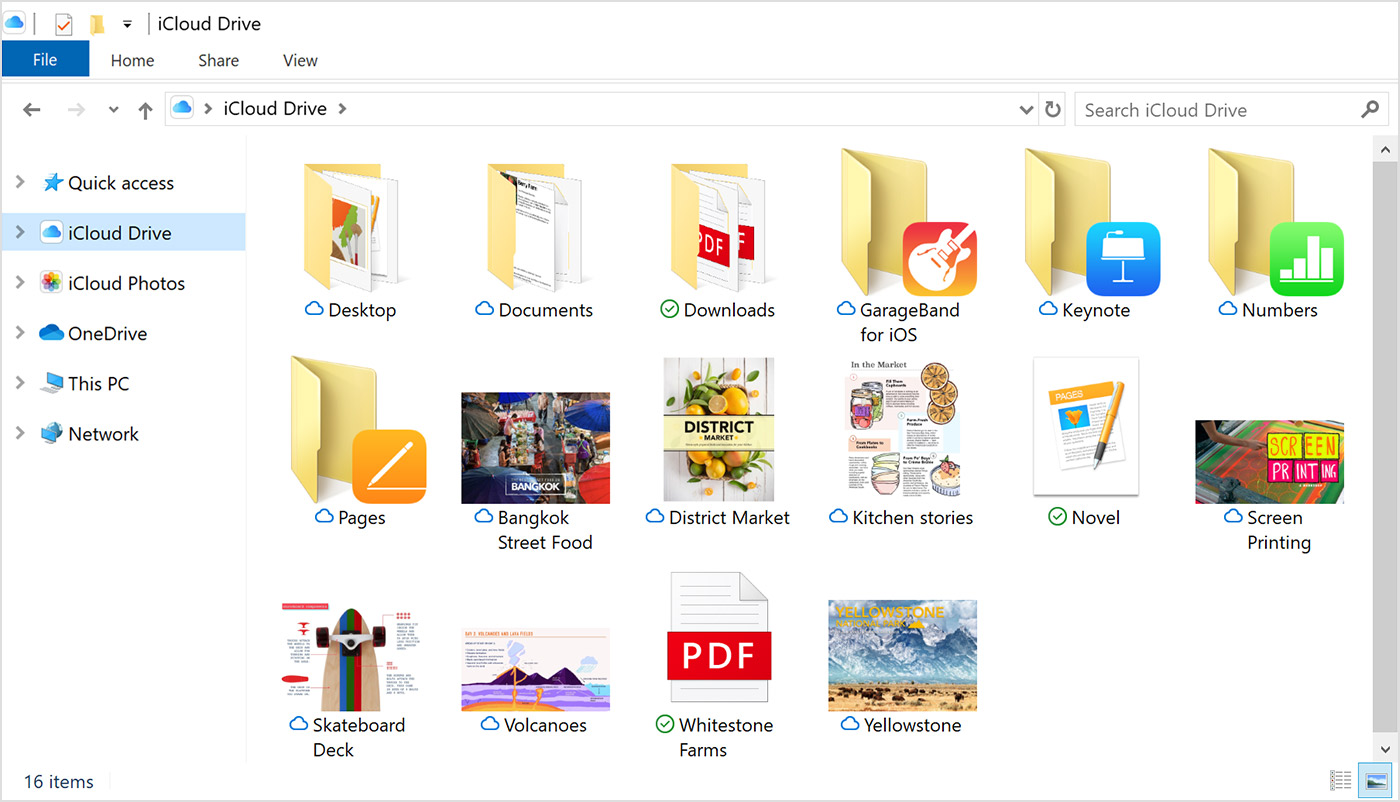
You can also access your iCloud Drive files and folders at iCloud.com.
If you receive an error when you try to move a file from iCloud for Windows, you might need to download the file to your Windows PC. After you download the file, try moving it again.
Keep your apps up to date
When you use iCloud on all of your devices, you can keep your Mail, Contacts, Calendars, and Tasks* updated no matter which device you’re using. Just make sure iCloud is set up on your PC, iPhone, iPad, iPod touch, or Mac using the steps below.
* On a Mac or iOS device, you see Reminders instead of Tasks.
On your PC
- Open iCloud for Windows.
- Select Mail, Contacts, Calendars, and Tasks then click Apply.
- You’ll see your iCloud Mail account in the folder pane on the left side of Microsoft Outlook 2007 through Outlook 2016.
If you sign in to iCloud using a third-party Mail app outside of iCloud for Windows, learn how to create an app-specific password to keep information up to date on your devices.
How to Jailbreak iOS Device on My Windows
Before you bypass the iCloud activation lock, you need to jailbreak the iOS device. Because there is no jailbreak tool for Windows system, you can follow this tutorial to create a jailbreak environment on a Windows computer and then jailbreak your iOS device.
Note:If you have a Mac (for macOS 10.13-10.15), it’s suggested that jailbreaking your iOS device would be a better choice.
A Video Tutorial: How to Jailbreak on Windows
What Should You Prepare Before Jailbreaking?
Here is a need-to-do list before you jailbreak the iOS device on Windows.
- Make sure your computer runs Windows 7 or later, 32 or 64 bit.
- Get a USB flash drive with more than 2 GB capacity.
- Download checkn1x-1.0.6-amd64.iso.
- Download rufus-3.1.1.exe.
Step-by-Step Guide on How to Jailbreak on Windows
Step 1. Burn the checkn1x ISO file to the USB flash drive
- Insert the USB flash drive into your computer.
- After downloading the file Rufus, click Rufus to open the application.
Click the “SELECT” button to find the downloaded checkn1x ISO file. Leave the other options as defaults, and then click “START”.

Then a warning message pops up saying the data on your USB flash drive will be formatted(If necessary, please back up your USB flash drive). Then select the «Write in DD Image Mode» option, and then click OK.
It takes 2 or 3 minutes to burn checkn1x ISO file to USB flash drive.
When the burning process is completed, click the «CLOSE» button.
Note: When the checkN1x ISO file is burned, please unplug and reinsert the USB flash driver into your computer in case the system doesn’t recognize it.
Step 2. Start to Jailbreak with checkN1x
- Restart your computer. When the computer is powered on and loaded in the meanwhile, press F12 (Boot Menu).
Note:For most branded computers, the shortcut key to «Boot Menu» is F12. If F12 is invalid, refer to the following «Boot Menu» shortcuts
| Boot Menu Key | Desktop Brand | Laptop Brand | Motherboard Brand |
|---|---|---|---|
| ESC | Dell | ASUS, Sony | MAXSUN, UNIKA, SUPOX, Spark, SOYO, EPOX, UNIKA, Jetway, J&W, Colorful, ECS, SOYO, FOXCONN |
| F8 | ASUS, BenQ | ASUS, YESTON, J&W | |
| F9 | HP, BenQ | BIOSTAR, GUANMING | |
| F10 | ASL | ||
| F11 | MSI | MSI, ASRock, ONDA, Colorful,ECS, Gamen, Topstar | |
| F12 | Lenovo, HP, Acer, Hasee, eFound, THTF, Haier | Thinkpad, Dell, Lenovo, TOSHIBA, Samsung, IBM, Acer, Hasee, Haier,eFound, THTF, GIGABYTE, Gateway, eMachines | GIGABYTE, Intel, Cthim, SOYO, FOXCONN, Gamen, Topstar |
Note:If your computer is unable to enter the «Boot Menu», try entering the COMPUTER BIOS/UEFI and modify the system Boot entry Settings to enter the Linux CheckRA1n environment. For detailed guide, please check the following:
In the startup window, select the USB flash drive that just burned the checkn1x ISO file.
After you’ve launched the Checkra1n, connect your iOS device to the computer. Then select the Options from the keyboard arrow key and press Enter to set the jailbreak tool.
From the Settings screen, select Allow Untested iOS/iPadOS/tvOS versions option from the keyboard arrow key, and press Enter to select it.
After selecting «Skip A11 BPR check», press Enter to select.
Note 1: If you have an iPhone 8/8 Plus/ X with iOS 14 system, you need to tick «Skip A11 BPR check» option .
Note 2: You could not jailbreak an iPhone 8/8 Plus/ X running iOS 14(with lock screen passcode). If with lock screen passcode, please have a deep flash of the firmware firstly, and try to jailbreak again.
Then choose the Back button and press Enter to back to the main interface.
After you hit the Start button, press Enter to jailbreak your iOS device.
After the checkn1x tool is initiated, connect your iOS device to the computer, and you will see a connected reminder in the program. The select the Start option from arrow keys the on your keyboard and press the enter key.
To jailbreak your iOS device, CheckN1x requires your device be in DFU mode. Select «Next» and the program will direct you to DFU mode.
Check the «Next» option and Checkn1x will automatically put your iOS device into recovery mode first.
Select the «Start» option, and then follow the instructions on Checkn1x to put your iOS device into DFU mode.
After your device enters DFU mode successfully, Checkn1x will automatically jailbreak your device. When the jailbreaking process is completed, select «Done» and unplug the USB flash drive.
Tip #1: If the jailbreaking process gets stuck:
- Change a different USB flash drive and try to jailbreak again.
- Restart your iOS device and computer and try to jailbreak again.
Tip #2: If jailbreak failed:
Re-plug your device into the USB port on the back of your computer host and try again.
Tip #3: Notes for iPhone 8/8 Plus/ X devices with iOS 14 system:
For Phone 8/8 Plus/ X with iOS 14 system before jailbreaking, they should be in inactive and without any lock screen passcode.
Remove iCoud Activation Lock On iOS Device
After your device is jailbroken successfully, restart the computer, and your computer will automatically enter the Windows operating system. Please use Tenorshare 4MeKey to remove the activation lock of the iOS device. Here comes the Tenorshare 4MeKey Remove iCloud Activation Lock Tutorial.
Xcode for Windows: Develop iOS Apps on PC
Written by Reinder de Vries on February 28 2020 in App Development

How can you run Xcode on Windows and develop iOS apps with a Windows PC? The short answer is: you can’t! You’ve got a few alternatives to get around that, however. In this tutorial, we’ll discuss how you can install Xcode on Windows to build iOS apps.
Here’s what we’ll get into:
- Rent a Mac in the cloud (starting at $20/mo)
- Run and compile Swift directly on Windows/Linux
- Learning to code with a Swift Sandbox
- Build your own “Hackintosh” by installing macOS on a PC
- Run Xcode on Windows by installing macOS on a virtual machine
- Develop iOS apps on Windows with cross-platform tools
- Get your hands on a second-hand Mac (starting at $300)
Xcode for Windows: What & Why
Xcode contains everything you need to build iOS apps, and it only runs on macOS!
That’s when the problems start. You want to make an iOS app with your Windows PC, but you can’t buy a PC or laptop with macOS pre-installed on it. Unlike Windows, Apple doesn’t license its operating system to other computer manufacturers. You can only use macOS on a Mac.
In fact, when you obtain a license to use macOS, which happens when you purchase a Mac computer, you have to agree to only run the operating system on Apple hardware. This effectively limits you to only develop apps on a Mac.
“It’s more fun to be a pirate than to join the navy.”
— Steve Jobs (1983)
But… it’s more fun to be a pirate, than to join the navy, right? Let’s discuss a few alternatives that’ll let you run Xcode on Windows and develop iOS apps on a Windows PC!
Rent a Mac in the Cloud
An even easier way to get your hands on macOS, albeit more expensive, is to rent a Mac “in the Cloud”. You can work with Xcode on Windows with this approach, because you’re essentially connected to a Mac that’s elsewhere.
Here’s how that works:
- Someone connects a bunch of Mac’s to the internet
- You sign in on one of those Macs via a Remote Desktop Connection (RDP)
- Done! You can use this Mac from Windows/Linux and build iOS apps
Services like MacinCloud and MacStadium offer affordable rent-a-Mac products, usually paid on a monthly basis. Prices typically start at $20/month and you can choose from several hardware options, including Mac Mini and Mac Pro.
| Starting at | Type | |
|---|---|---|
| MacinCloud | $20/month | Dedicated, Virtual, Server |
| MacStadium | $79/month | Dedicated, Enterprise |
| virtualmacosx.com | $9.75/month | Shared (timesharing) |
| Mac Cloud | $49/month | Virtual |
| Flow | Premium | Dedicated, Enterprise |
| HostMyApple | $25/month | Virtual, Dedicated |
You connect to those cloud-based Macs via a Remote Desktop Connection (RDP). Windows includes a stock Remote Desktop Client you can use, and so do most Linux operating systems. Once you’re logged on, you can launch Xcode, and start building your iOS app. That way you’re effectively running Xcode on your Windows PC!
Cloud-based Macs usually come in 3 flavours:
- A dedicated Mac, which means you get access to a physical Mac located in a data center, as if you bought a Mac in the Apple Store and put it on your desk.
- A virtual Mac, which means you get access to a virtual Mac in a data center, much like the VirtualBox solution mentioned earlier. Your Mac won’t run on Apple hardware, but it will run macOS.
- A Mac Build Server, which is a specialized kind of Mac that can be used to compile iOS apps. You’ll create those apps on your Mac, and then instruct the Build Server to compile the app for you.
A dedicated Mac is the most convenient, and the most powerful option. A virtual Mac is OK too, but it typically does not perform as well as a physical Mac computer.
Running Xcode via a Mac in the cloud has a drawback: you can’t easily connect your iPhone to Xcode via USB! With Xcode on your local Mac you can run and debug your app on your own iPhone, via the USB/Lightning cable. This obviously won’t work when your Mac is in the cloud…
Don’t worry! There are plenty of solutions for that:
- A simple approach is to run your app on iPhone Simulator, right from within Xcode. You can launch iPhone Simulator in Xcode, and debug your app with it. This is perfect for the development phase of your project.
- An alternative solution are tools like Flexihub, NoMachine and USB Network Gate. They only work with dedicated Mac hardware, and you need to have a dedicated IP address.
- Install your iOS app on your iPhone via TestFlight, and debug it with a tool like Bugsnag. You can monitor and debug live crashes in your app.
An interesting use case for renting a Mac in the cloud comes from the latest developments in Apple’s hardware. Many designers, developers and desktop-publishers have voiced their concerns over Apple hardware lagging behind, offering low-spec computers for a fairly high price.
If you don’t want to take your $3.000 MacBook Pro with you in a coffee shop, or on your next trip to Thailand, why not purchase a low-end Windows or Linux laptop, and connect to your Mac in the cloud? You can either host it at home yourself, co-locate it in a data center, or rent a dedicated cloud-based Mac.
Do you want to learn how to code iOS apps, but don’t want to invest money in a Mac? Rent a Mac in the cloud for the duration of the iOS development course you’re taking! It’s a great way to bootstrap learning iOS development, and you can always buy your own Mac later.

Learn how to code iOS apps
Get started with Xcode and Swift
Ready to get started with iOS development? Learn how to code iOS apps with Xcode and Swift with our immersive iOS development course. Works both on Mac and PC!


