- Руководство: SSH в Терминале Windows Tutorial: SSH in Windows Terminal
- Создание профиля Create a profile
- Указание начального каталога Specify starting directory
- How to login into Ubuntu using SSH from Windows 10/8/7?
- How do I SSH into Ubuntu from Windows?
- Step 1: OpenSSH-server on Ubuntu Linux machine
- Step 2: Enable the SSH server service
- Step 3: Check the SSH status
- Step 4: Download the Putty on Windows 10/9/7
- Step 5: Install Putty SSH client on Windows
- Step 6: Run and configure Putty
- Step 7: Login to Ubuntu server via Putty SSH client
- How To Use SSH Keys on Windows Clients (with PuTTY)
- Step 1: Download and Install PuTTY, PuTTYgen and Pageant
- Step 2: Generate the OpenSSH-compatible Keys with PuTTYgen
- Step 3: Save The Public Key On The Server
- Step 4: Create a PuTTY Profile to Save Your Server’s Settings
- Step 5 (Optional): Disable the Password for Root Login via SSH
- Using SSH on Windows
- Installing OpenSSH On Windows 10
- Using SSH on Windows 10 To Connect To A Server
- Using SSH On Windows 10 With Secure Shell App On Chrome
Руководство: SSH в Терминале Windows Tutorial: SSH in Windows Terminal
В Windows 10 встроен клиент SSH, который можно использовать в Терминале Windows. Windows 10 has a built-in SSH client that you can use in Windows Terminal.
В этом руководстве содержатся сведения о настройке профиля в Терминале Windows, использующем SSH. In this tutorial, you’ll learn how to set up a profile in Windows Terminal that uses SSH.
Создание профиля Create a profile
Вы можете запустить сеанс SSH в командной строке, выполнив ssh user@machine . После этого вам будет предложено ввести пароль. You can start an SSH session in your command prompt by executing ssh user@machine and you will be prompted to enter your password. Вы можете создать профиль Терминала Windows, выполняющий этот процесс при запуске, добавив параметр commandline в профиль в файле settings.json file. You can create a Windows Terminal profile that does this on startup by adding the commandline setting to a profile in your settings.json file.
Указание начального каталога Specify starting directory
Чтобы указать начальный каталог для сеанса SSH, вызываемого с помощью Терминала Windows, можно использовать следующую команду: To specify the starting directory for a ssh session invoked by Windows Terminal, you can use this command:
Флаг -t приводит к выделению псевдотерминала. The -t flag forces pseudo-terminal allocation. Эту возможность можно использовать для выполнения произвольных интерактивных программ на удаленном компьютере, например при реализации служб меню. This can be used to execute arbitrary screen-based programs on a remote machine, e.g. when implementing menu services. Вам потребуется использовать экранированные двойные кавычки, так как производные оболочки Bourne shell не выполняют дополнительную обработку строки в одинарных кавычках. You will need to use escaped double quotes as bourne shell derivatives don’t do any additional parsing for a string in single quotes.
Дополнительная информация: For more information, see:
How to login into Ubuntu using SSH from Windows 10/8/7?
SSH which is a Secure shell protocol allows the users to connect the Unix and Linux based operating systems running on servers or desktops remotely. We can run all commands on remote servers like Ubuntu, Debian, Centos, RedHat etc. using the lightweight piece of SSH software. To know more about it see our article: What is SSH (Secure Shell)?
Well, running SSH on Linux using SSH server to connect and login some other Linux system is pretty easy but how to do it between Ubuntu (Linux) and Windows 10/8/7. In this article, we focus on this and let you know the simple way to SSH into Ubuntu from Windows 10.
Note: This method will be the same for Ubuntu 18.04,170.4, 16.04, 14,04… to log in using Windows 7, Windows 8 or Windows 10.
How do I SSH into Ubuntu from Windows?
Step 1: OpenSSH-server on Ubuntu Linux machine
To connect & login the Ubuntu using the SSH first of all we need to install the same on Ubuntu. For this purpose use the command:
Step 2: Enable the SSH server service
After installing the SSH server, enable it on Ubuntu by using the command:
Step 3: Check the SSH status
Once you enabled the SSH service, its time to check whether it is running in the background or not. Use this command:
If you output for above command is * sshd is running then everything is fine and move to the next step.
Step 4: Download the Putty on Windows 10/9/7
To connect or log in the Ubuntu via SSH, we need an SSH client for Windows. The Putty is a free and easy way to login Ubuntu and other Linux servers remotely from Windows using SSH. However, there are numbers of other free SSH clients available online those ones can be used too. Here is the Putty Download Link.
Step 5: Install Putty SSH client on Windows
We can install the Putty.exe downloaded file just like any other software with few clicks. There is no special configuration or setup. Double click on it and follow the guided steps.
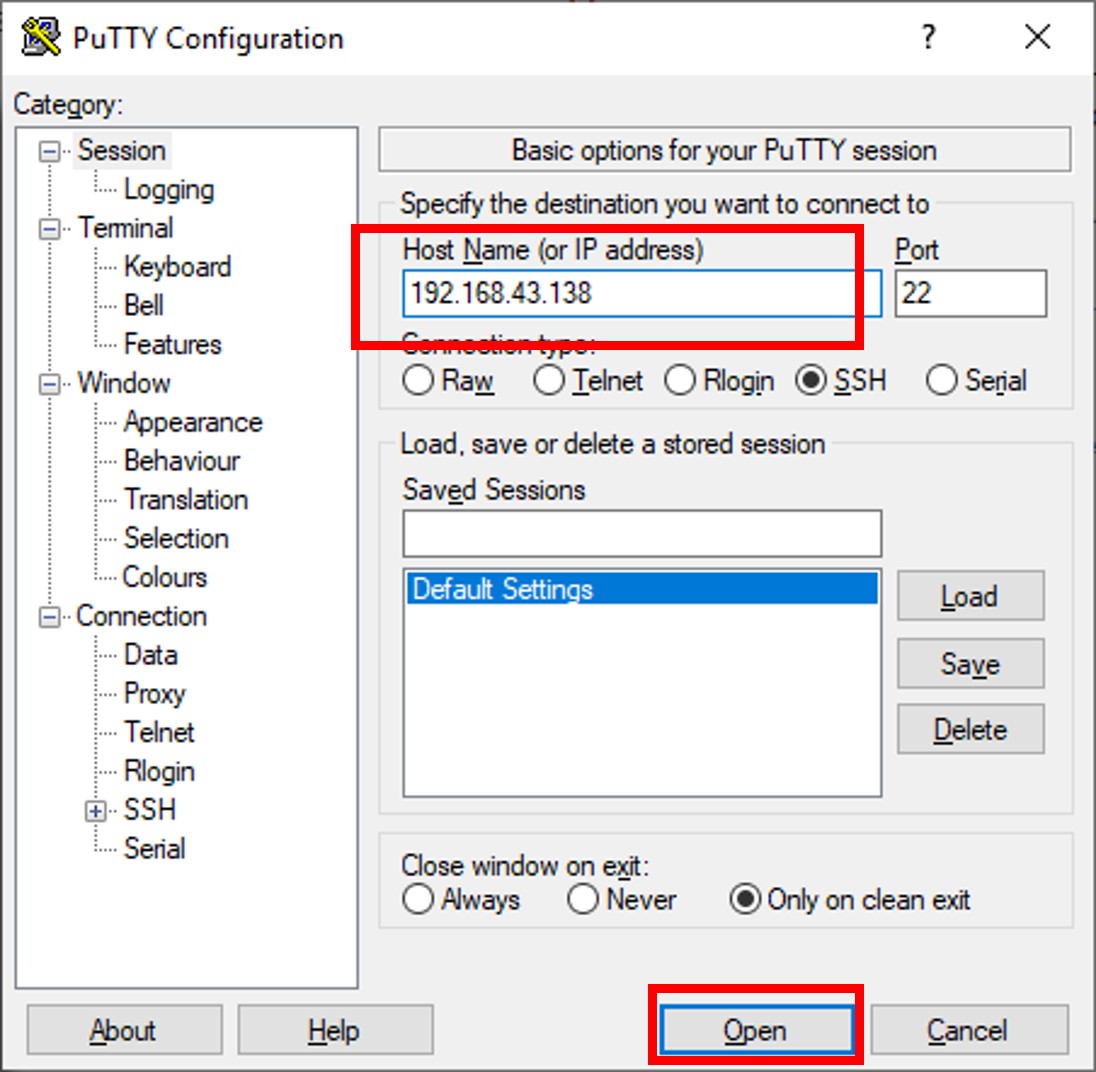
Step 6: Run and configure Putty
As we open the Putty, the first screen will be something like shown in the below screen. Now in the Host Name (or IP address) box type the Ip address of the remote Ubuntu server which you want to connect using the SSH protocol.
After adding the right IP address just click on the Open button.
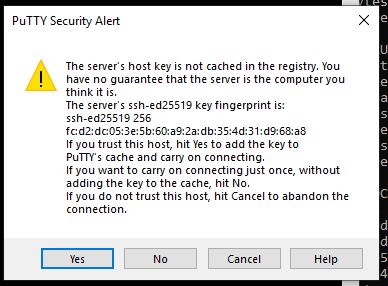
Step 7: Login to Ubuntu server via Putty SSH client
As we click on the Open button, the putty will ask whether you trust the server you about to connect or not, click on YES button.
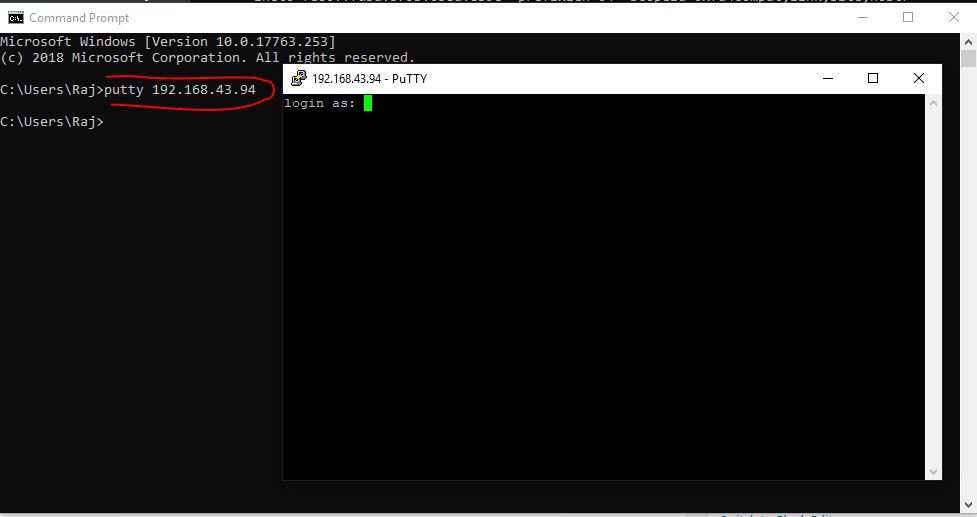
The black colour command terminal window of the Putty will appear along with login as: text. Enter the username and password of the remote server you want to login. That’s it.

You can also use the command prompt to use the SSH after installing the Putty. Go to Command prompt or PowerShell on Windows 10 and type: putty [ipaddres] and hit the enter button.
For example– putty 192.168.43.94
In this way, we can connect and login remote Ubuntu server or any other Linux or Unix machine over SSH from Windows 10/8/7.
Other Resources to read:
How To Use SSH Keys on Windows Clients (with PuTTY)
Using encrypted keys for authentication offers two main benefits. Firstly, it is convenient as you no longer need to enter a password (unless you encrypt your keys with password protection) if you use public/private keys. Secondly, once public/private key pair authentication has been set up on the server, you can disable password authentication completely meaning that without an authorized key you can’t gain access — so no more password cracking attempts.
It’s a relatively simple process to create a public/private key pair and install them for use on your ssh server.
Step 1: Download and Install PuTTY, PuTTYgen and Pageant
To get started, we’ll need to download and install both PuTTY (putty.exe), PuTTYgen (puttygen.exe) and Pageant (pageant.exe). You can find links to each of these at the project’s website. However, the easiest way to get both of the necessary programs is by downloading and installing the full .msi package, as pictured below:

Step 2: Generate the OpenSSH-compatible Keys with PuTTYgen
- Start the PuTTYgen utility, by double-clicking on its .exe file or pressing the Windows key and searching for PuTTYgen
- For Type of key to generate, select SSH-2 RSA
- In the Number of bits in a generated key field, specify either 2048 or 4096 (increasing the bits makes it harder to crack the key by brute-force methods)
- Click the Generate button
- Move your mouse pointer around in the blank area of the Key section, below the progress bar (to generate some randomness) until the progress bar is full
- A private/ public key pair has now been generated
- In the Key comment field, enter any comment you’d like, to help you identify this key pair, later (e.g. your e-mail address; home; office; etc.) — the key comment is particularly useful in the event you end up creating more than one key pair
- Optional: Type a passphrase in the Key passphrase field & re-type the same passphrase in the Confirm passphrase field (if you would like to use your keys for automated processes, however, you should notcreate a passphrase)
- Click the Save public key button & choose whatever filename you’d like (some users create a folder in their computer named my_keys)
- Click the Save private key button & choose whatever filename you’d like (you can save it in the same location as the public key, but it should be a location that only you can access and that you will NOT lose! If you lose your keys and have disabled username/password logins, you will no longer be able log in!)
- Right-click in the text field labeled Public key for pasting into OpenSSH authorized_keys file and choose Select All
- Right-click again in the same text field and choose Copy
NOTE: PuTTY and OpenSSH use different formats for public SSH keys. If the SSH Key you copied starts with «—- BEGIN SSH2 PUBLIC KEY . «, it is in the wrong format. Be sure to follow the instructions carefully. Your key should start with «ssh-rsa AAAA . «
Step 3: Save The Public Key On The Server
Now, you need log into your server via SSH as you normally would using PuTTY and paste the copied public key in the file
/.ssh/authorized_keys on your server.
If your SSH folder does not yet exist, create it manually:
Paste the SSH public key into your
/.ssh/authorized_keys file using the command-line text editor of your choice and save it.
Step 4: Create a PuTTY Profile to Save Your Server’s Settings
In PuTTY, you can create (and save) profiles for connections to your various SSH servers, so you don’t have to remember, and continually re-type, redundant information.
- Start PuTTY by double-clicking its executable file or pressing the Windows key and searching for PuTTY
- PuTTY’s initial window is the Session Category (navigate PuTTY’s various categories, along the left-hand side of the window)
- In the Host Name field, enter the IP address of your server
- Enter the port number in the Port field
- Select SSH under Protocol;
- Along the left-hand side of the window, select the Data sub-category, under Connection;
- Specify the username that you plan on using, when logging in to the SSH server, and whose profile you’re saving, in the Auto-login username field;
- Expand the SSH sub-category, under Connection;
- Highlight the Auth sub-category and click the Browse button, on the right-hand side of the PuTTY window;
- Browse your file system and select your previously-created private key;
- Return to the Session Category and enter a name for this profile in theSaved Sessions field, e.g. user@12.34.56.78 or user@hostname;
- Click the Save button for the Load, Save or Delete a stored session
Now you can log in to user@12.34.56.78 and you will not be prompted for a password. However, if you had set a passphrase on your public key, you will be asked to enter the passphrase at that time (and every time you log in, in the future).
Step 5 (Optional): Disable the Password for Root Login via SSH
Once you have copied your SSH keys unto your server and ensured that you can log in with the SSH keys alone, you can restrict the root login to only be permitted via SSH keys.
In order to do this, open up the /etc/ssh/sshd_config file:
Within that file, find the line that includes PermitRootLogin and modify it to ensure that users can only connect with their SSH key:
Alternatively, if you have configured sudo on your server and are configuring SSH keys for a sudo user, you can disable direct root access altogether:
Using SSH on Windows
Updated Thursday, February 25, 2021 , by Linode


It is common for software developers to work on multiple projects that require them to access different systems. Using SSH on Windows allows developers to connect to multiple machines remotely right from their terminal.
In this tutorial, you will learn how to use SSH on Windows 10 and older versions.
Installing OpenSSH On Windows 10
As of late 2018, OpenSSH is included with some versions of Windows. If this has been pre-installed, you can skip to the section on Using SSH on Windows 10. If unavailable, you can install OpenSSH using the following steps:
Enter the Settings menu. This can be found by typing “Settings” in the Windows search bar, and clicking on the settings application.
Next, select Apps. Click on Optional Features or Manage optional features from the menu that appears.


Click on Add a feature. A dropdown menu will appear. Select the OpenSSH client, followed by the Install button.


Using SSH on Windows 10 is similar to using it on other operating systems like Linux or Mac OSX, and can be accessed in the command prompt.
Using SSH on Windows 10 To Connect To A Server
All SSH commands are entered in the windows command prompt. The command prompt application can be opened by searching for the term “command prompt” in the windows search bar.
To connect with an SSH server, use the following syntax
If you want to connect with an SSH server at the domain “ssh.linode.com” with a username of “linode” for example, enter the following command:
When this command is entered, the SSH client will try to connect to ssh.linode.com on the standard TCP port 22 by default. If your SSH server is hosted on a different port, this port will need to be specified as part of the SSH command. You can modify the previous command and define the TCP port you need to connect to with the following syntax:
If the TCP port you want to connect with is “2222” for example, you can modify the previous command to:
When you connect with a server for the first time, the SSH client will prompt you to check and verify the host’s key fingerprint. When you execute the ssh command, you will see the following output:
Accept the prompt, and the ssh connection will be approved and established.
Using SSH On Windows 10 With Secure Shell App On Chrome
Secure shell is a Chrome application that allows you to execute ssh commands on the Chrome browser. This HTML based SSH client runs on Javascript. To use it, go to the Secure Shell Extension page on the Google chrome store and click Add to Chrome to install. Review and accept the required permission at the prompt, and select Add App to confirm the installation.

Once installed, you are automatically taken to your homepage on Google Chrome. If for some reason Google Chrome fails to redirect you, enter chrome://apps/ as the url into the chrome browser.
You should see Secure Shell App:


