- How To Install and Use Telnet Client In Linux and Windows
- Install
- Ubuntu, Debian, Mint, Kali
- Fedora, CentOS, RHEL
- Windows
- Security
- Connect Telnet Server
- Connect Different Telnet Port
- Specify Login Name
- Interactive Shell
- Как пользоваться telnet
- Что такое Telnet?
- Как пользоваться telnet?
- 1. Доступность сервера
- 2. Проверка порта
- 3. Отладка
- 4. Консоль telnet
- 5. Посмотреть сайт telnet
- 6. Удаленное управление telnet
- Выводы
- How to install and use telnet command in Linux(RedHat/CentOS 7/8) Using 5 Easy Steps
- Install and Use Telnet Command in Linux
- Step 1: Prerequisites
- Step 2: Update Your System
- Step 3: Install Telnet Command
- Step 4: Verify Package Installation
- Step 5: Test Telnet Command
- Linux telnet command
- Description
- Syntax
- Options
- Protocol
- Commands
- Environment
- Files
- Examples
How To Install and Use Telnet Client In Linux and Windows
Telnet is easiest remote management protocol used in Computer networks. It remains popular even today because of its simplicity. Telnet is a client server protocol where clients uses telnet tool which to connect remote telnet server. This telnet server may be switch, router, windows operating system, linux server or a printer. In this tutorial we will look how to install and enable telnet with some usage examples.
Install
Ubuntu, Debian, Mint, Kali
We can install telnet package with the following command in deb based Linux distributions.
Fedora, CentOS, RHEL
We can install telnet package with yum command for rpm based distributions like Fedora, centOS and RHEL.
Windows
As windows operating system do not have online package manager telnet is provided by inline. By defualt telnet server and client applications are not enabled. We will enable the client where server can be enabled too. Follow these instructions.
- Click Start >Control Panel.
- Click Programs and Features.
- Click Turn Windows features on or off.
- In the Windows Features dialog box, check the Telnet Client check box.
 Windows
Security
As telnet is old fashion protocol it provides some defects. One of the most important negative issue with telnet is its security features. Telnet do not have any encryption support as builtin. So telnet traffic can be easily eavesdropped during transmission. So do not rely telnet on insecure networks.
Connect Telnet Server
We will start by simply connecting a telnet server. The simplest form is just providing the host name or IP address of the telnet server. The syntax is like below. In this example telnet server is a Ubuntu 17.10 .
 Connect Telnet Server
Connect Different Telnet Port
The default port for telnet is TCP 23 . By default it is not specified during connection. But in some cases telnet server may use different then 23. We can specify the port number by adding after the host name or IP address. In this example we will connect port number 2323 .
Specify Login Name
Most cases telnet servers requires authentication. In order to authenticate ourself we need to provide some user name and password. The regular usage is providing username and then put password interactively. We will use -l which stands for login.
Interactive Shell
Telnet provides interactive shell where it provides its own environment. We can enter interactive shell just putting telnet command.
We can get help for interactive shell with help command. We can see that we will use open command and the hostname or IP address to connect telnet server.
 help
help
We will connect to the localhost telnet server.
 Open Connection
Источник
Как пользоваться telnet
Telnet — это сетевая утилита, которая позволяет соединиться с удаленным портом любого компьютера и установить интерактивный канал связи, например, для передачи команд или получения информации. Можно сказать, что это универсальный браузер в терминале, который умеет работать со множеством сетевых протоколов.
Эта утилита очень часто использовалась раньше, для удаленного управления компьютером с Linux, но потом ей на замену пришел защищенный протокол SSH. Но telnet все еще используется, например, для тестирования сети, проверки портов, а также для взаимодействия с различными IoT устройствами и роутерами. В этой статье мы рассмотрим что такое telnet, а также как пользоваться telnet для решения своих задач.
Что такое Telnet?
Как я уже сказал, эта утилита предназначена для создания интерактивного соединения между удаленными компьютерами. Она работает по протоколу TELNET, но этот протокол поддерживается многими сервисами, поэтому ее можно использовать для управления ими. Протокол работает на основе TCP, и позволяет передавать обычные строковые команды на другое устройство. Он может использоваться не только для ручного управления но и для взаимодействия между процессами.
Для работы с этим протоколом мы будем использовать утилиту telnet, ею очень просто пользоваться. Давайте рассмотрим синтаксис telnet:
$ telnet опции хост порт
Хост — это домен удаленного компьютера, к которому следует подключиться, а порт — порт на этом компьютере. А теперь давайте рассмотрим основные опции:
- -4 — принудительно использовать адреса ipv4;
- -6 — принудительно использовать адреса ipv6;
- -8 — использовать 8-битную кодировку, например, Unicode;
- -E — отключить поддержку Escape последовательностей;
- -a — автоматический вход, берет имя пользователя из переменной окружения USER;
- -b — использовать локальный сокет;
- -d — включить режим отладки;
- -р — режим эмуляции rlogin;
- -e — задать символ начала Escape последовательности;
- -l — пользователь для авторизации на удаленной машине.
Это все, что касается команды telnet для установки соединения. Но соединение с удаленным хостом, это только полдела. После установки подключения telnet может работать в двух режимах:
- Построчный — это предпочтительный режим, здесь строка текста редактируется на локальном компьютере и отправляется только тогда, когда она будет полностью готова. На такая возможность есть не всегда и не у всех сервисов;
- Посимвольный — все набираемые вами символы отправляются на удаленный сервер. Тут будет сложно что-либо исправить, если вы допустили ошибку, потому что Backspace тоже будет отправляться в виде символа и стрелки движения тоже.
Использование telnet заключается в передаче специальных команд. У каждого сервиса свои команды, но у протокола есть свои команды telnet, которые можно применять в консоли telnet.
- CLOSE — закрыть соединение с сервером;
- ENCRYPT — шифровать все передаваемые данные;
- LOGOUT — выйти и закрыть соединение;
- MODE — переключить режим, со строчного на символьный или с символьного на строчный;
- STATUS — посмотреть статус соединения;
- SEND — отправить один из специальных символов telnet;
- SET — установить значение параметра;
- OPEN — установить подключение через telnet с удаленным узлом;
- DISPLAY — отобразить используемые спецсимволы;
- SLC — изменить используемые спецсимволы.
Мы не будем рассматривать все команды, поскольку они вам вряд ли понадобятся, а если и понадобятся, то вы легко сможете их найти в официальной документации.
Как пользоваться telnet?
Дальше мы рассмотрим как использовать telnet для решения ваших задач. Обычно, утилита уже установлена в большинстве систем, но если это не так, то вы можете установить telnet из официальных репозиториев, например, в Ubuntu:
sudo apt install telnet
Теперь перейдем к применению утилиты. Изначально она использовалась для удаленного управления компьютером, но поскольку потом был разработан более безопасный протокол SSH, использовать ее перестали.
1. Доступность сервера
Утилита все еще может быть полезной при поверке доступности узла, для этого просто передайте ей ip адрес или имя хоста:

Для этого не обязательно применять telnet, есть ping.
2. Проверка порта
C помощью telnet мы можем проверить доступность порта на узле, а это уже может быть очень полезным. Чтобы проверить порт telnet выполните:
telnet localhost 123
$ telnet localhost 22
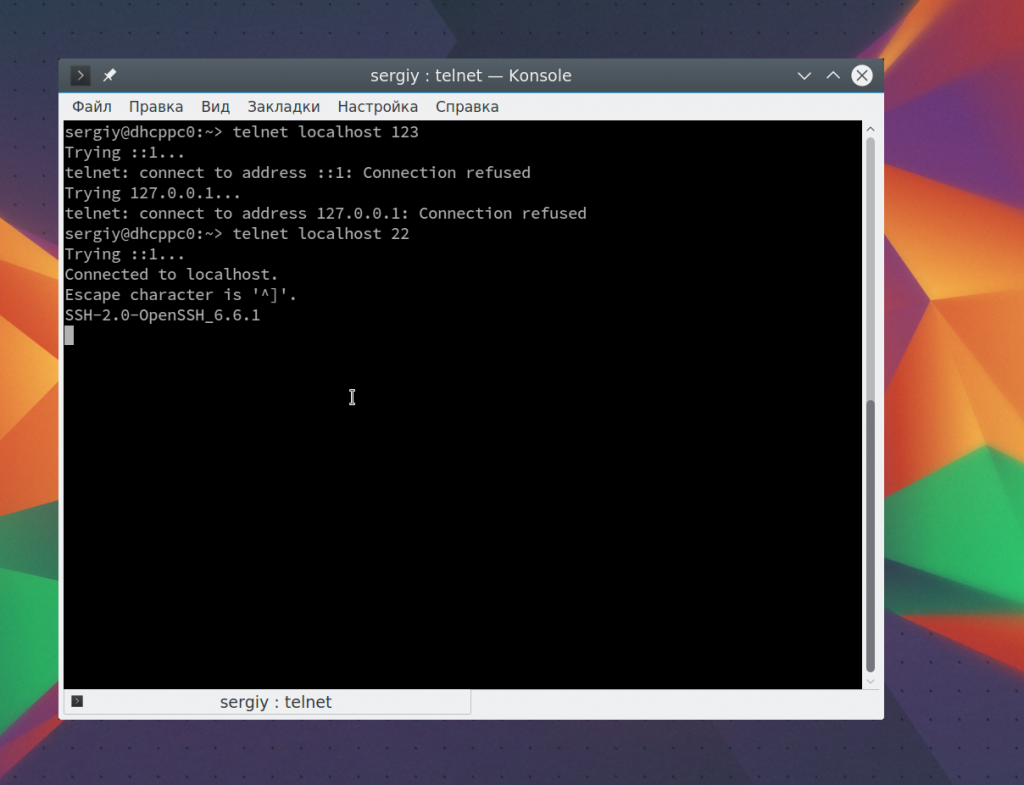
В первом случае мы видим, что соединение никто не принимает, во втором же выводится сообщение об успешном подключении и приветствие SSH сервера.
3. Отладка
Чтобы включить режим отладки и выводить более подробную информацию во время работы используйте опцию -d во время подключения:
sudo telnet -d localhost 22
4. Консоль telnet
Использование консоли telnet тоже важный момент в разборе как пользоваться telnet. В основном режиме вы можете выполнять команды, на удаленном сервере, если же вы хотите адресовать команду именно telnet, например, для настройки ее работы, необходимо использовать спецсимвол для открытия консоли, обычно утилита сразу говорит вам что это за символ, например, по умолчанию используется «^[«:
Для его активации вам нужно нажать сочетание клавиш Ctrl+[, затем вы уведите приглашение ввода telnet.
Чтобы посмотреть все доступные команды, вы можете набрать ?. Например, вы можете посмотреть статус подключения:
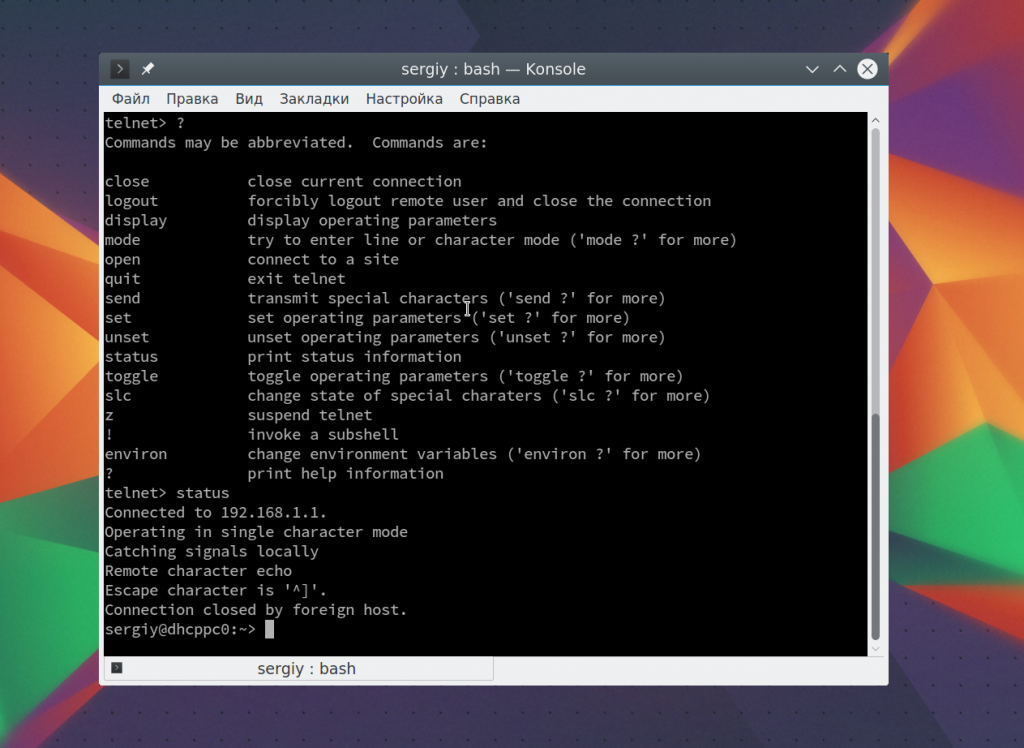
Здесь есть и другие интересные возможности. Такие вещи можно проделывать при любом подключении с помощью утилиты telnet.
5. Посмотреть сайт telnet
Один из распространенных способов использования telnet — это тестирование сайта из консоли. Да, красивую веб-страницу вы не получите, но можете вручную собрать запросы и видеть все переданные сервером данные.
telnet opennet.ru 80
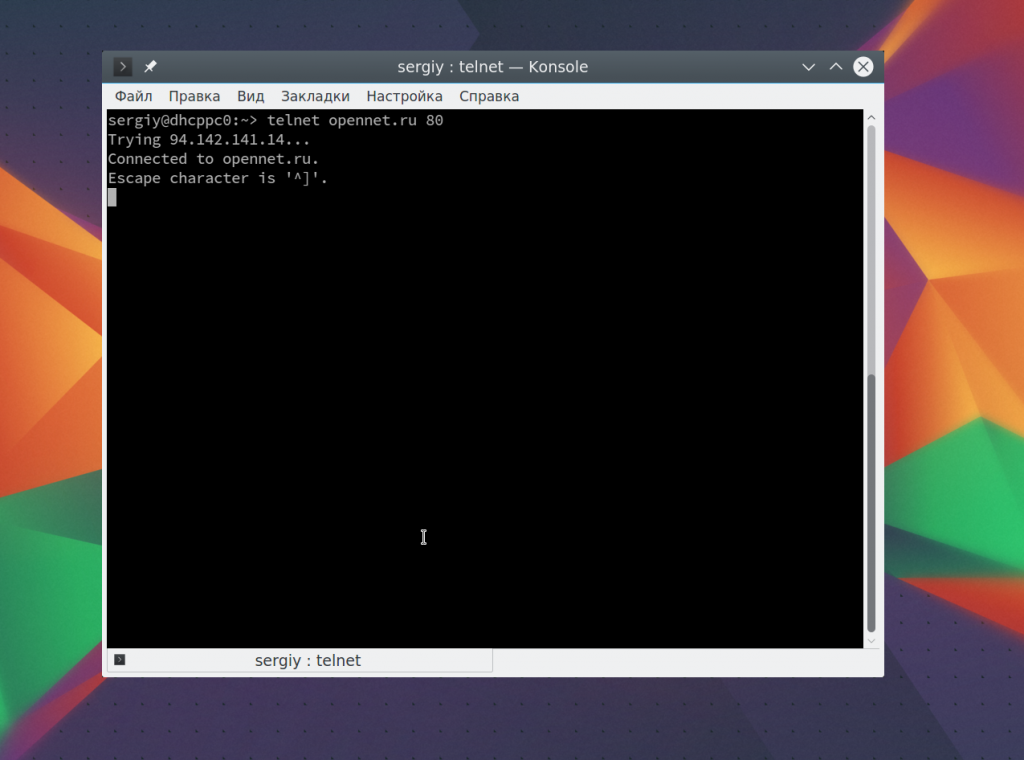 Затем наберите команду веб-серверу:

Веб сервер вернет полностью страницу, а также заголовки, которые необходимы для ее отображения браузером.
6. Удаленное управление telnet
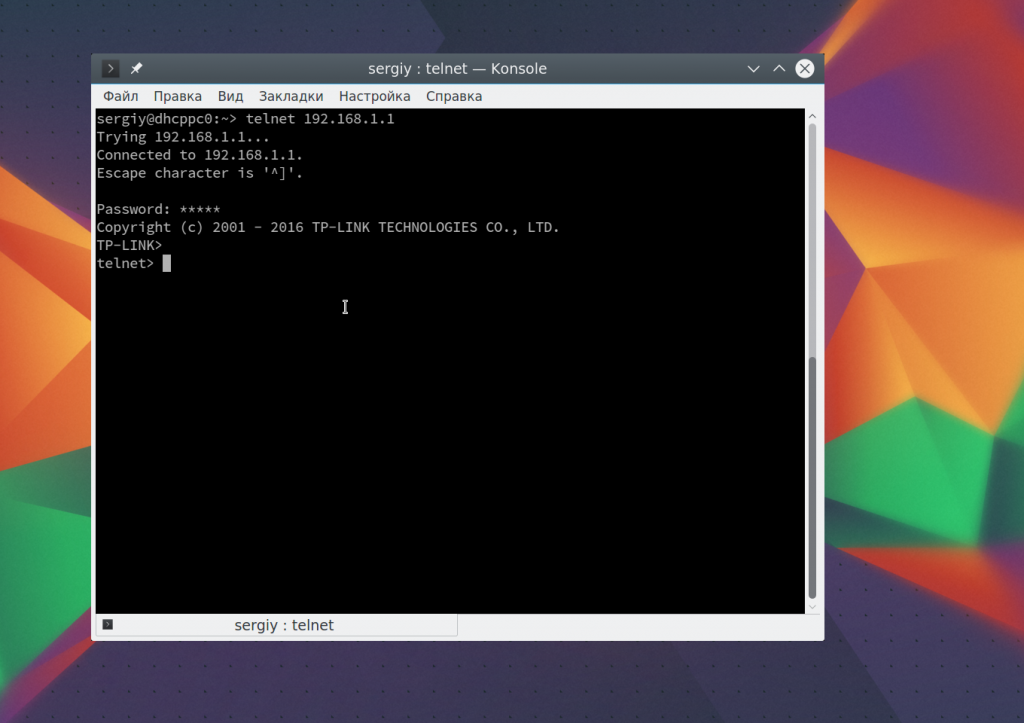
Настоятельно не рекомендуется использовать небезопасный telnet для удаленного управления, потому что все команды и пароли могут быть прослушаны сторонним пользователем. Но иногда, например, для роутеров telnet все же используется для удаленного управления. Все работает точно так же, как и для других подключений, только нужно использовать порт 23, а на удаленном компьютере должен быть установлен telnet-server:
telnet localhost 23
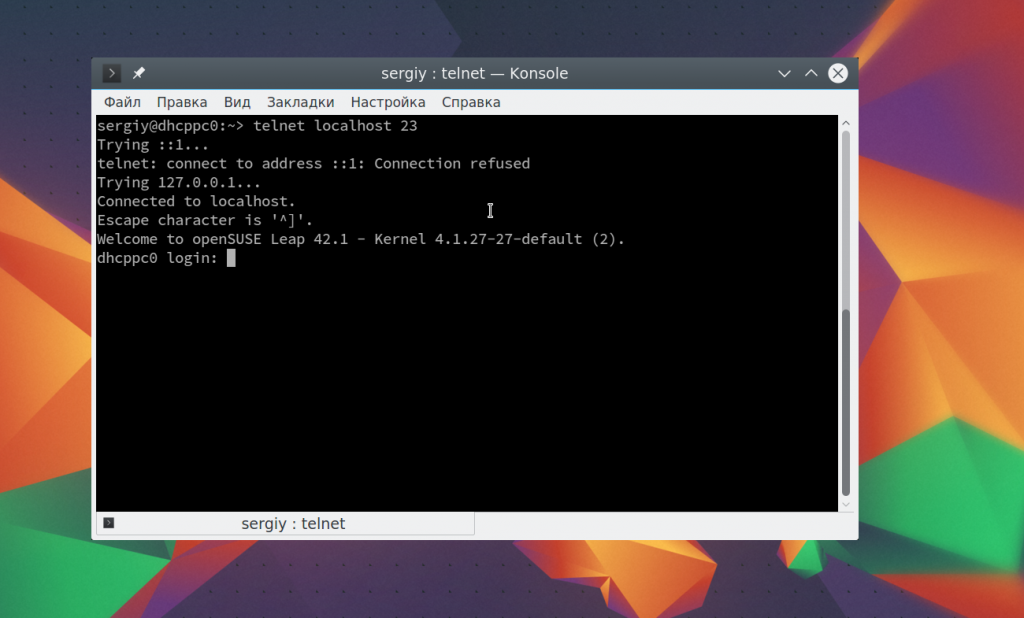 Тут порт можно даже не указывать, потому что по умолчанию будет использоваться именно 23. Далее, вам нужно ввести логин и пароль, а затем вы сможете выполнять команды в удаленной системе.
Выводы
В этой статье мы рассмотрели примеры использования telnet, а также что представляет из себя эта утилита, хотя она уже не используется по своему основному назначению, но до сих пор может быть полезной многим пользователям и системным администраторам. Если у вас остались вопросы, спрашивайте в комментариях!
Источник
How to install and use telnet command in Linux(RedHat/CentOS 7/8) Using 5 Easy Steps
Table of Contents
In this tutorial, I will take you through the steps to install and use telnet command in Linux. telnet command is used in Linux based system to check the remote server port connectivity from client system. Here when we say telnet command then we are referring to client package and not the telnet server package. By default telnet won’t be installed in your System. Hence before using telnet command in Linux you need to know the steps to install this command.

Install and Use Telnet Command in Linux
Step 1: Prerequisites
a)You need to have a Running RedHat/CentOS 7/8 System.
b)You should have yum installed in your System.
c)You should have sudo access to run privileged commands in your system.
Step 2: Update Your System
First you need to update all your packages with the latest available updates using yum update -y command as shown below.
Step 3: Install Telnet Command
Once system packages are updated with the latest version, you can now install telnet client package using yum install telnet -y command as shown below.
Step 4: Verify Package Installation
After successful Installation of telnet client package, you can check and verify the installation by querying the rpmdb using rpm command as shown below.
Step 5: Test Telnet Command
Now you can use telnet command to test the port connectivity with the remote server. In below example we are using telnet command to check the google.com Port 443 connectivity by running telnet google.com 443 command. As you can see the status is showing connected it means local client is able to reach to remote google.com server on Port 443 .
Popular Recommendations:-
Источник
Linux telnet command
Description
The telnet command is used for interactive communication with another host using the TELNET protocol. It begins in command mode, where it prints a telnet command prompt («telnet>«).
If telnet is invoked with a host argument, it performs an open command implicitly (see the Commands section below for details).
Syntax
Options
| -4 | Force IPv4 address resolution. |
| -6 | Force IPv6 address resolution. |
| -8 | Request 8-bit operation. This option causes an attempt to negotiate the TELNET BINARY option for both input and output. By default, telnet is not «8-bit clean» (it does not recognize 8-bit character encodings such as Unicode). |
| -E | Disables the escape character functionality; that is, sets the escape character to «no character». |
| -L | Specifies an 8-bit data path on output. This option causes the TELNET BINARY option to be negotiated on output. |
| -a | Attempt automatic login. Currently, this sends the username via the USER variable of the ENVIRON option if supported by the remote system. The username is retrieved via the getlogin system call. |
| -b address | Use bind on the local socket to bind it to a specific local address. |
| -d | Sets the initial value of the debug toggle to TRUE. |
| -r | Emulate rlogin. In this mode, the default escape character is a tilde. Also, the interpretation of the escape character is changed: an escape character followed by a dot causes telnet to disconnect from the remote host. A ^Z (Control-Z) instead of a dot suspends telnet, and a ^] (Control-close bracket, the default telnet escape character) generates a normal telnet prompt. These codes are accepted only at the beginning of a line. |
| -S tos | Sets the IP TOS (type-of-service) option for the telnet connection to the value tos. |
| -e escapechar | Sets the escape character to escapechar. If no character is supplied, no escape character will be used. Entering the escape character while connected causes telnet to drop to command mode. |
| -l user | Specify user as the user to log in as on the remote system. By sending the specified name as the USER environment variable, so it requires that the remote system support the TELNET ENVIRON option. This option implies the -a option, and may also be used with the open command. |
| -n tracefile | Opens tracefile for recording trace information. See the set tracefile command below. |
| host | Specifies a host to contact over the network. |
| port | Specifies a port number or service name to contact. If not specified, the telnet port (23) is used. |
Protocol
Once a connection is opened, telnet attempts to enable the TELNET LINEMODE option. If this fails, then telnet will revert to one of two input modes: either «character at a time» or «old line by line» depending on what the remote system supports.
When LINEMODE is enabled, character processing is done on the local system, under the control of the remote system. When input editing or character echoing is to be disabled, the remote system will relay that information. The remote system also relays changes to any special characters that happen on the remote system, so that they can take effect on the local system.
In «character at a time» mode, most text typed is immediately sent to the remote host for processing.
In «old line by line» mode, all text is echoed locally, and (normally) only completed lines are sent to the remote host. The «local echo character» (initially «^E«) may be used to turn off and on the local echo (this would mostly be used to enter passwords without the password being echoed).
If the LINEMODE option is enabled, or if the localchars toggle is TRUE (the default for «old line by line»; see below), the user’s quit, intr, and flush characters are trapped locally, and sent as TELNET protocol sequences to the remote side. If LINEMODE has ever been enabled, then the user’s susp and eof are also sent as TELNET protocol sequences, and quit is sent as a TELNET ABORT instead of BREAK. There are options (see toggle autoflush and toggle autosynch, below) which cause this action to flush subsequent output to the terminal (until the remote host acknowledges the TELNET sequence) and flush previous terminal input (in the case of quit and intr).
Commands
The following telnet commands are available. Unique prefixes are understood as abbreviations.
| auth argument . | The auth command controls the TELNET AUTHENTICATE protocol option. If telnet was compiled without authentication, the auth command is not supported. Valid arguments are as follows:
Note that the current version of telnet does not support authentication. | ||||||||||||||||||||||||||||||||||||||||
| close | Close the connection to the remote host, if any, and return to command mode. | ||||||||||||||||||||||||||||||||||||||||
| display argument . | Display all, or some, of the set and toggle values (see below). | ||||||||||||||||||||||||||||||||||||||||
| encrypt argument . | The encrypt command controls the TELNET ENCRYPT protocol option. If telnet was compiled without encryption, the encrypt command will not be supported. Valid arguments are as follows:
Note that the current version of telnet does not support encryption. | ||||||||||||||||||||||||||||||||||||||||
| environ arguments. | The environ command is used to propagate environment variables across the telnet link using the TELNET ENVIRON protocol option. All variables exported from the shell are defined, but only the DISPLAY and PRINTER variables are marked to be sent by default. The USER variable is marked to be sent if the -a or -l command-line options were used. Valid arguments for the environ command are:
| ||||||||||||||||||||||||||||||||||||||||
| logout | Send the TELNET LOGOUT protocol option to the remote host. This command is similar to a close command. If the remote host does not support the LOGOUT option, nothing happens. But if it does, this command should cause it to close the connection. If the remote side also supports the concept of suspending a user’s session for later reattachment, the logout command indicates that the session should be terminated immediately. | ||||||||||||||||||||||||||||||||||||||||
| mode type | The type is one of several options, depending on the state of the session. telnet asks the remote host to go into the requested mode. If the remote host says it can, that mode takes effect. Options for type are as follows:
| ||||||||||||||||||||||||||||||||||||||||
| open host [[-l] user][— port] | Open a connection to the named host. If no port number is specified, telnet attempts to contact a telnet daemon at the standard port (23). The host specification may be a hostname or IP address. The -l option may be used to specify a username to be passed to the remote system, like the -l command-line option. When connecting to ports other than the telnet port, telnet does not attempt telnet protocol negotiations. This method of connecting makes it possible to connect to services that do not support the telnet protocol without making a mess. Protocol negotiation can be forced by placing a dash before the port number. After establishing a connection, any commands associated with the remote host in /etc/telnetrc and the user’s .telnetrc file are executed, in that order. The format of the telnetrc files is as follows: Lines beginning with a #, and blank lines, are treated as comments (ignored). The rest of the file should consist of hostnames and sequences of telnet commands to use with that host. Commands should be one per line, indented by whitespace; lines beginning without whitespace are interpreted as hostnames. Lines beginning with the special hostname ‘DEFAULT’ will apply to all hosts. Hostnames including ‘DEFAULT’ may be followed immediately by a colon and a port number or string. If a port is specified it must match exactly with what is specified on the command line. If no port was specified on the command line, then the value ‘telnet’ is used. Upon connecting to a particular host, the commands associated with that host are executed. | ||||||||||||||||||||||||||||||||||||||||
| quit | Close any open session and exit telnet. An end of file condition on input, when in command mode, will trigger this operation as well. | ||||||||||||||||||||||||||||||||||||||||
| send arguments | Send one or more special telnet protocol character sequences to the remote host. The following are the codes which may be specified (more than one may be used in one command):
| ||||||||||||||||||||||||||||||||||||||||
| set argument value, unset argument value | The set command will set any one of the telnet variables to a specific value or as TRUE. The special value off turns off the function associated with the variable. This command is equivalent to using the unset command. The unset command will disable or set to FALSE any of the specified variables. The values of variables may be interrogated with the display command. The variables which may be set or unset, but not toggled, are listed here. Also, any of the variables for the toggle command may be explicitly set or unset.
| ||||||||||||||||||||||||||||||||||||||||
| slc state | The slc command (set local characters) is used to set or change the state of the special characters when the TELNET LINEMODE option is enabled. Special characters are characters that get mapped to TELNET commands sequences (like ip or quit) or line editing characters (like erase and kill). By default, the local special characters are exported. state may be one of the following:
| ||||||||||||||||||||||||||||||||||||||||
| status | Show the current status of telnet. This command includes the name of the remote host, if any, and the current mode. | ||||||||||||||||||||||||||||||||||||||||
| toggle arguments . | Toggle (between TRUE and FALSE) various flags that control how telnet responds to events. These flags may be set explicitly to TRUE or FALSE using the set and unset commands. More than one flag may be toggled at once. The state of these flags may be examined with the display command. Valid flags are:
| ||||||||||||||||||||||||||||||||||||||||
| z | Suspend telnet. This command only works when the user uses the C Shell (csh). | ||||||||||||||||||||||||||||||||||||||||
| ! [command] | Execute a single command in a subshell on the local system. If command is omitted, then an interactive subshell is invoked. | ||||||||||||||||||||||||||||||||||||||||
| ? [command] | Get help. With no arguments, telnet prints a help summary. If a command is specified, telnet prints the help information for that command. |
Environment
telnet uses at least the HOME, SHELL, DISPLAY, and TERM environment variables. Other environment variables may be propagated to the other side via the TELNET ENVIRON option.
Files
| /etc/telnetrc | global telnet startup values |
| /.telnetrc | user customized telnet startup values |
Examples
Attempts to open a connection to the remote host myhost.com. If a connection is established, the host prompts for a login name and password.
Attempts to open a connection to the remote host myhost.com on port 5555, using the login name myusername. If successful, the host prompts for myusername‘s password.
Opens a local telnet> prompt, where you can enter any of the commands listed above. For example, entering the following command at the prompt:
Источник


