- Use an Azure file share with Windows
- Prerequisites
- Using an Azure file share with Windows
- Mount the Azure file share
- Mount the Azure file share with File Explorer
- Accessing share snapshots from Windows
- List previous versions
- Restore from a previous version
- Securing Windows/Windows Server
- Auditing SMB 1 usage
- Removing SMB 1 from Windows Server
- Removing SMB 1 from Windows client
- Disabling SMB 1 on legacy versions of Windows/Windows Server
- SMB resources
- Next steps
- Performance tuning for file servers
- General tuning parameters for clients
- Client tuning example
Use an Azure file share with Windows
Azure Files is Microsoft’s easy-to-use cloud file system. Azure file shares can be seamlessly used in Windows and Windows Server. This article discusses the considerations for using an Azure file share with Windows and Windows Server.
In order to use an Azure file share outside of the Azure region it is hosted in, such as on-premises or in a different Azure region, the OS must support SMB 3.0.
You can use Azure file shares on a Windows installation that is running either in an Azure VM or on-premises. The following table illustrates which OS versions support accessing file shares in which environment:
| Windows version | SMB version | Mountable in Azure VM | Mountable on-premises |
|---|---|---|---|
| Windows Server 2019 | SMB 3.0 | Yes | Yes |
| Windows 10 1 | SMB 3.0 | Yes | Yes |
| Windows Server semi-annual channel 2 | SMB 3.0 | Yes | Yes |
| Windows Server 2016 | SMB 3.0 | Yes | Yes |
| Windows 8.1 | SMB 3.0 | Yes | Yes |
| Windows Server 2012 R2 | SMB 3.0 | Yes | Yes |
| Windows Server 2012 | SMB 3.0 | Yes | Yes |
| Windows 7 3 | SMB 2.1 | Yes | No |
| Windows Server 2008 R2 3 | SMB 2.1 | Yes | No |
1 Windows 10, versions 1507, 1607, 1803, 1809, 1903, 1909, and 2004.
2 Windows Server, versions 1809, 1903, 1909, 2004.
3 Regular Microsoft support for Windows 7 and Windows Server 2008 R2 has ended. It is possible to purchase additional support for security updates only through the Extended Security Update (ESU) program. We strongly recommend migrating off of these operating systems.
We always recommend taking the most recent KB for your version of Windows.
Prerequisites
Ensure port 445 is open: The SMB protocol requires TCP port 445 to be open; connections will fail if port 445 is blocked. You can check if your firewall is blocking port 445 with the Test-NetConnection cmdlet. To learn about ways to work around a blocked 445 port, see the Cause 1: Port 445 is blocked section of our Windows troubleshooting guide.
Using an Azure file share with Windows
To use an Azure file share with Windows, you must either mount it, which means assigning it a drive letter or mount point path, or access it via its UNC path.
This article uses the storage account key to access the file share. A storage account key is an administrator key for a storage account, including administrator permissions to all files and folders within the file share you’re accessing, and for all file shares and other storage resources (blobs, queues, tables, etc.) contained within your storage account. If this is not sufficient for your workload, Azure File Sync may be used, or you may use identity-based authentication over SMB.
A common pattern for lifting and shifting line-of-business (LOB) applications that expect an SMB file share to Azure is to use an Azure file share as an alternative for running a dedicated Windows file server in an Azure VM. One important consideration for successfully migrating a line-of-business application to use an Azure file share is that many line-of-business applications run under the context of a dedicated service account with limited system permissions rather than the VM’s administrative account. Therefore, you must ensure that you mount/save the credentials for the Azure file share from the context of the service account rather than your administrative account.
Mount the Azure file share
The Azure portal provides you with a script that you can use to mount your file share directly to a host. We recommend using this provided script.
To get this script:
Navigate to the storage account that contains the file share you’d like to mount.
Select File shares.
Select the file share you’d like to mount.
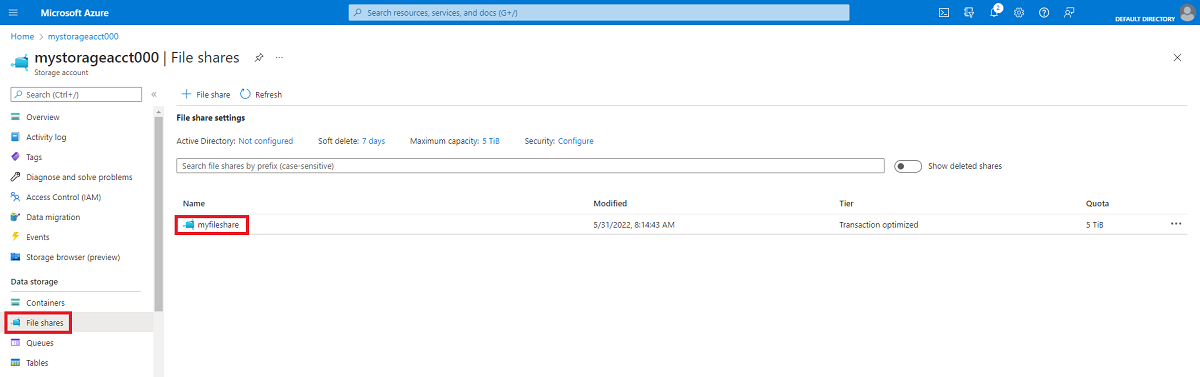
Select Connect.
Select the drive letter to mount the share to.
Copy the provided script.
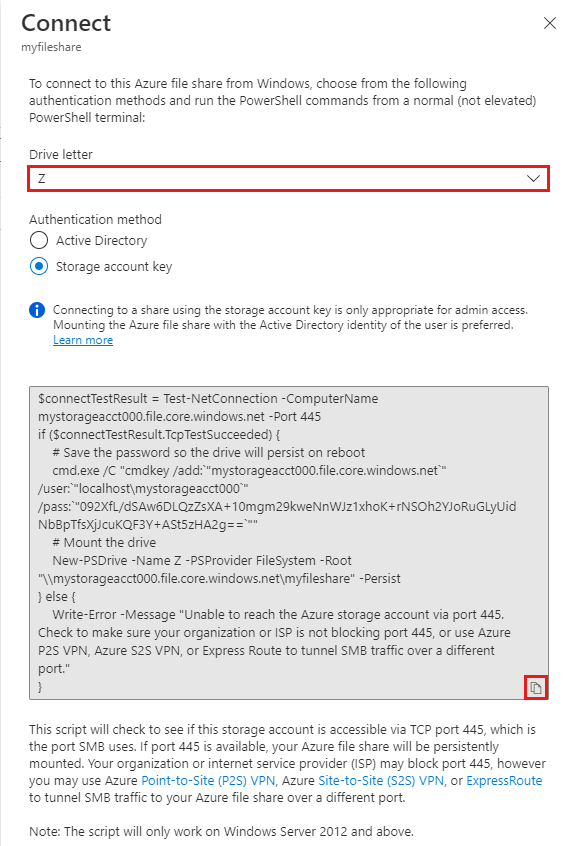
Paste the script into a shell on the host you’d like to mount the file share to, and run it.
You have now mounted your Azure file share.
Mount the Azure file share with File Explorer
Note that the following instructions are shown on Windows 10 and may differ slightly on older releases.
Open File Explorer. This can be done by opening from the Start Menu, or by pressing Win+E shortcut.
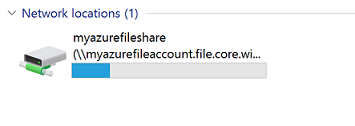
Navigate to This PC on the left-hand side of the window. This will change the menus available in the ribbon. Under the Computer menu, select Map network drive.
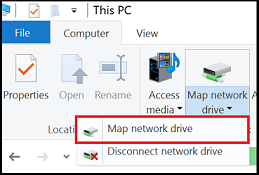
Select the drive letter and enter the UNC path, the UNC path format is \\ .file.core.windows.net\ . For example: \\anexampleaccountname.file.core.windows.net\example-share-name .

Use the storage account name prepended with AZURE\ as the username and a storage account key as the password.

Use Azure file share as desired.
When you are ready to dismount the Azure file share, you can do so by right-clicking on the entry for the share under the Network locations in File Explorer and selecting Disconnect.
Accessing share snapshots from Windows
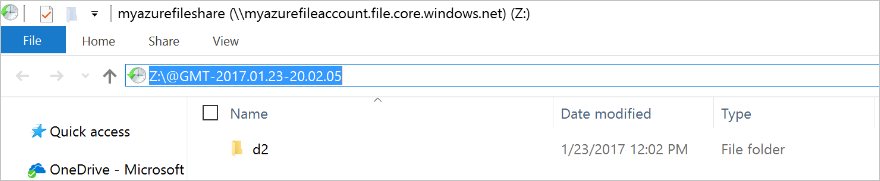
If you have taken a share snapshot, either manually or automatically through a script or service like Azure Backup, you can view previous versions of a share, a directory, or a particular file from file share on Windows. You can take a share snapshot using Azure PowerShell, Azure CLI, or the Azure portal.
List previous versions
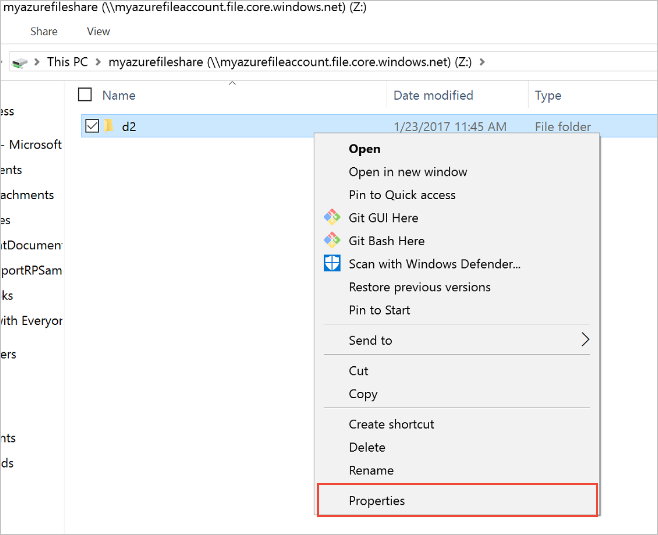
Browse to the item or parent item that needs to be restored. Double-click to go to the desired directory. Right-click and select Properties from the menu.
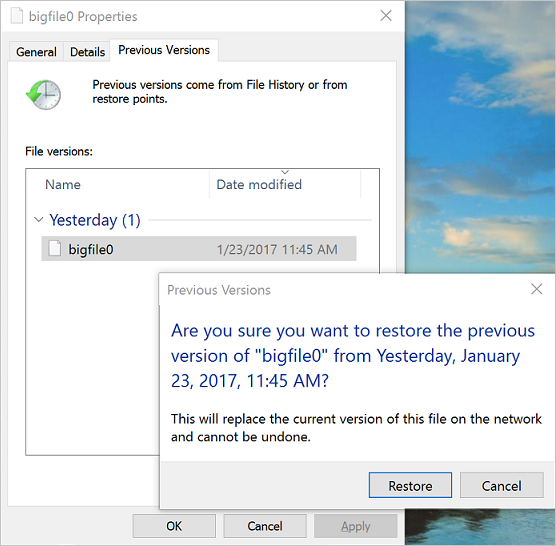
Select Previous Versions to see the list of share snapshots for this directory. The list might take a few seconds to load, depending on the network speed and the number of share snapshots in the directory.

You can select Open to open a particular snapshot.
Restore from a previous version
Select Restore to copy the contents of the entire directory recursively at the share snapshot creation time to the original location.
Securing Windows/Windows Server
In order to mount an Azure file share on Windows, port 445 must be accessible. Many organizations block port 445 because of the security risks inherent with SMB 1. SMB 1, also known as CIFS (Common Internet File System), is a legacy file system protocol included with Windows and Windows Server. SMB 1 is an outdated, inefficient, and most importantly insecure protocol. The good news is that Azure Files does not support SMB 1, and all supported versions of Windows and Windows Server make it possible to remove or disable SMB 1. We always strongly recommend removing or disabling the SMB 1 client and server in Windows before using Azure file shares in production.
The following table provides detailed information on the status of SMB 1 each version of Windows:
| Windows version | SMB 1 default status | Disable/Remove method |
|---|---|---|
| Windows Server 2019 | Disabled | Remove with Windows feature |
| Windows Server, versions 1709+ | Disabled | Remove with Windows feature |
| Windows 10, versions 1709+ | Disabled | Remove with Windows feature |
| Windows Server 2016 | Enabled | Remove with Windows feature |
| Windows 10, versions 1507, 1607, and 1703 | Enabled | Remove with Windows feature |
| Windows Server 2012 R2 | Enabled | Remove with Windows feature |
| Windows 8.1 | Enabled | Remove with Windows feature |
| Windows Server 2012 | Enabled | Disable with Registry |
| Windows Server 2008 R2 | Enabled | Disable with Registry |
| Windows 7 | Enabled | Disable with Registry |
Auditing SMB 1 usage
Applies to Windows Server 2019, Windows Server semi-annual channel (versions 1709 and 1803), Windows Server 2016, Windows 10 (versions 1507, 1607, 1703, 1709, and 1803), Windows Server 2012 R2, and Windows 8.1
Before removing SMB 1 in your environment, you may wish to audit SMB 1 usage to see if any clients will be broken by the change. If any requests are made against SMB shares with SMB 1, an audit event will be logged in the event log under Applications and Services Logs > Microsoft > Windows > SMBServer > Audit .
To enable auditing support on Windows Server 2012 R2 and Windows 8.1, install at least KB4022720.
To enable auditing, execute the following cmdlet from an elevated PowerShell session:
Removing SMB 1 from Windows Server
Applies to Windows Server 2019, Windows Server semi-annual channel (versions 1709 and 1803), Windows Server 2016, Windows Server 2012 R2
To remove SMB 1 from a Windows Server instance, execute the following cmdlet from an elevated PowerShell session:
To complete the removal process, restart your server.
Starting with Windows 10 and Windows Server version 1709, SMB 1 is not installed by default and has separate Windows features for the SMB 1 client and SMB 1 server. We always recommend leaving both the SMB 1 server ( FS-SMB1-SERVER ) and the SMB 1 client ( FS-SMB1-CLIENT ) uninstalled.
Removing SMB 1 from Windows client
Applies to Windows 10 (versions 1507, 1607, 1703, 1709, and 1803) and Windows 8.1
To remove SMB 1 from your Windows client, execute the following cmdlet from an elevated PowerShell session:
To complete the removal process, restart your PC.
Disabling SMB 1 on legacy versions of Windows/Windows Server
Applies to Windows Server 2012, Windows Server 2008 R2, and Windows 7
SMB 1 cannot be completely removed on legacy versions of Windows/Windows Server, but it can be disabled through the Registry. To disable SMB 1, create a new registry key SMB1 of type DWORD with a value of 0 under HKEY_LOCAL_MACHINE > SYSTEM > CurrentControlSet > Services > LanmanServer > Parameters .
You can easily accomplish this with the following PowerShell cmdlet as well:
After creating this registry key, you must restart your server to disable SMB 1.
SMB resources
Next steps
See these links for more information about Azure Files:
Performance tuning for file servers
You should select the proper hardware to satisfy the expected file server load, considering average load, peak load, capacity, growth plans, and response times. Hardware bottlenecks limit the effectiveness of software tuning.
General tuning parameters for clients
The following REG_DWORD registry settings can affect the performance of client computers that interact with SMB file servers:
ConnectionCountPerNetworkInterface
Applies to WindowsВ 10, Windows 8.1, WindowsВ 8, Windows Server 2016, Windows ServerВ 2012 R2, and Windows ServerВ 2012
The default is 1, and we strongly recommend using the default. The valid range is 1-16. The maximum number of connections per interface to be established with a server for non-RSS interfaces.
ConnectionCountPerRssNetworkInterface
Applies to WindowsВ 10, Windows 8.1, WindowsВ 8, Windows Server 2016, Windows ServerВ 2012 R2, and Windows ServerВ 2012
The default is 4, and we strongly recommend using the default. The valid range is 1-16. The maximum number of connections per interface to be established with a server for RSS interfaces.
ConnectionCountPerRdmaNetworkInterface
Applies to WindowsВ 10, Windows 8.1, WindowsВ 8, Windows Server 2016, Windows ServerВ 2012 R2, and Windows ServerВ 2012
The default is 2, and we strongly recommend using the default. The valid range is 1-16. The maximum number of connections per interface to be established with a server for RDMA interfaces.
MaximumConnectionCountPerServer
Applies to WindowsВ 10, Windows 8.1, WindowsВ 8, Windows Server 2016, Windows ServerВ 2012 R2, and Windows ServerВ 2012
The default is 32, with a valid range from 1-64. The maximum number of connections to be established with a single server running Windows ServerВ 2012 across all interfaces.
DormantDirectoryTimeout
Applies to WindowsВ 10, Windows 8.1, WindowsВ 8, Windows Server 2016, Windows ServerВ 2012 R2, and Windows ServerВ 2012
The default is 600 seconds. The maximum time server directory handles held open with directory leases.
FileInfoCacheLifetime
Applies to WindowsВ 10, Windows 8.1, WindowsВ 8, Windows 7, Windows Vista, Windows Server 2016, Windows ServerВ 2012 R2, Windows ServerВ 2012, Windows Server 2008 R2, and Windows Server 2008
The default is 10 seconds. The file information cache timeout period.
DirectoryCacheLifetime
Applies to WindowsВ 10, Windows 8.1, WindowsВ 8, Windows 7, Windows Vista, Windows Server 2016, Windows ServerВ 2012 R2, Windows ServerВ 2012, Windows Server 2008 R2, and Windows Server 2008
The default is 10 seconds. This is the directory cache timeout.
This parameter controls caching of directory metadata in the absence of directory leases.
A known issue in Windows 10, version 1803, affects the ability of Windows 10 to cache large directories. After you upgrade a computer to Windows 10, version 1803, you access a network share that contains thousands of files and folders, and you open a document that is located on that share. During both of these operations, you experience significant delays.
To resolve this issue, install Windows 10, version 1809 or a later version.
To work around this issue, set DirectoryCacheLifetime to 0.
This issue affects the following editions of Windows 10:
- Windows 10 Enterprise, version 1803
- Windows 10 Pro for Workstations, version 1803
- Windows 10 Pro Education, version 1803
- Windows 10 Professional, version 1803
- Windows 10 Education, version 1803
- Windows 10 Home, version 1803
DirectoryCacheEntrySizeMax
Applies to WindowsВ 10, Windows 8.1, WindowsВ 8, Windows 7, Windows Vista, Windows Server 2016, Windows ServerВ 2012 R2, Windows ServerВ 2012, Windows Server 2008 R2, and Windows Server 2008
The default is 64В KB. This is the maximum size of directory cache entries.
FileNotFoundCacheLifetime
Applies to WindowsВ 10, Windows 8.1, WindowsВ 8, Windows 7, Windows Vista, Windows Server 2016, Windows ServerВ 2012 R2, Windows ServerВ 2012, Windows Server 2008 R2, and Windows Server 2008
The default is 5 seconds. The file not found cache timeout period.
CacheFileTimeout
Applies to WindowsВ 8.1, WindowsВ 8, Windows ServerВ 2012, Windows ServerВ 2012В R2, and Windows 7
The default is 10 seconds. This setting controls the length of time (in seconds) that the redirector will hold on to cached data for a file after the last handle to the file is closed by an application.
DisableBandwidthThrottling
Applies to WindowsВ 10, Windows 8.1, WindowsВ 8, Windows 7, Windows Vista, Windows Server 2016, Windows ServerВ 2012 R2, Windows ServerВ 2012, Windows Server 2008 R2, and Windows Server 2008
The default is 0. By default, the SMB redirector throttles throughput across high-latency network connections, in some cases to avoid network-related timeouts. Setting this registry value to 1 disables this throttling, enabling higher file transfer throughput over high-latency network connections.
DisableLargeMtu
Applies to WindowsВ 10, Windows 8.1, WindowsВ 8, Windows 7, Windows Vista, Windows Server 2016, Windows ServerВ 2012 R2, Windows ServerВ 2012, Windows Server 2008 R2, and Windows Server 2008
The default is 0 for Windows 8 only. In Windows 8, the SMB redirector transfers payloads as large as 1В MB per request, which can improve file transfer speed. Setting this registry value to 1 limits the request size to 64В KB. You should evaluate the impact of this setting before applying it.
RequireSecuritySignature
Applies to WindowsВ 10, Windows 8.1, WindowsВ 8, Windows 7, Windows Vista, Windows Server 2016, Windows ServerВ 2012 R2, Windows ServerВ 2012, Windows Server 2008 R2, and Windows Server 2008
The default is 0, disabling SMB Signing. Changing this value to 1 enables SMB signing for all SMB communication, preventing SMB communication with computers where SMB signing is disabled. SMB signing can increase CPU cost and network round trips, but helps block man-in-the-middle attacks. If SMB signing is not required, ensure that this registry value is 0 on all clients and servers.
FileInfoCacheEntriesMax
Applies to WindowsВ 10, Windows 8.1, WindowsВ 8, Windows 7, Windows Vista, Windows Server 2016, Windows ServerВ 2012 R2, Windows ServerВ 2012, Windows Server 2008 R2, and Windows Server 2008
The default is 64, with a valid range of 1 to 65536. This value is used to determine the amount of file metadata that can be cached by the client. Increasing the value can reduce network traffic and increase performance when a large number of files are accessed.
DirectoryCacheEntriesMax
Applies to WindowsВ 10, Windows 8.1, WindowsВ 8, Windows 7, Windows Vista, Windows Server 2016, Windows ServerВ 2012 R2, Windows ServerВ 2012, Windows Server 2008 R2, and Windows Server 2008
The default is 16, with a valid range of 1 to 4096. This value is used to determine the amount of directory information that can be cached by the client. Increasing the value can reduce network traffic and increase performance when large directories are accessed.
FileNotFoundCacheEntriesMax
Applies to WindowsВ 10, Windows 8.1, WindowsВ 8, Windows 7, Windows Vista, Windows Server 2016, Windows ServerВ 2012 R2, Windows ServerВ 2012, Windows Server 2008 R2, and Windows Server 2008
The default is 128, with a valid range of 1 to 65536. This value is used to determine the amount of file name information that can be cached by the client. Increasing the value can reduce network traffic and increase performance when a large number of file names are accessed.
MaxCmds
Applies to WindowsВ 10, Windows 8.1, WindowsВ 8, Windows 7, Windows Vista, Windows Server 2016, Windows ServerВ 2012 R2, Windows ServerВ 2012, Windows Server 2008 R2, and Windows Server 2008
The default is 15. This parameter limits the number of outstanding requests on a session. Increasing the value can use more memory, but it can improve performance by enabling a deeper request pipeline.В Increasing the value in conjunction with MaxMpxCt can also eliminate errors that are encountered due to large numbers of outstanding long-term file requests, such as FindFirstChangeNotification calls. This parameter does not affect connections with SMB 2.0 servers.
DormantFileLimit
Applies to WindowsВ 10, Windows 8.1, WindowsВ 8, Windows 7, Windows Vista, Windows Server 2016, Windows ServerВ 2012 R2, Windows ServerВ 2012, Windows Server 2008 R2, and Windows Server 2008
The default is 1023. This parameter specifies the maximum number of files that should be left open on a shared resource after the application has closed the file.
Client tuning example
The general tuning parameters for client computers can optimize a computer for accessing remote file shares, particularly over some high-latency networks (such as branch offices, cross-datacenter communication, home offices, and mobile broadband). The settings are not optimal or appropriate on all computers. You should evaluate the impact of individual settings before applying them.
| Parameter | Value | Default |
|---|---|---|
| DisableBandwidthThrottling | 1 | 0 |
| FileInfoCacheEntriesMax | 32768 | 64 |
| DirectoryCacheEntriesMax | 4096 | 16 |
| FileNotFoundCacheEntriesMax | 32768 | 128 |
| MaxCmds | 32768 | 15 |
Starting in WindowsВ 8, you can configure many of these SMB settings by using the Set-SmbClientConfiguration and Set-SmbServerConfiguration Windows PowerShell cmdlets. Registry-only settings can be configured by using Windows PowerShell as well.


