- How to clean windows – get sparkling windows inside and out without streaking with our expert tips
- How to clean windows
- 1. Remove curtains and blinds
- 2. What’s the best thing to clean windows with?
- 3. How to cleaning windows without streaks – wipe off any excess cleaner
- 4. Try traditional methods
- 5. Clean the window edges
- How To Turn Your Screen Black & White
- Black & White Screen – Windows 10
- Windows 7
- Black & White Screen – macOS
- How To Fade-In/Out Your Video On Windows 10
- What is a video fade?
- How To Fade a Video on Windows 10? Four Steps to Magic!
- Step 1. Create a new video project
- Step 2: Upload Your Video or Images
- Step 3: Apply your Fades
- Finishing up
- Doing it right
- How to White out PDF Files in Quick Way
- 3 Steps to White out Text in PDF
- Step 1. Import PDF into PDFelement
- Step 2. Select the Area to be Redacted
- Step 3. White out PDF with Redaction
How to clean windows – get sparkling windows inside and out without streaking with our expert tips
Invite the brightness back into your home with sparkling clean windows. From making your own window cleaning solution to the trusted old newspaper trick, there are plenty of ways to bring the shine back to your window panes. Never underestimate the power of clean windows to transform your rooms, making them light, bright and good for the soul.
Take a look at our care and cleaning advice section for a host of tips and care guides
How to clean windows
Image credit: James French
Here’s what you’ll need for cleaning windows in order to get a professional finish:
- Large dry brush or broom handle for removing cobwebs and dust
- Bucket
- Sponge
- Squeegee
- Purpose made window cleaning solutions or vinegar
- Brown paper or newspaper
- Microfibre cloth
- Dry lint free cloth or drying pad
1. Remove curtains and blinds
Image credit: Damian Russell
Start by taking down curtains and blinds. If you can, take the opportunity to give drapes a thorough wash or spritz
with a fabric freshener like Febreze. Use a dry brush or dusting attachment on your vacuum to sweep away any dust
or cobwebs from around the corners of the windows and the windowsills.
2. What’s the best thing to clean windows with?
Image credit: Debi Treloar
Cleaning expert, Lynsey Queen of Clean recommends using white vinegar to clean windows. ‘When you spray it you don’t need much, it’s going to smell for about 15 minutes, but it’s going to disappear.’
You can also wash your windows with soapy water. Fill a bucket with a simple solution of washing-up liquid and warm water, but avoid creating too many soap suds as
these will leave further marks if allowed to dry. Start washing windows using a non-abrasive sponge.
3. How to cleaning windows without streaks – wipe off any excess cleaner
To clean the window work in an S-shape advises Lynsey. ‘With your microfibre cloth work in the shape of an S so you will get into every bit and that will stop the smears.’
You can also use a squeegee for a streak free finish. Also work in an S-shape. Periodically wipe the squeegee blade on a clean rag to avoid smearing dirt around. Remove remaining water with a damp chamois or microfibre cloth and dry the windowsill.
Avoid paper towels or cloths that might leave lint on the glass. For exterior upper-floor panes, it’s worth investing in a gadget with a U-shaped pole to avoid reaching out of top-floor windows!
4. Try traditional methods
Image credit: Holly Jolliffe
If you prefer to make your own cleaning solutions, add two tablespoons of vinegar to a small bucket of warm water (this won’t kill bacteria, though). If your windows need tough love, add two tablespoons of household ammonia, but wear rubber gloves. Buffing your clean, dry glass with crumpled newspaper gives windows a sparkling finish.
TIP: Aim to clean your windows at least twice a year to keep your rooms light and bright – avoid washing them on a sunny day, though!
5. Clean the window edges
Most window edges will be left gleaming after washing with soapy water. However, if you have white PVC Lynsey recommends using a cream based cleaner or a whitening product to keep them looking new.
‘You could use a white toothpaste. Leave it to do its work and that will whiten the frame,’ says Lynsey.
How To Turn Your Screen Black & White
Dec 15, 2017
Comment
Procrastination can be attributed to work being boring. In comparison, everything else looks so interesting but once you’re done with work the interesting stuff quickly fades away. If you’re prone to procrastinating to the point where you regularly miss deadlines, try tinting your screen black & white. You’ll be surprised how uninteresting everything suddenly looks and how much you’re able to focus on your work more. Of course, this isn’t recommended for design professionals who need the color on their screen, but if you have a boring report to write or a research paper to finish, turn your screen black & white and give it a go.
Black & White Screen – Windows 10
Windows 10 has a built-in color filter feature. It’s aimed at users who suffer from color blindness but it also has a grayscale option that can turn your screen black & white.
Open the Settings app and go to the Ease of Access group of settings. Go to the Color & high contrast tab, and turn on the ‘Apply color filter’ switch. From the ‘Choose a filter’ dropdown, select ‘Grayscale.

The filter is applied right away and you do not need to restart your system or log out and log back in again. It can be turned off just as easily.

Windows 7
Windows 7 has Ease of Access features however it doesn’t have a color filter like Windows 10 does. In this case, the simplest way to turn your screen black & white is to reduce your screen’s saturation to 0. Do this via your graphics card’s control panel. If you use an external monitor, don’t change its saturation levels from the monitor’s own controls.
For Intel Graphics, right-click on an empty area on your desktop and select Intel Graphics Settings. On the settings panel, go to Display>Color Settings. Drag the saturation slider all the way to the left so that its value is set to 0 and you will be left with a black & white screen.

If you use an NVIDIA or AMD graphics card, look for a similar option in the control panel for your GPU.
In the event your graphics card doesn’t let you change the saturation, try the NegativeScreen app which has a grayscale option and works with WindowsXP and above.
Black & White Screen – macOS
Apple products have pretty great accessibility options one of which includes a screen filter. Open the System preferences and go to Accessibility. Select Display from the column on the left, and from the options on the right, select ‘Use grayscale’.

Like the Windows 10 option, your screen turns black & white right away. You don’t have to log out or restart your Mac and turning the option off is just as easy as turning it on.

How To Fade-In/Out Your Video On Windows 10

Do you need to fade your video to black, white, or any other color on your Windows 10 desktop? We got you! Fade in and fade out effects are every video editor’s trump card. They make for seamless scene transitions, help certain elements pop on the screen, and are generally quite enjoyable to the viewer’s eye.
Think of them as the video editing equivalent of pulling a rabbit out of the hat – magic!
That said, they are definitely not the simplest trick in the book. Going too far or fading too soon can devastate the entire impression of the video you’ve worked so hard on.
So, how does one pull these effects off? More importantly, how do you pull them off right?
To ensure we’re on the same lane, let’s address the basics.
What is a video fade?
A video fade is a trick in videography that enables an image or video clip to gradually blend into (or appear out of) a color clip. This is a very simple presentation of the fade-out effect:
You can apply your video fades using a black or white color clip as background.
A video fade comes in two forms: fade in and fade out.
A fade-in refers to a technique that allows a video or image to slowly emerge out of a black, white. or colored background.
Conversely, a fade-out is a technique that allows a video or image to gradually blend into a black, white, or colored background.
How To Fade a Video on Windows 10? Four Steps to Magic!
For starters, you’ll need good software to edit your videos. If you use Windows 10, we suggest you give Animotica a shot. Animotica is smooth, easy, and fun to use. It’s also the most popular video editing app on Microsoft Store. You can install it for free to see how it works, and if you’d like to go all the way, you can get Animotica’s full features set at a decent price!
Click on the button to download it or launch it, if you already have Animotica installed.👇

That said, here’s how you apply fade-in and fade-out effects to your videos. In this section, you’ll learn how to fade in or fade out using a black or white background, as well as how to fade in or fade out using a colored background.
You can run a quick, basic fade using these four easy steps:
- Create a new video project in the video editor
- Upload your video or images
- Select your desired clip
- Select the fade panel and adjust accordingly
- Save
Clear as mud, right? Let’s break it down!
Step 1. Create a new video project
Launch the app and create a new project. You can double click on the Animotica icon, or you can launch it from the Start menu. Once the app starts, hit on New Project.
 Create a new project in Animotica
Step 2: Upload Your Video or Images
Just tap on Add Video/Photo Clips. From the pop up that emerges, select Add Video or Photo Clips.
 Add Video or Photo Clips
This will take you to your PC’s storage area, navigate to where you’ve stored your video or images, select them and hit Open. You can select multiple files by holding down the Ctrl button.
Done? Now it’s time to apply the fades.
Step 3: Apply your Fades
To apply the fade in/ fade out on a single clip:
- Tap on the clip you want to apply the fades on. This will reveal a bunch of editing options.
- Select Fade.
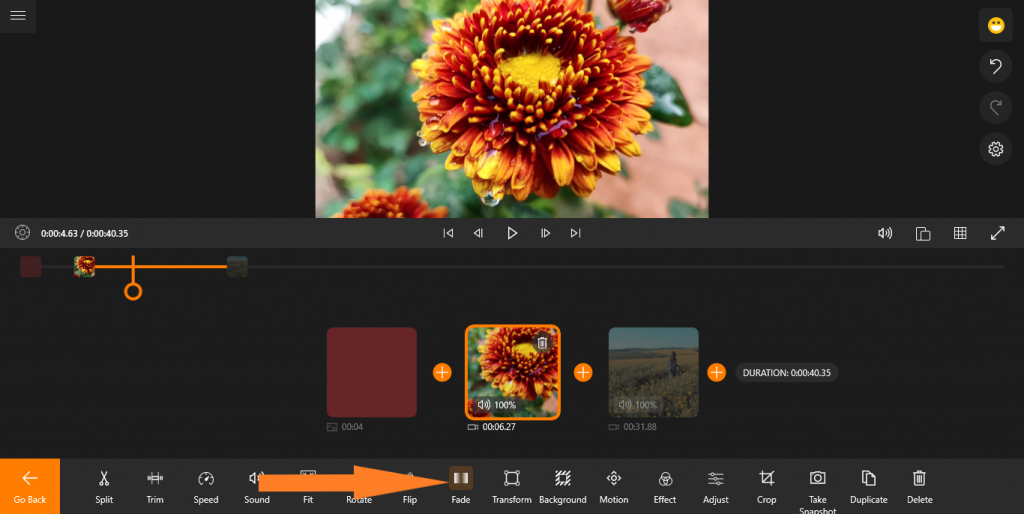
- On the new window, just adjust the Fade In/ Fade Out Duration slider to set when the clip should fade in or fade out. You can also choose between Fade In/Fade Out from white or black backgrounds.
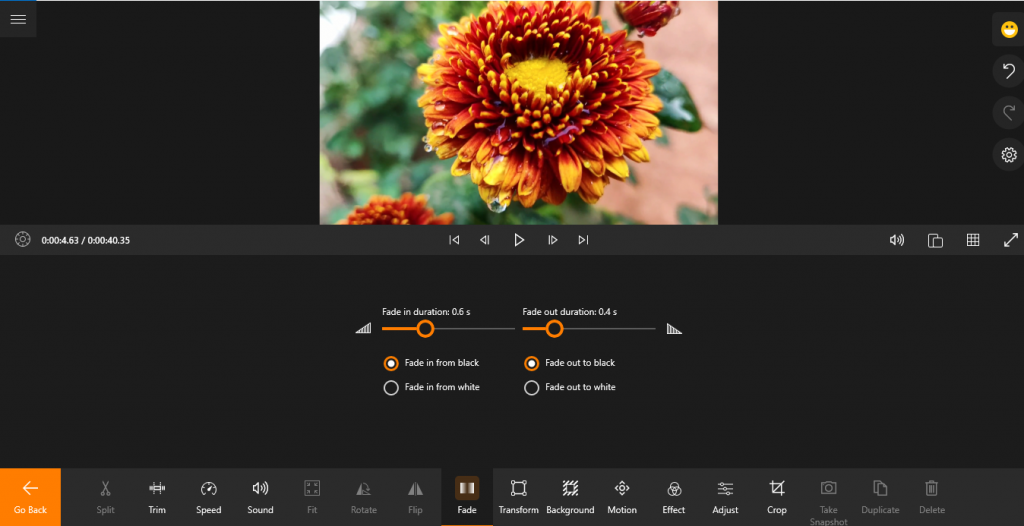 Adjust Fade in/ Fade out
To apply fade in/fade out between two clips;
- Select the transition icon between the two clips.
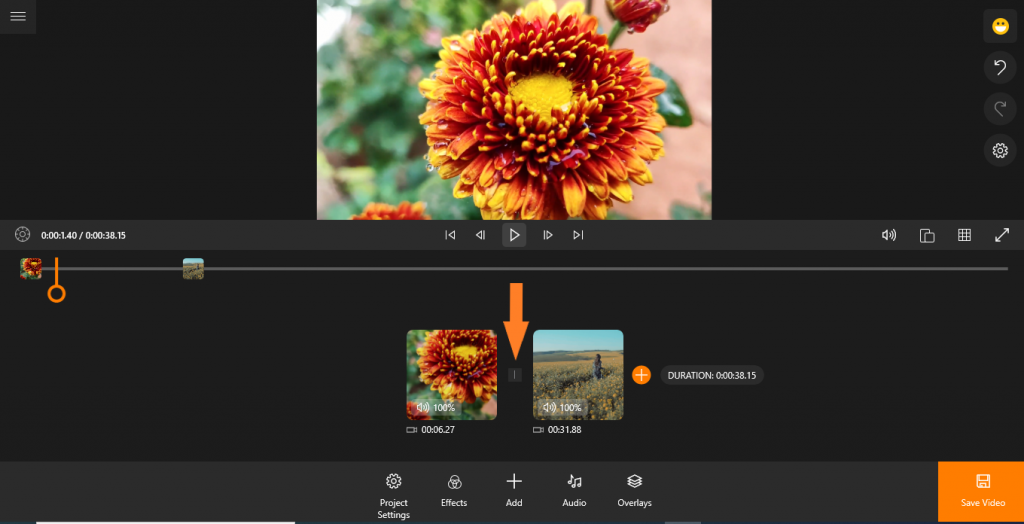 Transition
- Select Fade Black or Fade White and adjust the Duration of the Transition slider.
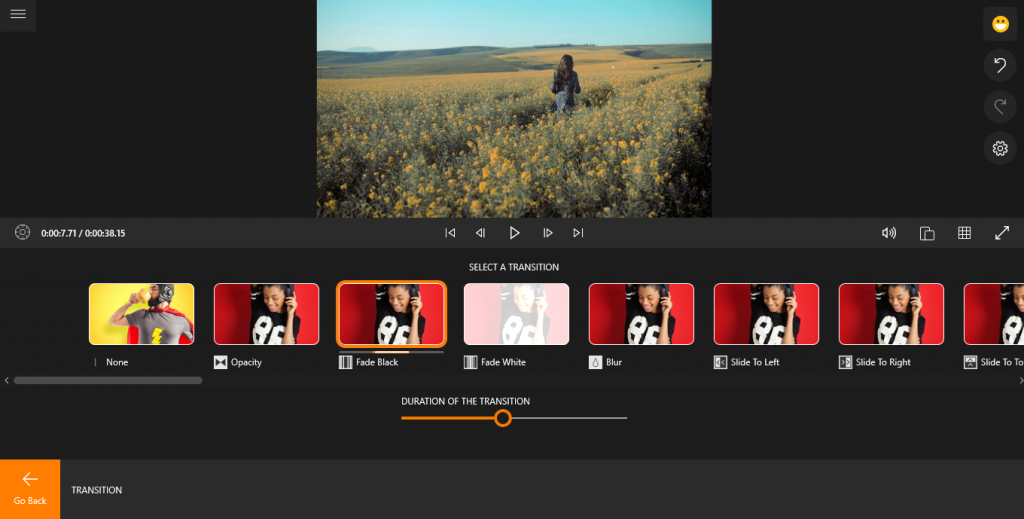 Fade Black/ Fade White
There’s more! You can fade in or fade out using a color of your choice—you don’t have to do it with black and white. Here’s how it’s done:
- Tap on the clip you want to apply the fade to.
- Click on the ‘+’ icon just before or after the clip, depending on where you want to apply your fade.
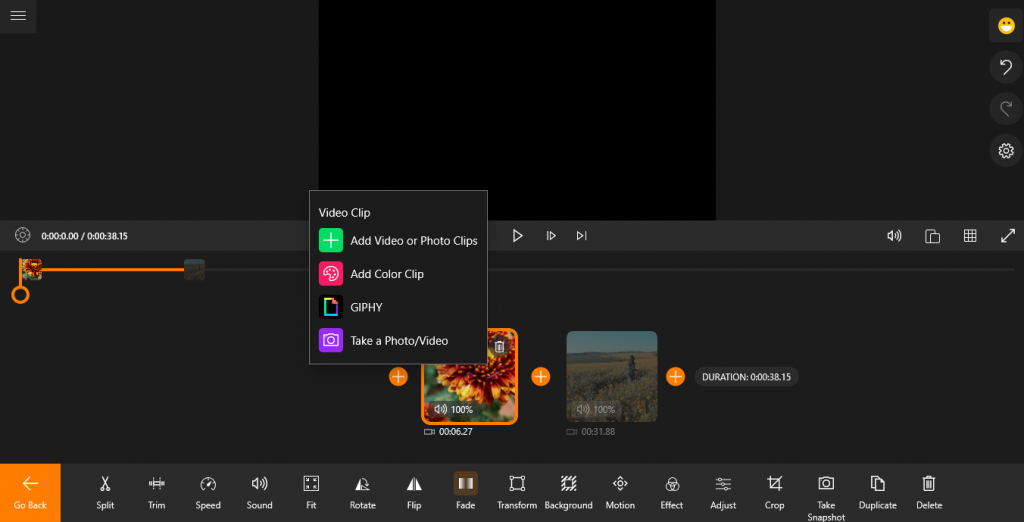 Add Color Clip
- From the pop-up, select Add Color Clip, and on the new window, tap on the pencil icon to reveal a set of colors you can use.
- Once you’ve selected the color, add the Opacity transition and set the duration slider.
 Add Opacity Transition
That’s all! You’ve just the applied fade in/ fade out feature!
Pro Tip. Set the Duration of each Transition to 2 seconds.
Use the play key to preview and make adjustments to the duration of the clips if you’d like something more personalized.
Finishing up
If you finish editing your masterpiece, click ‘Save’ button, choose the settings and after the rendering, your video will be downloaded.
Doing it right
Speaking of underdoing the effect, making the transition too fast, or painstakingly slow, here are a few tips that can serve as your first stepping stones for ongoing experimentation.
- Set the duration of the clip to 3 seconds.
- Set the duration for the opacity transition to 2 seconds.
This way you’ll definitely get a slick fade-in or fade-out effect that’s perfect for either changing the scene in the video or making it into a seamless loop.
If you still have any questions, we’ve created this video guide for you!
How to White out PDF Files in Quick Way

Elise Williams
2020-12-21 15:18:52 • Filed to: How-To • Proven solutions
A common problem faced by people working with PDF documents is their inability to protect sensitive content within the documents. Even if you encrypt PDF with a password, others can still hack the password and access the content. How to safely publish or share your PDF on the internet without information leakage? You only need to know how to white out PDF documents. This is fairly simple if you have PDFelement.
3 Steps to White out Text in PDF
The process of redaction is generally quite easy to follow. It requires users to select the data or image that is to be removed. Once that is done, then the redaction tool will simply white out that area of text or image and cover it with a redaction box. In this manner, the redacted portion ceases to exist and cannot be read by any other tool.
Step 1. Import PDF into PDFelement
After successful installation, run PDFelement on your computer. Open the PDF document which needs to be whited out by clicking the «Open File» button.

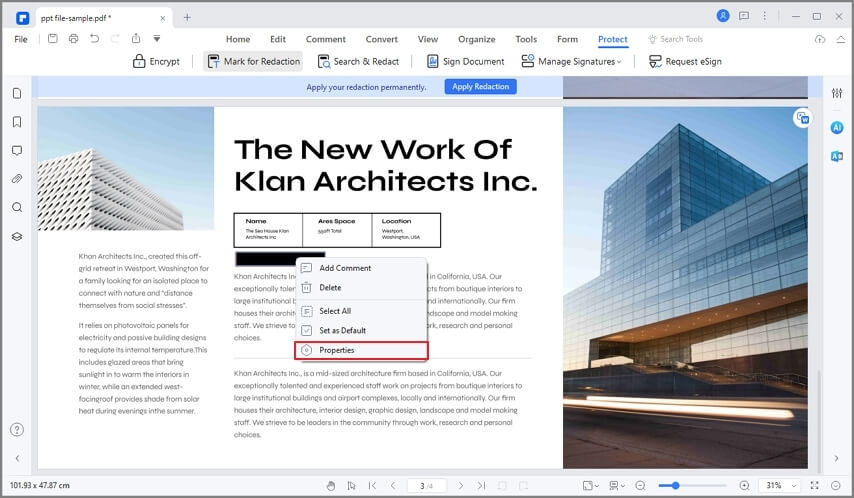
Step 2. Select the Area to be Redacted
Click on the «Mark for Redaction» button under the «Protect» tab. Then select the entire text area or image that needs to be worked on.

Step 3. White out PDF with Redaction
Right click the Redaction area and choose «Properties». This will open the Properties window, where you can choose the color of the area that has been redacted. If you wish to add any text on top, simply choose the option that says «Use Overlay Text». You can also tick «Redaction Codes» to add further information. Finally click «Apply Redactions» to permanently white out PDF.
Possibly the best method to white out on PDF is by using a professional redaction tool that can allow a range of options with the PDF. One tool that is highly recommended is PDFelement. It is an entire suite that allows access to editing, transformation, organization and combination tools for PDF documents. It provides users with the ability to manage a PDF as per their need and work on it without having to open the source document.
The smart tool can white out the required portions such as text, image and other objects on the document. You can also search specific text and redact the same words in a PDF at a time. PDFelement also gives you the possibility of changing the color of redaction area, putting custom text or message, adding redaction code. It also has a built in OCR which can turn scanned PDF into fully editable document. This will help you easily white out text in scanned PDF.


