- Transfer photos and videos from your iPhone, iPad, or iPod touch
- iCloud Photos
- Import to your Mac
- Import to your PC
- Set up and use iCloud for Windows
- Before you begin
- Set up iCloud for Windows
- Download and share your photos
- Share your photos
- See your files and folders with iCloud Drive
- Keep your apps up to date
- On your PC
- Use iTunes to share files between your computer and your iOS or iPadOS device
- Before you begin
- What you need for File Sharing
- See which of your iOS and iPadOS apps can share files with your computer
- Copy files from your computer to your iOS or iPadOS app
- Copy files from an iOS or iPadOS app to your computer
- Open shared files
- Back up shared files
- Delete a shared file from your iOS device
Transfer photos and videos from your iPhone, iPad, or iPod touch
Learn how to transfer photos and videos from your iPhone, iPad, or iPod touch to your Mac or PC. You can also make your photos available on all your devices with iCloud Photos.
iCloud Photos
iCloud Photos keeps your photos and videos safe, up to date, and available automatically on all of your Apple devices, on iCloud.com, and even your PC. When you use iCloud Photos, you don’t need to import photos from one iCloud device to another. iCloud Photos always uploads and stores your original, full-resolution photos. You can keep full-resolution originals on each of your devices, or save space with device-optimized versions instead. Either way, you can download your originals whenever you need them. Any organizational changes or edits you make are always kept up to date across all your Apple devices. Learn how to set up and use iCloud Photos.
The photos and videos that you keep in iCloud Photos use your iCloud storage. Before you turn on iCloud Photos, make sure that you have enough space in iCloud to store your entire collection. You can see how much space you need and then upgrade your storage plan if necessary.
Import to your Mac
You can use the Photos app to import photos from your iPhone, iPad, or iPod touch to your Mac.
- Connect your iPhone, iPad, or iPod touch to your Mac with a USB cable.
- Open the Photos app on your computer.
- The Photos app shows an Import screen with all the photos and videos that are on your connected device. If the Import screen doesn’t automatically appear, click the device’s name in the Photos sidebar.
- If asked, unlock your iOS or iPadOS device using your passcode. If you see a prompt on your iOS or iPadOS device asking you to Trust This Computer, tap Trust to continue.
- Choose where you want to import your photos. Next to «Import to,» you can choose an existing album or create a new one.
- Select the photos you want to import and click Import Selected, or click Import All New Photos.

- Wait for the process to finish, then disconnect your device from your Mac.
Import to your PC
You can import photos to your PC by connecting your device to your computer and using the Windows Photos app:
- Make sure that you have the latest version of iTunes on your PC. Importing photos to your PC requires iTunes 12.5.1 or later.
- Connect your iPhone, iPad, or iPod touch to your PC with a USB cable.
- If asked, unlock your iOS or iPadOS device using your passcode.
- If you see a prompt on your iOS or iPadOS device asking you to Trust This Computer, tap Trust or Allow to continue.
If you have iCloud Photos turned on, you need to download the original, full resolution versions of your photos to your iPhone before you import to your PC. Find out how.
When you import videos from your iOS or iPadOS device to your PC, some might be rotated incorrectly in the Windows Photos app. You can add these videos to iTunes to play them in the correct orientation.
If you’re having trouble importing photos from your iOS or iPadOS device to Windows 10, try these steps:
- On your iOS or iPadOS device, open the Settings app. Tap Camera, then tap Formats.
- Tap Most Compatible. From now on, your camera will create photos and videos in JPEG and H.264 formats.
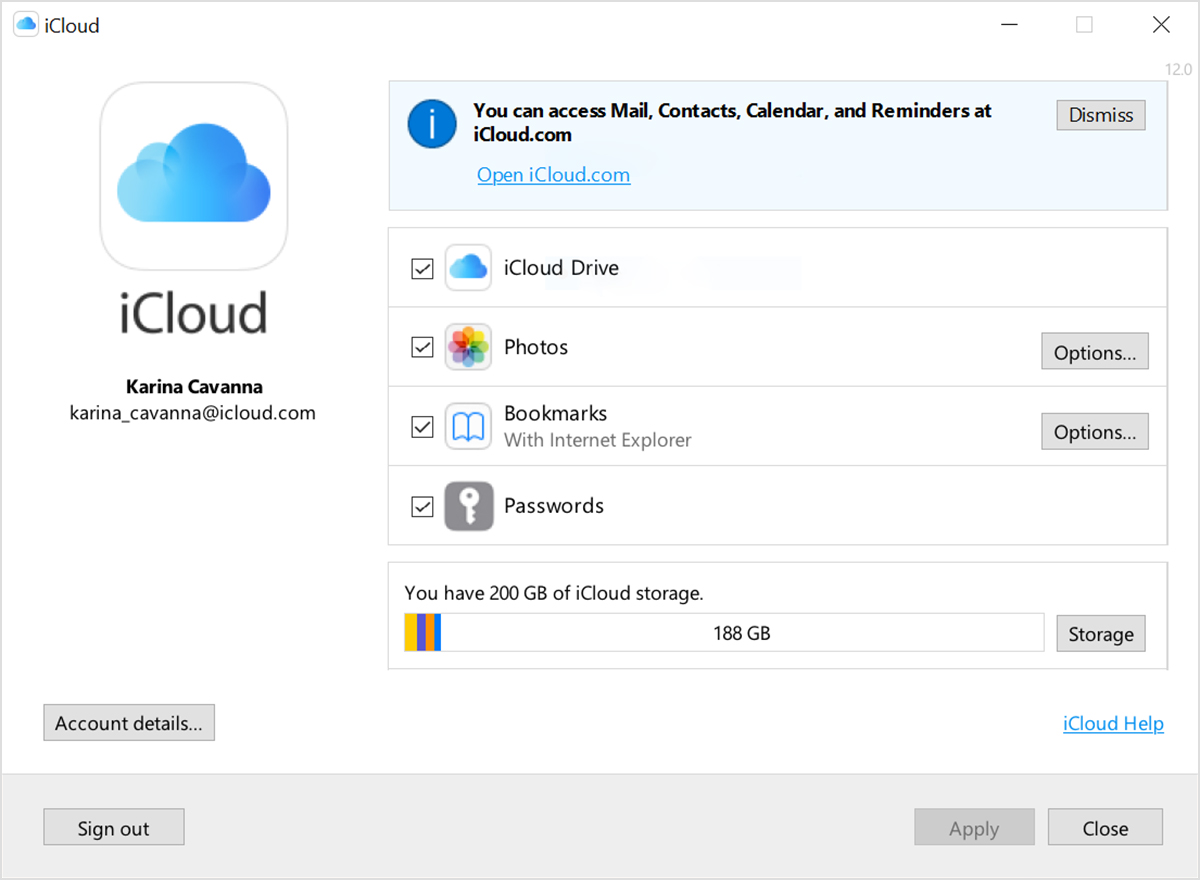
Set up and use iCloud for Windows
With iCloud for Windows, the photos, documents, and bookmarks on your PC are updated automatically on your Apple devices.
Before you begin
Make sure that you set up iCloud on your iPhone, iPad, or iPod touch or Mac and that you’re signed in with your Apple ID. Then follow the steps below to download and set up iCloud for Windows.
Want to access iCloud’s latest features? See the recommended system requirements. iCloud requires an Internet connection. iCloud might not be available in all areas and features vary. If you use a Managed Apple ID, iCloud for Windows isn’t supported.

Set up iCloud for Windows
- Download iCloud for Windows on your PC.
- Windows 10: Go to the Microsoft Store to download iCloud for Windows.
- Earlier versions of Windows*: Download iCloud for Windows from apple.com.
- If it doesn’t install automatically, go to File Explorer and open iCloud Setup.
- Restart your computer.
- Make sure iCloud for Windows is open. If it doesn’t open automatically, go to Start, open Apps or Programs, and open iCloud for Windows.
- Enter your Apple ID to sign in to iCloud.
- Choose the features and content that you want to keep up to date across your devices.
- Click Apply.
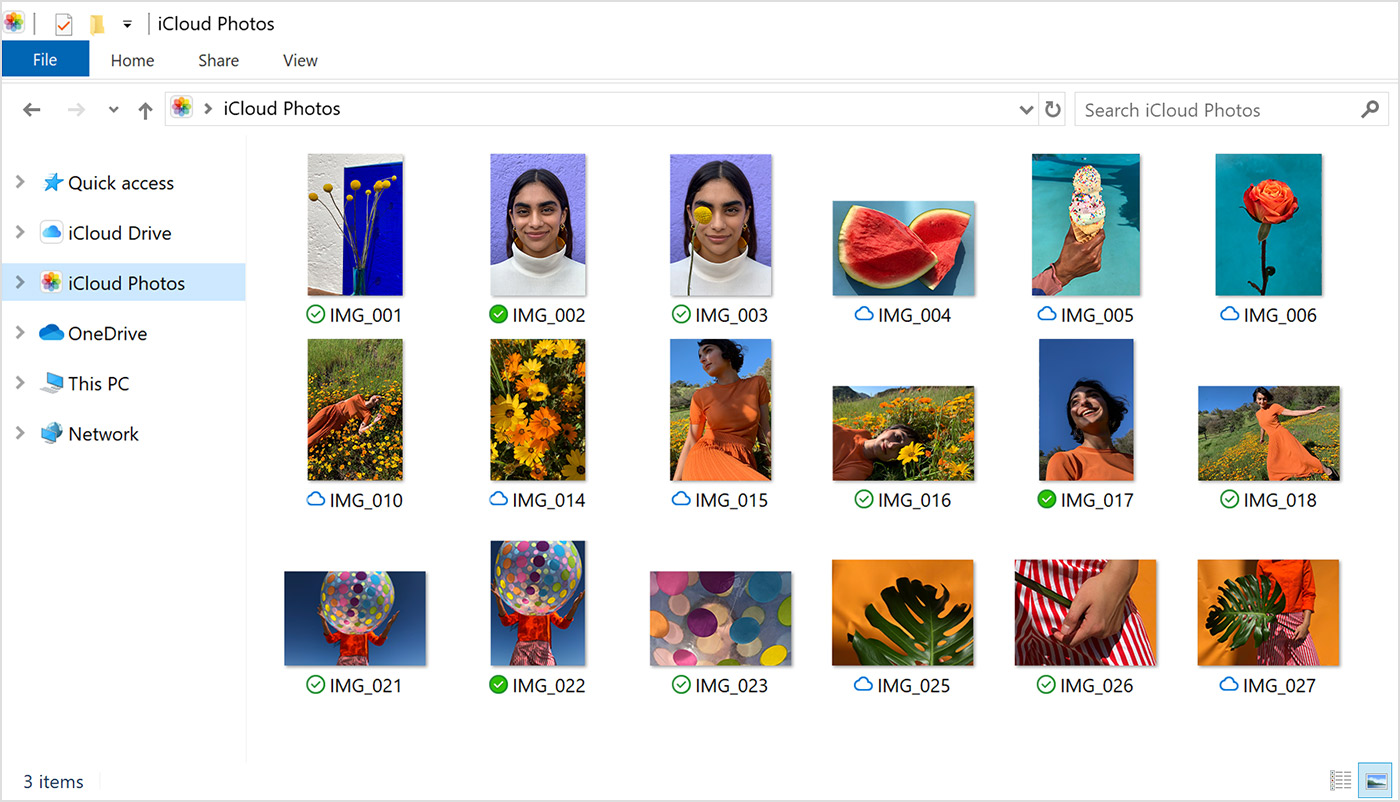
Download and share your photos
When you turn on Photos, iCloud for Windows creates a Photos folder in File Explorer called iCloud Photos. iCloud Photos uploads new photos and videos that you add to the iCloud Photos folder on your PC so you can see them in the Photos app on your iPhone, iPad, iPod touch, and Mac, and on iCloud.com. New photos and videos you take automatically download from iCloud Photos.
Share your photos
You can also share your photos. Shared Albums lets you view, share, and comment on the photos and videos you share with other people. And if you use the latest version of iCloud for Windows, you can pin photos to keep them local to your device. When you unpin them, they upload to iCloud instead.
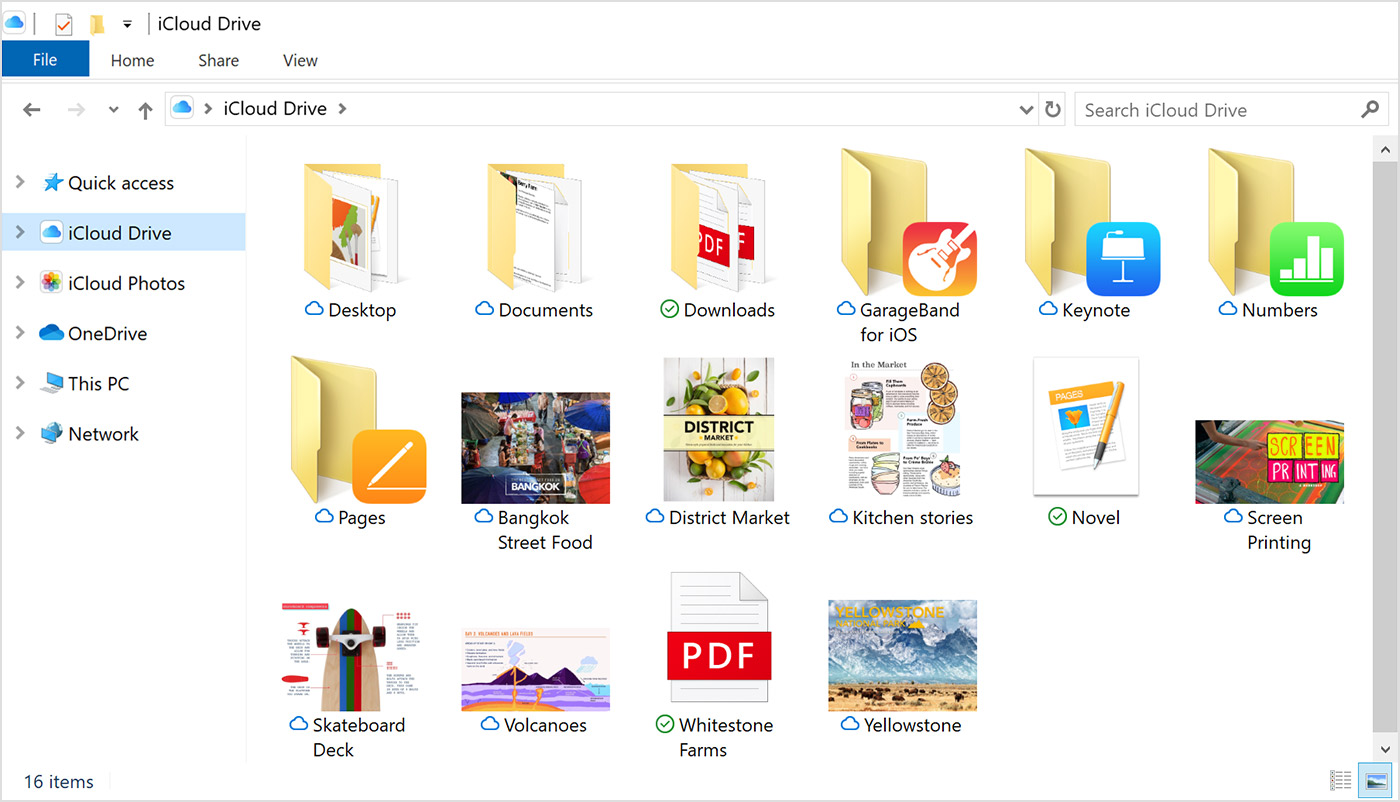
See your files and folders with iCloud Drive
When you turn on iCloud Drive, iCloud for Windows creates an iCloud Drive folder in File Explorer. You can find documents that you’ve stored in iCloud in this folder. When you create a file on your PC and save it to the iCloud Drive folder, it also appears on your other devices.
If you want to work on files with friends or colleagues, you can share individual files or create a shared folder to share a group of files. You can also pin files and folders so you can use them offline, and easily check the status of a download or shared file. In iCloud for Windows 12, you can find and recover files deleted from iCloud Drive in the past 30 days in Recently Deleted in iOS, iPadOS, or iCloud.com, in Trash in macOS, and in Recycle Bin in Windows. If you use Delete or Delete All in Recently Deleted or empty the Trash in macOS, files aren’t recoverable. If you don’t see the files you wish to restore, you can recover files deleted within the last 30 days at iCloud.com.
You can also access your iCloud Drive files and folders at iCloud.com.
If you receive an error when you try to move a file from iCloud for Windows, you might need to download the file to your Windows PC. After you download the file, try moving it again.
Keep your apps up to date
When you use iCloud on all of your devices, you can keep your Mail, Contacts, Calendars, and Tasks* updated no matter which device you’re using. Just make sure iCloud is set up on your PC, iPhone, iPad, iPod touch, or Mac using the steps below.
* On a Mac or iOS device, you see Reminders instead of Tasks.
On your PC
- Open iCloud for Windows.
- Select Mail, Contacts, Calendars, and Tasks then click Apply.
- You’ll see your iCloud Mail account in the folder pane on the left side of Microsoft Outlook 2007 through Outlook 2016.
If you sign in to iCloud using a third-party Mail app outside of iCloud for Windows, learn how to create an app-specific password to keep information up to date on your devices.
Use iTunes to share files between your computer and your iOS or iPadOS device
You can copy files between your computer and apps on your iOS or iPadOS device using File Sharing.
Before you begin
Instead of File Sharing, consider using iCloud Drive, Handoff, or AirDrop to keep your documents up to date across all of your devices.
iCloud Drive lets you securely access all of your documents from your iPhone, iPad, iPod touch, Mac, or PC. No matter which device you’re using, you’ll always have the most up to date documents when and where you need them.
With Handoff, you can start a document, email, or message on one device and pick up where you left off from another device. Handoff works with Apple apps such as Mail, Safari, Maps, Messages, Reminders, Calendar, Contacts, Pages, Numbers, and Keynote. Some third-party apps are also compatible.
AirDrop helps you share photos, videos, websites, locations, and more with other nearby Apple devices.
What you need for File Sharing
- The latest version of iTunes.
- The latest version of macOS or an up-to-date version of Windows 7 or later.
- An iPhone, iPad, or iPod touch with the latest version of iOS or iPadOS.
- An iOS or iPadOS app that works with File Sharing.
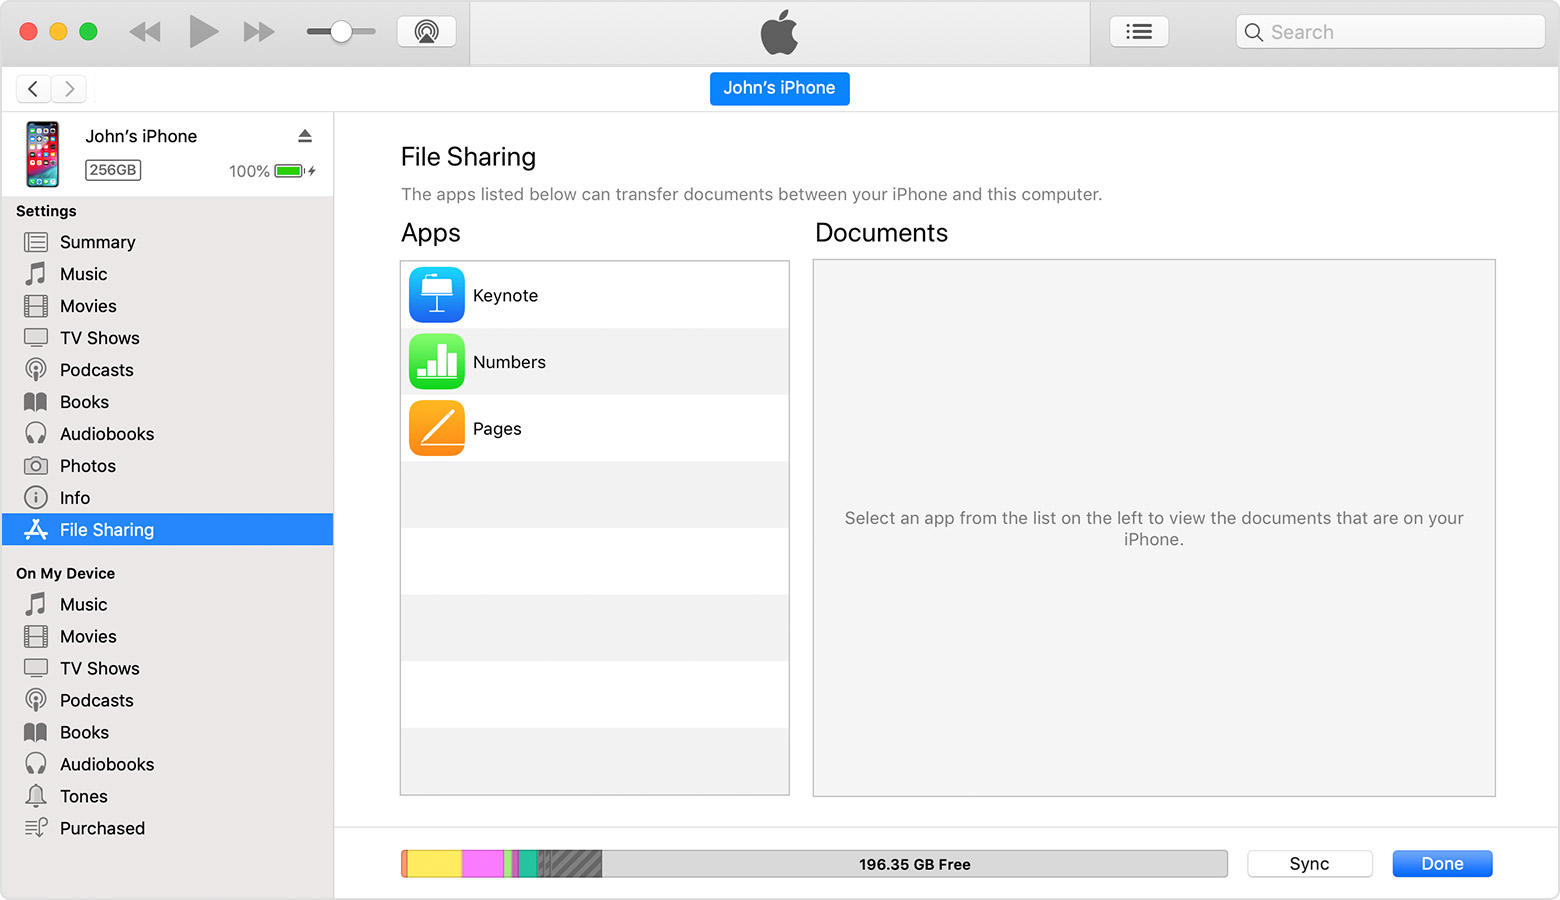
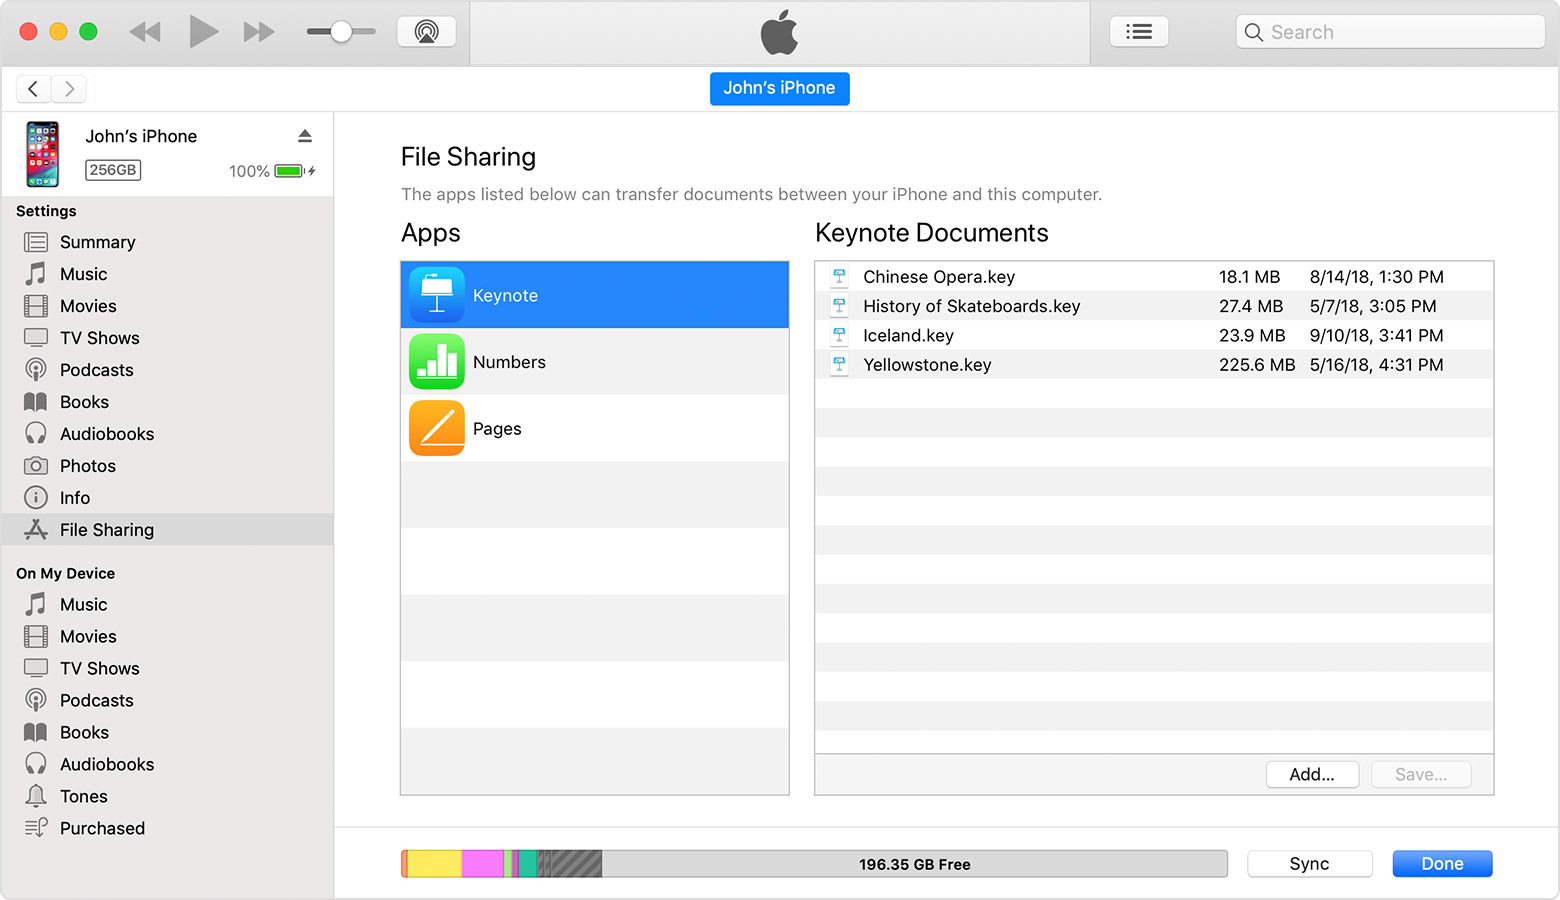
See which of your iOS and iPadOS apps can share files with your computer
- Open iTunes on your Mac or PC.
- Connect your iPhone, iPad, or iPod touch to your computer using the USB cable that came with your device.
- Click your device in iTunes. Get help if you can’t find it.
- In the left sidebar, click File Sharing.
- Select an app to see which files are available for sharing in that app on your device. If you don’t see a File Sharing section, your device has no file-sharing apps.

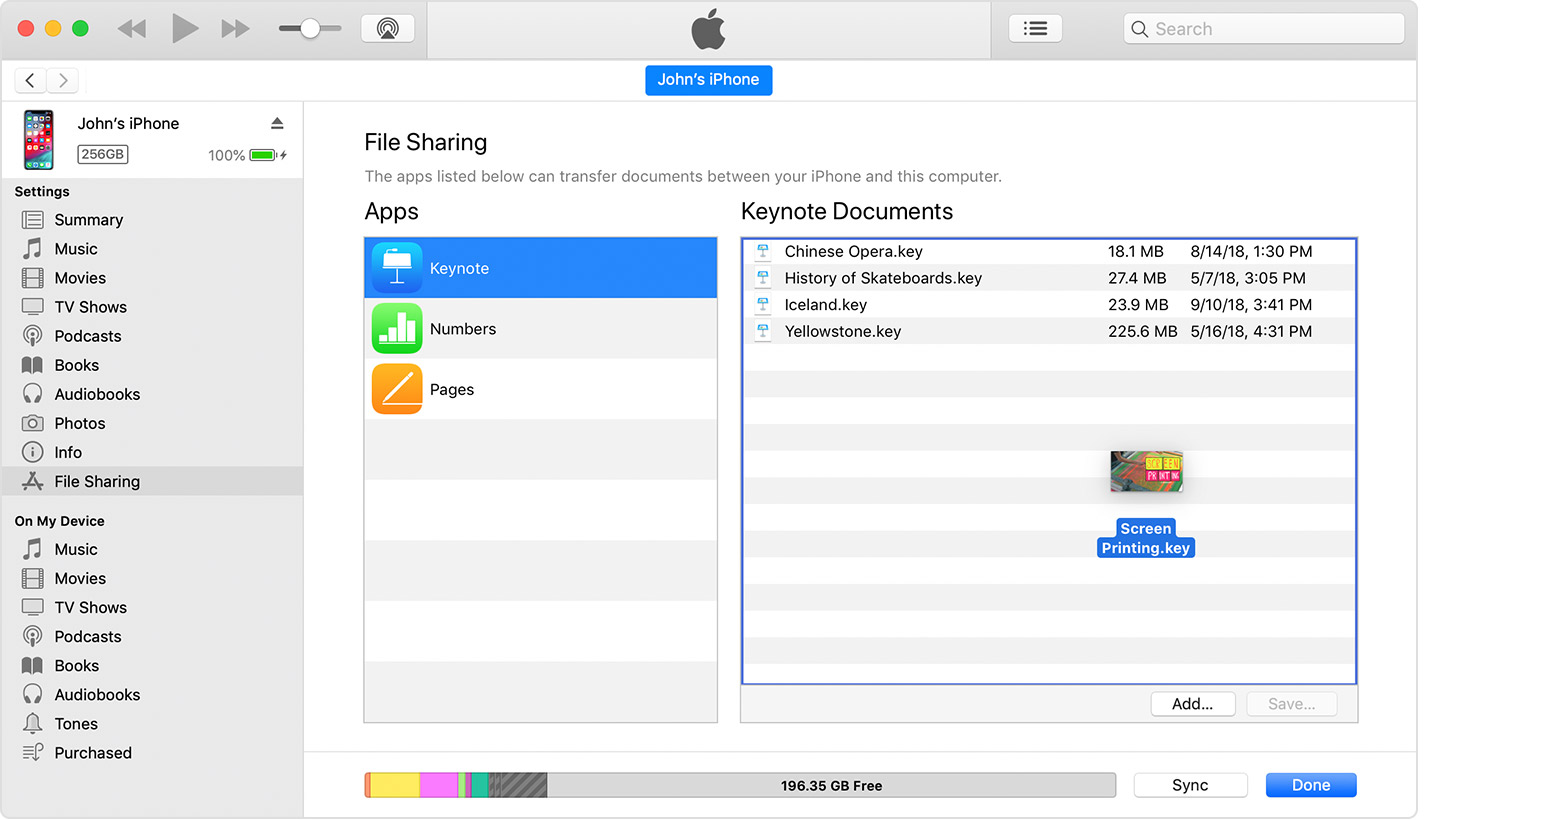
Copy files from your computer to your iOS or iPadOS app
- In iTunes, select the app from the list in the File Sharing section.
- Drag and drop files from a folder or window onto the Documents list to copy them to your device.
You can also click Add in the Documents list in iTunes, find the file or files you want to copy from your computer, and then click Add. iTunes copies these files to the app on your device. Choose only files that will work with the app. Check the app’s user guide to learn which kinds of files will work.
Copy files from an iOS or iPadOS app to your computer
- In iTunes, select the app from the list in the File Sharing section.
- Drag and drop files from the Documents list to a folder or window on your computer to copy them to your computer.
You can also select the file or files that you want to copy to your computer from the Documents list and click «Save» then find the folder on your computer to which you want to copy the files and click Save.
Open shared files
On your iOS device, you can open the files from your computer with the app that you chose for File Sharing.
You can’t access these files from other apps or locations on your device. You can see the list of files in the File Sharing section of iTunes when your device is connected to your computer.
Back up shared files
When iCloud (or iTunes) backs up your device, it backs up your shared files as well.
If you delete an app with shared files from your iOS device, you also delete those shared files from your device and your iCloud or iTunes backup. To avoid losing shared files, copy the files to your computer before deleting the app from your iOS device.
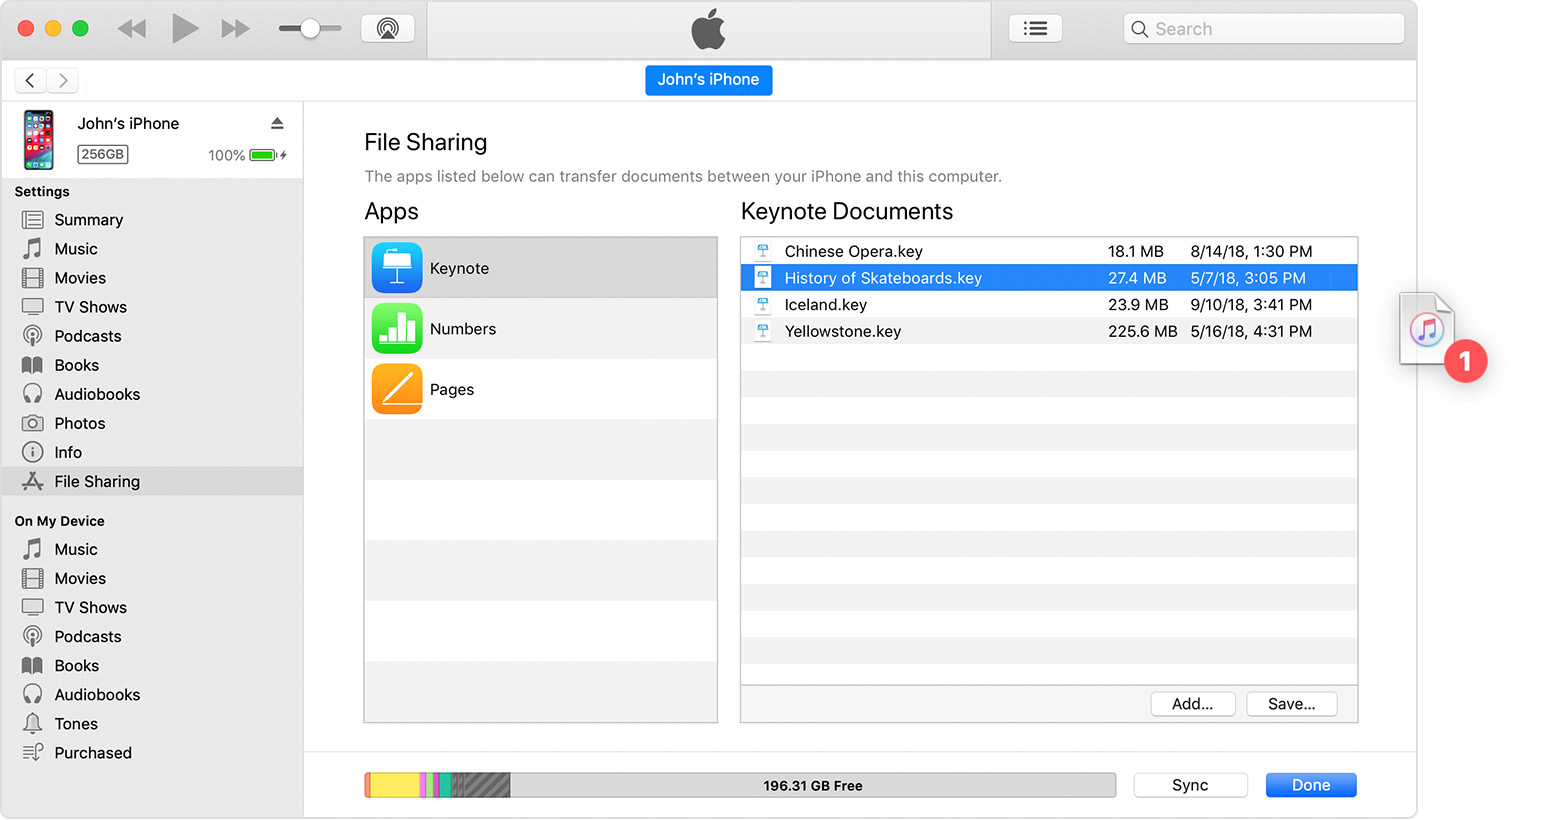
Delete a shared file from your iOS device
To delete a file you copied to an iOS or iPadOS app using File Sharing, follow these steps:
- Open iTunes on your Mac or PC.
- Connect your iPhone, iPad, or iPod touch to your computer using the USB cable that came with your device.
- Select your device in iTunes. Get help if you can’t find it.
- Select the app from the list in the File Sharing section.
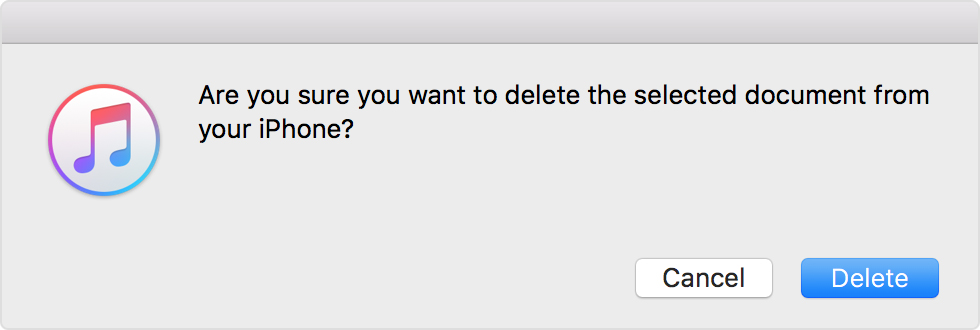
- Select the file that you want to delete in the Documents list, then press the Delete key on your keyboard.
- When iTunes asks you to confirm, click Delete.
There might be other ways to delete files from an app. Read your app’s user guide to find out more.


