Windraw dot Net
Установка HP 1536dnf в Ubuntu
Купили в пару офисов HP LaserJet 1536dnf на смену HP 1120. Менять решили по нескольким причинам:
- нужен автоподатчик документов
- периодические проблемы со сканированием в Ubuntu
- периодические зависоны устройства вообще.
- нужна печать с двух сторон, ну и т.д.
 Заказали, оплатили, получили железки. Тут в офисе первоначально настроили (прописали те же сетевые настройки, вместо которых они будут установлены) и отправили в офисы. На следующий день когда их включили в сеть — поняли, что не все так просто. Возникли проблемы при установке и сходу настроить не получилось. Пошарив по инету, почитав понемногу всего — решил описать свои действия, может пригодиться еще кому.
Проверяем версию hplip
Если установленная версия ниже чем 3.11.1 – нужно обновлять. Если же выше – принтер должен нормально установиться.
Для обновления делаем так:
sudo add-apt-repository ppa:hplip-isv/ppa
(должен быть полный интернет в это время)
Результатом этого действа будет примерно следующее:
$ sudo add-apt-repository ppa:hplip-isv/ppa Executing: gpg —ignore-time-conflict —no-options —no-default-keyring —secret-keyring /etc/apt/secring.gpg —trustdb-name /etc/apt/trustdb.gpg
—keyring /etc/apt/trusted.gpg —primary-keyring /etc/apt/trusted.gpg —keyserver keyserver.ubuntu.com —recv 6786BBBBAA1BD96ABA5CD549D5DD920D57840E95 gpg: запрашиваю ключ 57840E95 с hkp сервера keyserver.ubuntu.com gpg: ключ 57840E95: открытый ключ «Launchpad PPA for HPLIP» импортирован gpg: Всего обработано: 1 gpg: импортировано: 1 (RSA: 1) schelkovo@schelkovo:
sudo apt-get update sudo apt-get upgrade
После обновления снова проверяем версию.
Если не изменилась – идем в менеджер пакетов Синаптик, фильтруем по hpli и видим что не все обновилось – отмечаем пакеты для обновления и применяем.
Снова проверяем –
Убеждаемся что версия последняя.
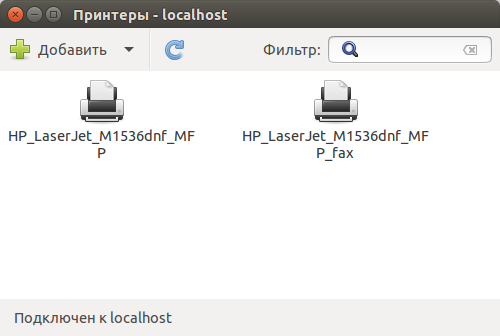
Теперь просто добавляем принтер стандартными средствами.
Печатаем тестовую страницу – все ок. Проверяем работает ли сканер – если нет — делаем по интрукции Ubuntu и сетевой сканер (МФУ)
Всем удачи. Кстати рекомендую — Компьютерная техника, ноутбуки, планшетники
Источник
hp laserjet 1536dnf MFP driver for linux
I confused HP laserjet m1536dnf MFP and HP laserjet 1536dnf MFP and bought the latter. How can I get it to work under linux? I cannot find it mentioned in HPLIP.
Is it partially supported by another driver?
Question information
Related bugs
Related FAQ:
I think both are same (i.e HP laserjet m1536dnf MFP). Just to confirm please send me the output of below command from Linux terminal after printer is connected via USB cable.
Also you can try below steps to check if printer is identified by HPLIP or not.
=> Download and install the latest HPLIP release from
http:// hplipopensource .com/hplip- web/install/ install/ index.html (automatic installer) or
http:// hplipopensource .com/hplip- web/install/ manual/ index.html (manual installation, if automatic installer does not work)
=> Reconfigure print queue with the commands in the terminal mentioned below.
=> system- config- printer (remove all print queues)
=> su -c «hp-plugin»
or
=> sudo hp-plugin (This will download right plugin)
=> hp-setup (It should not be run in a root mode. This command is adding print queue, make sure you select ppd name having «-ps» or «hpcups» substring)
=>Try printing now.
Here is what lsusb -v says. I am sending only the portion relating to the
HP printer
Bus 002 Device 006: ID 03f0:012a Hewlett-Packard
Device Descriptor:
bLength 18
bDescriptorType 1
bcdUSB 2.00
bDeviceClass 0 (Defined at Interface level)
bDeviceSubClass 0
bDeviceProtocol 0
bMaxPacketSize0 64
idVendor 0x03f0 Hewlett-Packard
idProduct 0x012a
bcdDevice 1.00
iManufacturer 1 Hewlett-Packard
iProduct 2 HP LaserJet M1536dnf MFP
iSerial 3 00CNF8F2K68W
bNumConfigura tions 1
Configuration Descriptor:
bLength 9
bDescriptorType 2
wTotalLength 122
bNumInterfaces 4
bConfigurat ionValue 1
iConfiguration 0
bmAttributes 0xc0
Self Powered
MaxPower 2mA
Interface Descriptor:
bLength 9
bDescript orType 4
bInterfac eNumber 0
bAlternat eSetting 0
bNumEndpoints 3
bInterfac eClass 255 Vendor Specific Class
bInterfac eSubClass 2
bInterfac eProtocol 1
iInterface 16 HP SCAN
Endpoint Descriptor:
bLength 7
bDescriptorTyp e 5
bEndpointAddre ss 0x03 EP 3 OUT
bmAttributes 2
Transfer Type Bulk
Synch Type None
Usage Type Data
wMaxPacketSize 0x0200 1x 512 bytes
bInterval 255
Endpoint Descriptor:
bLength 7
bDescriptorTyp e 5
bEndpointAddre ss 0x83 EP 3 IN
bmAttributes 2
Transfer Type Bulk
Synch Type None
Usage Type Data
wMaxPacketSize 0x0200 1x 512 bytes
bInterval 0
Endpoint Descriptor:
bLength 7
bDescriptorTyp e 5
bEndpointAddre ss 0x84 EP 4 IN
bmAttributes 3
Transfer Type Interrupt
Synch Type None
Usage Type Data
wMaxPacketSize 0x0008 1x 8 bytes
bInterval 16
Interface Descriptor:
bLength 9
bDescript orType 4
bInterfac eNumber 1
bAlternat eSetting 0
bNumEndpoints 2
bInterfac eClass 7 Printer
bInterfac eSubClass 1 Printer
bInterfac eProtocol 2 Bidirectional
iInterface 18 Printer
Endpoint Descriptor:
bLength 7
bDescriptorTyp e 5
bEndpointAddre ss 0x01 EP 1 OUT
bmAttributes 2
Transfer Type Bulk
Synch Type None
Usage Type Data
wMaxPacketSize 0x0200 1x 512 bytes
bInterval 255
Endpoint Descriptor:
bLength 7
bDescriptorTyp e 5
bEndpointAddre ss 0x81 EP 1 IN
bmAttributes 2
Transfer Type Bulk
Synch Type None
Usage Type Data
wMaxPacketSize 0x0200 1x 512 bytes
bInterval 0
Interface Descriptor:
bLength 9
bDescript orType 4
bInterfac eNumber 2
bAlternat eSetting 0
bNumEndpoints 3
bInterfac eClass 255 Vendor Specific Class
bInterfac eSubClass 3
bInterfac eProtocol 1
iInterface 21 HP FAX
Endpoint Descriptor:
bLength 7
bDescriptorTyp e 5
bEndpointAddre ss 0x05 EP 5 OUT
bmAttributes 2
Transfer Type Bulk
Synch Type None
Usage Type Data
wMaxPacketSize 0x0200 1x 512 bytes
bInterval 255
Endpoint Descriptor:
bLength 7
bDescriptorTyp e 5
bEndpointAddre ss 0x85 EP 5 IN
bmAttributes 2
Transfer Type Bulk
Synch Type None
Usage Type Data
wMaxPacketSize 0x0200 1x 512 bytes
bInterval 0
Endpoint Descriptor:
bLength 7
bDescriptorTyp e 5
bEndpointAddre ss 0x86 EP 6 IN
bmAttributes 3
Transfer Type Interrupt
Synch Type None
Usage Type Data
wMaxPacketSize 0x0008 1x 8 bytes
bInterval 16
Interface Descriptor:
bLength 9
bDescript orType 4
bInterfac eNumber 3
bAlternat eSetting 0
bNumEndpoints 3
bInterfac eClass 255 Vendor Specific Class
bInterfac eSubClass 4
bInterfac eProtocol 1
iInterface 22 HP LEDM
Endpoint Descriptor:
bLength 7
bDescriptorTyp e 5
bEndpointAddre ss 0x09 EP 9 OUT
bmAttributes 2
Transfer Type Bulk
Synch Type None
Usage Type Data
wMaxPacketSize 0x0200 1x 512 bytes
bInterval 255
Endpoint Descriptor:
bLength 7
bDescriptorTyp e 5
bEndpointAddre ss 0x89 EP 9 IN
bmAttributes 2
Transfer Type Bulk
Synch Type None
Usage Type Data
wMaxPacketSize 0x0200 1x 512 bytes
bInterval 0
Endpoint Descriptor:
bLength 7
bDescriptorTyp e 5
bEndpointAddre ss 0x8a EP 10 IN
bmAttributes 3
Transfer Type Interrupt
Synch Type None
Usage Type Data
wMaxPacketSize 0x0008 1x 8 bytes
bInterval 16
Device Qualifier (for other device speed):
bLength 10
bDescriptorType 6
bcdUSB 2.00
bDeviceClass 0 (Defined at Interface level)
bDeviceSubClass 0
bDeviceProtocol 0
bMaxPacketSize0 64
bNumConfigura tions 1
Device Status: 0x0001
Self Powered
I haven’t tried upgrading HPLIP yet, will do so. But it looks like the
internal device name is M1536dnf MFP which is the same. Yet the driver did
not work.
On Fri, Jun 21, 2013 at 1:21 PM, Sanjay Kumar > wrote:
> Your question #231119 on HPLIP changed:
> https:/ /answers. launchpad. net/hplip/ +question/ 231119
>
> Status: Open => Answered
>
> Sanjay Kumar proposed the following answer:
> I think both are same (i.e HP laserjet m1536dnf MFP). Just to confirm
> please send me the output of below command from Linux terminal after
> printer is connected via USB cable.
>
> $lsusb -v
>
> Also you can try below steps to check if printer is identified by HPLIP
> or not.
>
> => Download and install the latest HPLIP release from
> http:// hplipopensource .com/hplip- web/install/ install/ index.html( automatic installer) or
> http:// hplipopensource .com/hplip- web/install/ manual/ index.html (manual
> installation, if automatic installer does not work)
>
>
> => Reconfigure print queue with the commands in the terminal mentioned
> below.
> => system- config- printer (remove all print queues)
> => su -c «hp-plugin»
> or
> => sudo hp-plugin (This will download right plugin)
> => hp-setup (It should not be run in a root mode. This command is
> adding print queue, make sure you select ppd name having «-ps» or «hpcups»
> substring)
> =>Try printing now.
>
> —
> If this answers your question, please go to the following page to let us
> know that it is solved:
> https:/ /answers. launchpad. net/hplip/ +question/ 231119/ +confirm? answer_ id=0
>
> If you still need help, you can reply to this email or go to the
> following page to enter your feedback:
> https:/ /answers. launchpad. net/hplip/ +question/ 231119
>
> You received this question notification because you asked the question.
>
—
Professor, EE Dept Office: 332B ESB
Off: 2257 4421 Mobile: 98407 60093
Areas of interest: Plasma Physics, Optics, RF, signal processing
Источник
Блог неудавшегося программиста
Настройка принтера и сканера HP на Ubuntu 15.10 (Linux)
На работе потребовалось установить МФУ HP LaserJet 1536dnf. В принципе настройку принтера Ubuntu может выполнить и сама, и даже в GUI. А вот со сканером пришлось очень долго попотеть. Но все ж таки получилось это сделать.
Итак. В прошлый раз я настраивал все это дело на Ubuntu 15.04. И, не поверить, по инструкции все нормально встало и заработало. А вот с 15.10 — возникли большие проблемы. Как я понял (я не сильный пользователь Linux) проблема в разных версиях Python.
В общем описывать процесс долбления системы я не буду, сразу начну и правильной инструкции. Скажу только, что ошибка была такая:
error: Python gobject/dbus may be not installed
Она вылезала при установке плагина для принтера.
1. Для начала нам нужно установить hplip — HP Linux Imaging and Printing.
Это как я понимаю сами драйвера для работы с принтером и сканером.
Перед его установкой необходимо будет установить дополнительные пакеты:
sudo apt-get install —assume-yes avahi-utils libcups2 cups libcups2-dev cups-bsd cups-client libcupsimage2-dev libdbus-1-dev build-essential ghostscript openssl libjpeg-dev libsnmp-dev snmp-mibs-downloader libtool libtool-bin libusb-1.0.0-dev wget policykit-1 policykit-1-gnome python3-dbus python3-gi python3-dev python3-notify2 python3-pil python3-pyqt4 gtk2-engines-pixbuf python3-dbus.mainloop.qt python3-reportlab python3-lxml libsane libsane-dev sane-utils xsane
2. HPLIP мы будем собирать из исходников, самую последнюю версию, рекомендуемую разработчиком.
3. Для этого идем по ссылке с архивом и качаем его.
4. Распаковываем архив
tar xvfz hplip-3.15.11.tar.gz
5. Переходим в распакованную папку
6. Теперь необходимо сконфигурировать файлы командой
для 32-х битных систем:
./configure —with-hpppddir=/usr/share/ppd/HP —prefix=/usr —enable-qt4 —disable-libusb01_build —enable-doc-build —disable-cups-ppd-install —disable-foomatic-drv-install —disable-foomatic-ppd-install —disable-hpijs-install —disable-udev_sysfs_rules —disable-policykit —enable-cups-drv-install —enable-hpcups-install —enable-network-build —enable-dbus-build —enable-scan-build —enable-fax-build
для 64-х битных систем:
./configure —with-hpppddir=/usr/share/ppd/HP —libdir=/usr/lib —prefix=/usr —enable-qt4 —disable-libusb01_build —enable-doc-build —disable-cups-ppd-install —disable-foomatic-drv-install —disable-foomatic-ppd-install —disable-hpijs-install —disable-udev_sysfs_rules —disable-policykit —enable-cups-drv-install —enable-hpcups-install —enable-network-build —enable-dbus-build —enable-scan-build —enable-fax-build
После показа многа букав — по идее все должно закончиться хорошо, и вы не должны видеть записей error (по крайней мере у меня так было)
7. Следующая команда
ВАЖНО: ЗАПУСКАТЬ make необходимо от обычного пользователя.
sudo make install
9. HPLIPS у нас установился, теперь нужно заставить его найти наш МФУ. Для этого выполняем команду
10. Открывает окно настройки принтера
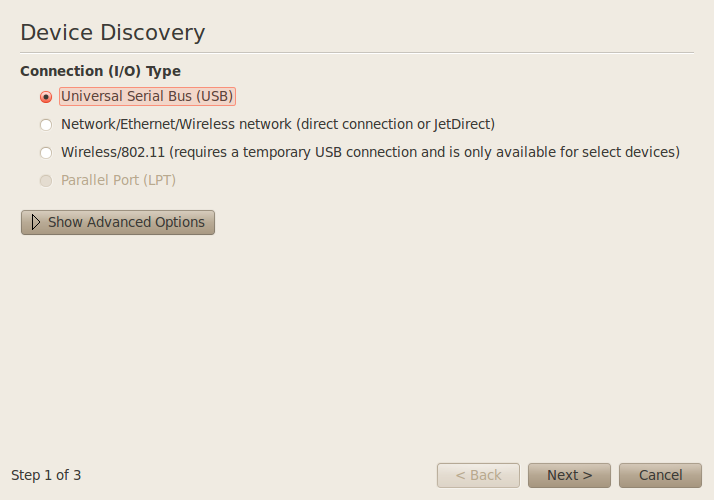
Выбираем нужный нам тип соединения, далее:
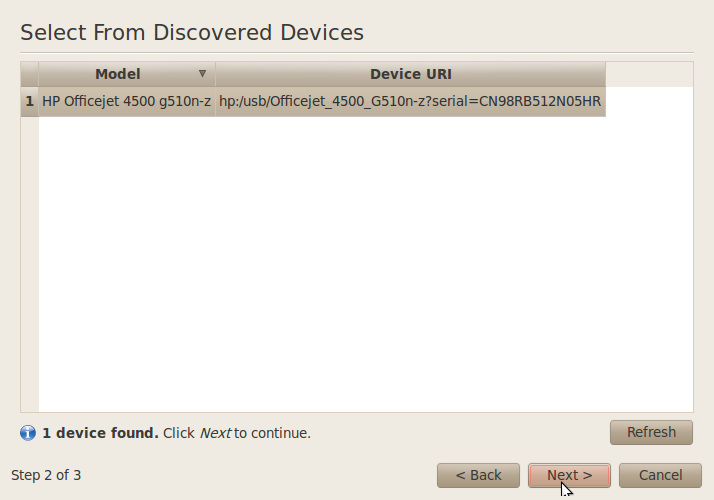
Выбираем принтер, далее.
11. Вот тут начинается самый сок. Программа просит установить плагин для МФУ — соглашаемся. Он начинает качаться, потом устанавливается (это видно в терминале). Это может продолжаться бесконечно, пока вы не прервете. В итоге он все равно не установится, а в терминела выдается та самая злополучная ошибка
error: Python gobject/dbus may be not installed
Все нахрен рушится, установка заканчивается, а принтер так и не появляется в доступных.
12. Запускаем снова sudo hp-setup, проходим шаги 10. Опять плагин качается, и начинается установка. В этот момент открываем другой терминал и идем сюда
Копируем папку plugin_tmp куда нибудь в другое место
13. В первом терминале прерываем установку плагина и закрываем его.
14. Во втором терминале заходим в папку, куда скопировали
и выполняем команду
sudo python3 installPlugin.py
И О ЧУДО — плагин встает нормально.
Снова запускаем sudo hp-setup. Проходим шаг 10. Наконец он не спрашивает у нас ничего боле, только ввести наименование принтера и еще заполнить пару полей. Заполняем. Все — готово. Принтер и сканер готов к работе.
Для того, чтобы запустить сканер — введите в терминале
Источник


