- Information Security Squad
- Нагрузочное тестирование веб-серверов с помощью Siege Benchmarking Tool
- Установка Siege HTTP Load Testing Utility в Linux
- Настройка Siege HTTP Load Testing Utility в Linux
- Тестирование загрузки сайта с помощью Siege Benchmarking Utility
- Запустить Siege на несколько веб-сайтов
- Заключение
- 3 Free Tools to Benchmark a Windows Gaming PC
- NovaBench
- UserBenchmark
- FutureMark 3DMark
- Http benchmarking tool windows
Information Security Squad
stay tune stay secure
- Home
- 2019
- Февраль
- 14
- Нагрузочное тестирование веб-серверов с помощью Siege Benchmarking Tool
Нагрузочное тестирование веб-серверов с помощью Siege Benchmarking Tool
Знание того, сколько трафика может обрабатывать ваш веб-сервер в условиях стресса, важно для планирования будущего роста вашего сайта или приложения.
Используя инструмент под названием siege, вы можете запустить нагрузочный тест на вашем сервере и посмотреть, как ваша система работает в различных условиях.
Вы можете использовать siege, чтобы оценить объем передаваемых данных, время отклика, скорость транзакции, пропускную способность, параллелизм и сколько раз сервер возвращал ответы.
У инструмента есть три режима, в которых он может работать –egression, internet simulation и brute force.
Важно: Siege следует запускать только на принадлежащих вам серверах или на тех, у вас есть явное разрешение на тестирование. В некоторых странах использование siege на несанкционированных сайтах может считаться преступлением.
Установка Siege HTTP Load Testing Utility в Linux
Siege является мультиплатформенным и может быть установлен в дистрибутивах Ubuntu / Debian и CentOS / RHEL с помощью следующих команд.
Чтобы установить Siege в Debin / Ubuntu, вы можете запустить:
Для CentOS / RHEL вам необходимо установить и включить репозиторий для установки:
Кроме того, вы можете собрать siege из исходника.
Для этого вам понадобятся установленные пакеты для сборки и разработки.
Затем вы можете скачать Siege с помощью команды wget и установить из исходников, как показано далее:
Настройка Siege HTTP Load Testing Utility в Linux
После завершения установки вы можете настроить файл конфигурации осады.
Он находится в /etc/siege/siegerc.
Если вы решили собрать пакет из исходного кода, вам нужно будет выполнить:
Это сгенерирует файл siege.conf, расположенный в домашней папке вашего пользователя
Содержимое файла должно выглядеть примерно так.
Обратите внимание, что я раскомментировал директивы logfile и time:
В текущей конфигурации siege будет имитировать 25 одновременно работающих пользователей в течение 1 минуты.
Теперь вы готовы к запуску siege.
Тестирование загрузки сайта с помощью Siege Benchmarking Utility
Выполнить siege довольно просто, вам нужно только указать веб-сайт, который вы хотите проверить, следующим образом:
Если доступность остается на уровне 100%, и нет ошибок подключения, значит, ваша система работала хорошо, и проблем не было.
Вы также должны следить за временем отклика.
Запустить Siege на несколько веб-сайтов
Вы можете проверить несколько URL-адресов, вы можете описать URL в /usr/local/etc/urls.txt следующим образом:
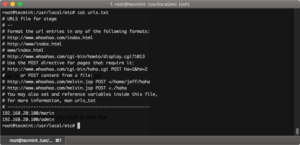
Теперь, чтобы сказать siege проверить URL-адреса из файла, используйте параметр -f, например:
Вы также можете использовать параметры командной строки, если вы хотите попробовать настройки, отличные от описанных в файле конфигурации.
- -C – указать свой собственный файл конфигурации.
- -q – подавляет вывод
- -g – получить, снять заголовки HTTP и отобразить транзакцию. Полезно для отладки.
- -c – количество одновременных пользователей, по умолчанию 10.
- -r – сколько раз запустить тест.
- -t – сколько времени для запуска теста. Вы можете указать S, M или H ex: –time = 10S на 10 секунд.
- -d – случайная задержка перед каждым запросом.
- -b – нет задержек между запросами.
- -i – пользовательское моделирование. Использует для попадания случайных URL-адресов.
- -f – проверить URL из указанного файла.
- -l – файл журнала.
- -H – добавить заголовок к запросу.
- -А – указать пользовательский агент.
- -T – устанавливает Content-Type в запросе.
- –no-parser – NO PARSER, отключить анализатор HTML-страницы.
- –no-follow – не следовать HTTP-перенаправлениям.
Заключение
Siege – это мощный инструмент для измерения надежности вашей системы в условиях высокой нагрузки.
Он может быть использован веб-разработчиками для проверки своего кода, когда сайт находится под тестированием.
Вы должны всегда выполнять свои тесты с осторожностью, поскольку тестируемый сервер может стать недоступным во время оценки.
3 Free Tools to Benchmark a Windows Gaming PC
Because the rest of them kinda suck
I recently bought my first custom gaming PC and the first thing I wanted to check after I got it was how well it benchmarked against other gaming systems. I started searching and testing out a bunch of benchmark programs for Windows, but realized quickly that only a few were good.
In this article, I’m going to write about three of my favorite benchmark programs and how to use them. I’m not going to go into any details about how to improve your score in this article as that’s a completely different topic, however, it’s something you should definitely research. When I benchmarked my gaming PC, it was ranking in the 43rd percentile, which was pretty pathetic for me.
After tweaking some settings in the BIOS related to XMP, overclocking, etc., I got it all the way up to the 76th percentile! So tweaking your hardware settings can make a big difference in your benchmark score. The scores shown below are from a non-gaming PC as I didn’t have my gaming desktop available when writing this article.
NovaBench
Novabench is a small benchmark program that lets you benchmark your PC in just a few minutes. I like it because it’s very easy to use and it gives you simple easy-to-understand results. Once you download it, go ahead and install it.
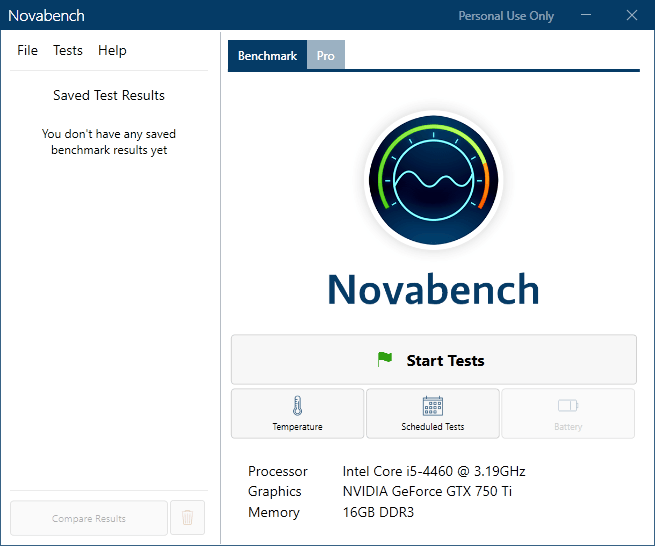
Run the program and then click on Start Tests. They also have a Pro version for $19 that lets you track the temperature over time, etc., but it’s really not needed unless you are a hardcore PC enthusiast.
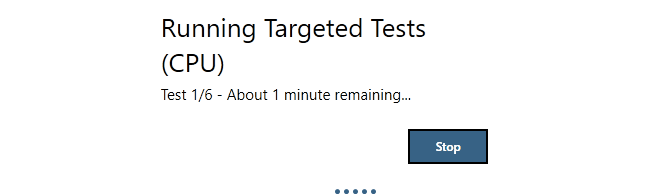
It performs six tests, which can take anywhere from a minute to a few minutes depending on the speed of your system.
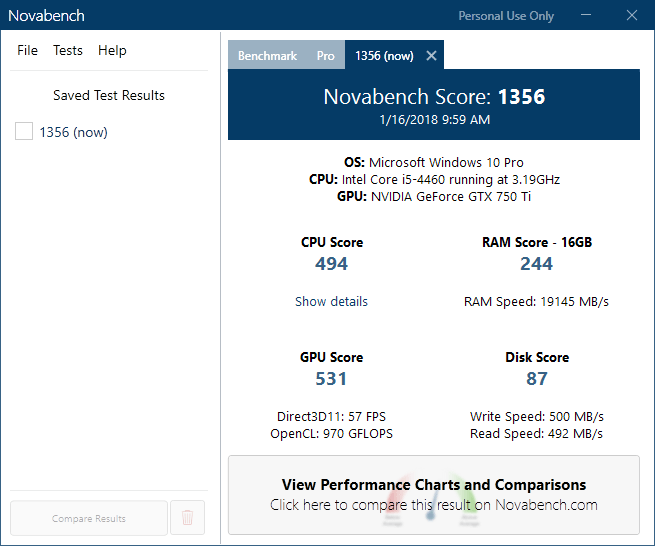
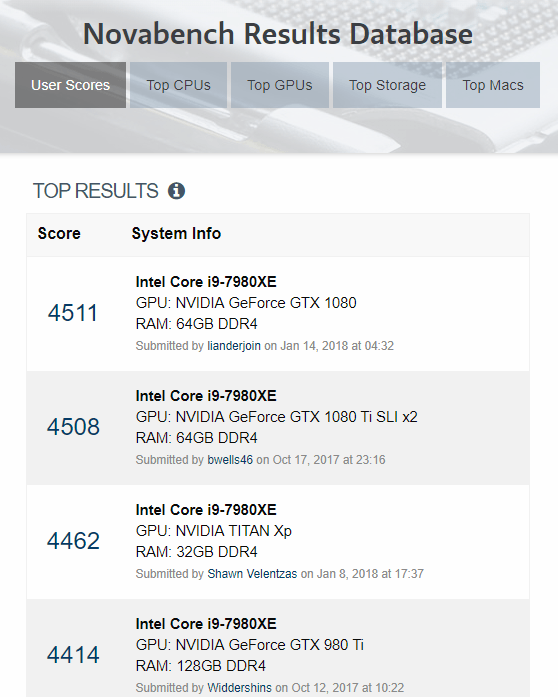
The results window will give you a Novabench score, which doesn’t mean much on its own unless you are benchmarking your PC several times before and after upgrading the hardware, overclocking, etc. If you click on the View Performance Charts and Comparisons button at the bottom, it will load a web page where you can get your percentile.
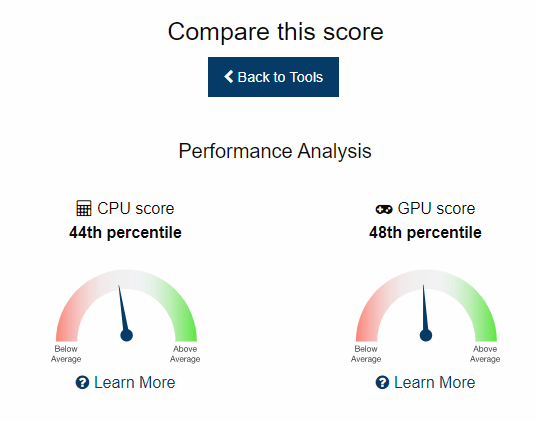
In addition, you can click on Scores & Stats at the very top, which will show you all scores recorded from highest to lowest. This is a good way to see how far you are from the fastest and best computer that has been benchmarked by the Novabench software.
UserBenchmark
Another really good program and website is UserBenchmark. Just download the software and run the EXE file to start the test. What I like about UserBenchmark is that it doesn’t even require any installation.
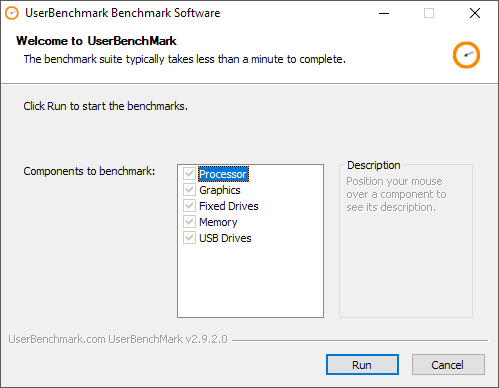
Simply click on Run to start the tests. It will take a few minutes and then the results will be displayed in a new browser window.
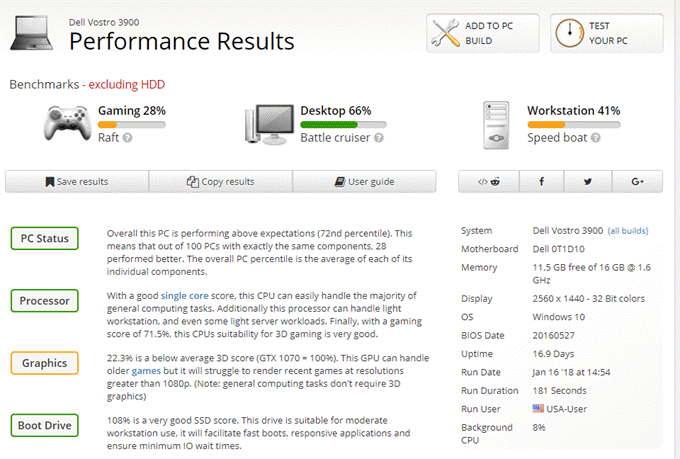
You’ll see a score for Gaming, Desktop and Workstation performance. If you scroll further down, you’ll also get an overall percentile score and a component-specific percentile score.
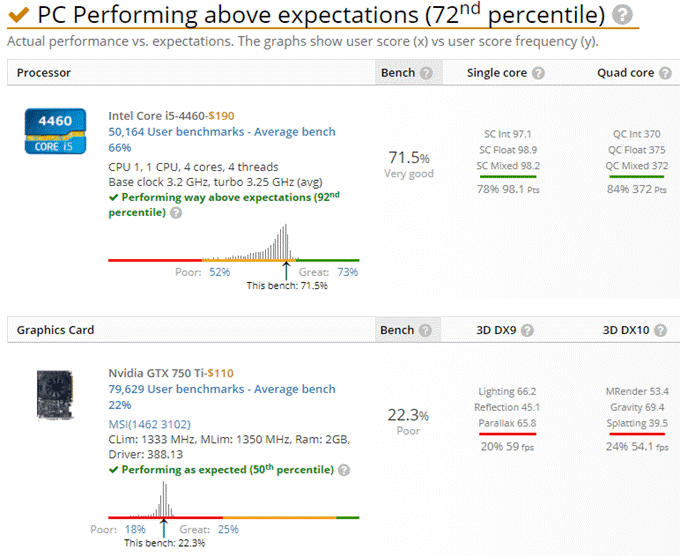
It’s worth noting that the overall percentile score is only against other computers with the same components. The PC benchmarked above is not in the 72nd percentile out of all computers benchmarked using their software. So the PC above is in the 72nd percentile out of all computers with the same components.
FutureMark 3DMark
Finally, the other one you should use if you are really wanting to get a proper demanding test done for a high-end gaming machine is Futuremark’s 3DMark benchmark. The basic edition is free and includes four free benchmarking tests.
I only suggest running this one on an actual gaming or high-performance workstation because the download is a whopping 3 GB! Mostly it’s just large files for playing back high-resolution graphics for testing, but it eats up a lot of space. Of course, you can run the benchmark and then uninstall it to get the space back.

After installing 3DMark and running it, you will see that it loads the Time Spy benchmark first. Just click Run to start the benchmark. This benchmarks takes the longest because it is the most demanding test out of the three.

When it’s finished, you’ll get a score, which doesn’t tell much until you compare it with other results. Click on the Compare Result Online button to see what your percentile score is.

As you can see, this old computer is only better than 4% of all results! My gaming PC was better than 91% of all results. That’s about it. Hopefully, these benchmarks will give you a good idea of how well your PC is performing overall and compared to others with the same components. Enjoy!
Founder of Help Desk Geek and managing editor. He began blogging in 2007 and quit his job in 2010 to blog full-time. He has over 15 years of industry experience in IT and holds several technical certifications. Read Aseem’s Full Bio
Http benchmarking tool windows


![]()
BenchmarkDotNet helps you to transform methods into benchmarks, track their performance, and share reproducible measurement experiments. It’s no harder than writing unit tests! Under the hood, it performs a lot of magic that guarantees reliable and precise results thanks to the perfolizer statistical engine. BenchmarkDotNet protects you from popular benchmarking mistakes and warns you if something is wrong with your benchmark design or obtained measurements. The results are presented in a user-friendly form that highlights all the important facts about your experiment. The library is adopted by 4500+ projects including .NET Runtime and supported by the .NET Foundation.
It’s easy to start writing benchmarks, check out an example (copy-pastable version is here):
BenchmarkDotNet automatically runs the benchmarks on all the runtimes, aggregates the measurements, and prints a summary table with the most important information:
The measured data can be exported to different formats (md, html, csv, xml, json, etc.) including plots:

Supported runtimes: .NET 5+, .NET Framework 4.6.1+, .NET Core 2.0+, Mono, CoreRT
Supported languages: C#, F#, Visual Basic
Supported OS: Windows, Linux, macOS Supported architectures: x86, x64, ARM, ARM64 and Wasm
BenchmarkDotNet has tons of features that are essential in comprehensive performance investigations. Four aspects define the design of these features: simplicity, automation, reliability, and friendliness.
You shouldn’t be an experience performance engineer if you want to write benchmarks. You can design very complicated performance experiments in the declarative style using simple APIs.
For example, if you want to parameterize your benchmark, mark a field or a property with [Params(1, 2, 3)] : BenchmarkDotNet will enumerate all of the specified values and run benchmarks for each case. If you want to compare benchmarks with each other, mark one of the benchmark as the baseline via [Benchmark(baseline: true)] : BenchmarkDotNet will compare it with all of the other benchmarks. If you want to compare performance in different environments, use jobs. For example, you can run all the benchmarks on .NET Core 3.0 and Mono via [SimpleJob(RuntimeMoniker.NetCoreApp30)] and [SimpleJob(RuntimeMoniker.Mono)] .
If you don’t like attributes, you can call most of the APIs via the fluent style and write code like this:
If you prefer command-line experience, you can configure your benchmarks via the console arguments in any console application (other types of applications are not supported).
Reliable benchmarks always include a lot of boilerplate code.
Let’s think about what should you do in a typical case. First, you should perform a pilot experiment and determine the best number of method invocations. Next, you should execute several warm-up iterations and ensure that your benchmark achieved a steady state. After that, you should execute the main iterations and calculate some basic statistics. If you calculate some values in your benchmark, you should use it somehow to prevent the dead code elimination. If you use loops, you should care about an effect of the loop unrolling on your results (which may depend on the processor architecture). Once you get results, you should check for some special properties of the obtained performance distribution like multimodality or extremely high outliers. You should also evaluate the overhead of your infrastructure and deduct it from your results. If you want to test several environments, you should perform the measurements in each of them and manually aggregate the results.
If you write this code from scratch, it’s easy to make a mistake and spoil your measurements. Note that it’s a shortened version of the full checklist that you should follow during benchmarking: there are a lot of additional hidden pitfalls that should be handled appropriately. Fortunately, you shouldn’t worry about it because BenchmarkDotNet will do this boring and time-consuming stuff for you.
Moreover, the library can help you with some advanced tasks that you may want to perform during the investigation. For example, BenchmarkDotNet can measure the managed and native memory traffic and print disassembly listings for your benchmarks.
A lot of hand-written benchmarks produce wrong numbers that lead to incorrect business decisions. BenchmarkDotNet protects you from most of the benchmarking pitfalls and allows achieving high measurement precision.
You shouldn’t worry about the perfect number of method invocation, the number of warm-up and actual iterations: BenchmarkDotNet tries to choose the best benchmarking parameters and achieve a good trade-off between the measurement prevision and the total duration of all benchmark runs. So, you shouldn’t use any magic numbers (like «We should perform 100 iterations here»), the library will do it for you based on the values of statistical metrics.
BenchmarkDotNet also prevents benchmarking of non-optimized assemblies that was built using DEBUG mode because the corresponding results will be unreliable. It will print a warning you if you have an attached debugger, if you use hypervisor (HyperV, VMware, VirtualBox), or if you have any other problems with the current environment.
During 6+ years of development, we faced dozens of different problems that may spoil your measurements. Inside BenchmarkDotNet, there are a lot of heuristics, checks, hacks, and tricks that help you to increase the reliability of the results.
Analysis of performance data is a time-consuming activity that requires attentiveness, knowledge, and experience. BenchmarkDotNet performs the main part of this analysis for you and presents results in a user-friendly form.
After the experiments, you get a summary table that contains a lot of useful data about the executed benchmarks. By default, it includes only the most important columns, but they can be easily customized. The column set is adaptive and depends on the benchmark definition and measured values. For example, if you mark one of the benchmarks as a baseline, you will get additional columns that will help you to compare all the benchmarks with the baseline. By default, it always shows the Mean column, but if we detected a vast difference between the Mean and the Median values, both columns will be presented.
BenchmarkDotNet tries to find some unusual properties of your performance distributions and prints nice messages about it. For example, it will warn you in case of multimodal distribution or high outliers. In this case, you can scroll the results up and check out ASCII-style histograms for each distribution or generate beautiful png plots using [RPlotExporter] .
BenchmarkDotNet doesn’t overload you with data; it shows only the essential information depending on your results: it allows you to keep summary small for primitive cases and extend it only for the complicated cases. Of course, you can request any additional statistics and visualizations manually. If you don’t customize the summary view, the default presentation will be as much user-friendly as possible. 🙂
Who use BenchmarkDotNet?
Learn more about benchmarking
BenchmarkDotNet is not a silver bullet that magically makes all of your benchmarks correct and analyzes the measurements for you. Even if you use this library, you still should know how to design the benchmark experiments and how to make correct conclusions based on the raw data. If you want to know more about benchmarking methodology and good practices, it’s recommended to read a book by Andrey Akinshin (the BenchmarkDotNet project lead): «Pro .NET Benchmarking». Use this in-depth guide to correctly design benchmarks, measure key performance metrics of .NET applications, and analyze results. This book presents dozens of case studies to help you understand complicated benchmarking topics. You will avoid common pitfalls, control the accuracy of your measurements, and improve the performance of your software.
| Build server | Platform | Build status |
|---|---|---|
| Azure Pipelines | Windows | |
| Azure Pipelines | Ubuntu | |
| Azure Pipelines | macOS | |
| AppVeyor | Windows |  |
| Travis | Linux | |
| Travis | macOS |
Contributions are welcome!
BenchmarkDotNet is already a stable full-featured library that allows performing performance investigation on a professional level. And it continues to evolve! We add new features all the time, but we have too many new cool ideas. Any help will be appreciated. You can develop new features, fix bugs, improve the documentation, or do some other cool stuff.
If you want to contribute, check out the Contributing guide and up-for-grabs issues. If you have new ideas or want to complain about bugs, feel free to create a new issue. Let’s build the best tool for benchmarking together!
Code of Conduct
This project has adopted the code of conduct defined by the Contributor Covenant to clarify expected behavior in our community. For more information, see the .NET Foundation Code of Conduct.


