- Httpd conf для linux
- Background
- What Do You Need?
- Install the httpd package
- Enable and start the httpd service
- Configure firewall rules (Optional)
- Test your deployment
- Edit the Apache configuration
- Create virtual hosts
- Create the document root folder
- Apply your configuration
- Configure HTTPS to secure your service
- Configure your TLS/SSL certificates
- Install the HTTPS add-on for Apache
- Update the Apache configuration
- Redirect HTTP requests to HTTPS
- Configure the firewall (optional)
- Next Tutorial
- Want to Learn More?
- ИТ База знаний
- Полезно
- Навигация
- Серверные решения
- Телефония
- Корпоративные сети
- Установка Apache в Linux
- Установка веб-сервера Apache на Linux
- Установка Apache на CentOS и RHEL
- Установка Apache на Ubuntu и Debian
- Запуск и управление веб-сервером Apache
- Проверить веб-сервер Apache
- Проверьте тестовую страницу Apache
- Создать HTML-файл для тестирования
- Настройка фаервола для Apache
- Файлы и каталоги Apache
Httpd conf для linux
This tutorial provides instructions for installing the Apache web server and enabling it on Oracle Linux 8.
Background
Apache has been in active development since 1993 and over time has become one of the most popular web servers in the world. The Apache web server is a key component of the «LAMP» (Linux, Apache, Oracle MySQL and Perl/PHP) software stack and continues to be widely used today.
The Apache web server is directly available from the Oracle Linux 8 Application Streams repository and is simple to deploy and configure.
What Do You Need?
- Any system with Oracle Linux 8 installed
Install the httpd package
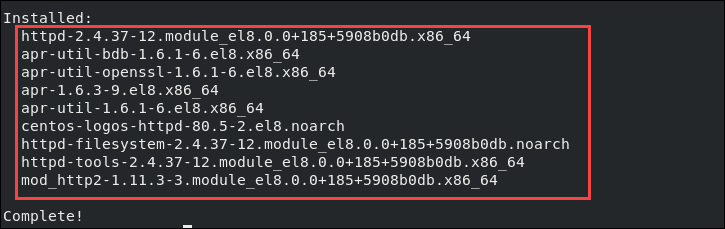
The following command installs the httpd package and all of its dependencies.
Enable and start the httpd service
To enable and start the httpd service for immediate access and make the service start automatically after a reboot, run the following command:
The service starts a web server that listens on TCP port 80 by default. To check the status of the service, run this command:
Configure firewall rules (Optional)
If you are using a custom firewall profile or an Oracle Cloud Infrastructure instance, open the firewall port for the Apache web service (80).
These commands enable the firewall port for the Apache web service and reload the default firewall service:
Test your deployment
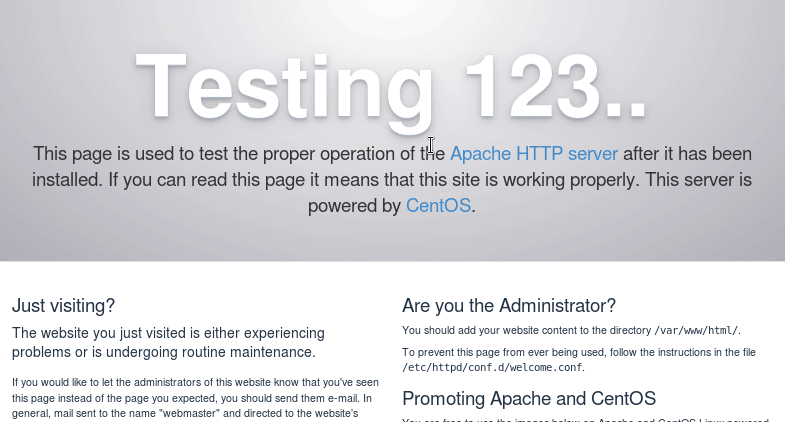
With your web browser, go to the domain name or IP address of your system.
The Apache web server opens the default test page.
Edit the Apache configuration
To change the root path for your web server, do not edit the /etc/httpd/conf/httpd.conf directly. Instead, as a preferred method, create a site-specific configuration in the /etc/httpd/conf.d directory.
Create virtual hosts
Create the file /etc/httpd/conf.d/example.com.conf and populate it with the following content:
Replace the ServerName and ServerAlias values with the hostnames, domain names, or IP addresses that you will use to access the service. Replace the DocumentRoot value with the path to where you intend to host the files for your web site. Replace the ErrorLog and CustomLog values with the path to where you intend to log activity from the httpd service.
Create the document root folder
Create a folder to host the web pages that Apache will serve to the browsers, then set the necessary ownership permissions for it.
On systems where SELinux is enabled in enforcing mode and pages are not served from within the /var/www directory, you must apply the correct security context to the DocumentRoot directory. For example, you would serve web pages from the /mnt/example.com directory as follows:
Apply your configuration
Restart the Apache web service to load the new configuration.
Note that if you are hosting multiple domains, you can specify different VirtualHost values for each configuration file that you create in the /etc/httpd/conf.d directory.
Configure HTTPS to secure your service
As a best practice, secure all communications between a web browser and your Apache server by using HTTPS. For a secure setup, a TLS certificate is required.
Configure your TLS/SSL certificates
Oracle strongly recommends using an TLS certificate that has been signed by an external Certificate Authority (CA). See https://docs.oracle.com/en/operating-systems/oracle-linux/certmanage/ for more information.
Install the HTTPS add-on for Apache
Install and enable the mod_ssl extension for Apache.
Update the Apache configuration
Open the /etc/httpd/conf.d/example.com.conf file in a text editor and create a new VirtualHost for HTTPS:
Redirect HTTP requests to HTTPS
Replace your existing HTTP VirtualHost configuration with a redirect, as follows:
Restart the Apache service to load the new configuration.
Configure the firewall (optional)
Enable the firewall port (443) for the Apache HTTPS web service and reload the default firewall service.
 Next Tutorial
 Next Tutorial
Want to Learn More?
- httpd(8) manual page.
- Upstream documentation at https://httpd.apache.org/docs/
- Oracle Linux Documentation
Oracle Linux: Install the Apache Web Server
Copyright © 2020, Oracle and/or its affiliates.
This tutorial provides instructions to install the Apache web server and enable it in Oracle Linux 8.
This software and related documentation are provided under a license agreement containing restrictions on use and disclosure and are protected by intellectual property laws. Except as expressly permitted in your license agreement or allowed by law, you may not use, copy, reproduce, translate, broadcast, modify, license, transmit, distribute, exhibit, perform, publish, or display any part, in any form, or by any means. Reverse engineering, disassembly, or decompilation of this software, unless required by law for interoperability, is prohibited.
The information contained herein is subject to change without notice and is not warranted to be error-free. If you find any errors, please report them to us in writing.
If this is software or related documentation that is delivered to the U.S. Government or anyone licensing it on behalf of the U.S. Government, then the following notice is applicable:
U.S. GOVERNMENT END USERS: Oracle programs (including any operating system, integrated software, any programs embedded, installed or activated on delivered hardware, and modifications of such programs) and Oracle computer documentation or other Oracle data delivered to or accessed by U.S. Government end users are «commercial computer software» or «commercial computer software documentation» pursuant to the applicable Federal Acquisition Regulation and agency-specific supplemental regulations. As such, the use, reproduction, duplication, release, display, disclosure, modification, preparation of derivative works, and/or adaptation of i) Oracle programs (including any operating system, integrated software, any programs embedded, installed or activated on delivered hardware, and modifications of such programs), ii) Oracle computer documentation and/or iii) other Oracle data, is subject to the rights and limitations specified in the license contained in the applicable contract. The terms governing the U.S. Government’s use of Oracle cloud services are defined by the applicable contract for such services. No other rights are granted to the U.S. Government.
This software or hardware is developed for general use in a variety of information management applications. It is not developed or intended for use in any inherently dangerous applications, including applications that may create a risk of personal injury. If you use this software or hardware in dangerous applications, then you shall be responsible to take all appropriate fail-safe, backup, redundancy, and other measures to ensure its safe use. Oracle Corporation and its affiliates disclaim any liability for any damages caused by use of this software or hardware in dangerous applications.
Oracle and Java are registered trademarks of Oracle and/or its affiliates. Other names may be trademarks of their respective owners.
Intel and Intel Inside are trademarks or registered trademarks of Intel Corporation. All SPARC trademarks are used under license and are trademarks or registered trademarks of SPARC International, Inc. AMD, Epyc, and the AMD logo are trademarks or registered trademarks of Advanced Micro Devices. UNIX is a registered trademark of The Open Group.
This software or hardware and documentation may provide access to or information about content, products, and services from third parties. Oracle Corporation and its affiliates are not responsible for and expressly disclaim all warranties of any kind with respect to third-party content, products, and services unless otherwise set forth in an applicable agreement between you and Oracle. Oracle Corporation and its affiliates will not be responsible for any loss, costs, or damages incurred due to your access to or use of third-party content, products, or services, except as set forth in an applicable agreement between you and Oracle.
Источник
ИТ База знаний
Курс по Asterisk
Полезно
— Узнать IP — адрес компьютера в интернете
— Онлайн генератор устойчивых паролей
— Онлайн калькулятор подсетей
— Калькулятор инсталляции IP — АТС Asterisk
— Руководство администратора FreePBX на русском языке
— Руководство администратора Cisco UCM/CME на русском языке
— Руководство администратора по Linux/Unix
Навигация
Серверные решения
Телефония
FreePBX и Asterisk
Настройка программных телефонов
Корпоративные сети
Протоколы и стандарты
Установка Apache в Linux
Apache — популярный бесплатный opensource веб-сервер. Он является частью стека LAMP (Linux, Apache, MySQL, PHP), который обеспечивает большую часть Интернета. Мы уже рассказывали про его установку на Windows и сравнивали его с nginx, а сегодня расскажем про то как установить Apache на Linux.
Онлайн курс по Linux
Мы собрали концентрат самых востребованных знаний, которые позволят тебе начать карьеру администратора Linux, расширить текущие знания и сделать уверенный шаг к DevOps


А про то как установить nginx на Linux, можно прочитать в нашей статье.
Установка веб-сервера Apache на Linux
Установка Apache на CentOS и RHEL
Откройте окно терминала и обновите списки пакетов репозитория, введя следующее:
Теперь вы можете установить Apache с помощью команды:
httpd — это имя службы Apache в CentOS. Опция –y автоматически отвечает да на запрос подтверждения.
Готово, Apache установлен.
Установка Apache на Ubuntu и Debian
В Ubuntu и Debian пакет и служба Apache называются apache2 . Сначала также обновите инструмент управления пакетами apt .
Теперь устанавливаем Apache:
Запуск и управление веб-сервером Apache
Apache — это сервис, работающий в фоновом режиме. В Debian и Ubuntu он автоматически запустится после установки, а в CentOS его нужно запустить вручную.
Не забывайте что в командах в CentOS нам нужно использовать httpd , а в Debian и Ubuntu apache2
Запустите службу Apache, введя следующее:
Система не возвращает вывод, если команда выполняется правильно.
Чтобы настроить автозагрузку Apache при запуске используйте команду:
Чтобы проверить состояние службы Apache:

Чтобы перезагрузить Apache (перезагрузит файлы конфигурации, чтобы применить изменения):
Чтобы перезапустить весь сервис Apache:
Чтобы остановить Apache:
Чтобы отключить Apache при запуске системы:
Проверить веб-сервер Apache
Задача вашего программного обеспечения Apache — обслуживать веб-страницы по сети. Ваша новая установка Apache имеет тестовую страницу по умолчанию, но вы также можете создать собственную тестовую страницу.
Проверьте тестовую страницу Apache
В окне терминала найдите IP-адрес вашей системы:
Если вы знакомы с командами ip addr show или ifconfig , вы можете использовать их вместо этого. Подробно про команду ip можно прочитать тут.
Откройте веб-браузер и введите IP-адрес, отображаемый в выводе. Система должна показать тестовую страницу HTTP-сервера Apache, как показано на скриншоте ниже:
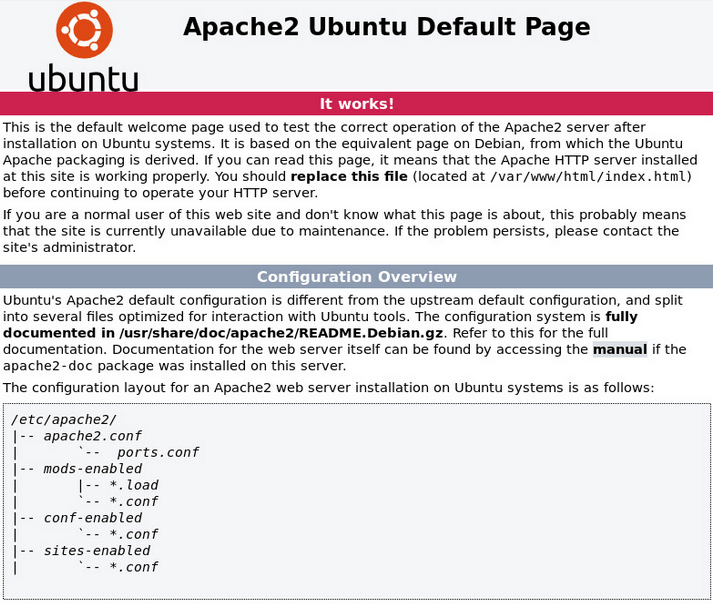
Или так, если у вас Ubuntu:
Если ваша система не имеет графического интерфейса, используйте команду curl:
Примечание. В конце: 80 обозначает порт 80, стандартный порт для интернет-трафика. Обязательно напишите соответствующий IP-адрес вместо [your_system’s_IP_address].
Создать HTML-файл для тестирования
Если по какой-либо причине вам нужна или у вас уже есть пользовательская HTML-страница, которую вы хотите использовать в качестве тестовой страницы, выполните следующие действия:
В окне терминала создайте новый индекс файл HTML:
Отредактируйте файл по своему вкусу и сохраните его.
Теперь вы можете выполнить действия, описанные в предыдущем разделе, и если ваш сервер Apache работает правильно, если он отобразит указанную пользовательскую страницу.
Настройка фаервола для Apache
Фаервол в вашей системе блокирует трафик через разные порты. Каждый порт имеет свой номер, и разные виды трафика используют разные порты. Для вашего веб-сервера вам нужно разрешить HTTP и HTTPS трафик через порты 80 и 443 .
В терминале введите следующее:
Еще раз проверьте, правильно ли настроен ваш фаервол:
Вы должны увидеть http и https в списке разрешенных сервисов.
Если вы пользуйтесь UFW, то можно открыть порты HTTP ( 80 ) и HTTPS ( 443 ), включив профиль Apache Full :
Если вы используете nftables для фильтрации подключений к вашей системе, откройте необходимые порты, введя следующую команду:
Файлы и каталоги Apache
Apache управляется путем применения директив в файлах конфигурации:
- /etc/httpd/conf/httpd.conf — основной файл конфигурации Apache
- /etc/httpd/ — Расположение всех файлов конфигурации
- /etc/httpd/conf.d/ — Все конфигурационные файлы в этом каталоге включены в основной файл настроек
- /etc/httpd/conf.modules.d/ — Расположение конфигурационных файлов модуля Apache
Примечание. При внесении изменений в файлы конфигурации не забывайте всегда перезапускать службу Apache, чтобы применить новую конфигурацию.
Логи Apache расположены тут:
- /var/log/httpd/ — расположение файлов логов Apache
- /var/log/httpd/access_log — показывает журнал систем, которые обращались к серверу
- var/log/httpd/error_log — показывает список любых ошибок, с которыми сталкивается Apache
Назначьте каталог для хранения файлов для вашего сайта. Используйте файлы конфигурации, чтобы указать каталог, который вы выбрали. Некоторые типичные места включают в себя:
- /home/username/my_website
- /var/www/my_website
- /var/www/html/my_website
- /opt/my_website
Онлайн курс по Linux
Мы собрали концентрат самых востребованных знаний, которые позволят тебе начать карьеру администратора Linux, расширить текущие знания и сделать уверенный шаг к DevOps
Источник


