- Как в Windows 10 HOME включить и установить Hyper-V
- Как активировать Hyper-V в Windows 10 Home
- Установка Hyper-V в Windows 10 Install Hyper-V on Windows 10
- Проверьте следующие требования Check Requirements
- Включение Hyper-V с помощью PowerShell Enable Hyper-V using PowerShell
- Включение Hyper-V с помощью CMD и DISM Enable Hyper-V with CMD and DISM
- Включение роли Hyper-V с помощью раздела «Параметры» Enable the Hyper-V role through Settings
- Install Hyper-V on Windows 10
- Check Requirements
- Enable Hyper-V using PowerShell
- Enable Hyper-V with CMD and DISM
- Enable the Hyper-V role through Settings
- Как включить Hyper-V в Windows 10
- Поддерживает ли ваша система виртуализацию?
- Включение Hyper-V на Windows 10 Home
- Отключение (удаление) Hyper-V из Windows 10 Home
- question
- Installation of Hyper-V on windows 10 home
- 6 Answers
Как в Windows 10 HOME включить и установить Hyper-V
Редакция Windows HOME (домашняя) не имеет встроенной виртуальной машины Hyper-V, но есть способ, как активировать функцию для включения виртуализации и установки Hyper-V.
Как активировать Hyper-V в Windows 10 Home
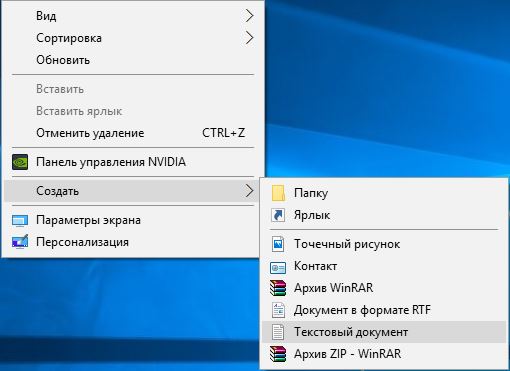
Шаг 1. Нажмите правой кнопкой мыши на пустом месте рабочего стола и выберите «Создать» > «Текстовый документ«.
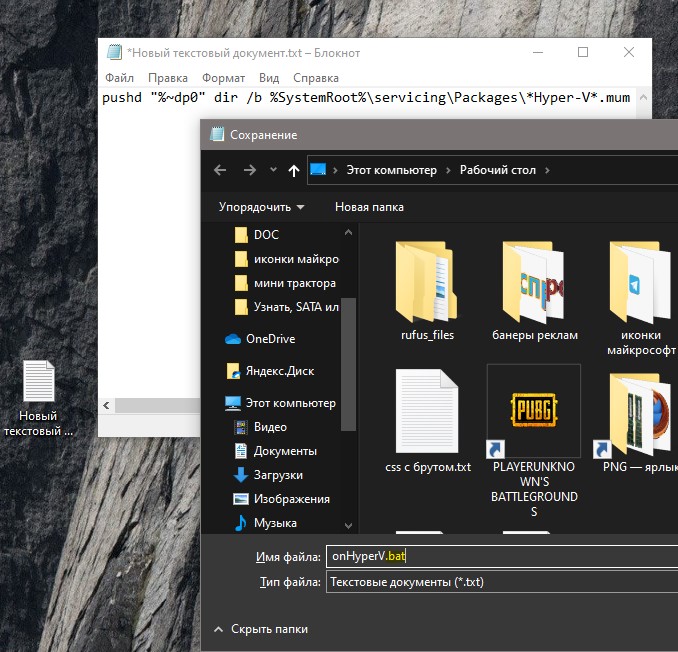
Шаг 2. Помести ниже скрипт написанный командной Microsoft Virtualization на Github в текстовый документ. Далее нажмите на вкладку сверху «Файл» > «Сохранить как«. В поле «Имя файла» укажите любое имя, но с расширением .bat и сохраните его на рабочий стол.
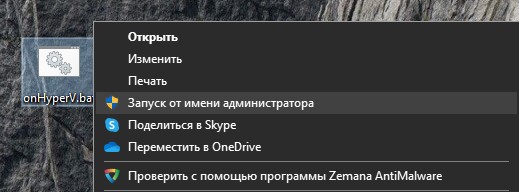
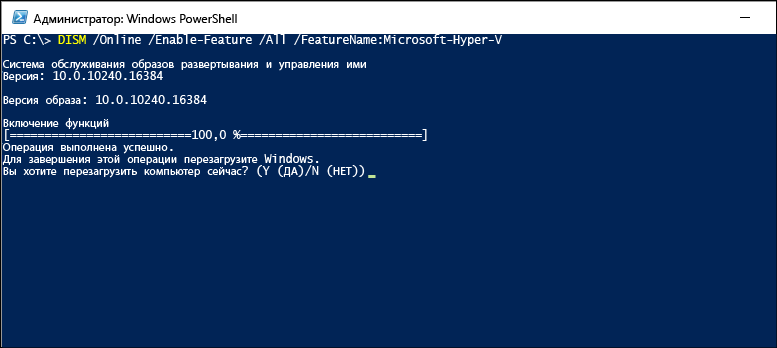
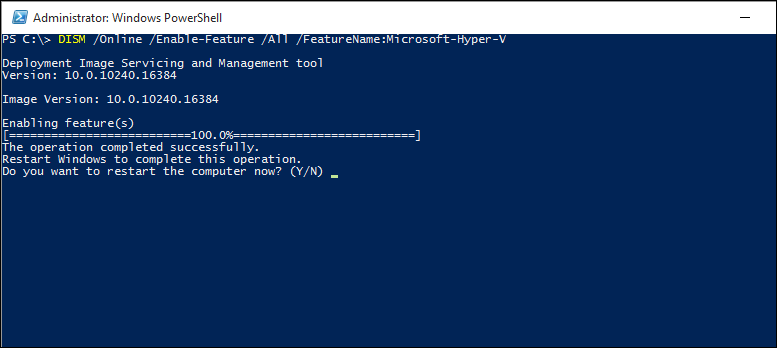
Шаг 3. На рабочем столе нажмите правой кнопкой мыши по созданному бат-файлу и выберите «Запустить от имени администратора«. Далее появится окно командной строки, где будет предложено перезагрузить компьютер нажав на Y.
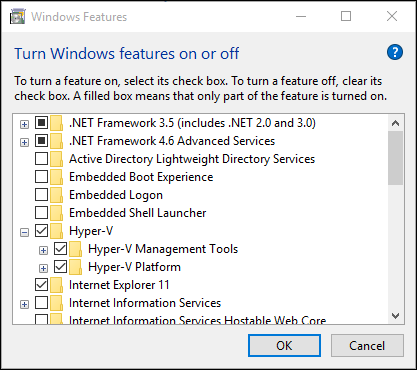
Шаг 4. Нажмите Win+R и введите optionalfeatures.exe, чтобы быстро открыть компоненты системы. Найдите Hyper-V и установите галочку, после чего нажмите OK.
После установки всех необходимых компонентов вы можете набрать в поиске меню «Hyper» и запустить виртуальную машину в Windows 10 HOME.
Установка Hyper-V в Windows 10 Install Hyper-V on Windows 10
Включение Hyper-V для создания виртуальных машин в Windows 10. Enable Hyper-V to create virtual machines on Windows 10.
Hyper-V можно включить разными способами, в том числе используя панель управления Windows 10, PowerShell или с помощью средства обслуживания образов развертывания и управления ими (DISM). Hyper-V can be enabled in many ways including using the Windows 10 control panel, PowerShell or using the Deployment Imaging Servicing and Management tool (DISM). В этом документе последовательно описан каждый из указанных способов. This documents walks through each option.
Примечание. Механизм Hyper-V встроен в Windows в качестве дополнительной функции. Скачать Hyper-V нельзя. Note: Hyper-V is built into Windows as an optional feature — there is no Hyper-V download.
Проверьте следующие требования Check Requirements
- Windows 10 Корпоративная, Pro или для образовательных учреждений Windows 10 Enterprise, Pro, or Education
- 64-разрядный процессор с поддержкой преобразования адресов второго уровня (SLAT). 64-bit Processor with Second Level Address Translation (SLAT).
- Поддержка расширения режима мониторинга виртуальной машины (технология VT-c на компьютерах с процессорами Intel). CPU support for VM Monitor Mode Extension (VT-c on Intel CPUs).
- Не менее 4 ГБ оперативной памяти. Minimum of 4 GB memory.
Роль Hyper-V невозможно установить в Windows 10 Домашняя. The Hyper-V role cannot be installed on Windows 10 Home.
Выполните обновление с выпуска Windows 10 Домашняя до выпуска Windows 10 Pro, открыв раздел Параметры > Обновление и безопасность > Активация. Upgrade from Windows 10 Home edition to Windows 10 Pro by opening up Settings > Update and Security > Activation.
Дополнительные сведения и советы по устранению неполадок см. в статье Требования к системе для Hyper-V в Windows 10. For more information and troubleshooting, see Windows 10 Hyper-V System Requirements.
Включение Hyper-V с помощью PowerShell Enable Hyper-V using PowerShell
Откройте консоль PowerShell от имени администратора. Open a PowerShell console as Administrator.
Выполните следующую команду. Run the following command:
Если не удается найти команду, убедитесь, что вы используете PowerShell от имени администратора. If the command couldn’t be found, make sure you’re running PowerShell as Administrator.
По завершения установки выполните перезагрузку. When the installation has completed, reboot.
Включение Hyper-V с помощью CMD и DISM Enable Hyper-V with CMD and DISM
Система обслуживания образов развертывания и управления ими (DISM) позволяет настраивать ОС Windows и образы Windows. The Deployment Image Servicing and Management tool (DISM) helps configure Windows and Windows images. Помимо всего прочего? средство DISM может включать функции Windows во время выполнения операционной системы. Among its many applications, DISM can enable Windows features while the operating system is running.
Чтобы включить роль Hyper-V с помощью DISM, выполните указанные ниже действия. To enable the Hyper-V role using DISM:
Запустите PowerShell или сеанс CMD от имени администратора. Open up a PowerShell or CMD session as Administrator.
Введите следующую команду: Type the following command:
Дополнительные сведения о DISM см. в разделе Техническое руководство по DISM. For more information about DISM, see the DISM Technical Reference.
Включение роли Hyper-V с помощью раздела «Параметры» Enable the Hyper-V role through Settings
Щелкните правой кнопкой мыши кнопку Windows и выберите пункт «Приложения и компоненты». Right click on the Windows button and select ‘Apps and Features’.
Выберите Программы и компоненты справа в разделе связанные параметры. Select Programs and Features on the right under related settings.
Выберите пункт Включение или отключение компонентов Windows. Select Turn Windows Features on or off.
Выберите Hyper-V и нажмите кнопку ОК. Select Hyper-V and click OK.

После завершения установки вам будет предложено перезапустить компьютер. When the installation has completed you are prompted to restart your computer.
Install Hyper-V on Windows 10
Enable Hyper-V to create virtual machines on Windows 10.
Hyper-V can be enabled in many ways including using the Windows 10 control panel, PowerShell or using the Deployment Imaging Servicing and Management tool (DISM). This documents walks through each option.
Note: Hyper-V is built into Windows as an optional feature — there is no Hyper-V download.
Check Requirements
- Windows 10 Enterprise, Pro, or Education
- 64-bit Processor with Second Level Address Translation (SLAT).
- CPU support for VM Monitor Mode Extension (VT-c on Intel CPUs).
- Minimum of 4 GB memory.
The Hyper-V role cannot be installed on Windows 10 Home.
Upgrade from Windows 10 Home edition to Windows 10 Pro by opening up Settings > Update and Security > Activation.
For more information and troubleshooting, see Windows 10 Hyper-V System Requirements.
Enable Hyper-V using PowerShell
Open a PowerShell console as Administrator.
Run the following command:
If the command couldn’t be found, make sure you’re running PowerShell as Administrator.
When the installation has completed, reboot.
Enable Hyper-V with CMD and DISM
The Deployment Image Servicing and Management tool (DISM) helps configure Windows and Windows images. Among its many applications, DISM can enable Windows features while the operating system is running.
To enable the Hyper-V role using DISM:
Open up a PowerShell or CMD session as Administrator.
Type the following command:
For more information about DISM, see the DISM Technical Reference.
Enable the Hyper-V role through Settings
Right click on the Windows button and select вЂApps and Features’.
Select Programs and Features on the right under related settings.
Select Turn Windows Features on or off.
Select Hyper-V and click OK.
When the installation has completed you are prompted to restart your computer.
Как включить Hyper-V в Windows 10
Hyper-V – это платформа Microsoft для виртуализации. Она доступна в операционных системах Windows Server, но Microsoft добавила функциональность Hyper-V в Windows 8.1 и Windows 10.
К сожалению, функция Hyper-V доступна только в выпусках Windows 10 Professional и Enterprise. По умолчанию вы не можете установить его в Windows 10 Home Edition. Однако, следуя инструкциям в этой статье, мы покажем вам, как включить Hyper-V в Windows 10 Home edition.
Поддерживает ли ваша система виртуализацию?
Прежде чем двигаться вперед, нам нужно проверить, поддерживает ли наша система виртуализацию. Аппаратная виртуализация требуется для правильной работы Hyper-V. В противном случае вы можете использовать другие платформы виртуализации, такие как Virtualbox и VMWare.
Для установки Hyper-V на компьютер с Windows 10 существует четыре основных требования:
- Расширения режима VM Monitor.
- Виртуализация включена в прошивке.
- Трансляция адресов второго уровня.
- Предотвращение выполнения данных.
Вы можете проверить все эти требования, открыв командную строку (Выполнить -> cmd) и запустив команду systeminfo. Вы можете проверить раздел требований Hyper-V.

Большинство современных компьютеров поддерживают все требования Hyper-V. Но в некоторых системах виртуализация отключена в BIOS. Вы можете перейти к компьютеру с настройкой BIOS при запуске и включить виртуализацию.

Включение Hyper-V на Windows 10 Home
Для установки и включения Hyper-V на Windows 10 Home нужно выполнить следующие действия:
Загрузите Hyper-V Enabler здесь: Hyper-V installer and enabler for Windows 10 Home (317 bytes, 3,997 hits)
После загрузки щелкните файл правой кнопкой мыши и выберите «Запуск от имени администратора». Это запустит скрипт установки. Для завершения установки может потребоваться некоторое время. Пожалуйста, не прерывайте установку.

После завершения нажмите Y, чтобы продолжить. Система перезагрузится.

Вы увидите экран обновлений Windows после перезагрузки.

После перезапуска вы можете проверить, отображается ли параметр Hyper-V в дополнительных функциях Windows. Чтобы проверить, перейдите в Выполнить > optionalfeatures. Вы найдете инструменты управления Hyper-V и Hyper-V.

Вы можете выполнить поиск Hyper-V в меню «Пуск», чтобы начать создавать виртуальные машины на домашнем компьютере с Windows 10.

Отключение (удаление) Hyper-V из Windows 10 Home
Если вам не нужна эта функция на вашем компьютере, вы всегда можете отключить ее. Есть два способа для удаления:
- Перейдите в Выполнить > optionalfeatures. Откроется окно «Дополнительные функции».
- Снимите отметку с инструментов управления Hyper-V.
- Перезагрузите компьютер.
Вы также можете сделать это с помощью командной строки:
PowerShell
Command Prompt
Иногда Hyper-V очень полезен даже для домашних пользователей. Его можно использовать для тестирования и оценки нового программного обеспечения без ущерба для хост-системы. Но бывают случаи, когда включение поддержки виртуализации или установка Hyper-V не рекомендуется.
Hyper-V требует некоторых системных ресурсов для запуска своих виртуальных машин. Например, если у вас 4 ГБ ОЗУ, вы не сможете выделить какие-либо ресурсы для виртуальной машины. Поэтому было бы неразумно включать функциональность Hyper-V.
Для каких целей вы хотите включить функциональность Hyper-V на своем домашнем компьютере с Windows 10? Пожалуйста, поделитесь своими мыслями в комментариях ниже.
question
Installation of Hyper-V on windows 10 home
How can I install Hyper-V on my windows 10 home edition in a verified way ?
Don’t you wish people that didn’t know what they are talking about would stop answering tech questions?
Irritating as hell, isn’t it?
Create a file, anywhere, using a text editor and copy the following into that file:
Now save that as hv.bat from your text editor. The desktop or download folder are good destinations for which to save and easily located for the next step.
After exiting the editor, open file manager and right mouse click the file and choose run as administrator.
Once complete it will reboot your machine and you can turn on Hyper-v from programs and features.
An error occurred while attempting to start the servicing process for the image located at C:.
For more information, review the log file.
Your question is missing sufficient context for anyone to help. We have no idea where you were in the process when you encountered this error. Are you following the steps either I or Hank laid out? If you describe what step you had already completed, and which step you encountered this error, someone may be able to try to help.
You cant use hyper V on window 10 home.
You need Window 10 pro or enterprise to use Hyper V.
If you want to use another Application similar to Hyper V in your home edition then go for Virtual Box.
I just did. Hyper V can be installed on Windows 10 Home. Follow the instructions in https://www.itechtics.com/enable-hyper-v-windows-10-home/
Can confirm I too just installed it using Hank’s suggestions. There are a few more steps to what Hank said, but he included the hard part. the final bit is in turn windows features on/off.
6 Answers
You can follow along here but windows 10 home edition does not support hyper-v role.
—please don’t forget to Accept as answer if the reply is helpful—
Regards, Dave Patrick .
Microsoft Certified Professional
Microsoft MVP [Windows Server] Datacenter Management
Disclaimer: This posting is provided «AS IS» with no warranties or guarantees, and confers no rights.
There are other Virtual Machine products available, such as VMware Player, or VirtualBox, since Hyper-V cannot be used on Home Edition.
Unfortunately, you can’t enable Hyper-V feature in Windows 10 Home as it is not supported. You need at least Pro or higher edition with 64-bit installation for using Hyper-V.
Windows 10 Home edition doesn’t support Hyper-V feature, it can only be enabled on Windows 10 Enterprise, Pro, or Education.
If you want to use virtual machine, you need to use third-party VM software, such as VMware and VirtualBox.
I’m on Windows 10 Home. Under «Turn Windows features on or off», I see:
Virtual Machine Platform
Windows Hypervisor Platform
I checked both of those, and the system told me to reboot. I did so, and upon opening up System Information, at the bottom I now see:
Virtualization-based security Running
A hypervisor has been detected. Features required for Hyper-V will not be displayed.
So, apparently, the Hyper-V hypervisor can be enabled on Windows 10 Home. I still didn’t have the Hyper-V Management Console. I found the following instructions on how to enable the Hyper-V Management Console on Windows 10 Home. I used them, and I now have the console that allows me to create new VMs.


