Ibm lotus notes для linux
NOTE: If you’re going to print this out, it would be wise to print Landscape instead of Portrait.
These are some screenshots outlining my install of the Lotus Notes 7.0.1 Linux Client. For the most part you just need to read the readme.pdf file that comes with the installation files and follow the instructions, but I know that screenshots are nice sometimes too (click on any of the screenshots below to get 800×600 images).
One general caveat: the current client install (at the time of this writing, August 2006) is only supported on Red Hat Enterprise Linux v4 update 3 (RHEL4), so there may be other things you have to do if you are on another distro (or if you have a non-standard RHEL setup). I used CentOS-4, which is built from the RHEL sources and aims to be 100% binary compatible with Red Hat, and I had no problems.
If you want to install on another distro, you might want to take a look at this wiki page that talks about installing the client on Debian for some pointers.
Also, the Linux client install files are currently only available to Passport customers, so you won’t be able to find a trial version for download on the public Lotus site. If you want to use an older version of the Notes client on Linux, you can always try running it with Wine.
If you have problems, a good place to start looking for answers is the IBM Knowledge Collection Technote: IBM Lotus Notes client for Linux. There’s also a Technote with known limitations of the Linux client. And read the readme.pdf file that gets extracted when you unzip the install files — there are a lot of known issues (and a few workarounds) in there.
| Step 0 This is probably obvious, but the first thing you have to do is download the Notes client install package and set up your Linux workstation. For my testing, I installed CentOS-4 on a VMWare virtual machine with 384 MB of RAM. It worked, but a larger RAM allotment would have been much more comfortable. You’ll also need about 2 GB of free space to handle the install files, the temp files, and all the new program files. My CentOS install was the default workstation install, with no customizations. I ran up2date before starting the Notes client install process. Also note that I was logged in as a non-root user during the install. | |
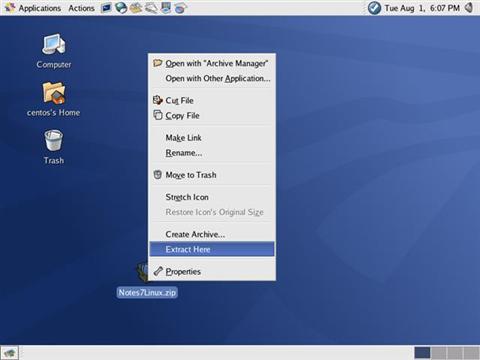 | Step 1 You’ll start with a ZIP file that contains all the installation files for the client. I think it was originally C93D1NA.zip or something. I renamed it to Notes7Linux.zip so I’d know what it was later. Anyway, just right-click the ZIP file and choose «Extract Here». |
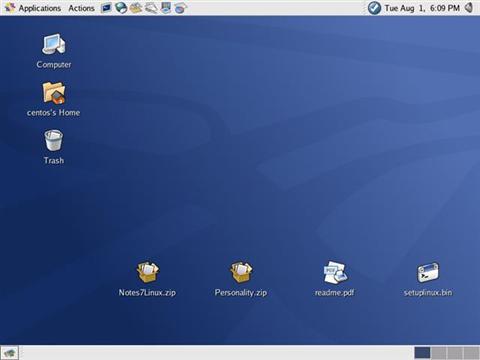 | Step 2 This will extract 3 files: Personality.zip, readme.pdf, and setuplinux.bin. |
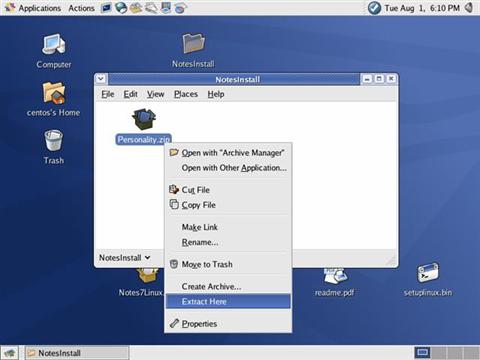 | Step 3 Create a temporary folder to extract the install files, which are all in the Personality.zip file. I just created a «NotesInstall» folder on my Desktop. Move the Personality.zip file inside this folder, right-click it, and choose «Extract Here». |
 | Step 4 The setup_wct_platform.bin file is the actual install file we’ll be running. However, it’s not executable by default. We’ll need to make it executable by right-clicking it and choosing «Properties». |
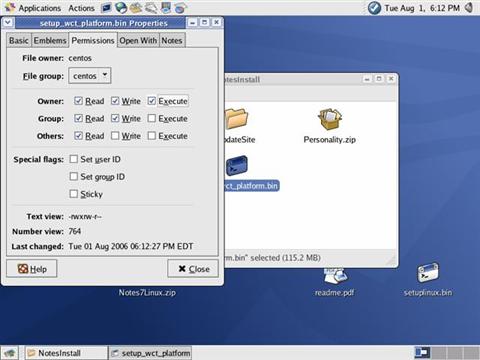 | Step 5 . and then putting a check mark next to the «Execute» permission for Owner, on the Permissions tab. Click the «Close» button after you’ve done this. |
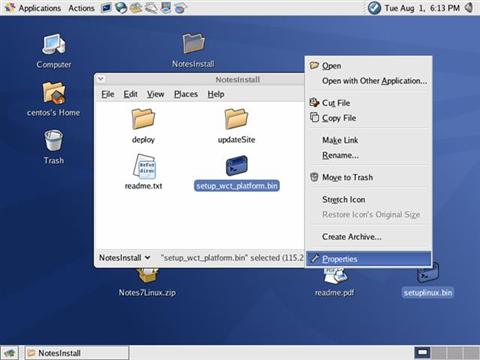 | Step 6 We’ll need to do the same thing with the setuplinux.bin file, which was one of the original 3 files that got unzipped in Step 2. So again, right-click it and choose «Properties». |
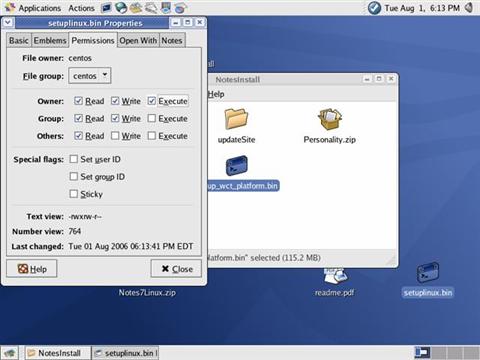 | Step 7 . and put a check mark next to the «Execute» permission for Owner, on the Permissions tab. |
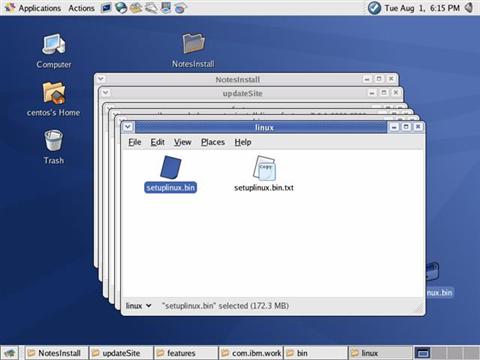 | Step 8 The setuplinux.bin file actually belongs in a subfolder of one of the folders that came out of the Personality.zip file. So go to the place where you extracted Personality.zip in Step 3 (that was NotesInstall for me) and navigate down to: /updateSite Wow! Okay, now copy the setuplinux.bin file from the previous step (right-click it and choose «Copy File») and Paste it into the «linux» folder you should now have open. |
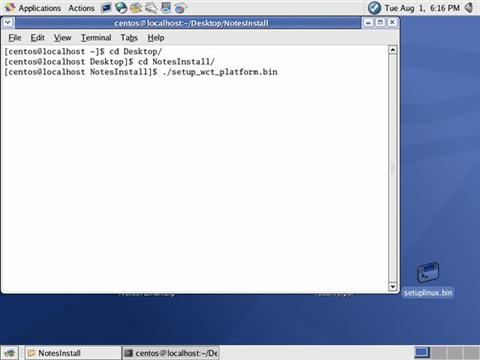 | Step 9 Open a Terminal window (Applications — System Tools — Terminal) and change directories to the place where setup_wct_platform.bin is. One nice thing about Linux Terminal windows is that they normally have auto-complete, so you can start typing the name of the file or directory you want and it will fill in the rest for you. For example, I wanted to navigate from my home directory to /Desktop/NotesInstall. So I typed «cd De» and pressed the TAB key, which changed the line to «cd Desktop/». Then I pressed ENTER and typed «cd No» and pressed TAB, and the line became «cd NotesInstall». However you do it, once you’re in the proper directory, type: «./setup_wct_platform.bin» (or «./set[TAB]» to auto-complete) to run the setup_wct_platform.bin file. Don’t forget the «./» at the beginning of the command — it’s important. |
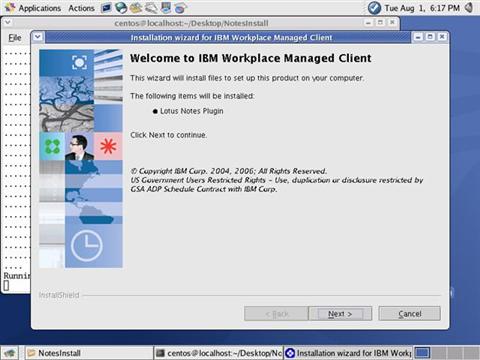 | Step 10 Some messages about starting Java and running InstallShield will go by, and then hey, look at that! There’s an IBM Workplace Managed Client install screen! Click the «Next» button. |
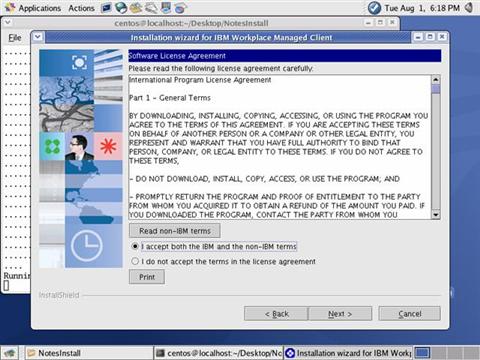 | Step 11 Agree to the license terms and click «Next» (or don’t agree and you’re all done with the install, I suppose). |
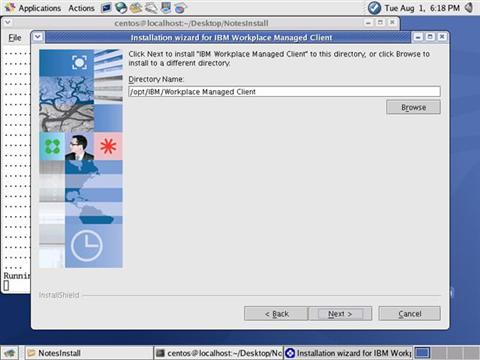 | Step 12 You will be prompted for a location to install the IBM Workplace Managed Client. By default, this directory is: /opt/IBM/Workplace Managed Client However, I wasn’t sure if I had rights to the /opt directory and I wasn’t planning on sharing this installation with anyone else, so. |
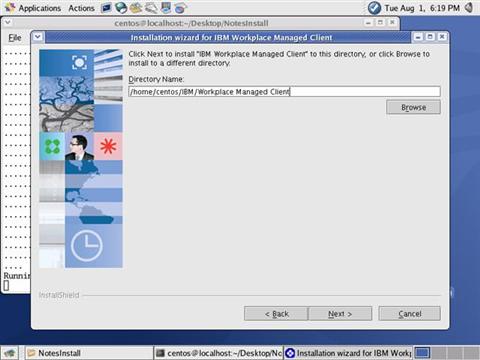 | Step 13 . I changed the install directory to: /home/centos/IBM/Workplace Managed Client Which was in my /home directory (my user name was «centos») and I knew I had rights to that. It also makes it easier to back everything up if it’s in my /home directory. |
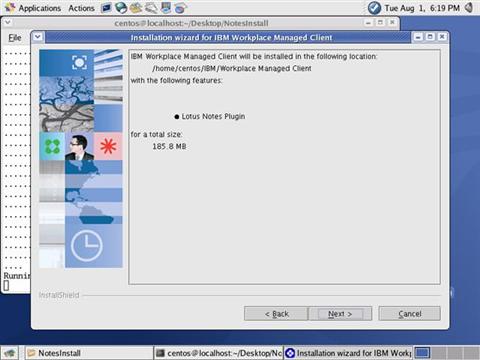 | Step 14 Now you’ll be told where the client will be installed (should be the location from the previous step), and it’ll also tell you that the Lotus Notes Plugin will be installed with it. As expected. Just click «Next». |
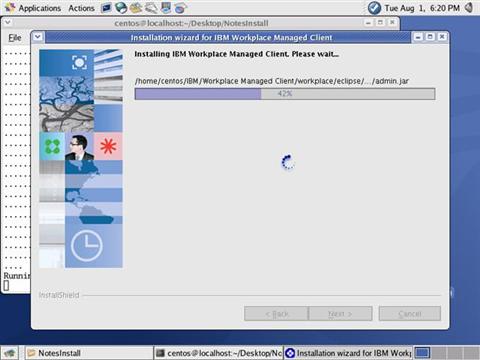 | Step 15 Files will install. Watch the progress bar and wait (it only took a minute or so for me). |
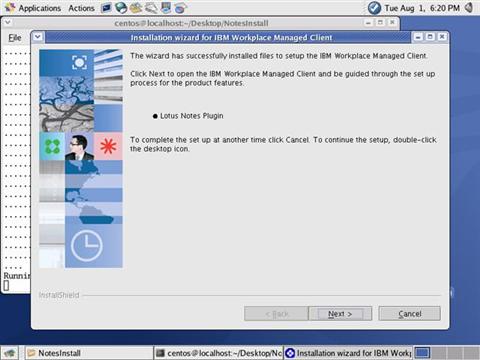 | Step 16 Now you’ll be told that the Lotus Notes Plugin is about to be installed. You want this, so click «Next». |
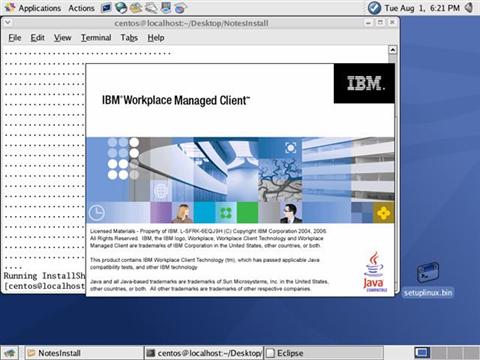 | Step 17 IBM Workplace Managed Client splash screen. Oooh. Ahhh. |
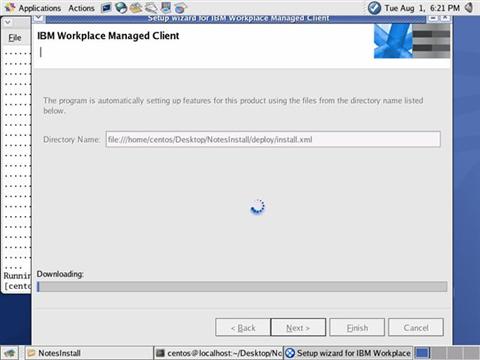 | Step 18 More files will unpack and install. More progress bars. More waiting (about 3 minutes or so for me). |
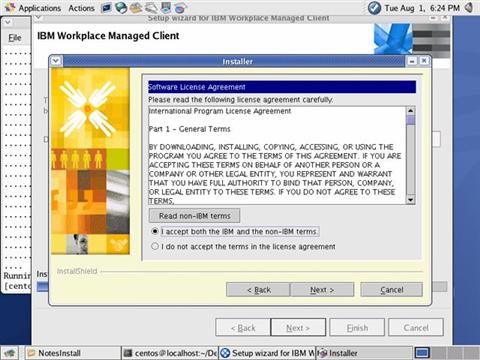 | Step 19 Now you’ll get some additional licensing and lawyer talk. Just accept it and click «Next» — you’ve gone this far, no sense in turning back. |
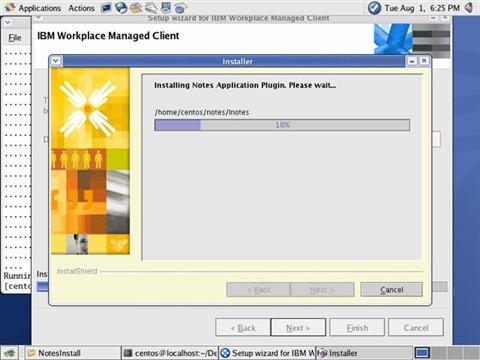 | Step 20 Another progress bar. Don’t panic, it’ll only be another minute or so. |
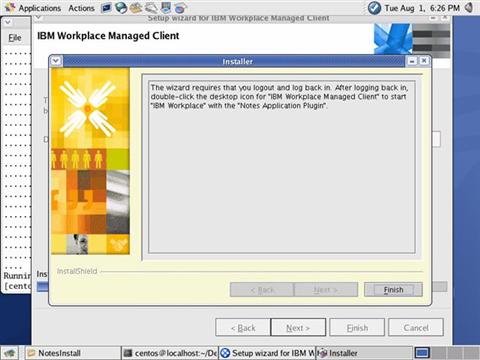 | Step 21 Now it’ll tell you to log out and log back in, presumably because it added things to your bash profile. But don’t worry, it’s not a full reboot like you’re used to on Windows machines, just a simple log out and log in. Click the «Finish» button to close the dialog. DO NOT log out yet. |
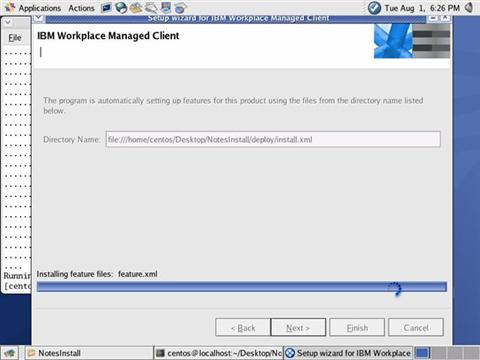 | Step 22 HA! Thought you were finished, didn’t you? Sucker. There are still a few more files to install. Aren’t you glad I told you not to log out yet? |
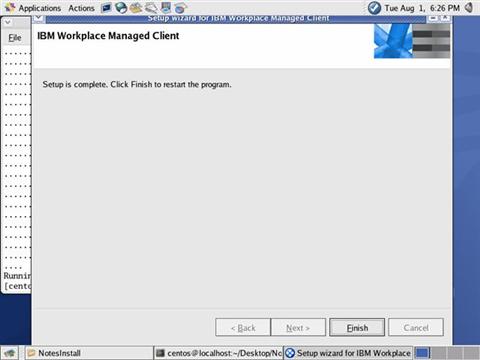 | Step 23 Finally done with the install. For some reason it says «Click Finish to restart the program» here, but I don’t know what program it’s going to restart. When you click «Finish» (go ahead, click it) the Setup Wizard dialog closes, but nothing restarts. It’s probably just messing with your head. |
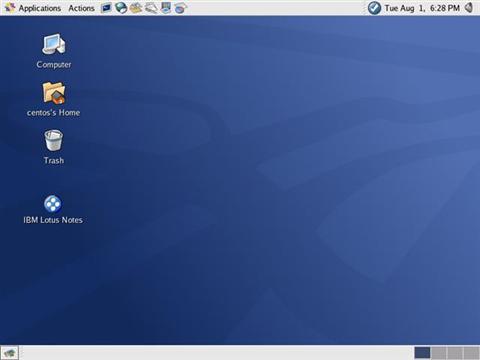 | Step 24 Go ahead and close all the open windows, and delete all the install files and folders you had laying around junking up the place. You will also see a nifty new «IBM Lotus Notes» icon on your Desktop. NOW you can log out. |
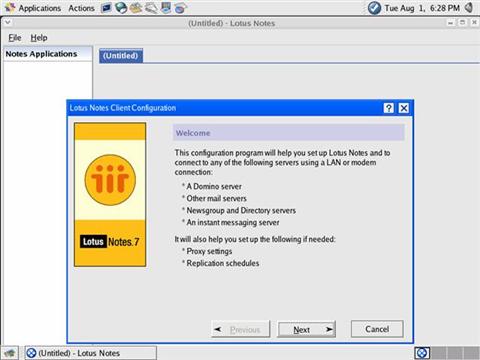 | Step 25 After you’ve logged back in, double-click the «IBM Lotus Notes» icon on the desktop. You’ll get the Lotus Notes Client Configuration screen. Configure away. |
Overall, the whole install process took about 20 minutes, so not too bad. And a lot of what you’re doing is waiting on files to unzip or copy or configure themselves. Not a lot of options at all, but there are a few tricks.
It’s not as easy as an RPM or DEB packaged app, but it’s a lot better than building from source. Just remember to READ THE INSTRUCTIONS.
Источник
Lotus Notes
IBM Lotus Notes — программный продукт, платформа для автоматизации совместной деятельности рабочих групп (Groupware). Производится компанией IBM Lotus Software, входящей в компанию IBM Software Group.
Программное обеспечение можно скачать с сайта IBM. Внимание! На сайте IBM последняя версия Lotus Notes (8.5.2) недоступна для русского языка, программное обеспечение было взято из иного источника.
Содержание
Протестированное программное обеспечение [ править ]
- IBM Lotus Notes Client 8.5.2 for Linux (RPM Install) Russian.tar (592 MB) (не совместимо с современными версиями ос Альт)
- IBM Lotus Notes Client 8.5.3 for Linux (RPM Install). Проверялось на Альт 8СП (ядро 4.19, ИК 2019)
- IBM Lotus Notes Client 9.0 for Linux (RPM Install). Проверялось на Альт 8СП (ядро 4.19, ИК 2019)
- IBM Lotus Notes Client 9.0.1 for Linux (RPM Install). Проверялось на Альт 8СП (ядро 4.19, ИК 2019)
Примечание: Lotus Domino недоступен для свободной загрузки. Результаты его тестирования будут предоставлены позднее.
Установка [ править ]
Установка производилась на Альт Линукс СПТ 6.0 i586 с установленной графической средой GNOME.
Перед установкой убедитесь, что доступен из Интернета или зеркала репозиторий cert6 (i586 и noarch).
Скачайте архив с кодом и распакуйте командой:
Установите базовые и зависимые приложения:
При этом будут также установлены пакеты из онлайнового репозитория: libXp libgnomecups libgnomeprint libgnomeprintui tcsh
Примечание: При обновлении и установке пакетов может быть показана надпись:
Нажмите клавишу y и Enter или просто Enter.
Во время установки (когда будет установлен последний пакет ibm_lotus_notes и показано 100%, откройте в другом окне файл /tmp/rcp_install и ждите, когда там будет последняя строка вида:
Переключитесь на консоль установки и нажмите Ctrl+c.
Запуск [ править ]
Запустить клиент Lotus Notes можно из меню Офис → Lotus Notes 8.5.
Примечания [ править ]
1. Для того, чтобы Lotus Notes запустился, нужно скопировать /opt/ibm/lotus/notes/data/notes.ini в одном из каталогов, которые указывает вывод
(например, в $HOME/bin) и дать права писать в этот файл пользователю, от которого будет запускаться программа.
2. Возникают проблемы со шрифтами (очень маленький шрифт). Должно решаться установкой шрифта Tahoma из Windows и указанием его, в качестве шрифта по умолчанию в настройках DE, либо установкой пакета fonts-ttf-ms (но это не срабатывает).
Источник
Debian Linux + Lotus Domino ( Установка Lotus Domino 8.5 на Debian GNU/Linux Squeeze. )
28 июня 2011 (обновлено 15 августа 2016)
OS: Debian GNU/Linux Squeeze.
Application: IBM Lotus Domino 8.5 for Linux (xSeries).
В принципе, можно на Linux применить дистрибутив Lotus Domino, предназначенный для Solaris или AIX — отличаются они только инсталлятором. Но в этом нет необходимости, так как IBM подготовила для «обычных» Linux дистрибутив «xSeries». Он так и именуется, например, дистрибутив «IBM Lotus Domino 8.5 for Linux» называется «lotus_domino85_xlinux».
Проведём подготовительные работы.
В файле /etc/hosts описываем для локального и внешнего IP определённое серверу символическое имя, для того, чтобы в дальнейшем оперировать не с IP адресами, а с постоянными именами:
.
127.0.0.1 localhost
127.0.0.1 domino.example.com domino
192.168.1.1 domino.example.com domino
.
Создаём местечко, где будет работать сервер Domino:
Добавляем группу и пользователя, от имени которых будет работать сервер Domino:
Обращаю внимание на то, что я лишил пользователя notes возможности работать в так называемой «оболочке», иначе говоря, от имени пользователя можно запустить приложение, но нельзя будет работать в «командной строке». Это создаёт некоторые неудобства при тестировании работы приложений, но добавляет лишний час спокойного сна.
Явно добавляем пользователя notes в группу notes:
Создадим для пользователя notes скрипт определения набора переменных окружения среды Bash, в которой мы будем запускать сервер Domino, где укажем дополнительные пути поиска исполняемых файлов, библиотек и конфигурационных файлов:
Распаковываем дистрибутивный архив в место, которое мне представляется наиболее для этого подходящим:
Переходим в директорию с инсталляционными скриптами и запускаем установку в режиме текстовой командной строки:
Lotus Domino for Unix Install Program
————————————-
InstallShield Wizard
Initializing InstallShield Wizard.
.
Пробежимся по ключевым этапам инсталляции.
Читаем лицензионное соглашение, подтверждаем его приём или отказываемся от использования продукта, буде что не устроит.
В случае достижения соглашения с производителем продукта выбираем на следующем этапе режим установки одиночной инсталляции «Domino Server», явно отказываясь от установки «Server Partitions»:
.
[ ] 1 — Install Data Directories Only for Partitioned Domino Server
To select an item enter its number, or 0 when you are finished: [0]
Далее соглашаемся с будущим месторасположением исполняемых файлов «Lotus Domino»:
Please specify a directory or press Enter to accept the default directory.
Program Files Directory Name [/opt/ibm/lotus]
А вот месторасположение баз данных, предлагаемых установщиком по умолчанию мне не нравится. Переопределим его на своё:
Please specify a directory or press Enter to accept the default directory.
Data Files Directory Name [/local/notesdata] /var/lib/notes/data
Задаём имя и группу пользователя, под которым будет запускаться сервер Domino:
User Name [notes]
Group Name [notes]
Определимся с методом первичной настройки сервера после его установки.
Лучше всего после прохождения процесса установки запустить сервер Lotus Domino в специальном режим первичной настройки и удаленно донастроить сервер с помощью утилиты serversetup из комплекта «Notes Administrator». На данный момент IBM предоставляет «Notes Administrator» и «Notes Designer» только для платформы Microsoft Windows, потому придется держать для администраторов и разработчиков рабочие станции на базе этой операционной системы.
Указываем «Remote server setup», выбирая вариант удалённой установки:
After the installation completes, for new installation server setup will be
launched and for upgrade the server will be restarted automatically.
[ ] 1 — Local
[X] 2 — Remote
[ ] 3 — Manual
Удостоверимся в том, что всё так, как нам и требуется:
Program Files: /opt/ibm/lotus
Data Files: /var/lib/notes/data
Domino Kit Type: EnterpriseServer
Unix Install Options:
User Name: notes
Group Name: notes
Install Data Only: No
Start Server Setup: Yes (Remote)
.
Даём отмашку на непосредственно инсталляцию:
Checking Minimum OS Version
Warning:
*****************************************************
Domino does not support this system:
Installing Lotus Domino. Please wait.
Нас уведомят в том, что используемая операционная система официально не поддерживается производителем Lotus Domino. Впрочем, инсталляции это не мешает, так как все необходимые для работы компоненты имеются.
После завершения установки создаётся комплект для «деинсталляции»:
Минут десять ожидаем.
На случай, «деинсталлятор» скромно расположился в директории «/opt/ibm/lotus/notes/latest/linux/_uninst/» и запустить его, при необходимости, можно следующим образом (хотя проще попросту удалить директории «/opt/ibm/lotus» и «/var/lib/notes/data» — после этого сервер можно считать полностью удалённым):
В итоге, читаем меморандум о том, что содеяли:
Читаем лог установщика по адресу «/tmp/DominoInstall.log», если интересно или что-то показалось прошедшим не так, как должно было бы быть.
С учётом того, что наша операционная система официально не поддерживается производителем, в процессе инсталляции есть некоторые особенности. В частности, после установки сервер Domino не запускается автоматически в ожидании дальнейшей настройки. Сделаем это вручную:
Сессия блокируется в ожидании подключения извне, с сопутствующим уведомлением:
./java -ss512k -Xoss5M -cp jhall.jar:cfgdomserver.jar:./ndext/ibmdirectoryservices.jar lotus.domino.setup.WizardManagerDomino -data /var/lib/notes/data -listen
Remote server setup enabled on port 8585.
The Domino setup server is now in listening mode.
A remote client can now connect to this server and configure Domino.
To connect to this server, launch the Remote Domino Setup program from a command-prompt as follows:
From a Domino administrator client: serversetup -remote
From a Domino server: server -remote
.
Сразу, как только мы подключимся клиентом администрирования для настройки сервера, получим уведомление о том, куда будет записан журнал событий:
После успешной настройки можно попробовать запустить сервер Lotus Domino вручную:
Lotus Domino (r) Server, Release 8.5.x .
Copyright (c) IBM Corporation 1987, . All Rights Reserved.
Event Monitor started
.
Console Logging is ENABLED
.
Database Server started
.
Database Replicator started
.
Agent Manager started
.
LDAP Server: started
.
Administration Process started
.
JVM: Java Virtual Machine initialized.
.
Удостоверимся в том, что сервер Lotus Domino прослушивает определённый ему порт:
Теперь, после того, как мы наигрались с пробными запусками сервера Domino, пришло время создать скрипт управления и автоматического запуска/остановки сервиса.
Устанавливаем утилиту Screen, с помощью которой будем запускать сервер Domino:
Создаём для Screen специальный конфигурационный файл, в котором включим журналирование всего происходящего:
Пишем скрипт управления и автоматизации запуска:
export PATH=/usr/local/sbin:/usr/local/bin:/sbin:/bin:/usr/sbin:/usr/bin/:/var/lib/notes:/var/lib/notes/data
DATE=`date +»%Y-%m-%d %H:%M:%S»`
NOTESUSER=notes
NOTESSERVER=/opt/ibm/lotus/bin/server
NOTESEXEC=/opt/ibm/lotus/bin/nsd
NOTESDATA=/var/lib/notes/data
NOTESINI=/var/lib/notes/data/notes.ini
NOTESLOG=/var/log/notes/managment.log
SCREENCONF=/var/lib/notes/.screenrc-log
SCREENLOG=/var/log/notes/screen.log
start() <
echo «$
echo «$
# Запускаем сервер Lotus Notes Domino в Screen от имени пользователя notes с явным указанием конфигурационного файла notes.ini
su —shell /bin/bash —login $
return $
>
case «$1» in
start)
start
;;
stop)
stop
;;
kill)
echo «$
echo «$
su —shell /bin/bash —login $
;;
restart)
echo «$
echo «$
stop
echo «Wait. »
sleep 5
start
;;
*)
echo «Usage: $0
exit 1
;;
esac
Прописываем наш скрипт для всех уровней исполнения в системе:
Слегка наводим порядок с доступом к ресурсам и конфигурациям:
Для того, чтобы не получать сильно разросшийся одиночный файл журнала настроим его ротацию.
Устанавливаем приложение ротации текстовых файлов с одновременным их сжатием:
Создаем конфигурационный файл ротации журнальных файлов для Lotus Notes Domino:
Проверяем корректность конфигурационного файла:
[ уже посетило: 24424 / +3 ] [ интересно! / нет ]


Поблагодарить автора 
Источник


