- Ida remote linux debugger
- First check whether the machines can be pinged
- 0x00: Environment
- 0x01: Server component running IDA in Unbuntu
- 0x02: Configure IDA debug under Windows
- ————————https://bbs.pediy.com/thread-247830-1.htm
- IDA dynamically debugs ELF files
- how to setup IDA pro linux GDB server
- 1 Answer 1
- Not the answer you’re looking for? Browse other questions tagged ida debugging gdb or ask your own question.
- Linked
- Related
- Hot Network Questions
- Subscribe to RSS
Ida remote linux debugger
Since version 4.7, IDA offers a console Linux debugger and a console Linux disassembler (since version 5.1 IDA also offers a Mac OS X debugger and disassembler). The Linux version of IDA brings the power of combined disassembly and debugging to the Linux world. Like its Windows sibling, the IDA Linux Disassembler comes in two versions that differ only by the number of processors they support: click here for a list of processors supported by the Starter and Professional version of IDA.
The Linux version of IDA:
- is able to disassemble any file supported by the Windows version.
- supports all the features of the Windows console version, including interactivity, scripting and plugins.
- offer local debugging of Linux executables.
- can connect to Windows machines running our debugging server and debug Windows executables.
- remote debugging server that allows you to debug Linux programs from another Linux machine, or even a Windows one.
Below: the Linux Debugger working locally.
Below: the Windows Debugger about to debug a remote Linux binary.

A typical use of the remote linux debugger would be the safe analysis of an hostile Windows binary: the Linux debugger, for example, brings unprecedented flexibility and security to the virus analyst. A typical use of the remote Windows debugger would be Linux debugging in a comfortable, well known GUI.
The IDA debugger, disassembler and remote debuggers are not sold separately but are included in the normal IDA distribution.
Источник
First check whether the machines can be pinged
0x00: Environment
ELF file to be debugged
IDA 7.0
Host: Windows
Virtual machine: Linux
Reached effect: Use IDA to remotely and dynamically debug ELF files in Linux on Window
0x01: Server component running IDA in Unbuntu
IDA comes with the following components:
linux_server: A server component that is executed on a Linux computer and used to debug 32-bit Linux applications.
linux_server64: A server component for debugging 64-bit Linux applications executed on a 64-bit Linux computer.
Note here that if you choose linux_server, you should enable 32-bit IDA
Similarly, open 64-bit IDA
1) Copy the corresponding component under the dbgsrv folder in IDA under Windows to Linux, and run this component.
Note: If the debugged file is 32-bit, copy linux_server, and if the debugged file is 64-bit, copy linux_server64.
2) After copying, open the terminal and run the component:
- If it is a 64-bit file to be debugged
If it is a 32-bit file to be debugged

0x02: Configure IDA debug under Windows
In the menu bar: Debugger -> Run -> Remote Linux debugger

- Application: The full path of the binary file of the application you want to debug, including the program. For remote debugging sessions, the path is the path on the debugging server. If you choose not to use the full path, the remote server will search its current working directory.
- Directory: For remote debugging, this field indicates the remote directory.
- Parameters: Used to specify any command line parameters passed to the process when it starts. For remote debugging sessions, the process output will be displayed in the console used to start the debugging server.
- Hostname: remote debugging server host or IP address.
- Port: The TCP port number monitored by the remote debugging server.
- Password: The password required for remote debugging of the server.
1)Application
View the path where the ELF file to be debugged is stored in Ubuntu
Note: Application is the full path of the binary file of the application to be debugged, so when filling in, add the file name of the ELF to be debugged.
So what should be filled in Application should be: (hideandseek is my file to be debugged)
2)Directory
Enter the path to store the ELF file to be debugged, there is no need to add the ELF file
4)Hostname
Open the terminal under Linux, enter ifconfig, check the IP
Fill in this IP in Hostname
The port is 23946 by default, as can be seen from the second picture
6) In summary
After filling in, press OK, IDA will load the remote program, and you can start debugging.
Reference: The Definitive Guide to IDA Pro
————————https://bbs.pediy.com/thread-247830-1.htm
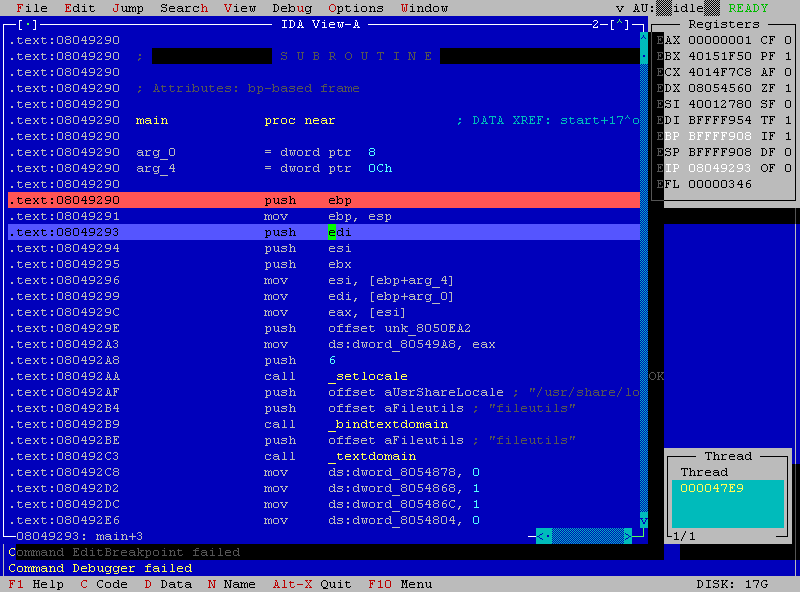
After setting, click [OK] to start debugging, look at the debugging interface:
The layout is basically the same as Ollydbg, and we can easily find the four familiar windows.
Debug command
Introduce the commonly used debugging commands:
Debugging instructions Description
Step into (F7) Execute the next instruction. If a function is encountered, it will enter the function code and stop at the first instruction of the function.
Step over (F8) Execute the next instruction. If a function is encountered, only the function itself will be executed without entering the function.
Terminate (CTRL-F2) Terminate a running debugging process.
Continue (F9) Continue to execute a suspended process. Execution will continue until a breakpoint is encountered, the user pauses or terminates execution, or the process terminates itself.
Pause () Pause a process that is being debugged.
Run to return (CTRL-F7) It runs inside the function code until it encounters RETN (or breakpoint).
breakpoint
Like Ollydbg, you can use the F2 shortcut key to set software breakpoints in the selected instruction memory location. After the setting is successful, it will be highlighted in red (the blue highlight is the next instruction to be executed). You can view all the breakpoints currently set in the program through [Debugger]-[Breakpoints]-[Breakpoint list]:
We can edit the breakpoint we set, select the breakpoint to be edited in the [Breakpoint list], right-click the menu and select [Edit. ] to open the editing window:
In this window, we can see that through the [Condition] column, conditions can be set for the breakpoint, so that the breakpoint is transformed into a «conditional breakpoint». Check the [Hardware] in [Settings] and then the software breakpoint will be converted to «Hardware breakpoint». This is the [Hardware breakpoint mode] option will be activated. To set the hardware breakpoint, the behavior must be specified.
Original text: https://blog.csdn.net/txx_683/article/details/53454139
IDA dynamically debugs ELF files
01 IDA remote debugging configuration
- IDA under Windows
- Find linux_server and linux_serverx64 in the IDA installation directory/dbgsrc/ and copy them to the linux virtual machine
- Run linux_server in linux and run the demo to be debugged in linux
- Debugger — Attach — Remote Linux debbuger


The configuration method is the same as that of Windows
[Debugger] -> [Attach] -> [Remote Linux debugger]

02 IDA dynamic debugging
- Debug command
| Step into (F7) | Encounter a function, will enter the function code |
| Step over (F8) | Execute the next instruction |
| Run to the cursor (F4) | |
| Breakpoint (F2) | You can view the breakpoints through [Debugger]-[Breakpoints]-[Breakpoint list], right click [Edit] to set breakpoints |
| Continue to run (F9) | |
| Terminate (CTRL-F2) | Terminate a running debugging process |
| Run to return (CTRL-F7) | It runs inside the function code all the time, and does not stop until RETN (or breakpoint) is encountered. |
- Add register monitoring
[Debugger] -> [Debugger windows] -> [Watch view]

The types that can be added are
(Object*)v0
(String)v0
(char*)v0
(int)v0

03 Reference link
One reason for the connection failure is that the Linux firewall is turned on:
Centos has used firewalld by default since 7, which is based on iptables. Although there is the core of iptables, the service of iptables is not installed. So you only need to stop the firewalld service:
sudo systemctl stop firewalld.service && sudo systemctl disable firewalld.service
If you want to use iptables instead, you need to install the iptables service:
sudo yum install iptables-services
sudo systemctl enable iptables && sudo systemctl enable ip6tables
sudo systemctl start iptables && sudo systemctl start ip6tables
Incompatible debugging server:
address size is 4 bytes, expected 4
Your android_server is 32-bit
and the ida you started is 64-bit
Change to 32-bit ida and it’s OK
adb shell ls /data/data/ command permission denied
opendir failed, Permission denied
adb is not started with the highest authority
Adb kill-server first, then adb start-server
Or execute adb root, adb remount
Re-test and solve the problem
The connection has been gracefully closed by peer.
Check that IDA is the only debugger for the target.
In addition to IDA, other debugging tools or development tools such as Android Studio or Eclipse are turned on, just turn off the others.
adb shell am start -D -n (package name)/ (package name + class name)
adb forward tcp:17178 jdwp:16406
jdb -connect com.sun.jdi.SocketAttach:port=17178,hostname=localhost
The following error occurred when using jdb to debug:
Fatal error:
cannot attach to the target VM.
It may be because the apk forgot to modify the manifest -> application ->> android:debuggable=»true» in AndroidManifest.xml.
IDA encountered when debugging so
got SIGCHLD signal (Child status has changed) (exc.code 11, tid 3756)
Wait for the message
Just pass to apptication. = =
Warning
—————————
Timed out while waiting for a JWDP reply
—————————
OK
—————————
—————————
Warning
—————————
The debugger could not attach to the selected process.
This can perhaps indicate the process was just terminated, or that you don’t have the necessary privileges.
—————————
OK
—————————
When this prompt appears, it means that the Dex file you imported may be too large, and IDA can’t parse it. Use BackSmali to export the Dex, delete the irrelevant code, and repackage it into a small Dex file with smali, and then debug it
It is also possible that there is a problem with the wiring and the phone is unplugged and replugged.
The function has undefined instruction/data at the specified address.
Your request has been put in the autoanalysis queue.
Failed to create the function, use the method of selecting the code, and then press P, see the following address for details
The debugger could not attach to the selected process.
This can perhaps indicate the process was just terminated, or that you don’t have the necessary privileges.
1. Don’t use an emulator, use a real machine
Источник
how to setup IDA pro linux GDB server
I have Ubuntu 14.04 x64 and I am running Ida pro V6.6 in virtual box in windows 8 . currently I want to debug some Linux elf’s using Ida either via IDA linux remote server or gdbserver but I don’t know how to set up such thing (remember Linux is the host and windows is the guest and IDA runs in windows)
1 Answer 1
- Ensure that networking is enabled on the guest system and that it can communicate via TCP/IP with the host system.
- Copy \dbgsrv\linux_serverx64 to your host system and run it.
- Copy the target ELF binary to the guest system and load it into IDA (disassemble it).
- In IDA (on the guest system), go to Debugger → Select debugger. in the menu bar and choose Remote Linux debugger .
- In IDA (on the guest system), go to Debugger → Process options. in the menu bar and specify the hostname or IP of your host system, the debugging port used by linux_serverx64 , and the debugging password (if you specified one when running linux_serverx64 ).
- In IDA (on the guest system), select Debugger → Start process in the menu bar (or Attach to process. if the target is already running on the host system).

Not the answer you’re looking for? Browse other questions tagged ida debugging gdb or ask your own question.
Linked
Related
Hot Network Questions
Subscribe to RSS
To subscribe to this RSS feed, copy and paste this URL into your RSS reader.
site design / logo © 2021 Stack Exchange Inc; user contributions licensed under cc by-sa. rev 2021.10.8.40416
By clicking “Accept all cookies”, you agree Stack Exchange can store cookies on your device and disclose information in accordance with our Cookie Policy.
Источник


