- GoLand
- Информация
- Описание
- Лучшие IDE для Golang?
- Зачем использовать IDE?
- Интегрированная организация кода и навигация
- Комплексное тестирование
- Интегрированная отладка
- Gogland
- Редактор кода и помощь
- дебаггер
- Запуск тестов
- Go Tools
- Контроль версий
- Интегрированный Терминал
- Расширяемость
- Visual Studio Code
- LiteIDE
- Основные особенности
- «Golang» — поддержка
- Дополнительная поддержка
- Go плагины для других IDE
- Текстовые редакторы
- Emacs
- Sublime Text
- Vim и NeoVim
- Заключение
- Ide для golang mac os
- See More. Do More…
- Go IDE in macOS
- Visual Studio Code
- Atom
- Sublime Text 3
- Conclusion
GoLand
Информация
Описание
JetBrains GoLand – кросс-платформенная IDE, созданная для Go-разработчиков. Обнаружение ошибок на лету с возможностью их автоматического исправления, безопасные рефакторинги, умное автодополнение кода и встроенная документация, реализованные в JetBrains GoLand, помогают создавать надежный код гораздо быстрее.
Мгновенный переход к любому элементу в коде
Чтобы разобраться в большом незнакомом проекте, требуются время и усилия. В GoLand можно мгновенно переходить к переопределенным методам, имплементациям, объявлениям или интерфейсам, которые реализуют типы.
Отладка и запуск прямо в IDE
Встроенный отладчик, инструменты для запуска тестов и анализа покрытия кода сразу готовы к работе. Встроенный инструмент Code Coverage поможет проследить, чтобы весь важный код был покрыт тестами.
Встроенная поддержка Git, GitHub и Mercurial
GoLand предоставляет встроенную поддержку Git, GitHub и Mercurial. Поддержка Perforce, ClearCase и других VCS доступна посредством устанавливаемых плагинов.
Не просто IDE для Go
GoLand не был бы полноценной IDE, если бы не поставлялся с богатым набором инструментов, которые, помимо разработки непосредственно на Go, поддерживают jаvascript, TypeScript, NodeJS, SQL, базы данных, Docker, Kubernetes и Terraform. В совокупности все эти возможности делают его первоклассным инструментом для работы над любой задачей, будь то современное веб-приложение или инструменты DevOps.
Источник
Лучшие IDE для Golang?
Go это фантастический язык программирования. Он также поставляется с комплексной цепочкой инструментов. Многие разработчики просто используют текстовые редакторы с или без плагинов для написания кода Go, но многие другие предпочитают использовать надлежащие IDE (интегрированные среды разработки).
В этом уроке вы узнаете о текущем состоянии Go IDE и будете готовы выбрать свое оружие.
Зачем использовать IDE?
Я всегда был большим поклонником IDE. В начале своей карьеры я использовал Microsoft Visual Studio для разработки C/C ++, а также C #. Я использовал NetBeans для короткого периода разработки Java. Я использовал JetBrains PyCharm для разработки на Python, и в настоящее время я использую JetBrains Gogland для разработки на Go.
Обычно я работаю с крупномасштабными программными системами, которые состоят из нескольких проектов с тысячами файлов. Мне нужна большая помощь с большой кодовой базой. Вот основные причины, по которым мне так нравятся IDE:
Интегрированная организация кода и навигация
С помощью хорошей IDE вы можете упорядочить свой код в иерархическом порядке, легко просматривать и перемещать его, а также быстро искать код. Среда IDE будет выполнять гораздо больше, чем просто текстовый поиск, и позволит вам выполнять фильтрацию по языковым конструкциям (например, показывать только классы или интерфейсы с определенным именем).
Комплексное тестирование
Комплексное тестирование также имеет решающее значение. Я трачу большую часть своего времени на разработку тестов — либо пишу их, пытаюсь заставить их пройти, либо исследую, почему тесты внезапно провалились. Хорошая IDE со встроенным тестированием позволит вам запускать тесты выборочно (все, только один проект, только неудачные тесты из предыдущего запуска), выделит сбои и позволит вам быстро перейти в нужное место в коде, чтобы исправить любые проблема.
Интегрированная отладка
Это, наверное, самая важная особенность для меня. Я люблю интегрированные отладчики. Я хочу иметь возможность добавлять точки останова (включая условные точки останова), просматривать трассировку стека и просматривать переменные в каждом фрейме.
Что касается бонусных баллов (спасибо PyCharm), мне нравится проводить сеанс интерактивной консоли при достижении точки останова. Альтернативы отладки printf (требующие изменения кода и перестройки) или просмотра файлов журналов (часто с недостаточной степенью детализации или большим количеством шума) являются гораздо более неприятными и менее производительными. Даже автономные отладчики, такие как gdb, не приближаются к производительности хорошего интегрированного отладчика.
Gogland
Gogland — это моя текущая Golang IDE. Это очень молодой продукт, который все еще находится на ранней стадии предварительного просмотра, но я все еще считаю его наиболее полным и интегрированным Go IDE. Он построен на прочной основе JetBrains, поэтому он чрезвычайно надежен и полон функциональности.
Редактор кода и помощь
Редактор кода Gogland великолепен. Вот некоторые из его возможностей:
- Интерфейс с вкладками
- Умное авто-завершение кода
- Инспекции и быстрые исправления
- Рефакторинг
- Быстрая навигация
- Быстрые всплывающие окна для документации, определения, использования, структуры и т.д.
- Генерация кода (например, интерфейс реализации)
- Обнаружение рекурсивных вызовов
- Отображение типа любого выражения
- Функция выделения точек выхода
- Подсказки параметров
дебаггер
Отладчик Gogland превосходен. Он построен поверх Delve, который используется другими IDE, которые мы также рассматриваем. Он использует знакомые конфигурации отладки JetBrains для управления всем, что касается запуска отладки, таким как исполняемый двоичный файл, переменные среды, рабочий каталог и аргументы командной строки.
Вы можете установить контрольные точки, условные контрольные точки и часы. Когда достигается точка останова, вы можете наблюдать трассировку стека и локальные переменные в каждом кадре. К сожалению, глобальные переменные не отображаются и часто необходимы в Go.
У меня была одна проблема с отладчиком, когда точки останова срабатывали преждевременно! Рассмотрим следующий фрагмент кода:
Иногда, если я поставлю точку останова на последней строке, она попадет, но значение z будет 0, а не 4. Как это может быть? Оказывается, отладчик как-то запутался. Если я продолжу шагать по коду, он вернется к z: = x + y , назначит 4 для z, а затем снова вернется к последней строке и правильно выведет 4 на экран.
Я потратил пару часов, пытаясь отладить сложный кусок кода, не понимая, что не всегда получаю правильную картину. В конце концов, я выяснил, что происходит, и просто проигнорировал ложное раннее срабатывание точек останова.
Я не уверен, что это проблема Delve или Gogland, но я уверен, что они скоро это исправят. Помните, что это просто предварительный просмотр.
Запуск тестов
Тестовый прогон позволяет запускать, останавливать и перезапускать тесты. Я смог успешно использовать его для запуска и отладки модульных тестов, а также интеграционных тестов с использованием как пакета тестирования Go, так и среды тестирования BDD, такой как ginkgo.
Go Tools
Go поставляется с различными инструментами, и Gogland интегрирует их прямо в IDE. Вы можете вызвать любой инструмент из меню «Code | Go Tools». Встроенное форматирование кода Gogland использует стандартный инструмент «go fmt».
Контроль версий
Gogland наследует зрелую систему управления исходным кодом других продуктов JetBrains. Я использовал в первую очередь поддержку git, которая позволяет управлять несколькими проектами, отлично отображать ветки, множественные наборы изменений и многое другое. Другие системы контроля версий, такие как Mercurial и SVN, также поддерживаются с помощью дополнительных плагинов.
Интегрированный Терминал
Gogland предоставляет встроенный терминал на случай, если вам нужно будет выполнить некоторые команды. Приятно оставаться в IDE и иметь возможность просматривать или копировать из/в панели редактора, не переключая окна полностью.
Расширяемость
Gogland имеет множество встроенных возможностей, но он полностью расширяемый, и многие из его встроенных функций на самом деле являются предварительно загруженными плагинами. Вы можете установить много полезных плагинов, и вы можете разработать свои собственные плагины, если хотите.
Visual Studio Code
Visual Studio Code — это расширяемый редактор кода с открытым исходным кодом, разработанный в основном Microsoft (с большим вкладом сообщества). Он основан на Electron, который в свою очередь основан на Chromium. Visual Studio Code поддерживает множество языков и изначально ориентирован на веб-разработку. Он имеет сильную поддержку разработки Go, включая интеграцию всех инструментов Go и отладчика Delve через выделенное расширение. Вам нужно будет установить некоторые пакеты и инструменты Go, чтобы начать.
Visual Studio Code также предлагает встроенную интеграцию с git, иерархический обозреватель папок/файлов и интерфейс с вкладками.
Поддержка IntelliSense (автозаполнение, отображение типов параметров и документация) великолепна и обеспечивает очень приятный опыт редактирования. Встроенный отладчик (также использует Delve под капотом) очень хорошо сделан и соответствует отладчику Gogland.
Visual Studio Code очень отзывчив и быстр. Вот его существенный список возможностей:
- Списки завершения (используя gocode)
- Справка по подписи (с помощью gogetdoc или godef + godoc)
- Сниппеты
- Краткая информация (с помощью gogetdoc или godef + godoc)
- Определение Goto (используется gogetdoc или godef + godoc)
- Поиск ссылок (используя guru)
- Ссылки CodeLens
- Схема файла (используя go-outline)
- Поиск символов рабочего пространства (с использованием go-символов)
- Переименовать (используя gorename. Примечание. Чтобы отменить переименование для работы в Windows, необходимо иметь инструмент diff)
- Build-on-save (используя go build и go test)
- Lint-on-save (с использованием golint или gometalinter)
- Формат (используя goreturns или goimports или gofmt)
- Генерировать скелет юнит-тестов (используя gotests)
- Добавить импорт (используя gopkgs)
- Добавить/удалить теги в структурных полях (используя gomodifytags)
- Семантические/синтаксические сообщения об ошибках при вводе (используя gotype-live)
- Запускать тесты под курсором, в текущем файле, в текущем пакете, во всем рабочем пространстве (используя go test)
LiteIDE
LiteIDE очень необычный. Это был первый серьезный Go IDE, начатый еще в 2011/2012 году, и он все еще набирает силу. Это приложение C ++ Qt, и оно имеет собственный внешний вид. Подобно Gogland и Visual Studio Code, он использует инструменты Go и отладчик Delve для предоставления языковых услуг (хотя он начинался с отладчика gdb до того, как Delve был готов).
В целом, это полнофункциональная IDE, но она не выглядит такой отточенной. Насколько я могу судить, это в значительной степени работа одного человека, которая является экстраординарной. Вот разбивка функций LiteIDE.
Основные особенности
- Управление системной средой
- Настраиваемые команды сборки
- Простая и открытая система отладки (поддерживает как gdb, так и Delve)
- Kate формат для автозаполнения и тематики
- Настраиваемое автозаполнение с WordApi
- Система на основе MIME-типа
- Поддержка плагинов
- Быстрое открытие
«Golang» — поддержка
- Пакетный браузер
- Класс просмотра и наброски
- Браузер документов
- Поддержка Gocode
- GOPATH API index
- Навигация по коду
- Поиск использований
- Code Refactor
- Go playground
Дополнительная поддержка
- Markdown
- JSON
- Golang Present
Wide представляет интерес, потому что это выделенная веб-среда Golang. Он сосредоточен на совместной разработке и предназначен для команд. Разработчик — китаец, и большая часть документации на китайском языке, поэтому она может не подходить для всех. Он определенно не наравне с другими IDE с точки зрения функций и интеграции.
Go плагины для других IDE
Существует много универсальных сред разработки, которые поддерживают множество языков программирования, а также добавили поддержку языка Go. Я не большой поклонник таких сред. Я считаю, что интегрированная среда должна иметь глубоко интегрированные языковые особенности. Это трудно реализовать как простой плагин (хотя вы можете утверждать, что это именно то, что делает VS Code).
Некоторые популярные среды разработки, в которых добавлена поддержка Go:
Текстовые редакторы
Go это простой язык. Многие люди чувствуют себя очень продуктивно, просто используя текстовый редактор, возможно, с некоторыми дополнительными плагинами Go. Я не рассматриваю их как действительно интегрированные среды разработки. Но это имеет смысл, если у вас есть многолетний опыт работы с текстовым редактором, вы уже настроили его по своему вкусу и используете его для многих других задач. Вот список некоторых наиболее популярных текстовых редакторов и их плагинов Go:
Emacs
Со следующими плагинами:
- go-mode
- GoFlyMake Синтаксис в стиле Flymake для Go
- go-errcheck.el Интеграция с Errcheck для Emacs
Sublime Text
Vim и NeoVim
С множеством плагинов Go.
Заключение
Go прошел долгий путь и имеет мощную экосистему, включающую множество вариантов среды разработки. Отладчик Delve предоставляет фантастические возможности интерактивной отладки и используется большинством ведущих IDE. Поиграйте с этими IDE и найдите тот, который подходит вам больше всего.
Правильная IDE может сделать работу с Go еще более увлекательной.
Источник
Ide для golang mac os

See More. Do More…
Go IDE in macOS
In this article, we are going to turn our attention to some Golang IDE’s.
Before we continue with the Go IDE’s, make sure you install Go in your machine. To install Golang in your machine go through this article. Although on the official Golang website there is a list of recommended IDE’s.
IntelliJ Goland is not free and for the beginner, you can try the 30-day trial. After trying it for 30 days, we conclude that Golang is the complete package when it comes to Go development. This entails all the features it provided and easy to install. In addition, JetBrains provides a Go plugin for IntelliJ Ultimate Edition users. For more information about this plugin see Jetbrains Go plugin.
Vim is a free and open-source IDE that supports the programming language Golang. The code editor VIM installation can be a bit confused for beginners since it requires some command through Terminal.
In this article, we are going to focus on the easy to install code editors, so everyone can get them up and running without too many difficult steps in between. From all the available Go IDE’s we are going to focus on the following code editors which can be used as a Go IDE’s which is also easy to install:
Visual Studio Code
Visual studio code is an open-source and free code editor developed by Microsoft which is redefined and optimized for building and debugging modern web and cloud applications. It also supports Git, Github and some additional features such as syntax, highlighting, intelligent code completion, snippets and code refactoring. Furthermore, it is also highly customizable which allow the user to perform the following:
- Change theme’s
- Add keyboard shortcut
- Change preferences
- Install additional extensions for additional functionalities
Golang plugin
By default, Visual Studio Code does not support Go, but there is Go plugin available in Visual Studio Code. Once the Go-plugin is installed you can start developing Go applications.
VS Code installation
This code editor can be downloaded directly from the official VS Code website.
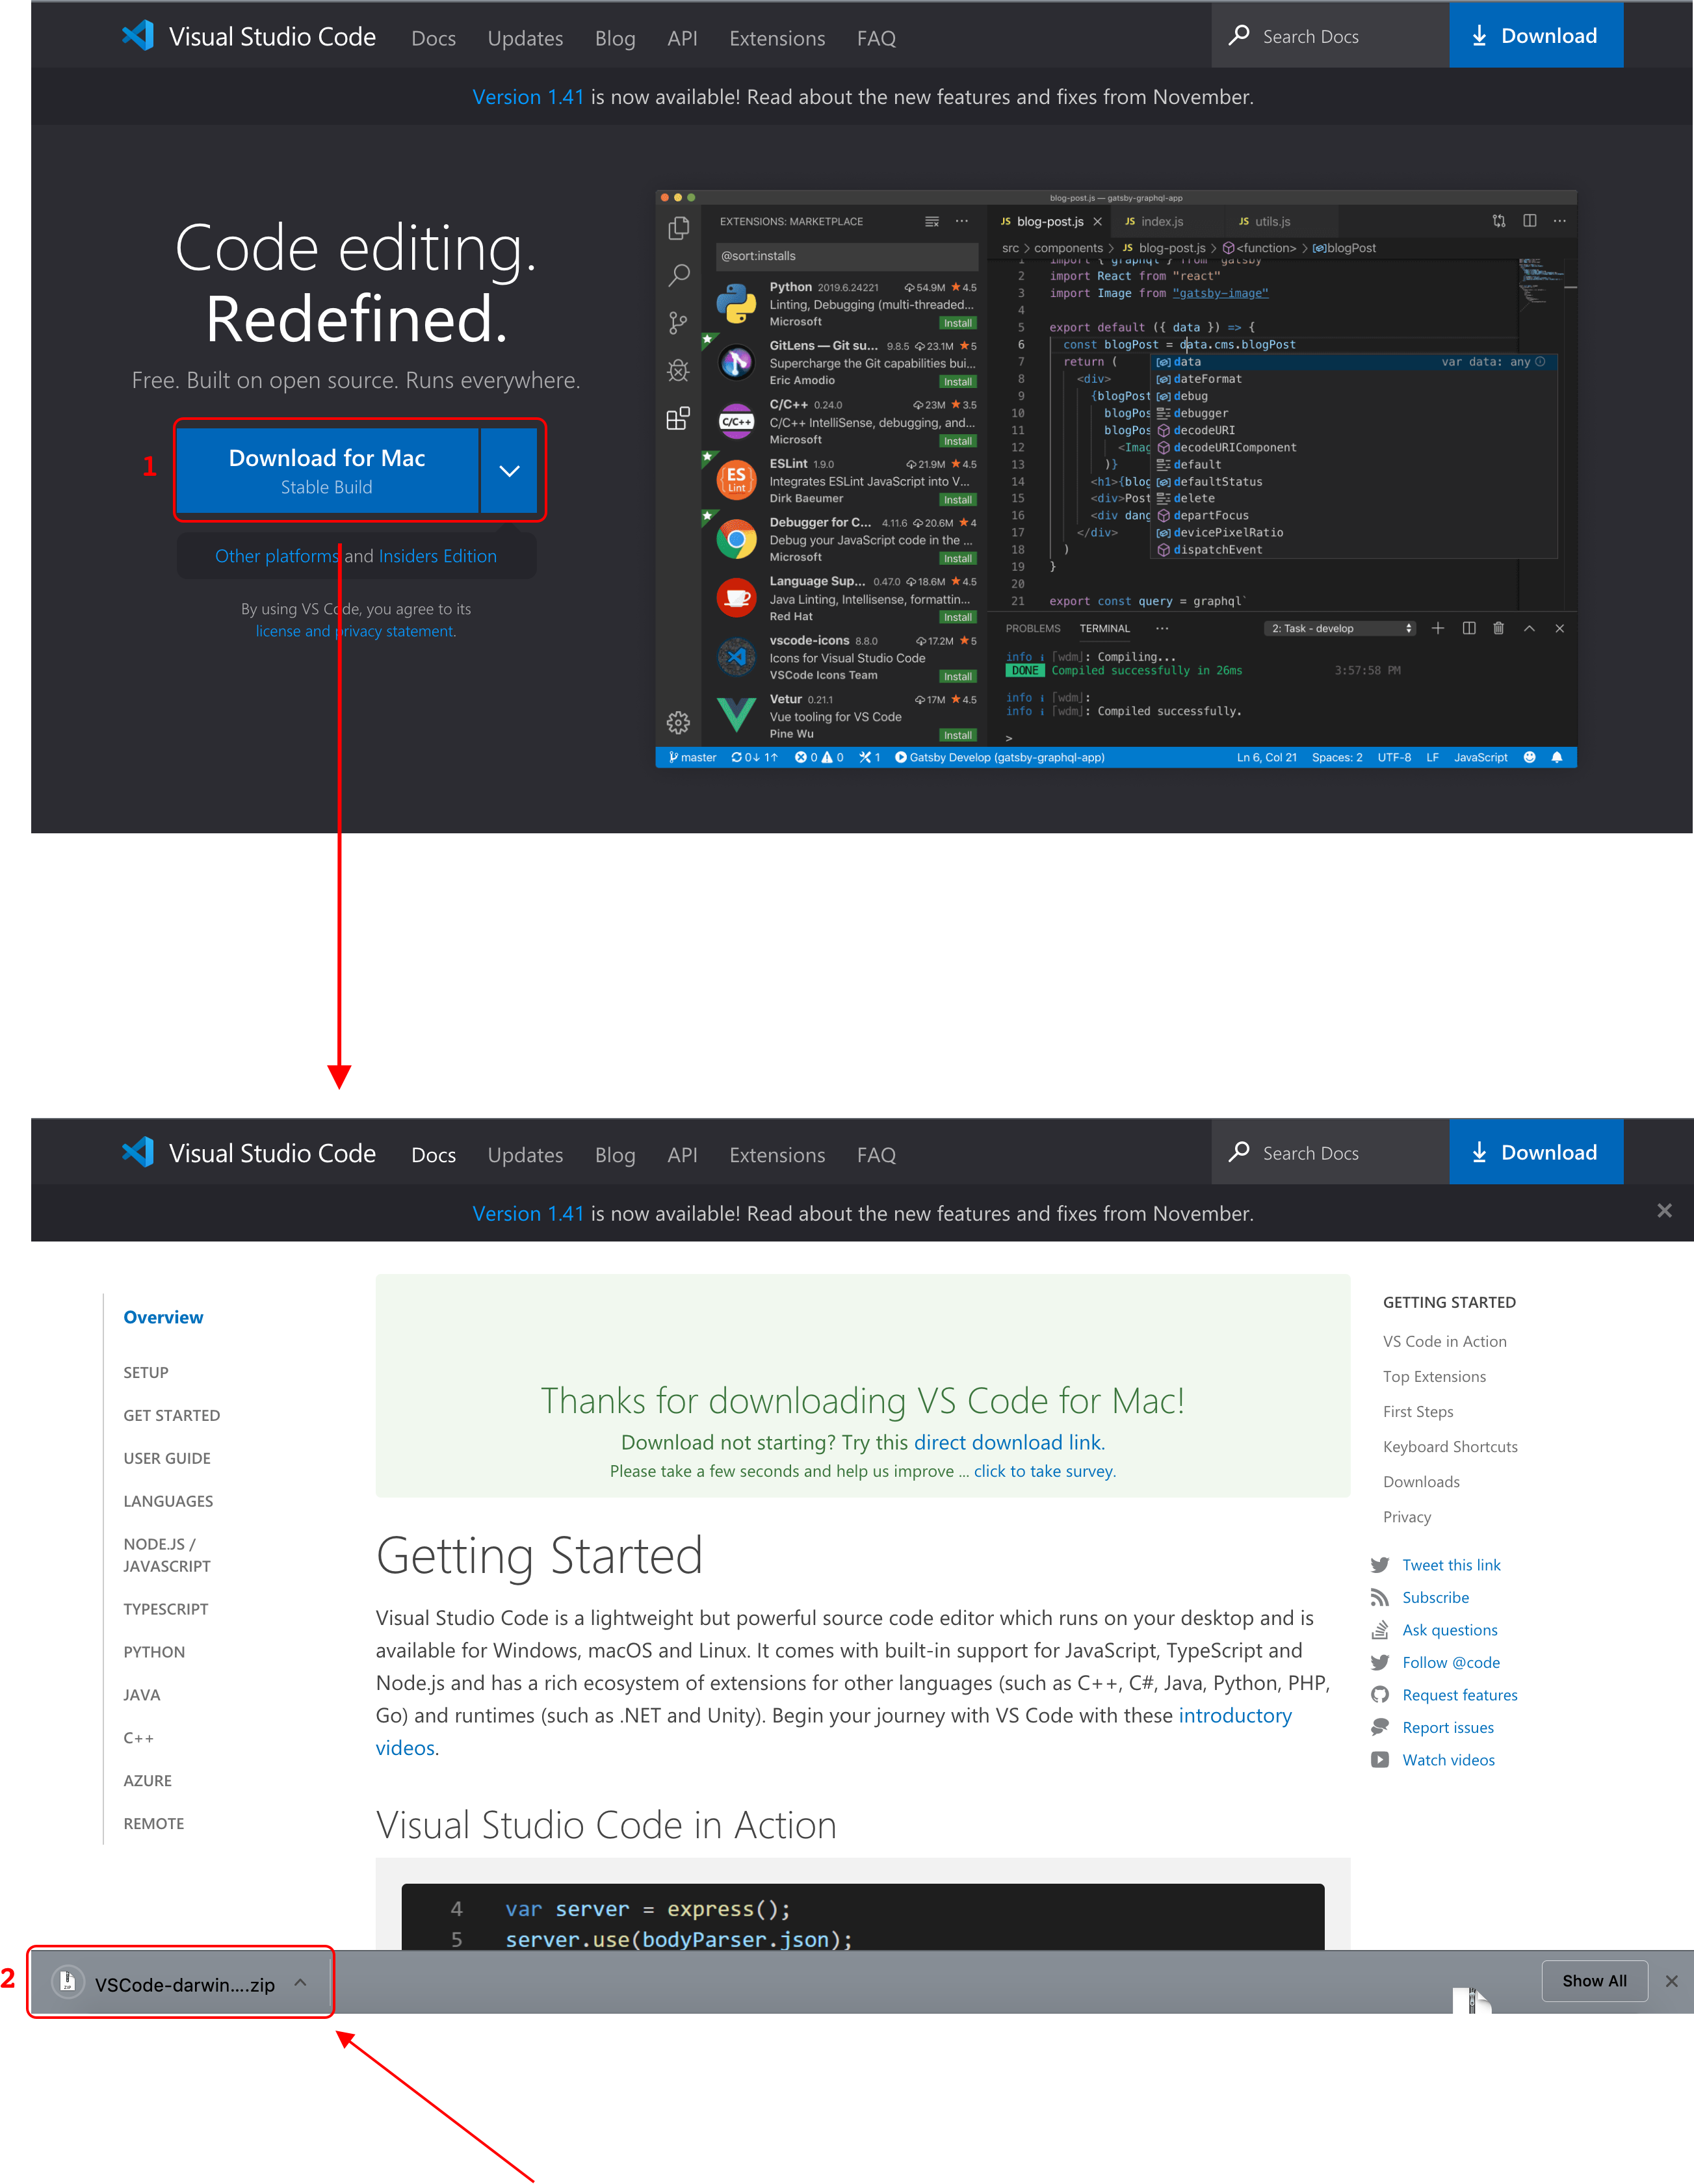
After downloading VS studio code from the official website, just extract the .zip file where the application itself is located.
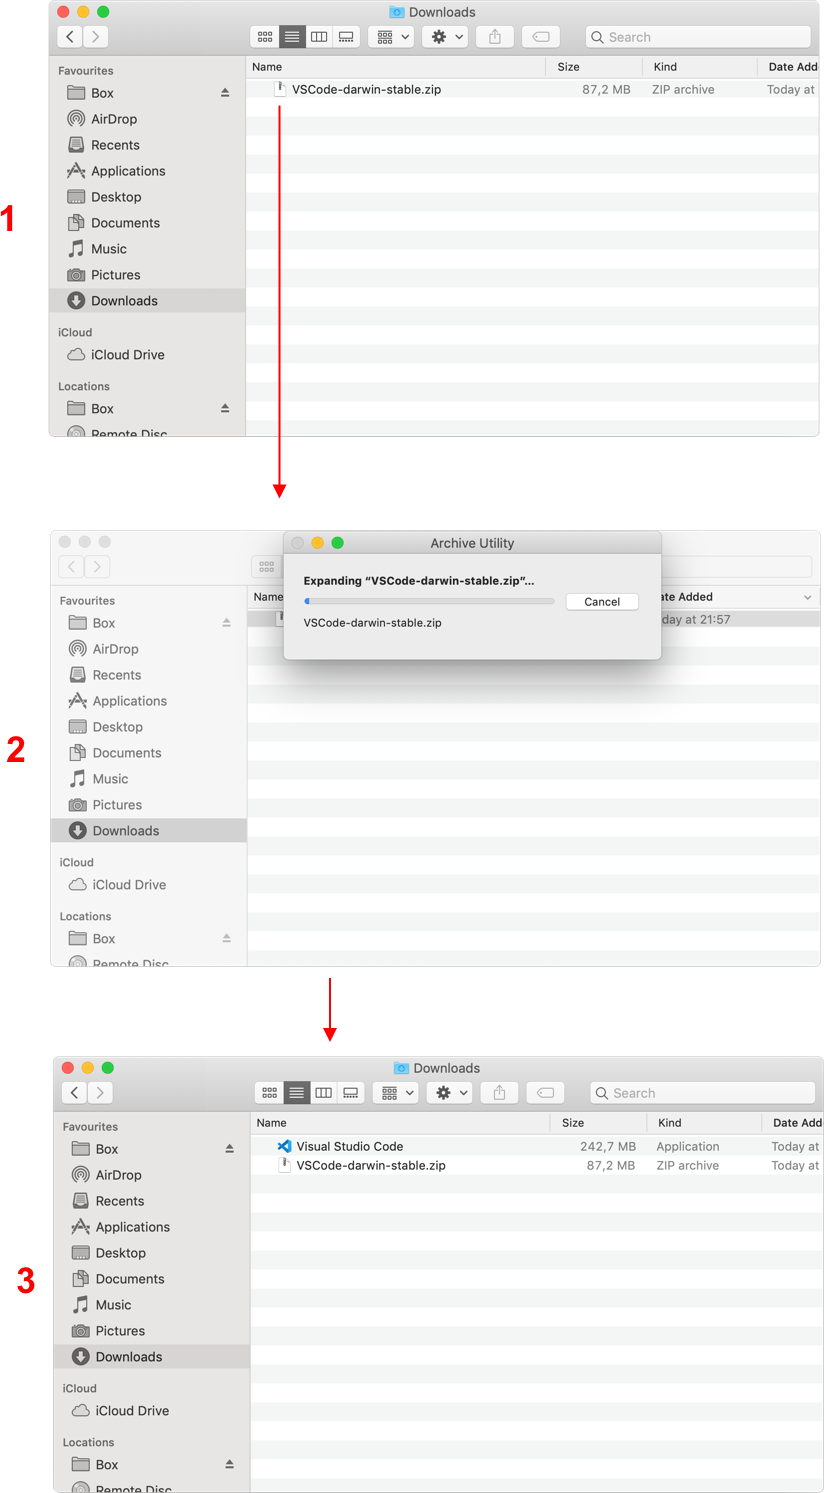
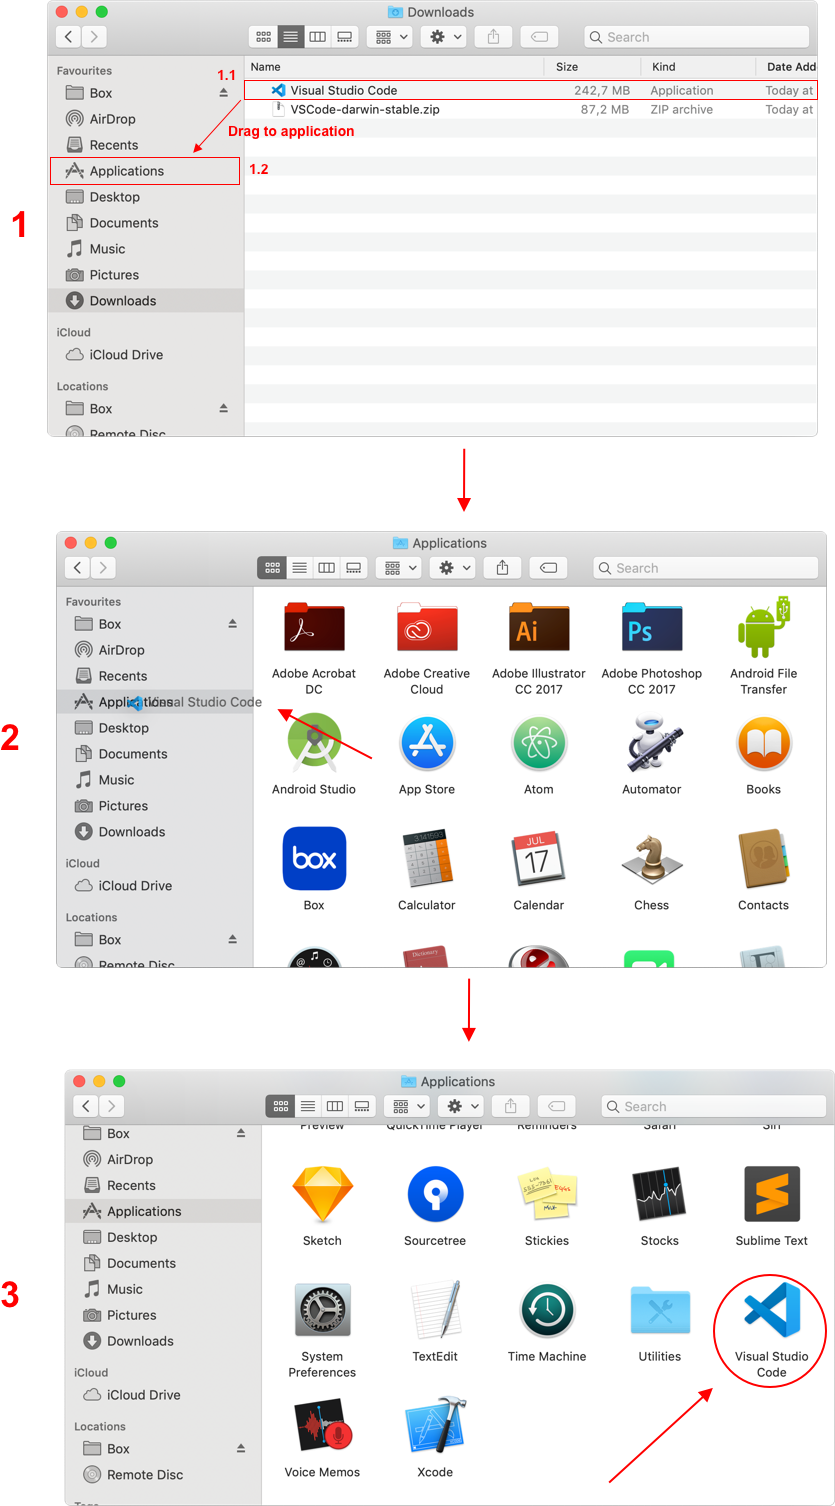
After extracting the .zip file, the VS Code application appears in the list. It is recommended to drag it to the ‘Application’ folder since if you leave the VS Code application in the Download folder it would run fine, but if you accidentally delete it, VS Code would not work anymore. Hence, drag and drop it to Application to prevent this from happening.
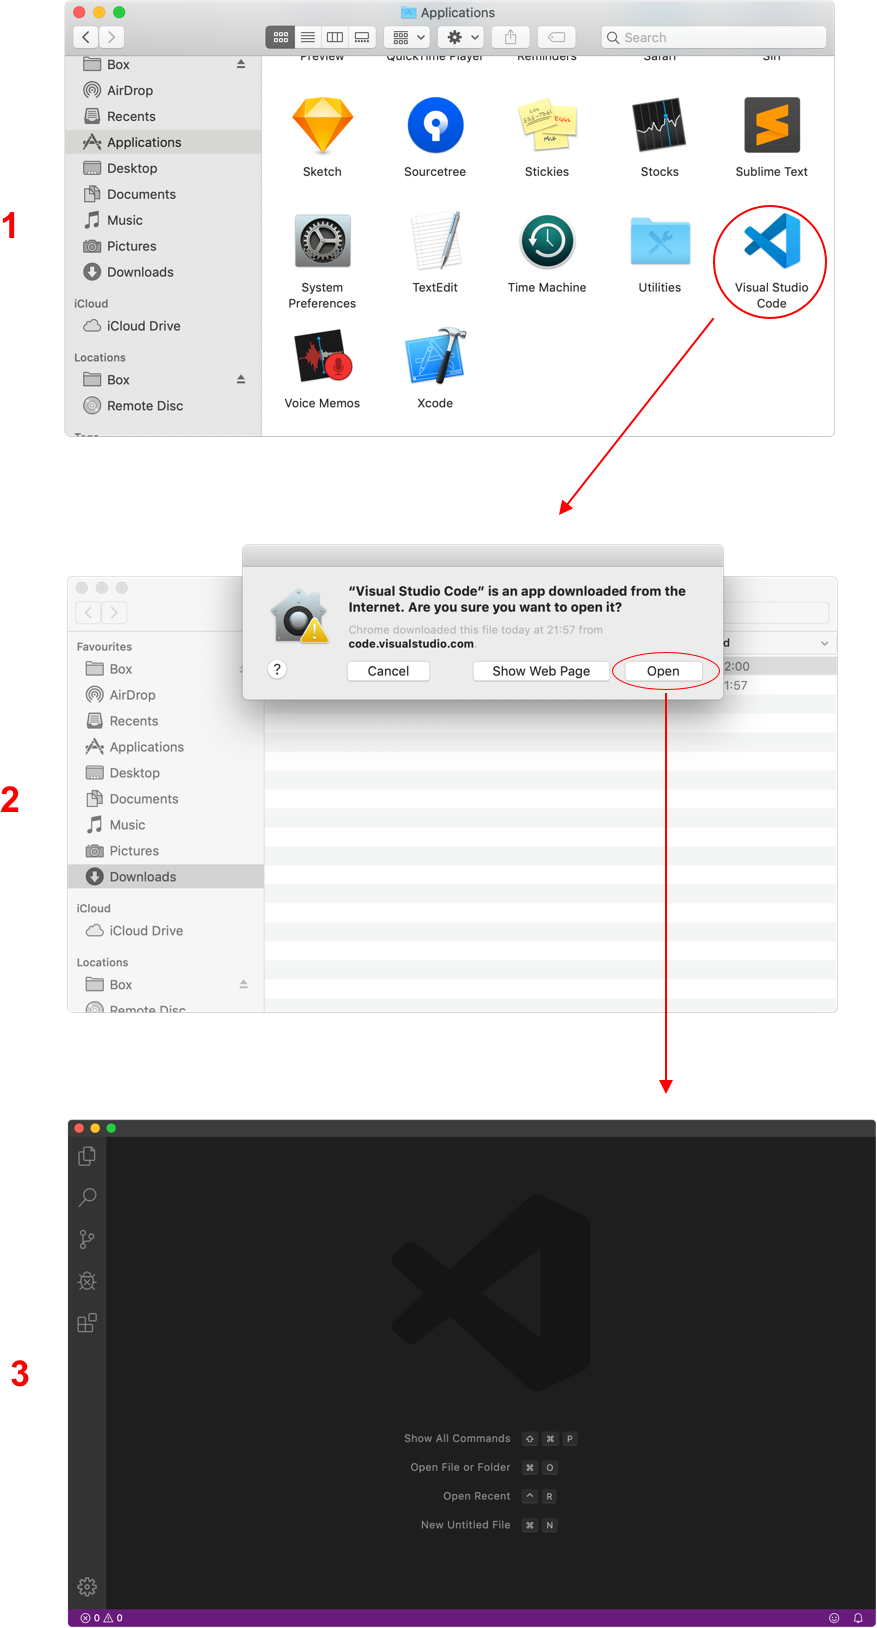
Just double click the VS Code in the Application folder and it will ask you for permission in order to continue. Proceed by clicking open and it will launch the VS Code app.
For a better Go programming experience in VS Code, enable the terminal. In order to do this in VS Code follow these simple steps:
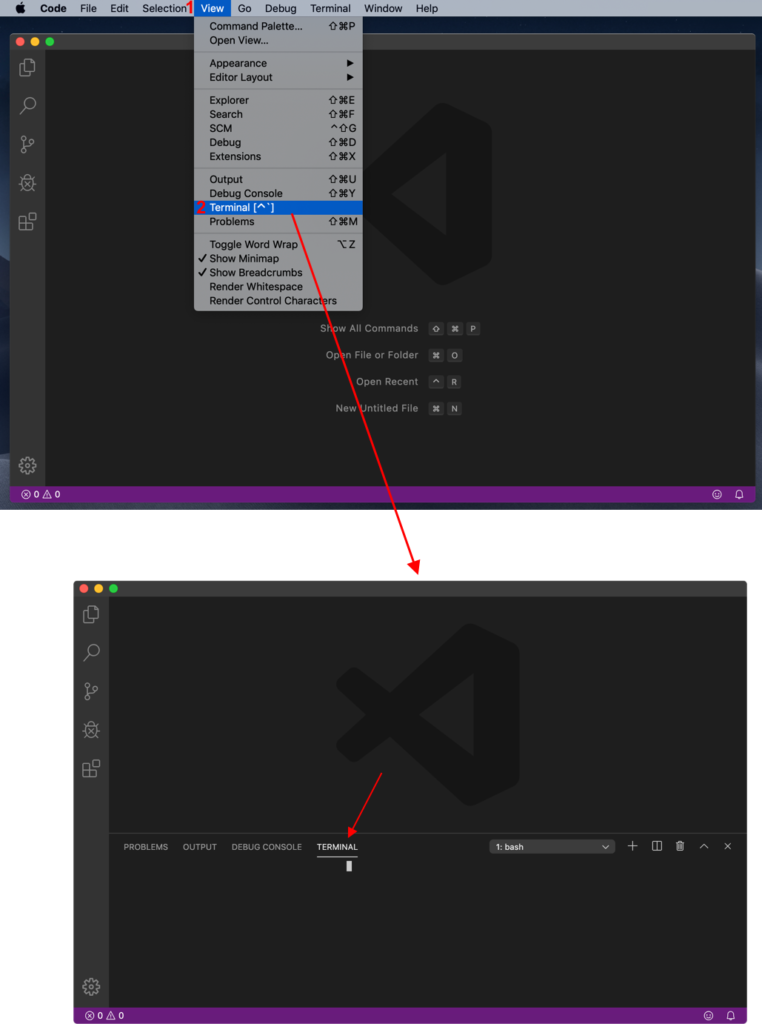
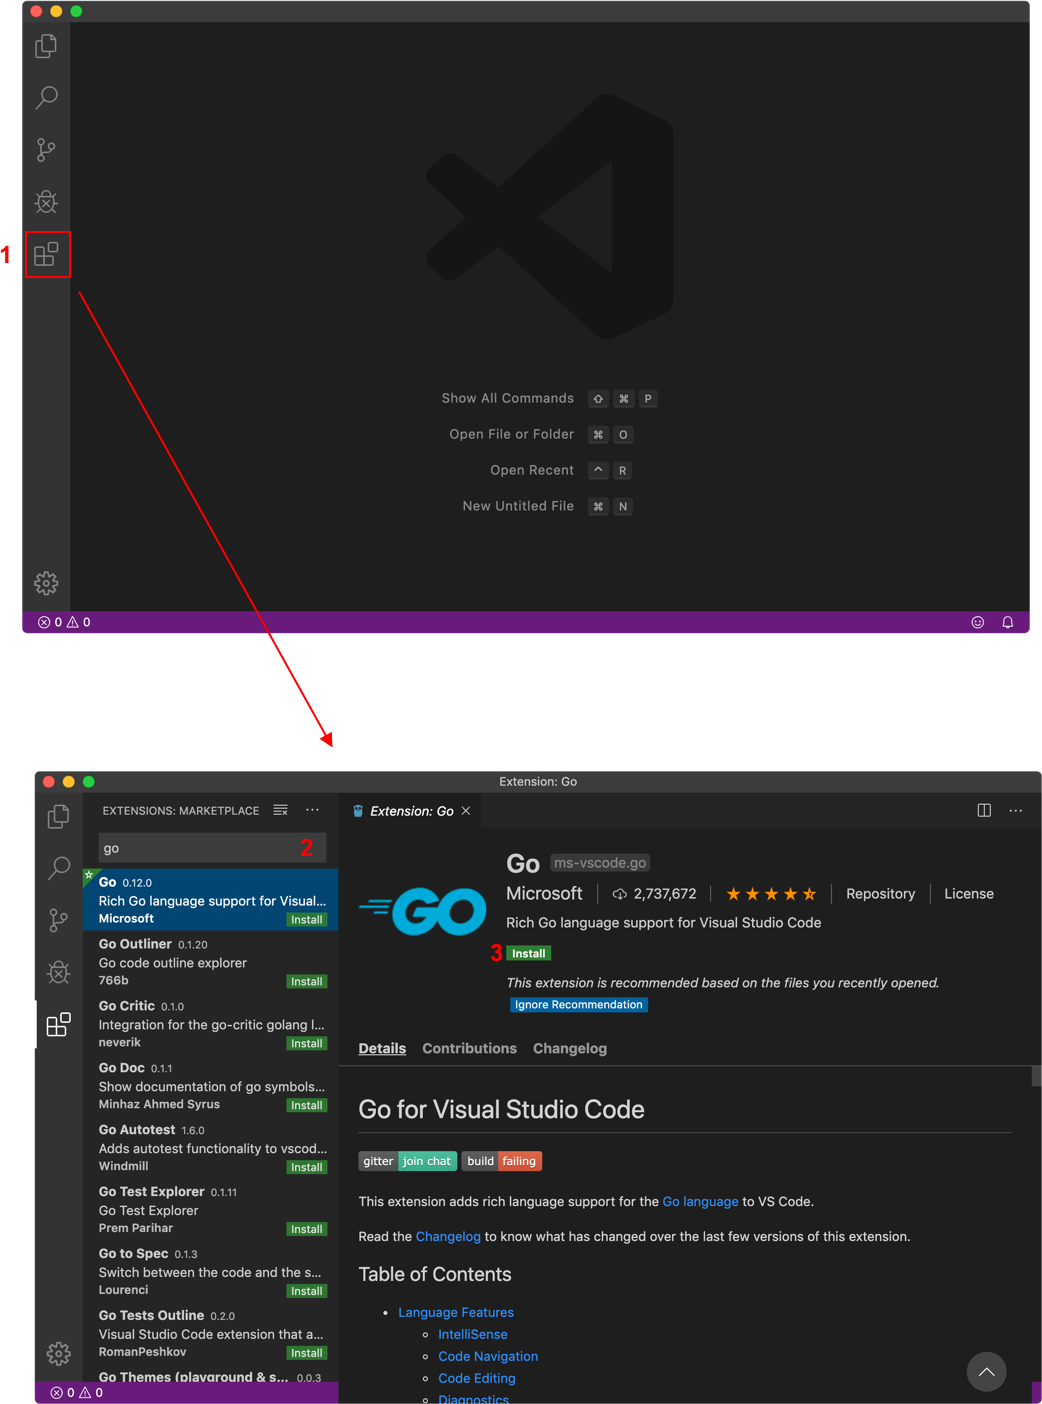
Installing Go-plugin in VS Code
Installing the Go-plugin in VS Code is a straight forward process and it is these simple steps:
Create a simple hello world go application in VS Code
Creating a Go file through File -> New File and save the file with the .go extension.
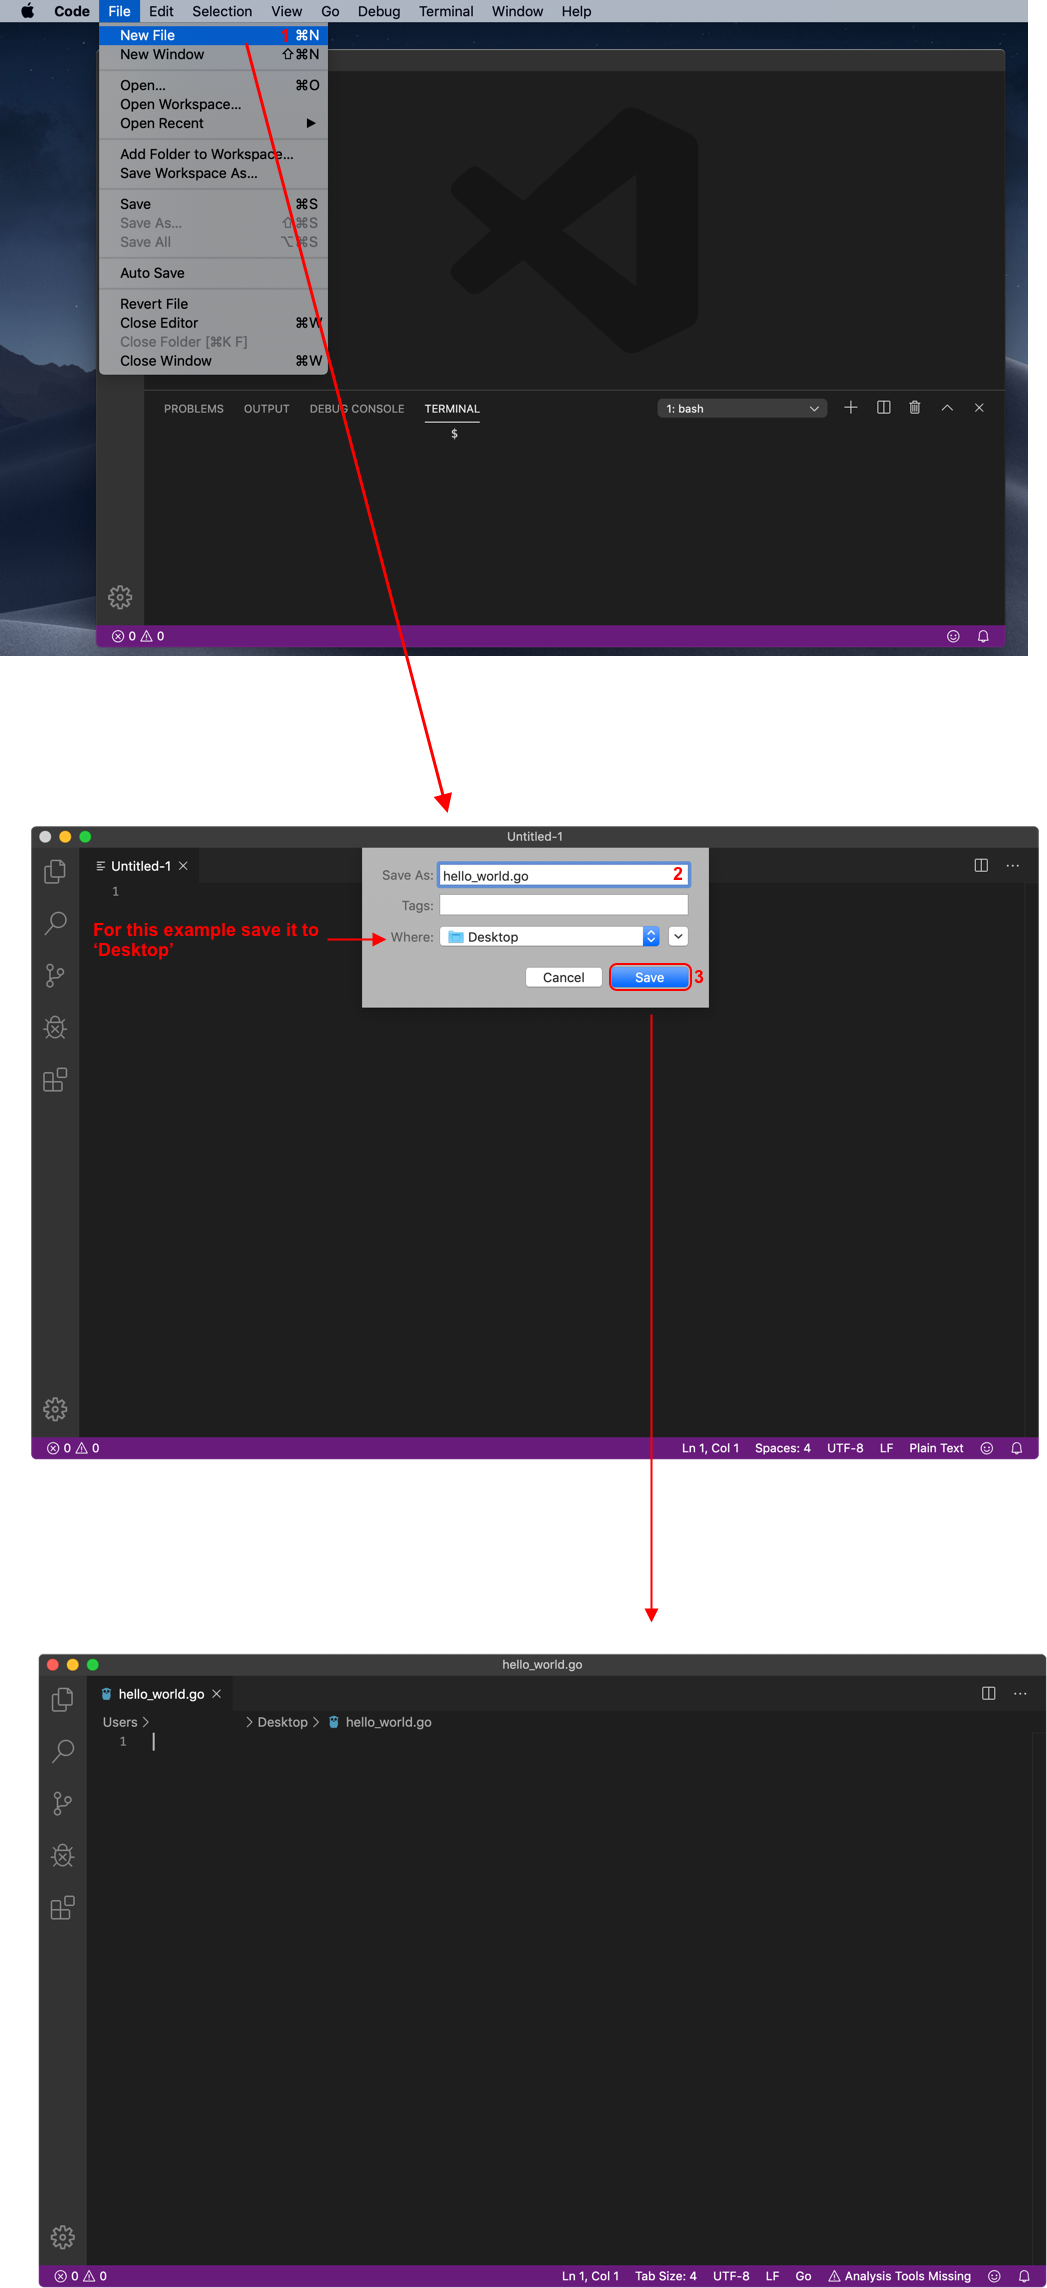
Ones the file is created, just type the following Go code and save the file.
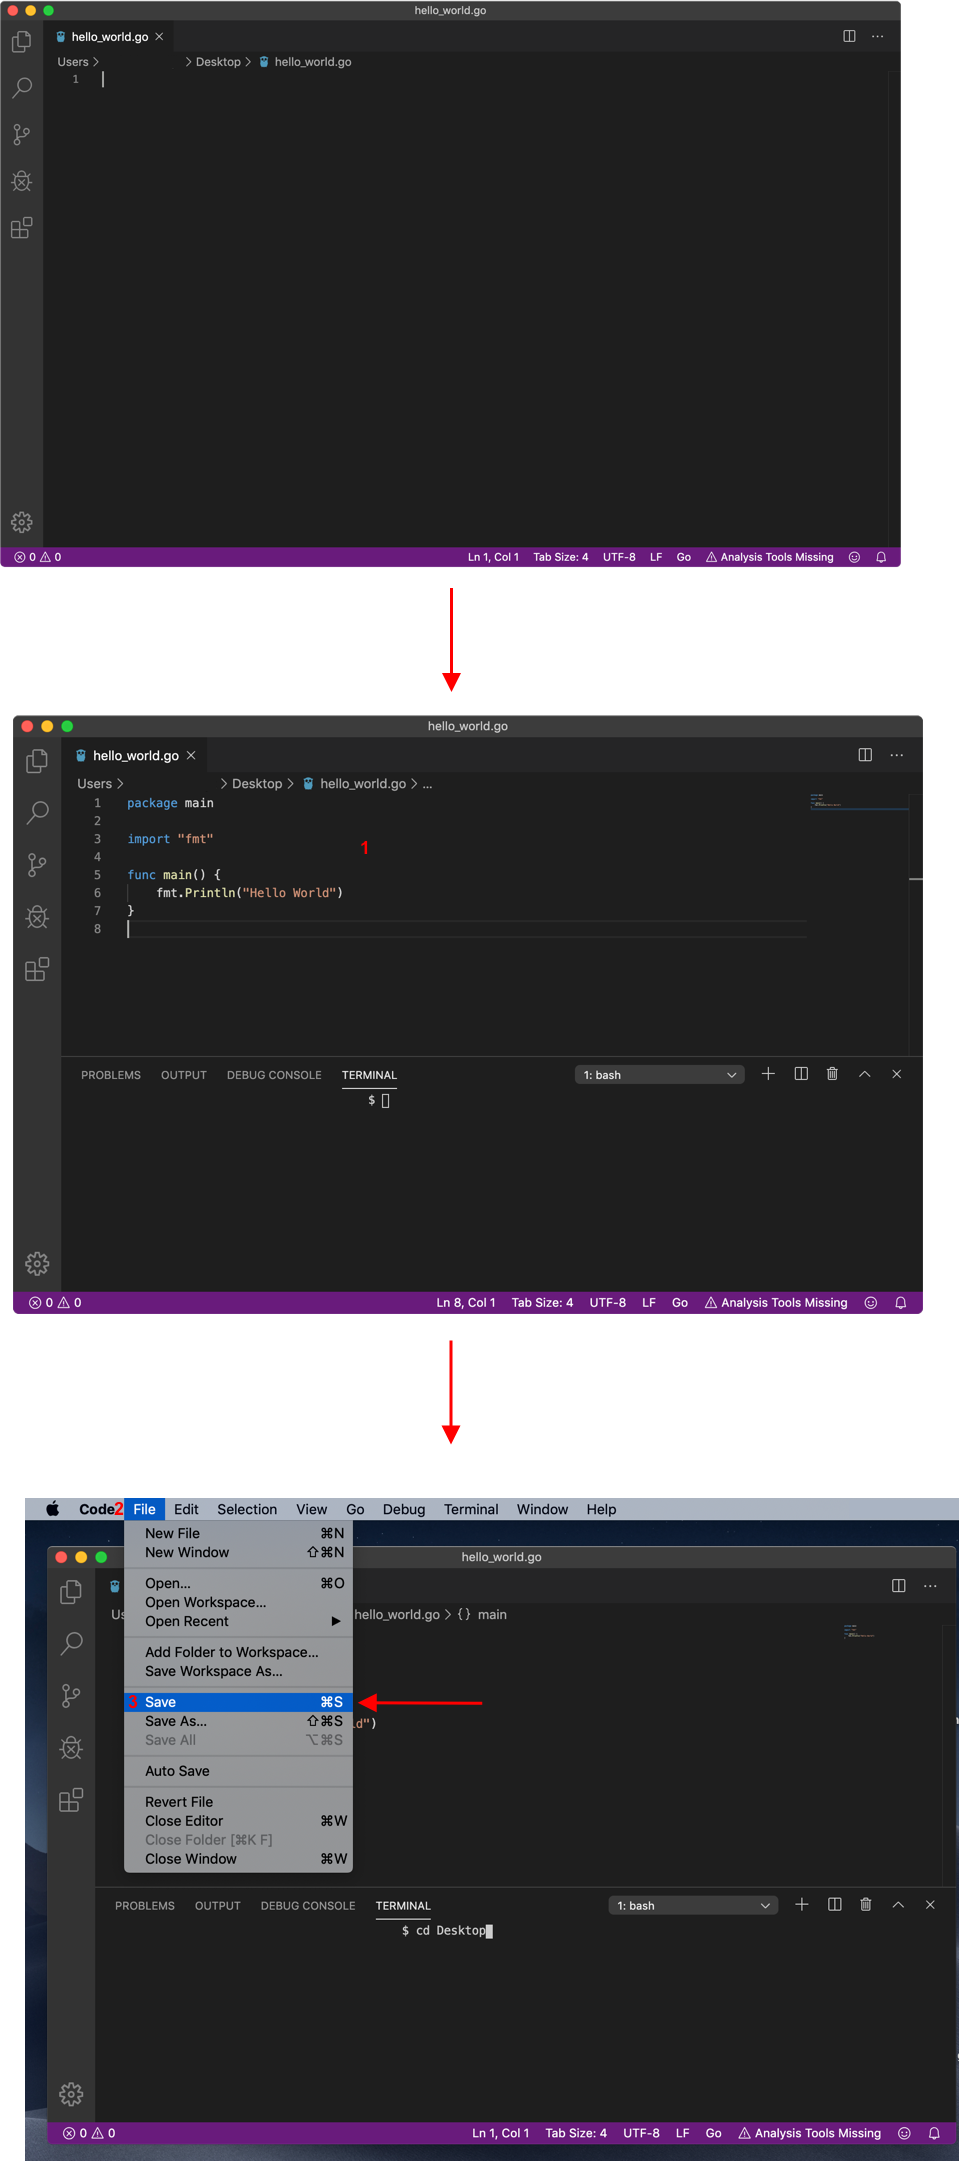
Running your Go code in VS Code
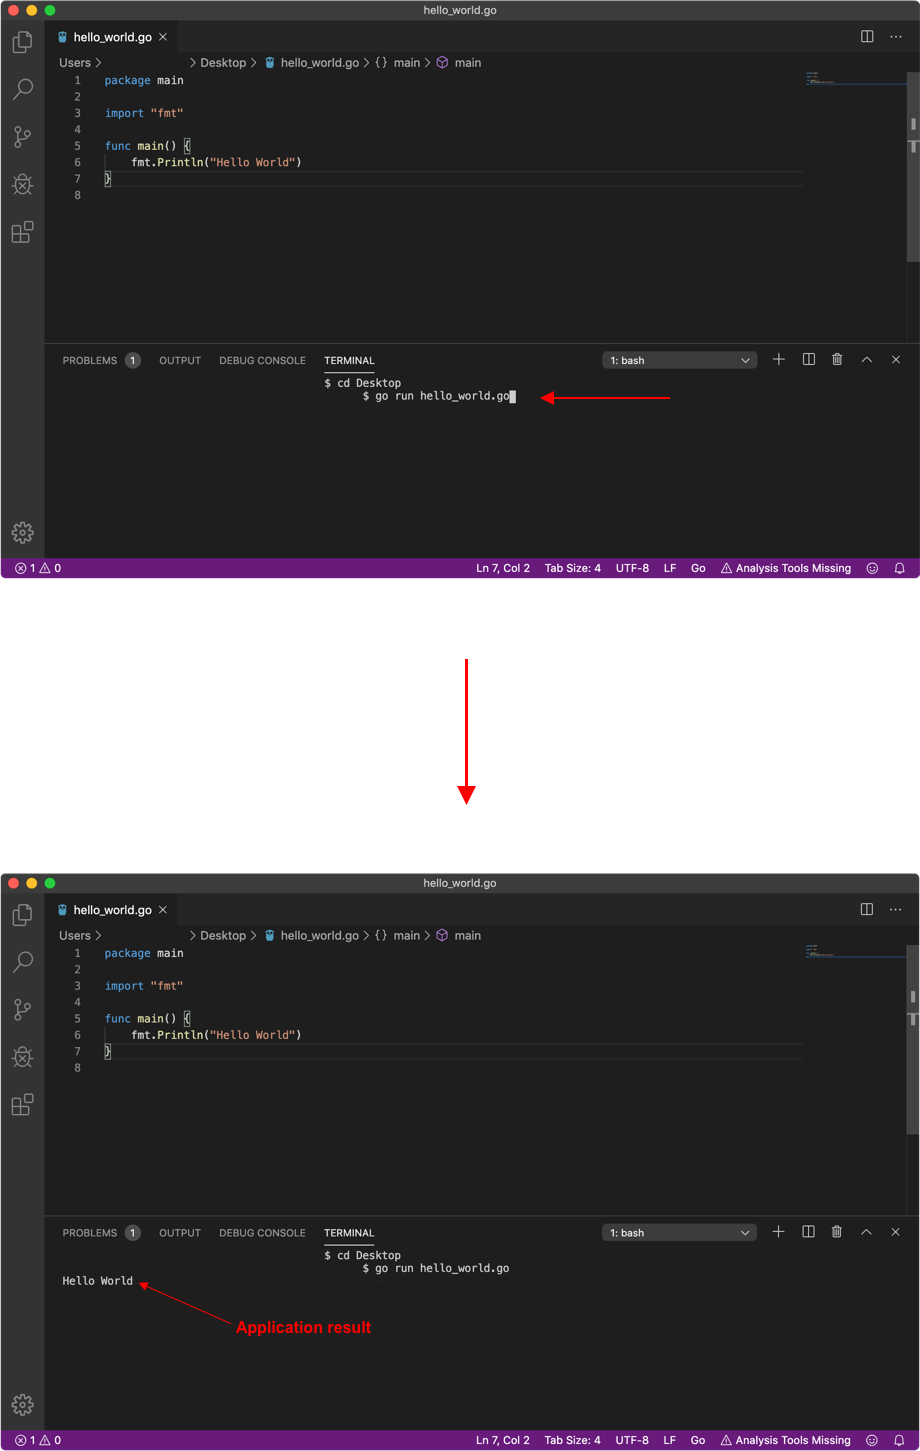
Now the terminal becomes handy as you can run your Go code through the VS Code embedded Terminal. Since in this example we save the Go file on Desktop, we need to navigate to Desktop in order to execute the Go file we created.
In order to navigate to Desktop just enter the following command in the VS Code terminal:
cd Desktop
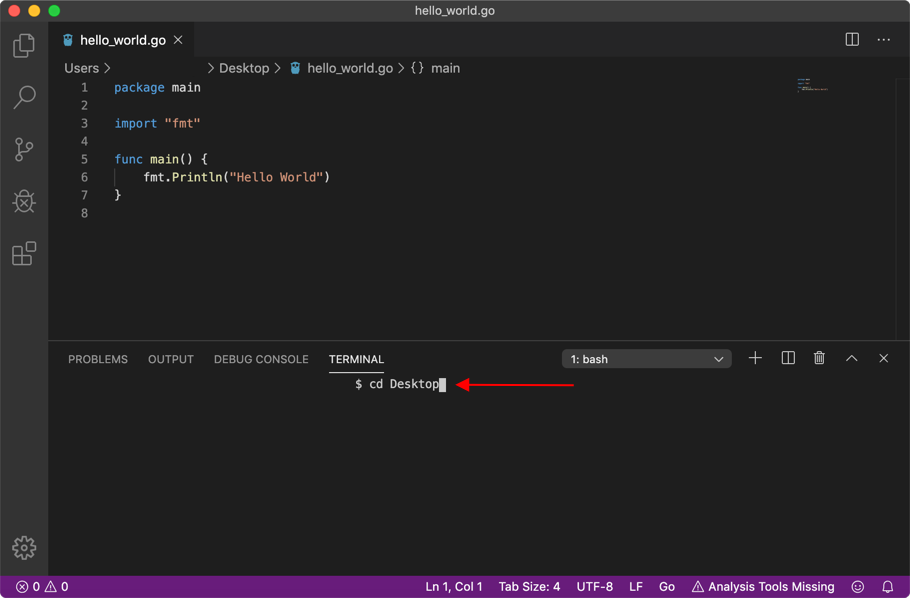
Ones you navigate to Desktop, you can just execute to the following command to run your Go codes.
go run hello_world.go
Atom
Atom is an open-source text and code editor with several open-source plugins (known as ‘packages’) and it comes with a Git and GitHub already preinstalled by default. Most of the available packages are free of charge since they are developed and maintained by community developers. Atom is fully customizable through HTML, CSS, and JavaScript. This code editor has several terminal packages, but in this example, we are going to use terminal-tab, for more info about this package see: terminal-tab.
Golang support
Atom by default automatically detects Golang when it is installed on your Mac. No additional plugin installation is required.
Atom installation
Installing Atom on your mac starts by downloading the .zip file from the official website.
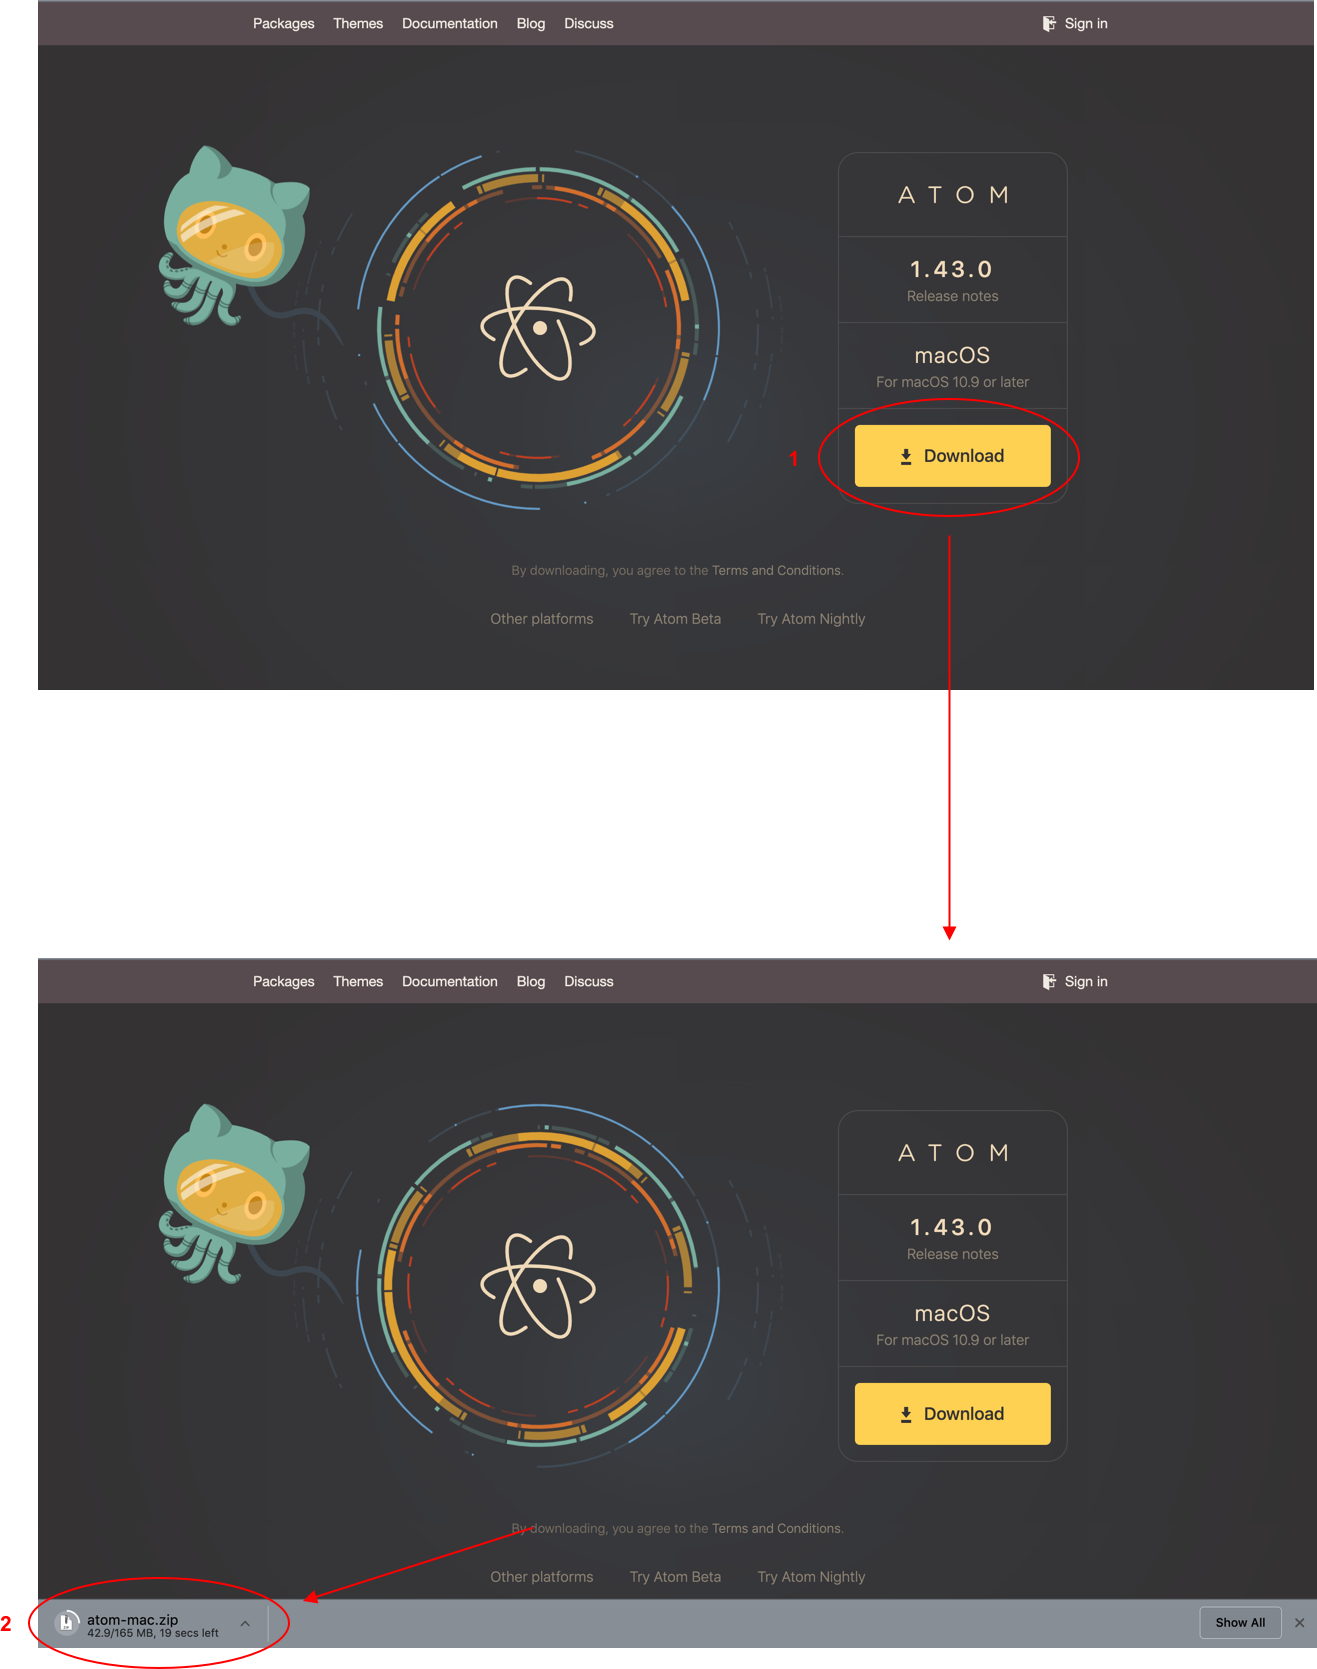
After downloading the zip file just double click it in order to extract it. Ones it is extracted application appears in the list (just like with VS Code).

You can open it by double-clicking the application that appears. Again just like VS Code drag and drop it to Application.
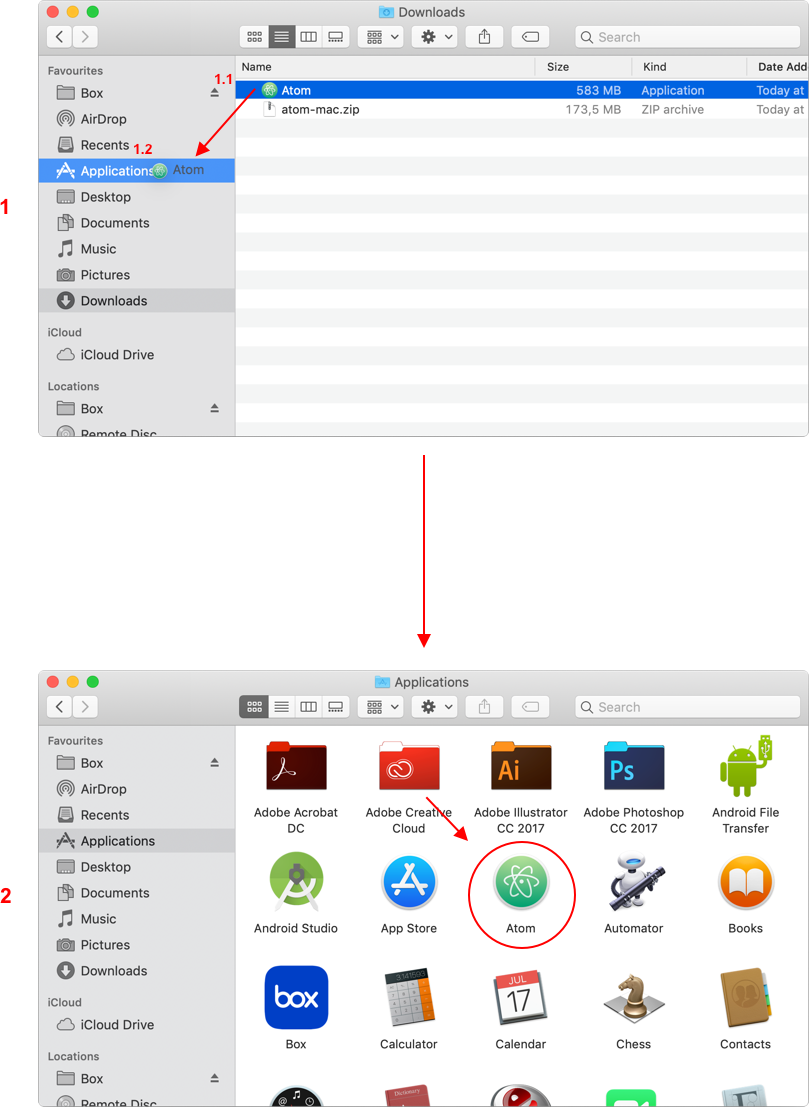
Launching the Atom application
Launching Atom is just a matter of double-clicking it in the Application folder. The verification and permission process followed. Ones these steps proceed you will see the Atom main screen.
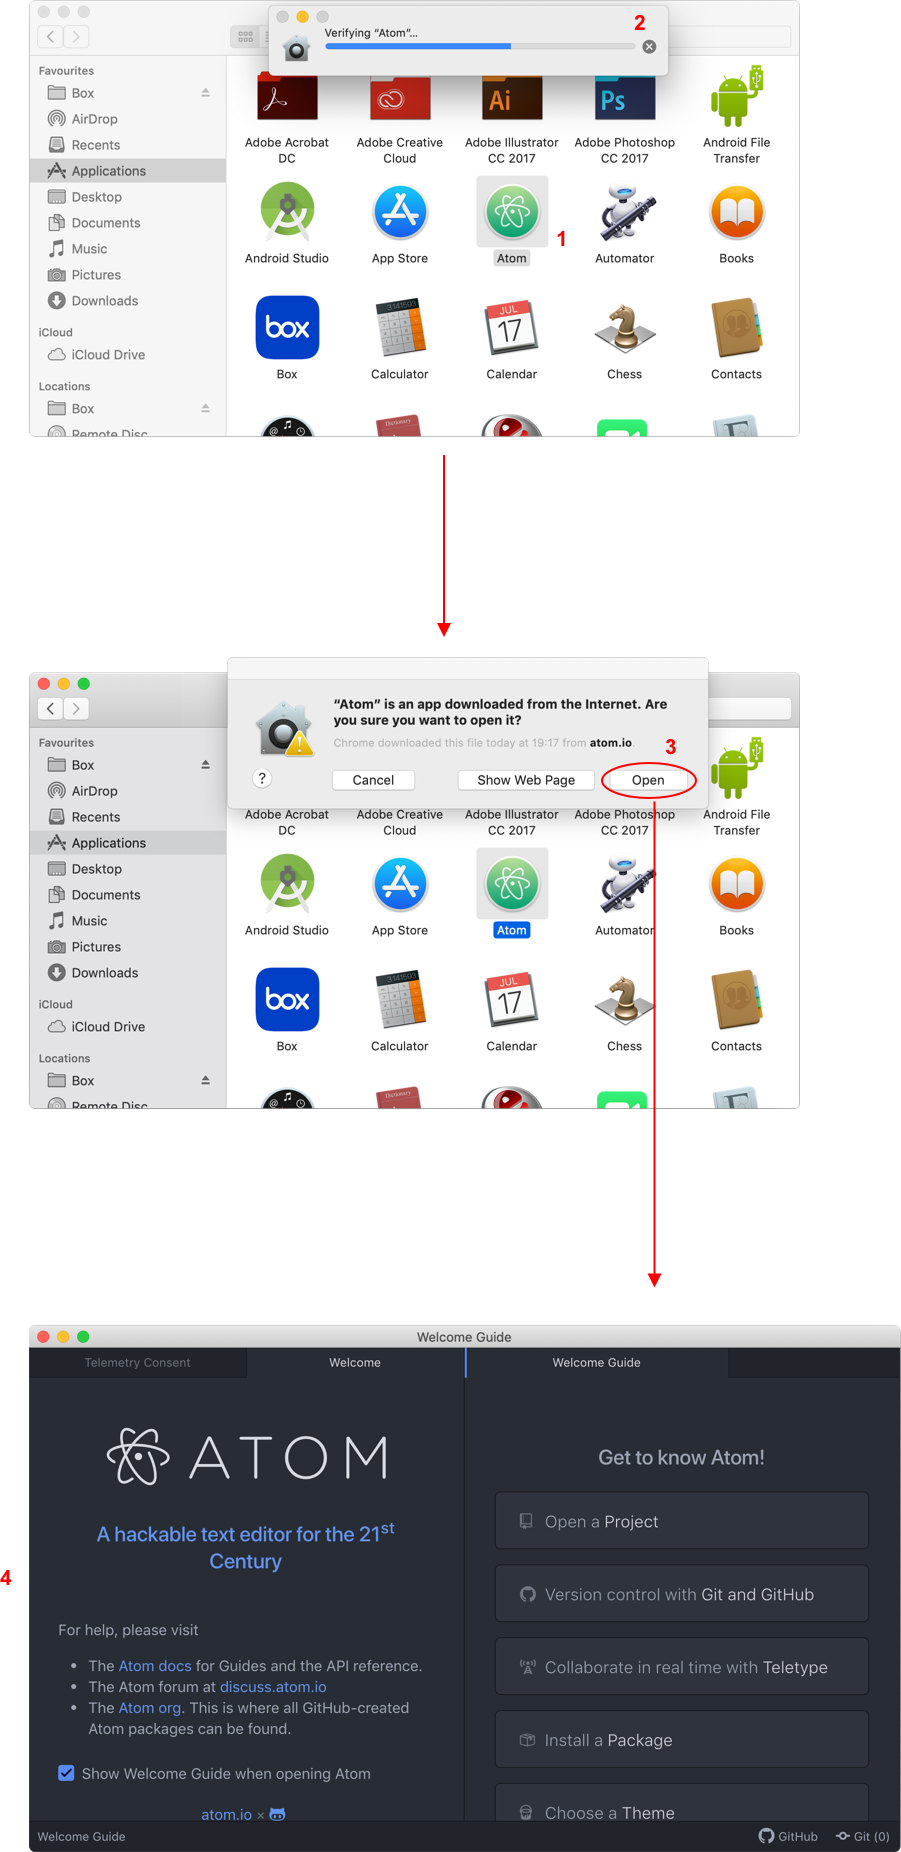
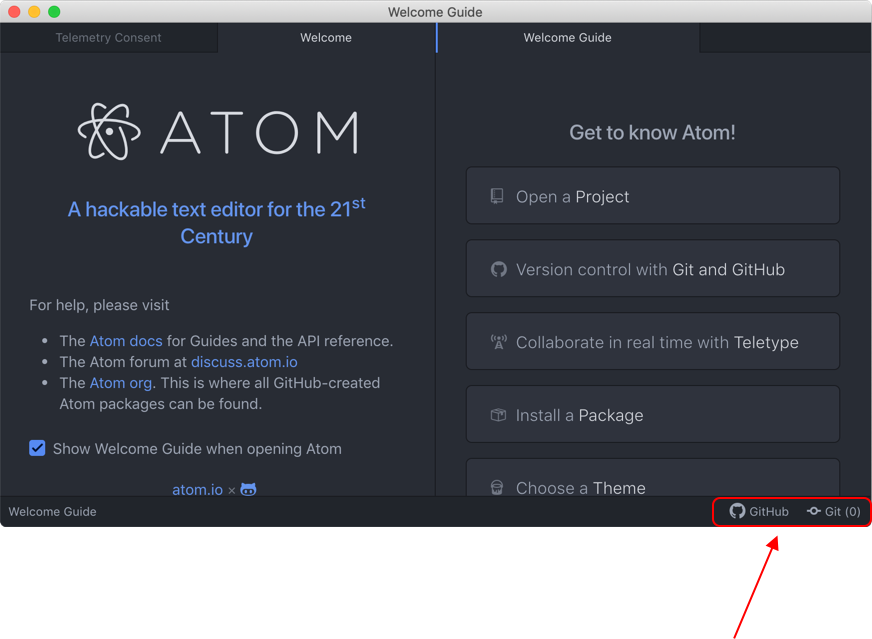
As you can see on the main screen of the Application, Git and GitHub appear at the bottom right of the screen.
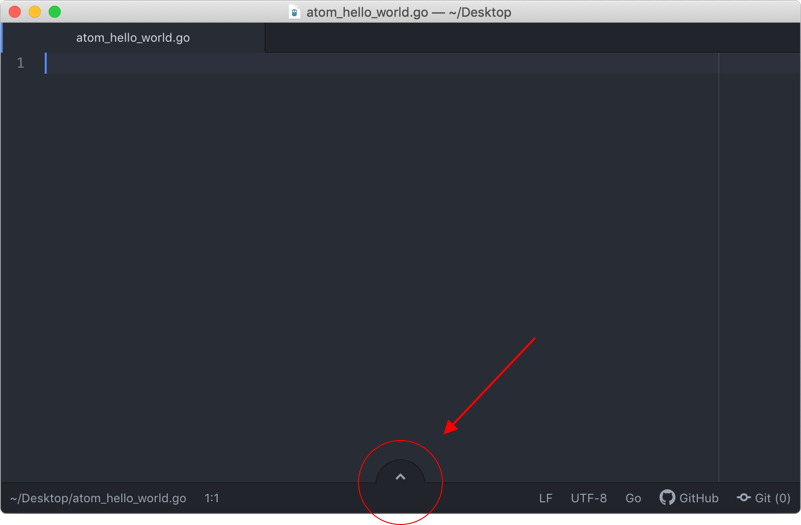
Enable Terminal in Atom
For a better programming experience, it highly recommended installing one of the available Terminal packages in Atom. So, you can run your Go code in Atom without switching to the macOS terminal each time. In this example, we are going to install the package terminal-tab developed by jsmecham. Select the Install a Package option on the application main screen and the install package window will appear.

Ones the install package window opens, select Open Installer and insert terminal-tab in the search bar on the left. If everything went well, you must be able to see the terminal-tab appear in the result section. Click install and wait until it is successfully installed.
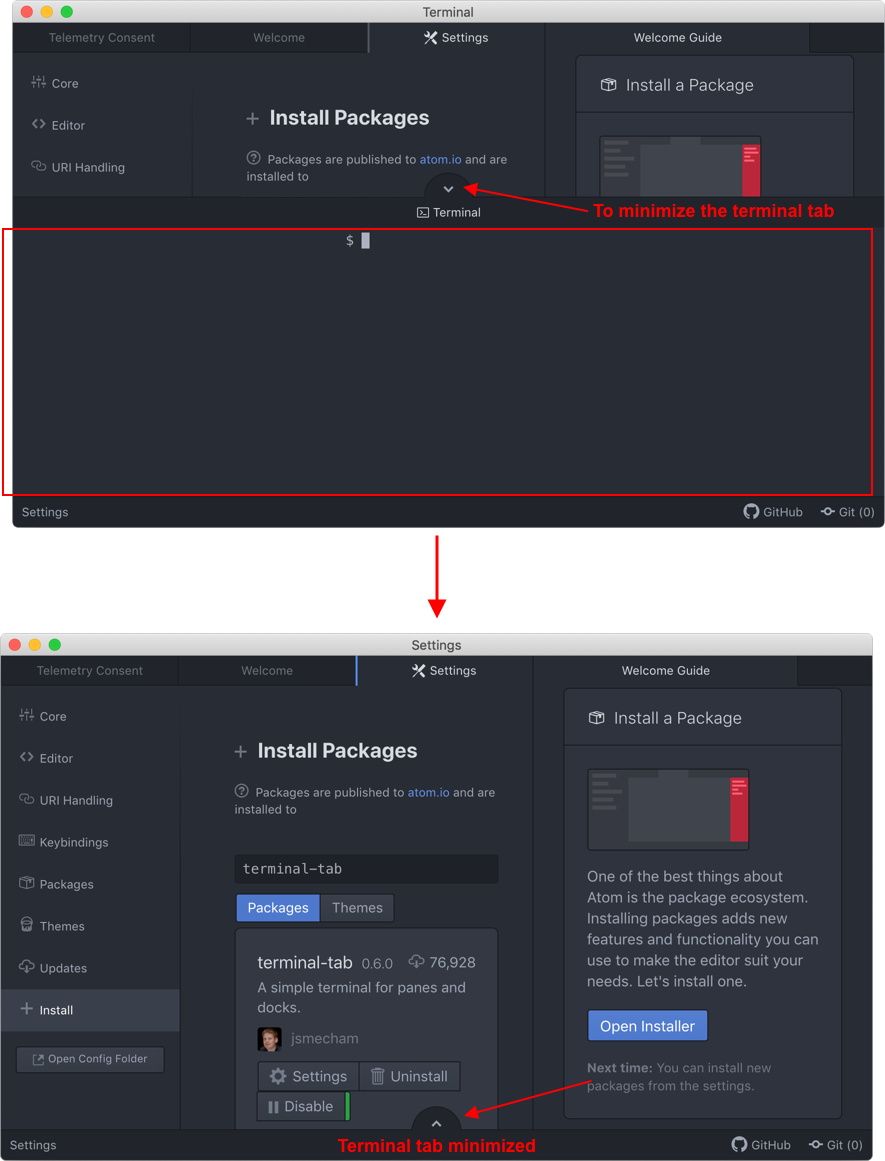
To view the terminal in Atom just press cmd+Shift+T and it will appear in the application. For more information and documentation about the terminal-tab, see terminal-tab documentation.
Writing your first Go app using Atom
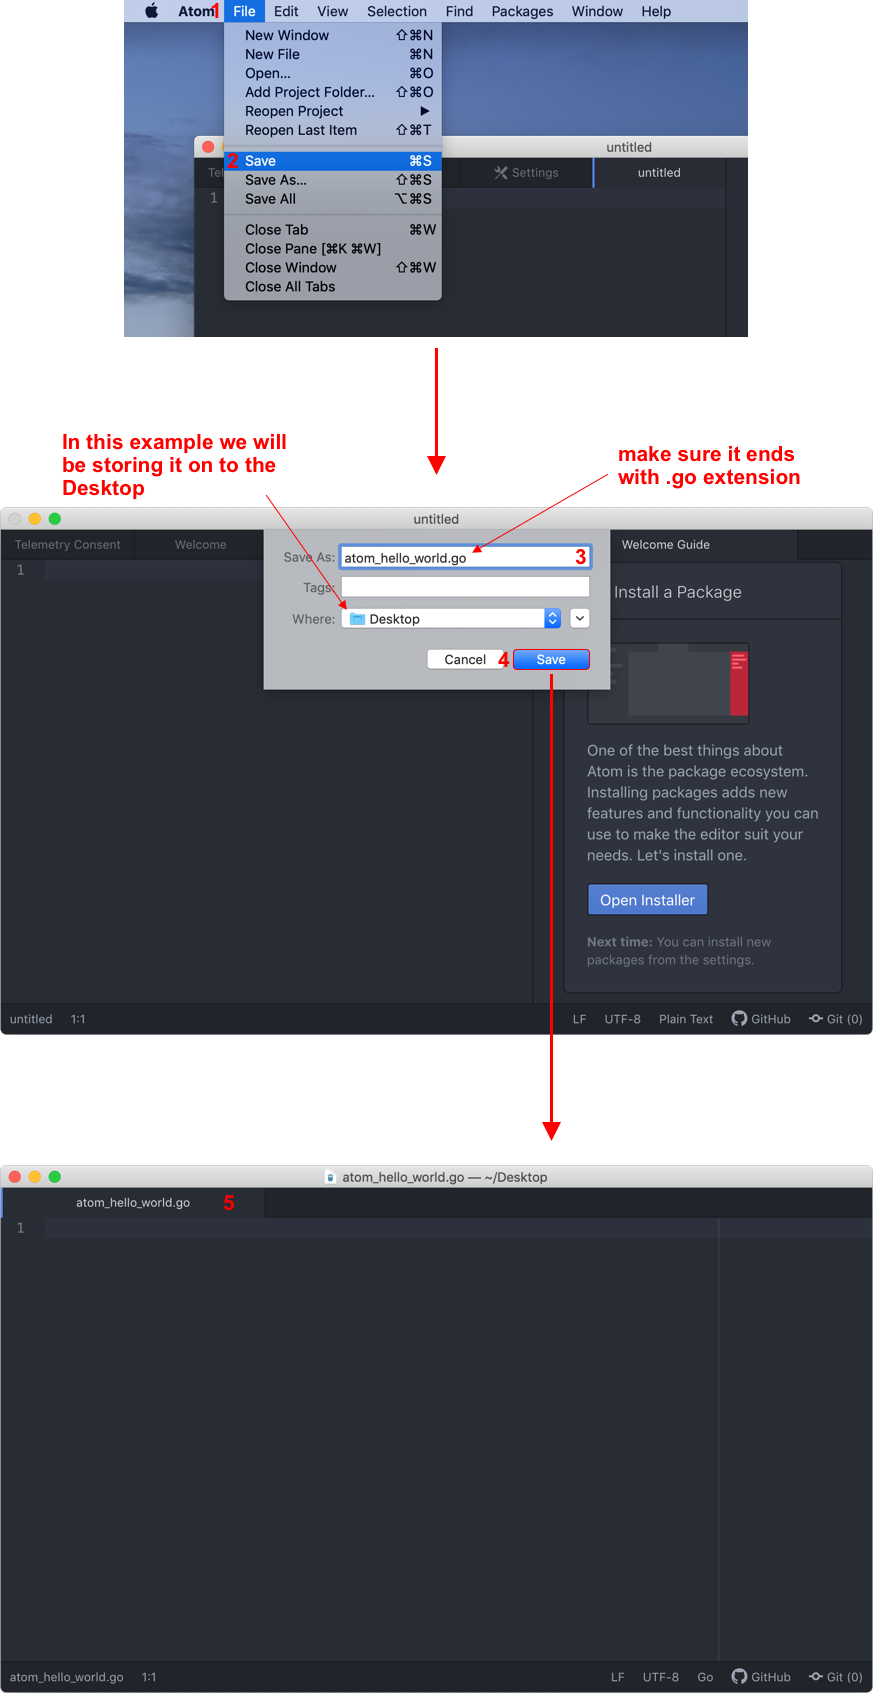
Just like the example, we did with VS Code we are going to write a simple Hello World Go application using Atom. We will start off by creating a new file by selecting File -> New File and a blank file will be created.
![]()
Next, save this blank file as a Go(.go) file File -> Save and save the file with the .go extension. In this example, we will be using the file name atom_hello_world. After conducting these steps, your Go file is created.
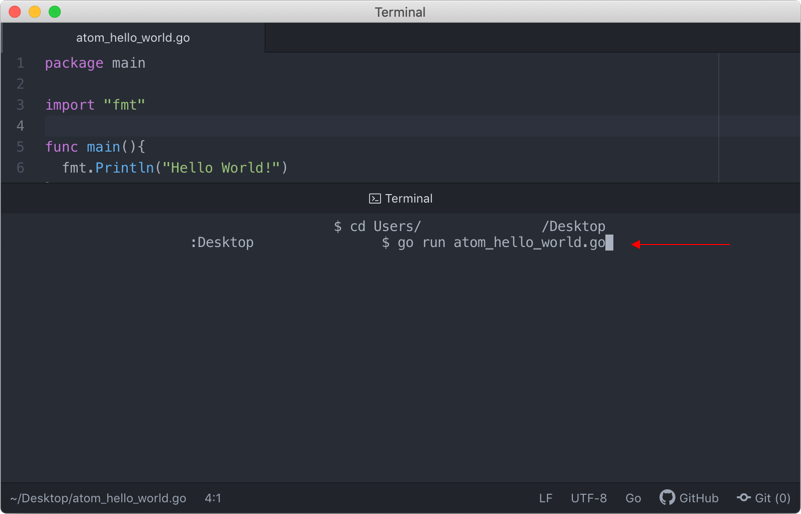
Run your Go application using Atom
In order to run your Go application in Atom, you must maximize the Terminal tab in order to execute the Go application. Sometimes the terminal-tab will be disabled and you need to enable it back by using the following shortcut cmd + Shift + T and it will re-appear in the application.
For this simple Go app just type the following code:

In order to run this sample application, you must open the terminal tab. By default, the terminal tab initiates in the Home directory. This means that you need to navigate to the Desktop since in this example we saved the Go file on to the Desktop.
Enter the following command in the terminal-tab to Desktop:
cd Users/[username]/Desktop

To run the program just enter the following command:
go run [filename].go
go run atom_hello_world.go
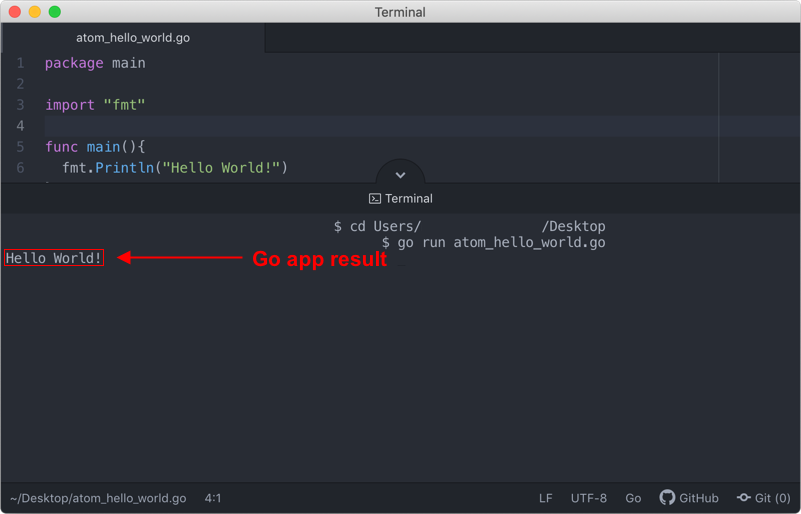
The application result will be displayed in the terminal tab as follows:
Sublime Text 3
Sublime Text 3 is a code editor with a Python application Interface (API). It supports many programming languages and markup languages, and in addition to that, functions and plugins can be added. All these plugins are community-built and maintained under free-software licenses. In Sublime Text 3 comes with a built-in Git feature which allows you to track changes without leaving the code editor.
Golang plugin
Sublime text 3 also has a Golang support package that can be installed using package control. Ones this package is installed you are all set and can start developing your own Go applications using Sublime Text 3.
Installation
Sublime Text 3 is can be downloaded directly from the official website.
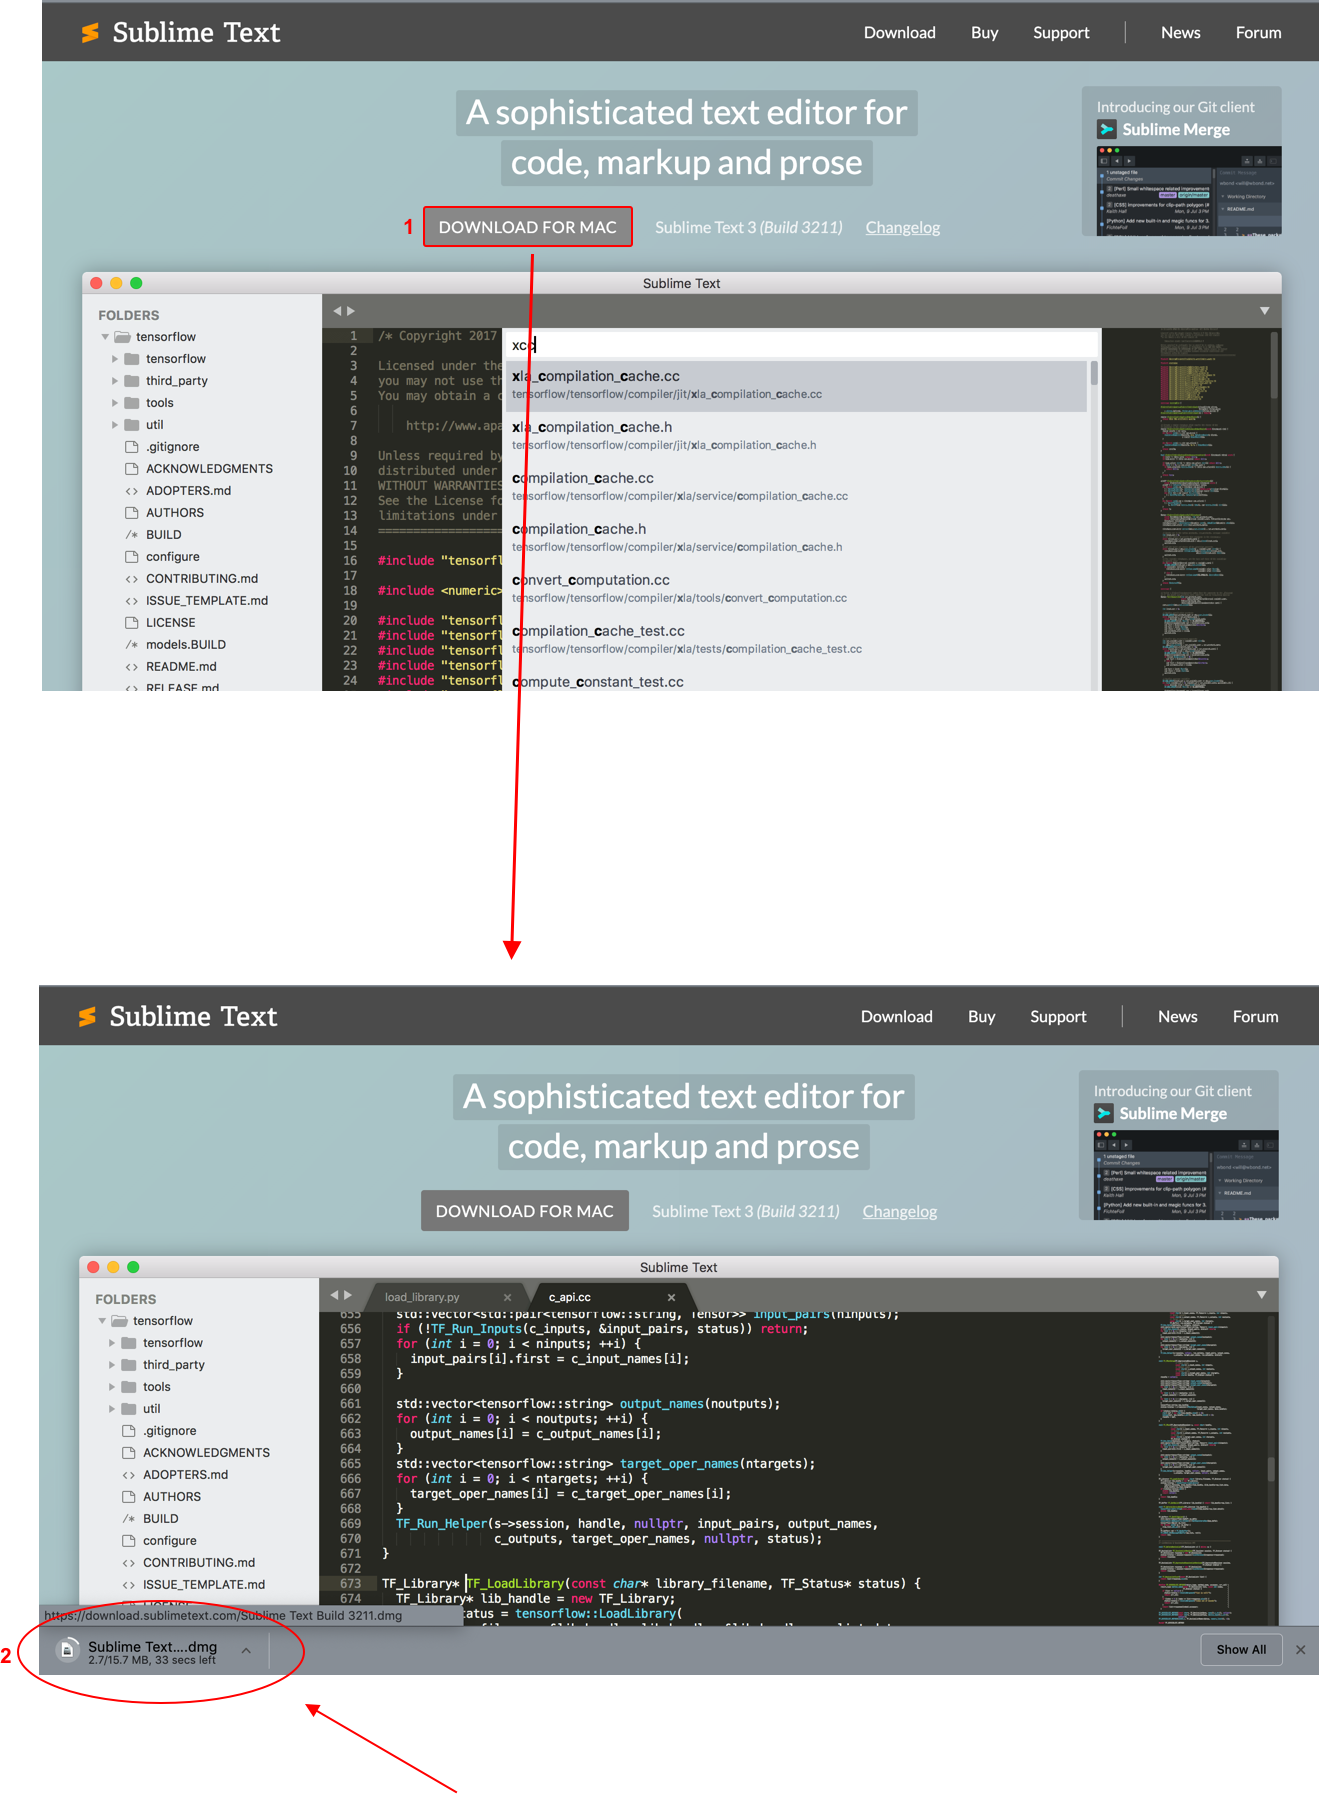
After downloading the Sublime Text 3, just launch the .dmg file located in the Download folder.
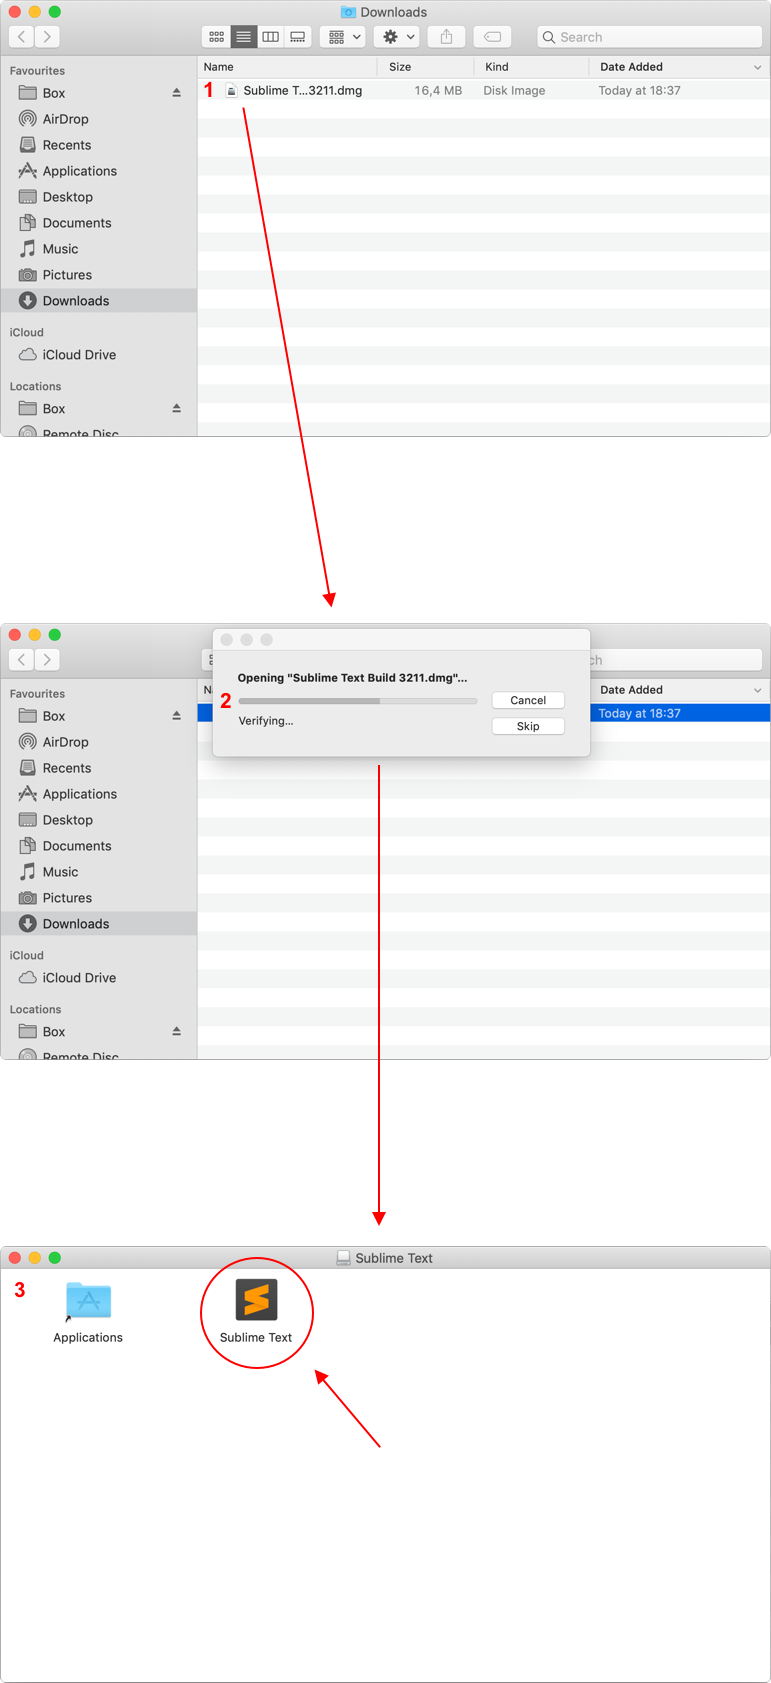
Ones the .dmg file is open, drag and drop the Sublime Text application to the Application folder.
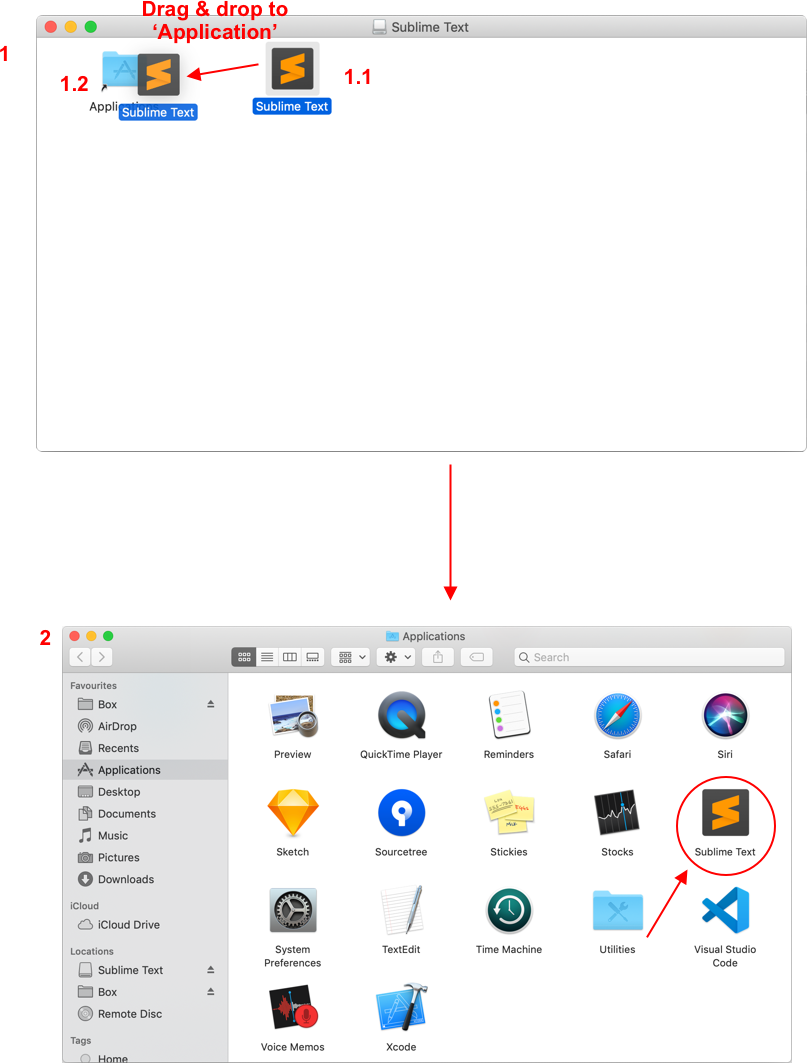
Launching the Sublime Text 3
Launching Sublime Text 3 can be launch from the Application folder.

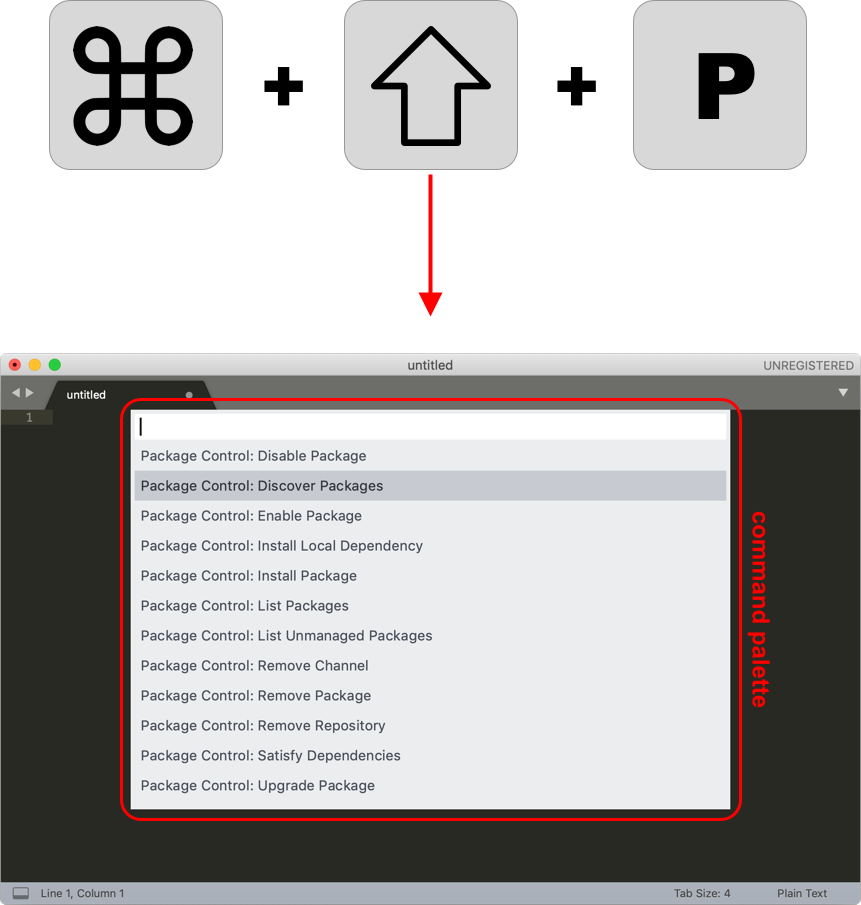
Sublime command palette
The sublime command palette plays an important role when it comes to installing packages and other configurations. To open the command palette, just follow these simple steps:
Sublime Golang support
Before you begin writing your first Go application, there are a few handy packages that need to be installed. These packages are:
- Golang
- Terminus (for the embedded terminal in Sublime)
Installing packages in Sublime Text 3
Every package is installed through the Sublime Package control. Follow these steps to install the package control:
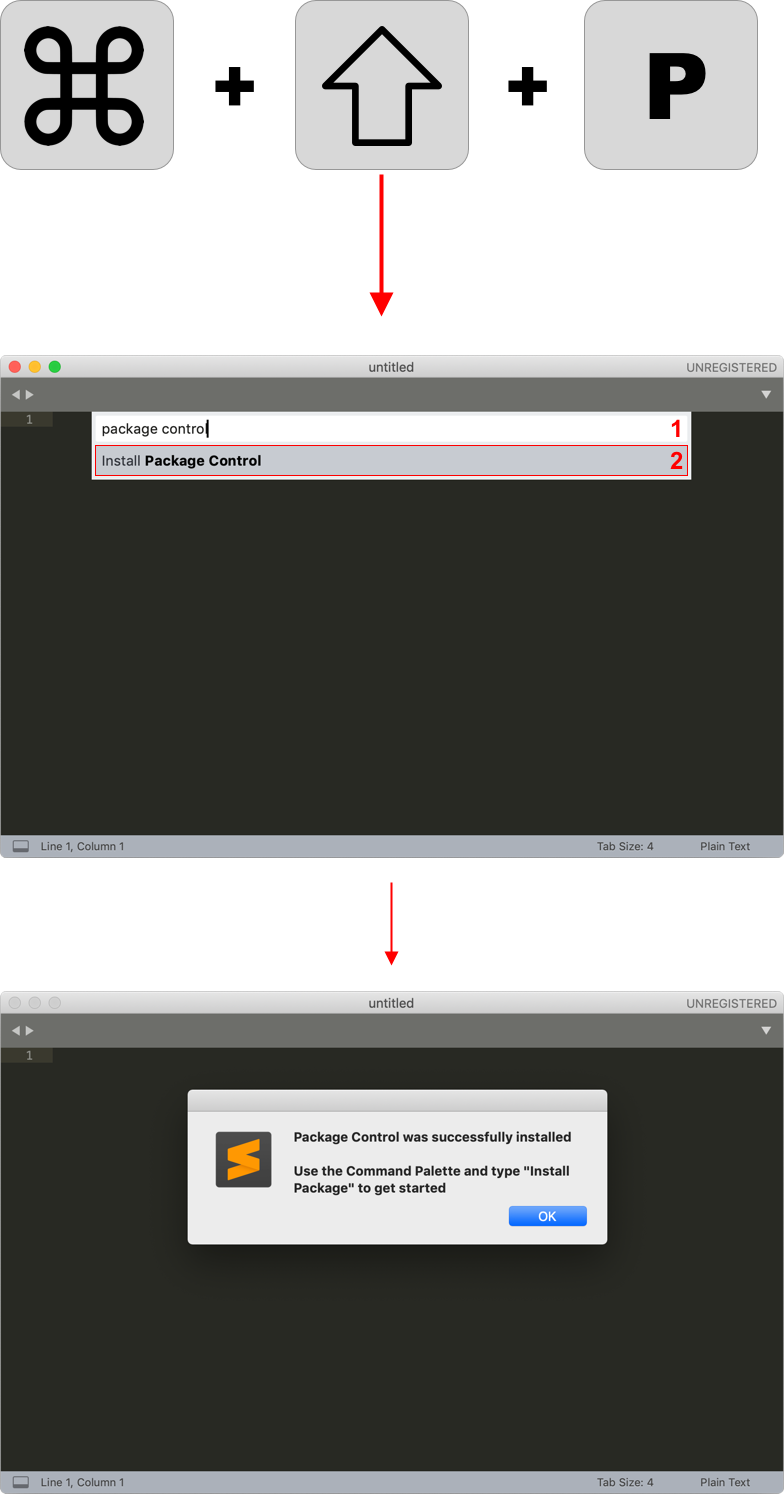
Installing Golang package in Sublime
The first step before writing your Go application is to install the Go package.
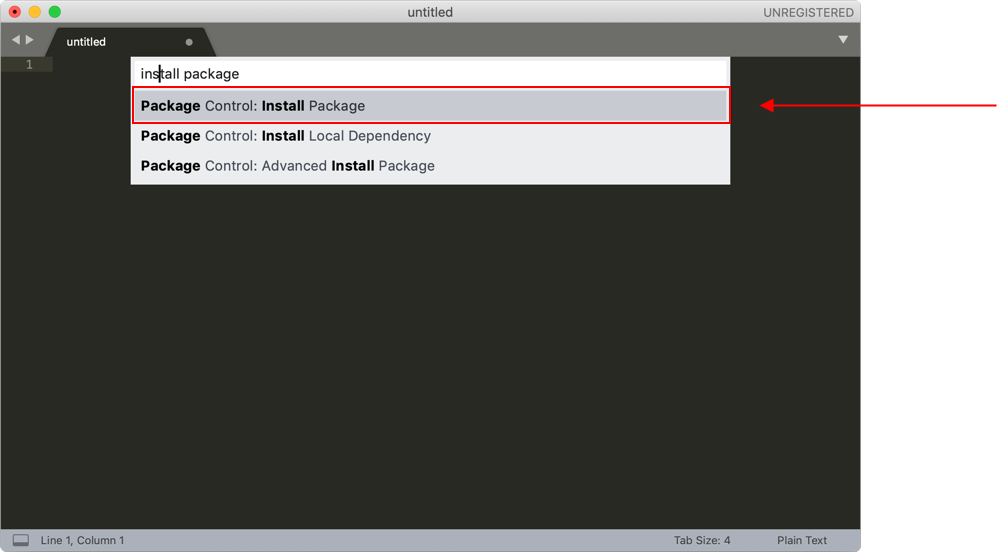
- Open the Sublime package control
- Enter the following: install package in the search bar and select the Package Control: Install Package
In the install package search bar for golang.
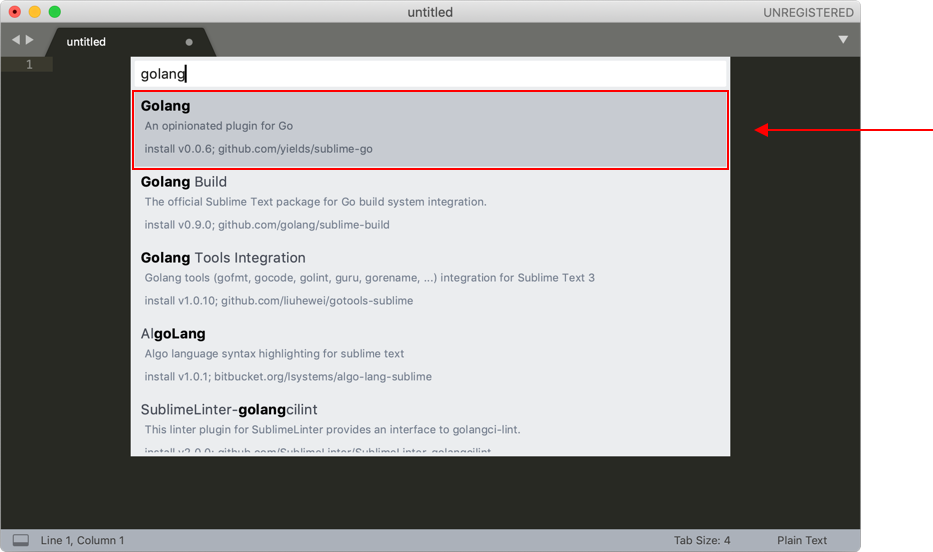
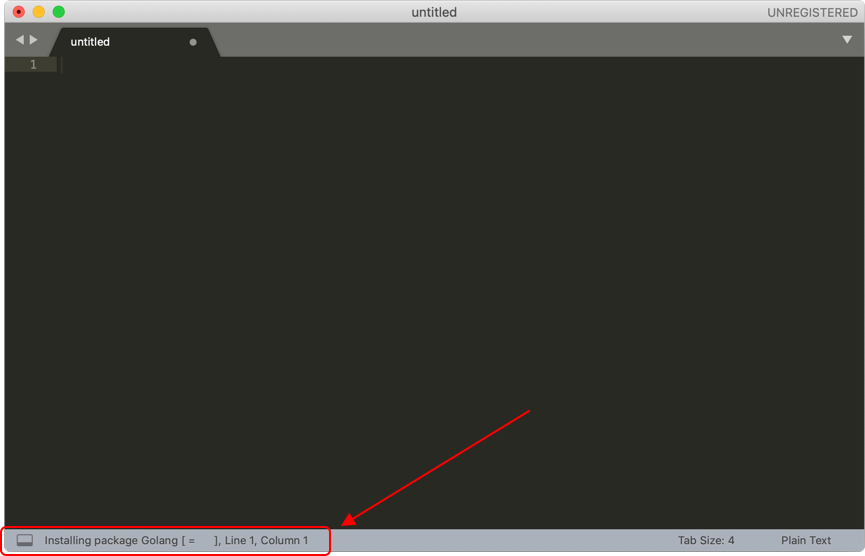
Select golang from the search result list and the package installation will start.
Installing Terminus package in Sublime
In order to get terminal in Sublime Text 3 we are going to install the terminus package. The procedure is identical to the previous steps mentioned above.
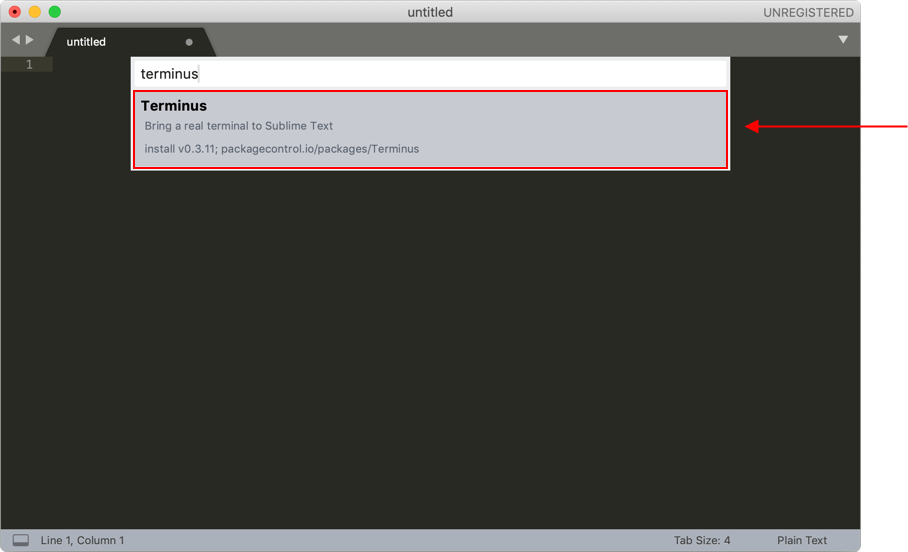
To launch terminus, open the package control and enter terminus and the list of options will appear in the list.
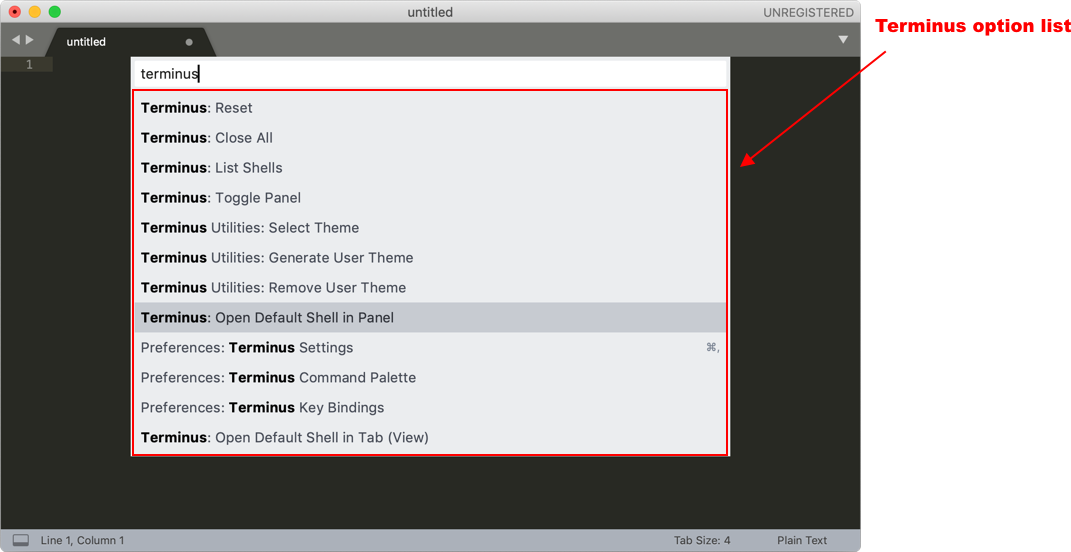
There are two options that you can choose to launch terminus, namely:
- Terminus: Open Default Shell in Tab (View)
- Terminus: Open Default Shell in Panel
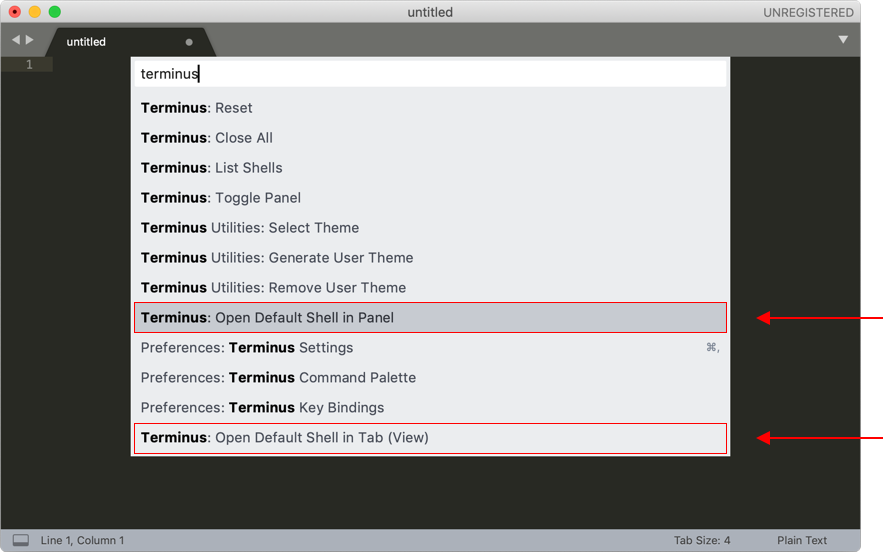
Terminus: Open Default Shell in Tab (View)
Open the default Shell in Tab (View) will open terminus in a separated tab.
Terminus: Open Default Shell in Panel
Opens the shell at the bottom in the form of a panel which means it will stick at the bottom regardless of which tab you are currently working in.
For this example, we are going to choose the Terminus: Open Default Shell in Panel option. But at all depends on your personal choice. In this example, we are going to use this option and also modified the settings which makes it handy and easy to toggle while using Sublime Text 3.
Launch and modify terminus in Sublime text 3
Select the Terminus: Open Default Shell in Panel option and terminal will be open in a panel at the bottom of the tab.

Terminus modification in Sublime
Ones the terminal is enabled you can start executing commands. To make it a bit easier to toggle between the visibility state of terminus we are going to implement a handy command in the settings. To achieve this, we are going to implement a key bindings preference.
Perform the following steps to achieve this:
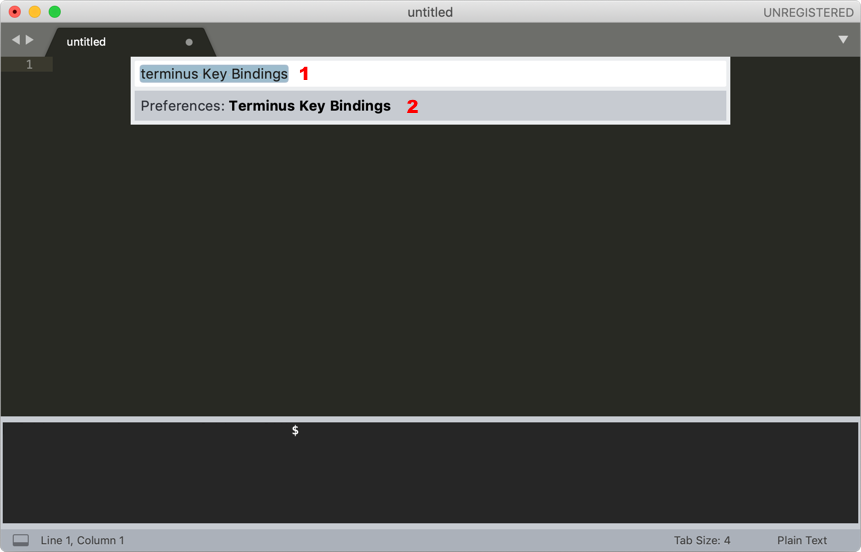
Open the package control and enter the Terminus Key Bindings and in the resulting dialog choose Preference: Terminus Key Bindings
Ones the key bindings view open, you will see two sections:
- Default settings list (Left)
- Custom Key Bindings settings list (Right)
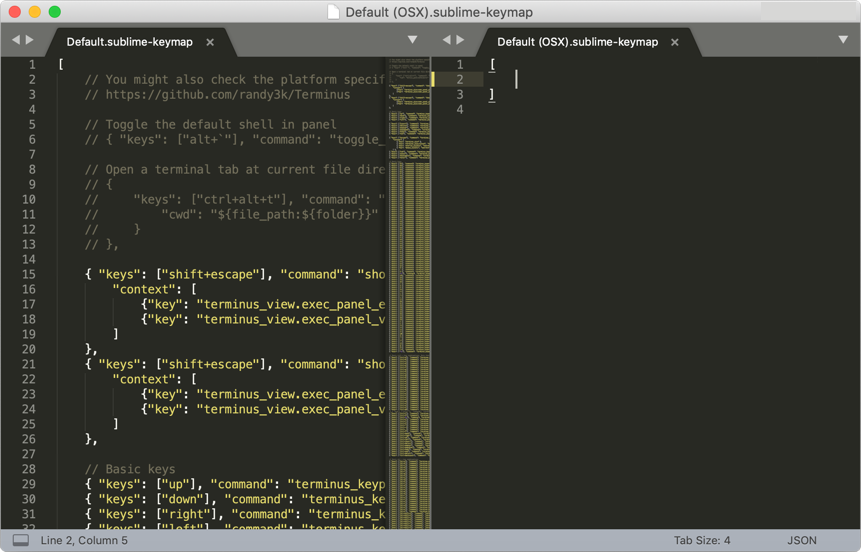
In the custom key bindings section on the right, enter the following code to set the toggling effect.

And lastly, save this custom key bindings settings by pressing cmd + s or File -> Save.

Ones this key binding setting is successfully saved, we must be able to toggle Terminus by pressing the following keyboard shortcut: cmd + `
Writing your Go app in Sublime
Just as the previous example we are going to write a simple ‘Hello World’ Go application. In order to achieve this, we must perform the following tasks:
- Create your Go file
- Write your app code
- Save your Go code
- Run your code using terminus
Create your Go file
From the tab that is currently open, you can save the current file that is already open ending it with the .go extension. Saving the current file can be done by pressing cmd + s or File -> Save.

Write your app code
After creating the Go file, you are ready to write your Go codes in Sublime. For this Hello World Go application write the following code:
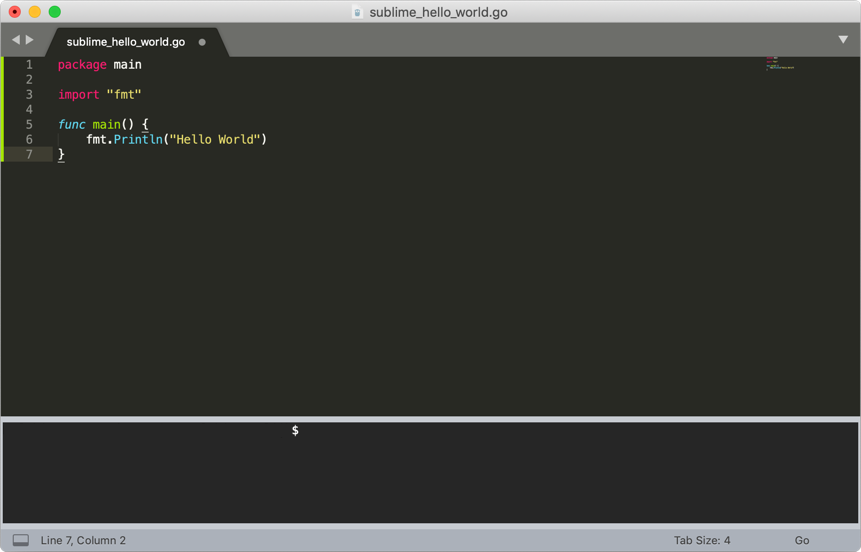
Save your Go code
After writing the Go code save the file by pressing cmd + S or File -> Save.
Running your Go code
Running your Go code in Sublime can be done by using Terminus. By contrast to VS code terminus start in the [user] directory. So, in order to navigate to Desktop were the Go file is saved, just enter the following command:
cd Desktop
Ones you navigate to Desktop just enter the following command:
go run sublime_hello_world.go

Conclusion
The Golang code editors described in this article are easy to install and use. Although for long term use of Sublime Text 3, it recommended purchasing a license of $80,- (One time purchase).
When it comes to pro and cons of the code editors in question, based on a Golang developer point of view, there is not a solid conclusion in this regard. Since most Golang developers use one of these code editors based on personal choice. Other reviews are based on other programming languages and not really related to Golang.
Our recommendation is to download and install these code editors and use them so you can rate them based on your own personal experience.
Источник


