- iExpress.exe — Создание самораспаковывающегося и самоустанавливающегося пакета.
- Iexpress in windows 10
- How to convert PowerShell script (PS1) file to EXE with IExpress on Windows 10
- Convert PowerShell script (PS1) file to EXE with IExpress
- Related Posts
- How to disable Windows Mobility Centre in Windows 10
- How to disable Steps Recorder in Windows 10
- How to Paste as Plain Text in Windows 10
- [email protected]
- ASUS ExpressCache not working in windows 10
- Replies (19)
- Getting started With NodeJS and ExpressJS in Windows 10
iExpress.exe — Создание самораспаковывающегося и самоустанавливающегося пакета.
iexpress.exeЭто тип исполняемого файла, который будет идти, чтобы быть «Все они имеют и многие понятия не имеют,».
iexpress.exe — введено Microsoft на всех операционных системах Windows (Windows 7, Windows Виста, Windows XP…), этот исполняемый файл запускает приложение IEexpress Скрытые программы, включенные в категорию. Hidden Программы.
С помощью этого приложения вы можете создать свой собственный бинарные пакетыиз архивирование или установка программного обеспечения, В частности, вы можете создавать файлы .exe.
IExpress — это технология, предназначенная для упрощения создания программы установки. Используя пошаговый мастер IExpress, вы можете создать самораспаковывающийся fileкоторые автоматически запускают программу установки, содержащуюся внутри. Программа установки может быть .inf file или исполняемая программа. Технология IExpress автоматически удаляет настройки fileс после установки, экономя время пользователя и разочарование.
iexpress.exe находится в папке% windir% ServicePackFilesi386, либо в%system%. Если много исполняемых файлов доставляют пользователям головную боль, этот iexpress.exe подойдет. Мы являемся исполняемым файлом, ответственным за system core, очень редко становится целью вирусов.
Чтобы запустить это приложение, выберите «Пуск» -> «Выполнить…» -> введите «iexpress» -> Enter.
Iexpress in windows 10

В ноутбуках Samsung 5-й серии стоит гибридная система хранения данных: HDD + SSD.
Для успешного взаимодействия дисков между собой разработчики создали две системы:
Express Cache — используется для хранения кэша приложений, часто используемых данных, и файла подкачки и технология Rapid от Intel — применяется для ускорения процесса перехода в гибернацию и выхода из него. Эти программы очень сильно ускоряют работу компьютеров.
Рассмотрим процесс настройки данных систем, после переустановки Windows.
1. Удаляем все разделы с диска SSD, при этом не создаём новые разделы и не форматируем.
Запускаем консоль от администратора: Win+X — Командная строка (Администратор).
Пишем следующие команды: DISKPART — переходим в управление дисками, LIST DISK — отображаем список всех дисков, SELECT DISK 1 — выбираем именно наш диск SSD, 1 — это номер диска SSD, он может быть и другим, например — 0, CLEAN — удаляем все разделы с диска, EXIT — выходим из Diskpart.
2. Создаём раздел для гибернации.
Запускаем консоль от администратора: Win+X — Командная строка (Администратор).
Пишем следующие команды: DISKPART — переходим в управление дисками, LIST DISK — отображаем список всех дисков, SELECT DISK 1 — выбираем именно наш диск SSD, 1 — это номер диска SSD, он может быть и другим, например — 0, CREATE PARTITION PRIMARY SIZE=6144 — создаём раздел для гибернации, где число 6144 — это размер ОЗУ в мегабайтах, в данном случае 6 Gb (6 х 1024 Mb), EXIT — выходим из Diskpart.
3. Настройка управления гибернацией.
Запускаем консоль от администратора: Win+X — Панель управления.
Выбираем раздел — Электропитание. Действие кнопки Питание. Изменение параметров, которые сейчас недоступны. Ставим галочку — Режим гибернации. Сохранить.
4. При необходимости установить программное обеспечение Intel Rapid.
5. С официального сайта Samsung, устанавливаем последнюю версию программного обеспечения Express Cache.
6. Перезагружаем компьютер.
7. Проверяем работоспособность Express Cache.
Запускаем консоль от администратора: Win+X — Командная строка (Администратор).
Пишем следующие команды: ECCMD -INFO — отображение информации о работе Express Cache,
8. Задаем размер раздела для Express Cache (при необходимости, например если SSD диск большой емкости): ECCMD -PARTITION 1 6144, где число 6144 — это размер создаваемого раздела в мегабайтах, в данном случае 6 Gb (6 х 1024 Mb), а цифра 1 — это номер диска SSD, он может быть и другим, например — 0.
9. Форматируем раздел Express Cache: ECCMD -FORMAT и EXIT — выходим из консоли.
10. Перезагружаем компьютер.
11. Проверяем работоспособность Express Cache.
Запускаем консоль от администратора: Win+X — Командная строка (Администратор).
Пишем следующую команду: ECCMD -INFO — отображение информации о работе Express Cache.
How to convert PowerShell script (PS1) file to EXE with IExpress on Windows 10
You can wrap an executable file around a PowerShell script (PS1) so that you can distribute the script as an .exe file rather than distributing a “raw” script file. This eliminates the need of explaining to non-technical users how to execute scripts through PowerShell or Command Prompt.
We have seen how to create self-extracting archives using IExpress. Now in this post, we will show you how to convert PowerShell script file to EXE file with IExpress on Windows 10.
Convert PowerShell script (PS1) file to EXE with IExpress
IExpress is an extremely useful tool for turning Visual Basic script or PowerShell script files and other non-executable scripts into one-click executables.
It’s assumed you have already created a PowerShell script. Now, continue as follows:
Press Windows key + R to invoke the Run dialog.
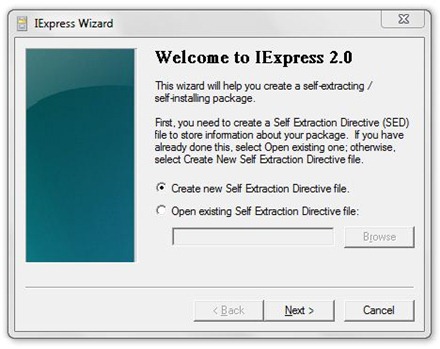
In the Run dialog box, type iexpress and hit Enter.
Select the radio button for Create new Self Extraction Directive file option. Click Next.
Select the radio button for Extract files and run an installation command option. Click Next.
Type a name for your executable. Click Next.
You will be asked whether you want to prompt the user to confirm the installation of their package. For the purpose of this tutorial, select No prompt and then click Next. If you want to prompt a user with a message you could choose Prompt user with and enter your message in the box below.
Similarly, you will be prompted whether or not you would like to display a license agreement. For the purpose of this tutorial choose Do not display a license and click Next.
On the Packaged files screen, click the Add button and be sure to add your PowerShell script. Click Next.
Your executable script should now be visible in the Install Program dropdown.
Select the file and leave the Post Install Command option as and click Next.
On the Show window screen, leave the original selection as Default (recommended). Click Next.
On the Finished message screen, leave the selection as No message. If you want to have a display message after your script runs, select the Display message option and enter the message into the box. Click Next.
On the Package Name and Options dialog, click Browse. Choose a location and enter a file name. Click Save. You can leave the Options section as it is or check both options. Click Next.
On the Configure restart dialog, choose Only restart if needed. Click Next.
You can save your IExpress configuration in case you would like to come back and edit it later. For the purpose of this tutorial choose Don’t save. Click Next.
All of your configuration is complete and you are now ready to create the executable. Click Next to begin this process.
The executable will now be created. When done, click Finish to close the IExpress Wizard.
You can find the executable file in the location you chose earlier.
Bonus: You can also convert PowerShell (Ps1) files to .exe files using the following third-party tools:
- PS2EXE – a Microsoft PowerShell script.
- F2KO Ps1 To Exe – a free desktop application with multilingual support that can run on Windows OS.
- F2KO Online Converter – a web application is an addition to the portable standalone Ps1 to .exe converter application.
- PowerGUI Script Editor – a desktop application.
- PowerShell Studio – This software can visually create PowerShell GUI tools, carry out multi-file and file debugging, create MSI installers, monitor script performance, and many more.
- ISE Steroids 2.0 Enterprise – a desktop application. The software specifically extends the built-in ISE of a typical PowerShell editor.
These tools are fairly easy to use. For example, to use the PS2EXE tool, download it, and extract the zip file contents. After doing so, converting a PowerShell script to EXE format is simply a matter of running PS2EXE, specifying the script that you want to convert, and designate a filename for the resulting EXE file.
Date: January 15, 2021 Tags: Features
Related Posts
How to disable Windows Mobility Centre in Windows 10

How to disable Steps Recorder in Windows 10
How to Paste as Plain Text in Windows 10
[email protected]
Obinna Onwusobalu, has studied Information & Communication Technology and is a keen follower of the Windows ecosystem. He runs a computer software clinic. He says it’s best practice to create a System Restore Point before making any changes to your PC. You can contact him on Twitter @ChidumOsobalu.
ASUS ExpressCache not working in windows 10
Replies (19)
* Please try a lower page number.
* Please enter only numbers.
* Please try a lower page number.
* Please enter only numbers.
the procedure ( explained by Julio) is working for win 10 64bit I’m already using ExpressCache without any problem on my win 10 64bit pro.
for installing drivers you can do it manually go to bellow paths:
C:\Program Files\Diskeeper Corporation\ExpressCache\excfs
C:\Program Files\Diskeeper Corporation\ExpressCache\excsd
right click on the set up file (in my system there are 3 files in each directory and set up file is the second one — the one in the middle-) and choose install. the drivers will be installed, then use the above stated procedure by Julio for configuring ExpressCache and reboot the system. SSD drive will be mounted automatically.
After rebooting if you go to EXpressCache directory from command prompt as an administrator and using the command ECCmd -info you’ll probably see that its working normally.
hope this comment help you,
2 people found this reply helpful
Was this reply helpful?
Sorry this didn’t help.
Great! Thanks for your feedback.
How satisfied are you with this reply?
Thanks for your feedback, it helps us improve the site.
How satisfied are you with this reply?
Thanks for your feedback.
Thank you very much, for this tutorial.
I managed to install on windows 10 with this tutorial and the ExpressCache available in the tutorial link.
I had the freedom to place another link to download this ExpressCache that worked on windows 10, link: https://mega.nz/#!TsFg2TgY!sERKTDnGENtmMgMUvZTrxFL1s13Xer8fhoxrxlSm5ko
Was this reply helpful?
Sorry this didn’t help.
Great! Thanks for your feedback.
How satisfied are you with this reply?
Thanks for your feedback, it helps us improve the site.
How satisfied are you with this reply?
Thanks for your feedback.
![]()
thx for the extra effort and the upload (which i have downloaded).
i will try it again after some time.
i emailed ASUS, they replied not knowing anything at the helpdesk and advised to wait a few months ;-(
Was this reply helpful?
Sorry this didn’t help.
Great! Thanks for your feedback.
How satisfied are you with this reply?
Thanks for your feedback, it helps us improve the site.
How satisfied are you with this reply?
Thanks for your feedback.
I managed to install ExpressCache in Windows 10 with this tutorial. I am providing download files and another more detailed tutorial for people who are having difficulty equal I had, at the following link:
Was this reply helpful?
Sorry this didn’t help.
Great! Thanks for your feedback.
How satisfied are you with this reply?
Thanks for your feedback, it helps us improve the site.
How satisfied are you with this reply?
Thanks for your feedback.
ASUS released on 2015/08/31 a new ExpressCache driver for Windows 10 (ExpressCache 1.3.118.0).
I included the download link here: Latest ASUS drivers for Windows 10 — Other drivers
Was this reply helpful?
Sorry this didn’t help.
Great! Thanks for your feedback.
How satisfied are you with this reply?
Thanks for your feedback, it helps us improve the site.
How satisfied are you with this reply?
Thanks for your feedback.
Yes, the new ExpressCache driver for Windows 10 (ExpressCache 1.3.118.0) downloaded from your page was very helpful.
Getting started With NodeJS and ExpressJS in Windows 10

Syed Monowarul Islam
Jan 4, 2018 · 5 min read
PS: I have updated it for 2020.
Firstly I want to touch up on why you need NodeJS. You need NodeJS so you can write server-si d e code using JavaScript and it is open-sourced. NodeJS uses chrome’s v8 engine to transform JavaScript into Machine readable format. and ExpressJS is one of the most popular frameworks available for NodeJS. Its super lightweight and it has a easy to read documentation.
This Tutorial is aimed at beginners and who are trying to do a project in NodeJS and ExpressJS . A newcomer to this environment might feel disheartened because a lot of names are thrown at him in the beginning and its hard to keep track of it. But once you make a few projects it would make sense to you .As NodeJS is open-sourced people make improvements on it and make many different libraries with it and thus we get so many names and different packages . NodeJS has so many packages that it needs its own dedicated package manager for it . It is called npm( Node package manager) and all the packages are available at : https://www.npmjs.com/
Lets start things of :
Firstly as we have to setup our developing machine so that it can understand the code . We need :
I would ask you to read this article and setup Mongodb in that way .Trust me when I say you would like it .
Installing the above things will prepare your machine so that in can make projects .
After the installation , Start of by creating a folder at any location of your storage space. (I am using a PC)

after you create your folder & enter that folder . so for my case I created Nodeproject folder . Now enter the folder and bring up PowerShell.

if you are on a mac or Linux use your respective CLIs (item,Terminal) and enter the location of the folder .
PS. (I think PowerShell is way better than command prompt in windows.)
You should see a similar interface similar to this .

onen up the CLI and type in:

we now need to install ExpressJS in our project, type in

So now we have ExpressJS setup in our project folder .You may ask “Why does the folder say node_modules and not ExpressJS ? ” that is because ExpressJS itself is made from NodeJS.If you enter the node_modules folder you will see all the NodeJS libraries used to create ExpressJS,as well as a Express folder.

now lets turn our focus to the contents of package.json file .Open it up using a text editor notice that there are blanks and default values . That is because we chose to leave everything blank at image 4(look back up).

So index.js is our project start file . but we don’t have a index.js file . We should create it in our directory.

so we have created index.js file but it is blank . We will now take help from ExpressJS ‘s website to start of the project. navigate to (http://expressjs.com/en/starter/hello-world.html)
there you will find a code similar to this :

copy this code and paste it in your index.js file:
the above code means :

next we go back to PowerShell and type :

Now our application is up at port 3000 . so if we hit the port 3000 we would get a response form the server.
lets open up our browser and type :

Our application is now up and running .
Please fell free to leave a clap or 50 claps if you feel like it. It will show me that this helped you or a comment if it didn’t help you.Thanks for reading and I hope this helped .Your feedback will be appreciated.
PS. : We didn’t use MongoDB in this project but I included it in the preparing your machine part. as you will most likely need it when you use a database for your project . Studio3T/Robo3T is the name of the GUI for mongoDB in your developing machine you can download Studio 3T/Robo3T from the internet .When we need to use mongoDB database for projects ,it is better to use mongoose on your project (it ‘s a library for mongoDB ) ,it will reduce complications of your Database code .


