- Настройка аутентификации Windows при расположении веб-сервера IIS и рабочих серверов на разных машинах
- Описание проблемы
- Решение проблемы
- Расположение веб-сервера IIS и рабочих серверов 1С на разных машинах
- Настройка Kerberos авторизации на сайте IIS
- Configure Windows Authentication in ASP.NET Core
- Proxy and load balancer scenarios
- IIS/IIS Express
- Launch settings (debugger)
- Kestrel
- Kerberos authentication and role-based access control (RBAC)
- Windows environment configuration
- Linux and macOS environment configuration
- HTTP.sys
- Authorize users
- Disallow anonymous access
- Allow anonymous access
Настройка аутентификации Windows при расположении веб-сервера IIS и рабочих серверов на разных машинах
Описание проблемы
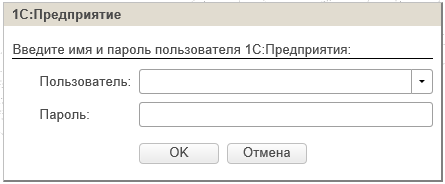
Не работает аутентификация операционной системы (windows) через IIS при использовании тонкого клиента или веб-клиента.
С точки зрения пользователей, будет видно окно с запросом логина и пароля.
Проблема может заключаться в том, что методы операционной системы в силу различных причин возвращают описание текущего пользователя сеанса в таком представлении, которое не совпадает ни с одним пользователем в списке пользователей информационной базы 1С
Решение проблемы
На сервере 1С включить технологический журнал, используя следующую настройку:
Воспроизвести ситуацию с неудачной аутентификацией операционной системы. Авторизоваться под пользователем операционной системы, указанным в свойствах пользователя 1С.

Открыть технологический журнал рабочего процесса и найти событие EXCP со следующим описанием: «Идентификация пользователя не выполнена
Неправильное имя или пароль пользователя»
Обратите внимание на предшествующее ему событие CONN и значение свойства DstUserName2 — именно в таком виде пользователь должен быть указан в свойствах пользователя информационной базы.
04:45.940011-0,CONN,2,process=rphost,t:clientID=60,Txt=Srvr: SrcUserName1: svc-1c@DOMAIN701.COM
04:45.940012-0,CONN,2,process=rphost,t:clientID=60,Txt=Srvr: DstUserName1: testuser2@DOMAIN701.COM(DOMAIN701.COM\testuser2)
04:45.971001-0,CONN,2,process=rphost,t:clientID=60,Txt=Srvr: DstUserName2: DOMAIN701\testuser2(DOMAIN701\testuser2)
04:46.205021-0,EXCP,2,process=rphost,p:processName=trade,t:clientID=60,t:applicationName=WebServerExtension,t:computerName=webserver,t:connectID=19,Exception=a01f465c-ed70-442e-ada5-847668d7a41c,Descr=’src\VResourceInfoBaseServerImpl.cpp(991):
a01f465c-ed70-442e-ada5-847668d7a41c: Идентификация пользователя не выполнена
Неправильное имя или пароль пользователя’
Заменить значение свойства «Пользователь» пользователя информационной базы согласно следующему формату «\\» + [Имя пользователя из свойства DstUserName2 без скобок].
Проверить работоспособность аутентификации средствами операционной системы, войдя в информационную базу, используя веб-клиент.
Расположение веб-сервера IIS и рабочих серверов 1С на разных машинах
В некоторых случаях, несмотря на корректно указанного пользователя операционной системы в пользователе информационной базы, при попытке входа в опубликованную базу через браузер аутентификация операционной системы не проходит. Такая ситуация может возникать, если веб-сервер IIS и сервер 1с находятся на разных машинах. В таком случае в технологическом журнале рабочего процесса можно наблюдать следующую картину:
56:39.487001-0,CONN,2,process=rphost,p:processName=accounting,t:clientID=39,t:applicationName=WebServerExtension,t:computerName=webserver,t:connectID=16,Txt=Srvr: SrcUserName1: winserver1c$@DOMAIN701.COM
56:39.487002-0,CONN,2,process=rphost,p:processName=accounting,t:clientID=39,t:applicationName=WebServerExtension,t:computerName=webserver,t:connectID=16,Txt=Srvr: DstUserName1: testuser2@DOMAIN701.COM(DOMAIN701.COM\testuser2)
56:39.596004-0,CONN,2,process=rphost,p:processName=accounting,t:clientID=39,t:applicationName=WebServerExtension,t:computerName=webserver,t:connectID=16,Txt=Srvr: DstUserName2: NT AUTHORITY\ANONYMOUS LOGON(NT AUTHORITY\ANONYMOUS LOGON )
56:39.659003-0,EXCP,2,process=rphost,p:processName=accounting,t:clientID=39,t:applicationName=WebServerExtension,t:computerName=webserver,t:connectID=16,Exception=a01f465c-ed70-442e-ada5-847668d7a41c,Descr=’src\VResourceInfoBaseServerImpl.cpp(991):
a01f465c-ed70-442e-ada5-847668d7a41c: Идентификация пользователя не выполнена
Неправильное имя или пароль пользователя’
При возникновении такой ситуации необходимо проверить следующие настройки:
1) Убедиться, что процессы сервера 1С запущены от имени доменной учетной записи, входящей в группу Domain Users.
2) Убедиться, что веб-сервер IIS настроен корректно.
В публикации информационной базы найти настройки аутентификации
В настройках аутентификации отключить анонимную аутентификацию и включить Windows-аутентификацию. В Windows-аутентификации упорядочить доступных провайдеров так, чтобы на первом месте был Negotiate.
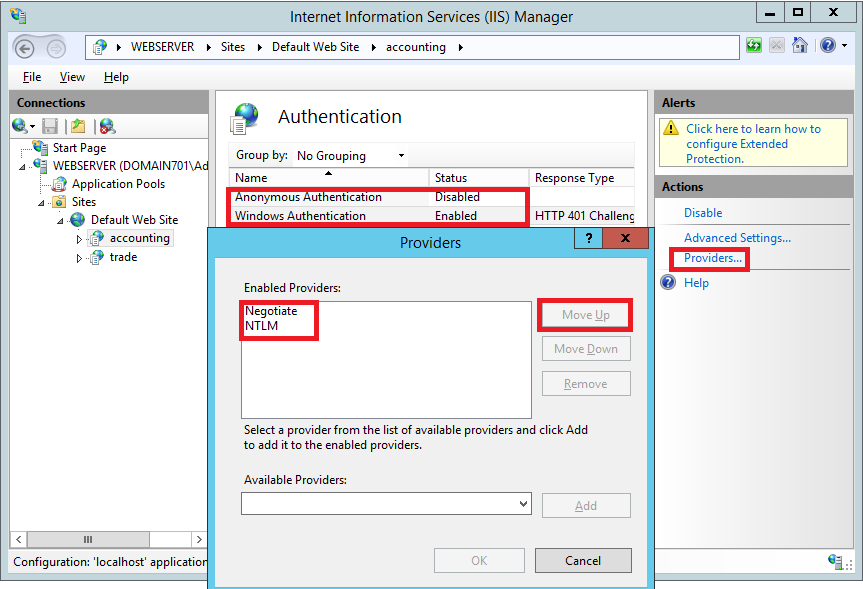
Пул приложений публикации не нуждается в настройках, в нем можно оставить все по умолчанию.
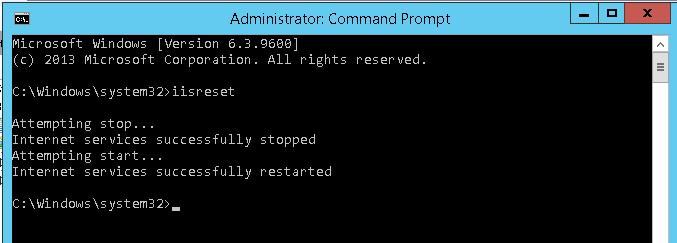
После изменения настроек перезапустить веб-сервер с помощью команды iisreset в командной строке.
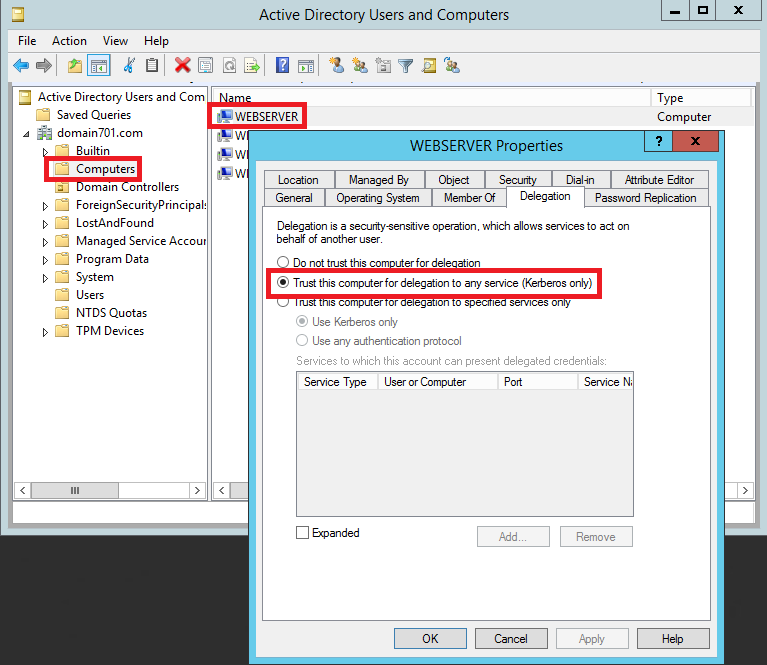
3) Убедиться, что в контроллере домена в свойствах компьютера, на котором запущен веб-сервер, на вкладке делегирование установлено «Доверять компьютеру делегирование любых служб (только Kerberos)»
Для этого откройте оснастку Active Directory Users and Computers (dsa.msc), в компьютерах найдите веб-сервер, перейдите в его свойства и на вкладке Делегирование установить значение «Доверять компьютеру делегирование любых служб (только Kerberos)» и нажать применить.
4) Убедиться, что на клиенте в свойствах обозревателя разрешена встроенная проверка подлинности Windows.
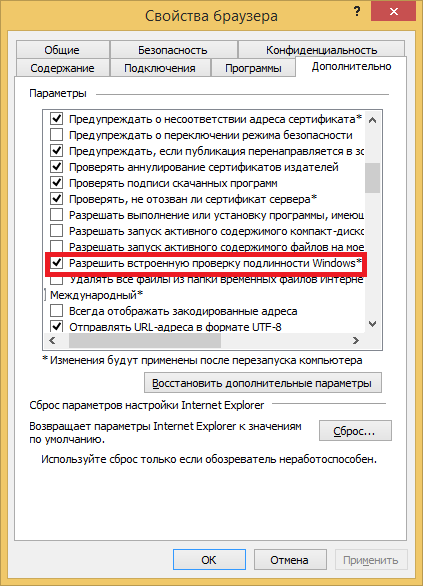
После выполнения всех действий необходимо перезагрузить клиентский компьютер (рабочие серверы перезагрузки не требуют) и убедиться, что аутентификация операционной системы успешно выполняется.
Важно: аутентификации Windows при расположении веб-сервера IIS и рабочих серверов на разных машинах в тонком клиенте работает, начиная с версии 8.3.10.2620 (для тестирования).
Настройка Kerberos авторизации на сайте IIS
Пошаговая инструкция по настройке на веб-сайте IIS на Windows Server 2012 R2 прозрачной авторизации доменных пользователей в режиме SSO (Single Sign-On) по протоколу Kerberos.
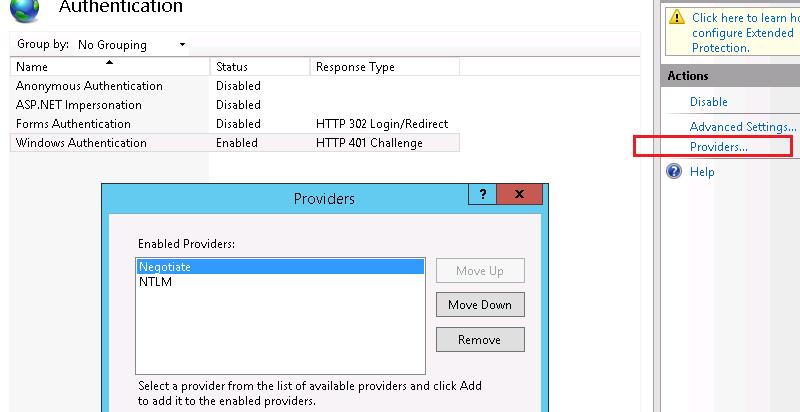
На веб сервере запустите консоль IIS Manager, выберите нужный сайт и откройте раздел Authentication. Как вы видите, по умолчанию разрешена только анонимная аутентификация (Anonymous Authentication). Отключаем ее и включаем Windows Authentication (IIS всегда сначала пытается выполнить анонимную аутентификацию).
 Открываем список провайдеров, доступных для Windows аутентификации (Providers). По умолчанию доступны два провайдера: Negotiate и NTLM. Negotiate – это контейнер, который в качестве первого метода проверки подлинности использует Kerberos, если эта аутентификация не удается, используется NTLM. Необходимо, чтобы в списке провайдеров метод Negotiate стоял первым.
Следующий этап – регистрация Service Principal Name (SPN) записей для имени сайта, к которому будут обращаться пользователи. В том случае, если сайт IIS должен быть доступен только по имени сервера, на котором он расположен (http://server-name или http://server-name.contoso.com), создавать дополнительные SPN записи не нужно (SPN записи уже имеются в учетной записи сервера в AD). При использовании адреса сайта, отличного от имени хоста, или при построении веб-фермы с балансировкой, придется привязывать дополнительные записи SPN к учётной записи сервера или пользователя.
Предположим, у нас имеется ферма IIS серверов. В этом случае оптимально создать отдельную учетную запись в AD и привязать SPN записи к ней. Из-под этой же учетной записи будут запускать целевой Application Pool нашего сайта.
Создадим доменную учетную запись iis_service. Убедимся, что SPN записи для этого объекта не назначены (атрибут servicePrincipalName пустой).
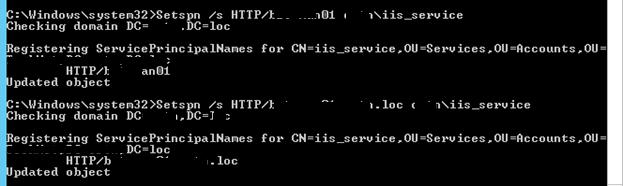
![]() Предположим, что сайт должен отвечать по адресам _http://webportal and _http://webportal.contoso.loc. Мы должны прописать эти адреса в SPN атрибут служебной учетной записи
Предположим, что сайт должен отвечать по адресам _http://webportal and _http://webportal.contoso.loc. Мы должны прописать эти адреса в SPN атрибут служебной учетной записи
Setspn /s HTTP/webportal contoso\iis_service
Setspn /s HTTP/webportal.contoso.loc contoso\iis_service
 Таким образом, мы разрешим этой учетной записи расшифровывать тикеты Kerberos при обращении пользователей к данным адресам и аутентифицировать сессии.
Проверить настройки SPN у учетной записи можно так:
setspn /l iis_service

Следующий этап – настройка в IIS Application Pool для запуска из-под созданной сервисной учетной записи.
Выберите Application Pool сайта (в нашем примере это DefaultAppPool).
 Откройте раздел настроек Advanced Settings и перейдите к параметру Identity.
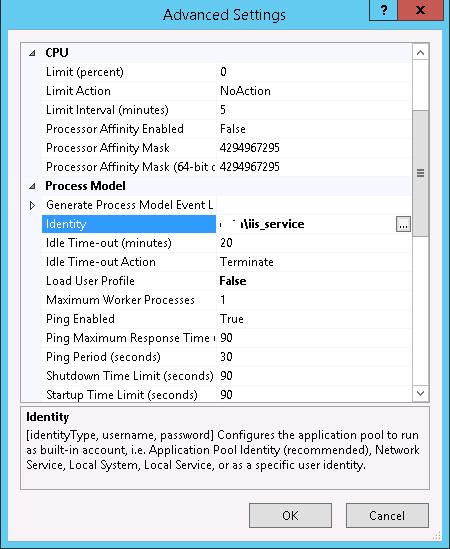
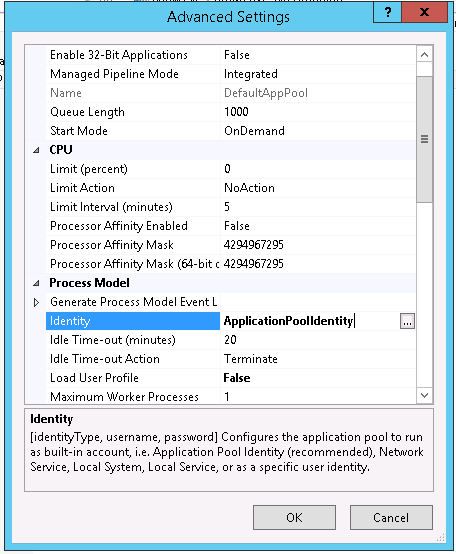 Измените его с ApplicationPoolIdentity на contoso\iis_service.
Затем в консоли IIS Manager перейдите на свой сайт и выберите секцию Configuration Editor.
В выпадающем меню перейдите в раздел system.webServer > security > authentication > windowsAuthentication

Измените useAppPoolCredentials на True.
Тем самым мы разрешим IIS использовать доменную учетку для расшифровки билетов Kerberos от клиентов.
Перезапустим IIS командой:
 Аналогичную настройку нужно выполнить на всех серверах веб-фермы.
Протестируем работу Kerberos авторизации, открыв в браузере клиента (браузер нужно предварительно настроить для использования Kerberos) адрес _http://webportal.contoso.loc
Убедится, что для авторизации на сайте используется Kerberos можно с помощью инспектирования HTTP трафика утилитой Fiddler (ранее мы уже упоминали эту утилиту).
Запускаем Fiddler, в браузере открываем целевой сайт. В левом окне находим строку обращения к сайте. Справа переходим на вкладку Inspectors. Строка Authorization Header (Negotiate) appears to contain a Kerberos ticket, говорит о том, что для авторизации на IIS сайте использовался протокол Kerberos.
Configure Windows Authentication in ASP.NET Core
Windows Authentication (also known as Negotiate, Kerberos, or NTLM authentication) can be configured for ASP.NET Core apps hosted with IIS, Kestrel, or HTTP.sys.
Windows Authentication (also known as Negotiate, Kerberos, or NTLM authentication) can be configured for ASP.NET Core apps hosted with IIS or HTTP.sys.
Windows Authentication relies on the operating system to authenticate users of ASP.NET Core apps. You can use Windows Authentication when your server runs on a corporate network using Active Directory domain identities or Windows accounts to identify users. Windows Authentication is best suited to intranet environments where users, client apps, and web servers belong to the same Windows domain.
Windows Authentication isn’t supported with HTTP/2. Authentication challenges can be sent on HTTP/2 responses, but the client must downgrade to HTTP/1.1 before authenticating.
Proxy and load balancer scenarios
Windows Authentication is a stateful scenario primarily used in an intranet, where a proxy or load balancer doesn’t usually handle traffic between clients and servers. If a proxy or load balancer is used, Windows Authentication only works if the proxy or load balancer:
- Handles the authentication.
- Passes the user authentication information to the app (for example, in a request header), which acts on the authentication information.
An alternative to Windows Authentication in environments where proxies and load balancers are used is Active Directory Federated Services (ADFS) with OpenID Connect (OIDC).
IIS/IIS Express
Add authentication services by invoking AddAuthentication (Microsoft.AspNetCore.Server.IISIntegration namespace) in Startup.ConfigureServices :
Launch settings (debugger)
Configuration for launch settings only affects the Properties/launchSettings.json file for IIS Express and doesn’t configure IIS for Windows Authentication. Server configuration is explained in the IIS section.
The Web Application template available via Visual Studio or the .NET Core CLI can be configured to support Windows Authentication, which updates the Properties/launchSettings.json file automatically.
New project
- Create a new project.
- Select ASP.NET Core Web Application. Select Next.
- Provide a name in the Project name field. Confirm the Location entry is correct or provide a location for the project. Select Create.
- Select Change under Authentication.
- In the Change Authentication window, select Windows Authentication. Select OK.
- Select Web Application.
- Select Create.
Run the app. The username appears in the rendered app’s user interface.
Existing project
The project’s properties enable Windows Authentication and disable Anonymous Authentication:
- Right-click the project in Solution Explorer and select Properties.
- Select the Debug tab.
- Clear the check box for Enable Anonymous Authentication.
- Select the check box for Enable Windows Authentication.
- Save and close the property page.
Alternatively, the properties can be configured in the iisSettings node of the launchSettings.json file:
New project
Execute the dotnet new command with the webapp argument (ASP.NET Core Web App) and —auth Windows switch:
Existing project
Update the iisSettings node of the launchSettings.json file:
When modifying an existing project, confirm that the project file includes a package reference for the Microsoft.AspNetCore.App metapackage or the Microsoft.AspNetCore.Authentication NuGet package.
IIS uses the ASP.NET Core Module to host ASP.NET Core apps. Windows Authentication is configured for IIS via the web.config file. The following sections show how to:
- Provide a local web.config file that activates Windows Authentication on the server when the app is deployed.
- Use the IIS Manager to configure the web.config file of an ASP.NET Core app that has already been deployed to the server.
If you haven’t already done so, enable IIS to host ASP.NET Core apps. For more information, see Host ASP.NET Core on Windows with IIS.
Enable the IIS Role Service for Windows Authentication. For more information, see Enable Windows Authentication in IIS Role Services (see Step 2).
The ASP.NET Core Module is configured to forward the Windows Authentication token to the app by default. For more information, see ASP.NET Core Module configuration reference: Attributes of the aspNetCore element.
Use either of the following approaches:
Before publishing and deploying the project, add the following web.config file to the project root:
When the project is published by the .NET Core SDK (without the property set to true in the project file), the published web.config file includes the section. For more information on the property, see Host ASP.NET Core on Windows with IIS.
After publishing and deploying the project, perform server-side configuration with the IIS Manager:
- In IIS Manager, select the IIS site under the Sites node of the Connections sidebar.
- Double-click Authentication in the IIS area.
- Select Anonymous Authentication. Select Disable in the Actions sidebar.
- Select Windows Authentication. Select Enable in the Actions sidebar.
The section added to the web.config file by IIS Manager is outside of the app’s section added by the .NET Core SDK when the app is published. Because the section is added outside of the node, the settings are inherited by any sub-apps to the current app. To prevent inheritance, move the added section inside of the section that the .NET Core SDK provided.
When IIS Manager is used to add the IIS configuration, it only affects the app’s web.config file on the server. A subsequent deployment of the app may overwrite the settings on the server if the server’s copy of web.config is replaced by the project’s web.config file. Use either of the following approaches to manage the settings:
- Use IIS Manager to reset the settings in the web.config file after the file is overwritten on deployment.
- Add a web.config file to the app locally with the settings.
Kestrel
The Microsoft.AspNetCore.Authentication.Negotiate NuGet package can be used with Kestrel to support Windows Authentication using Negotiate and Kerberos on Windows, Linux, and macOS.
Credentials can be persisted across requests on a connection. Negotiate authentication must not be used with proxies unless the proxy maintains a 1:1 connection affinity (a persistent connection) with Kestrel.
The Negotiate handler detects if the underlying server supports Windows Authentication natively and if it is enabled. If the server supports Windows Authentication but it is disabled, an error is thrown asking you to enable the server implementation. When Windows Authentication is enabled in the server, the Negotiate handler transparently forwards authentication requests to it.
Add authentication services by invoking AddAuthentication and AddNegotiate in Startup.ConfigureServices :
Add Authentication Middleware by calling UseAuthentication in Startup.Configure :
For more information on middleware, see ASP.NET Core Middleware.
Kerberos authentication and role-based access control (RBAC)
Kerberos authentication on Linux or macOS doesn’t provide any role information for an authenticated user. To add role and group information to a Kerberos user, the authentication handler must be configured to retrieve the roles from an LDAP domain. The most basic configuration only specifies an LDAP domain to query against and will use the authenticated user’s context to query the LDAP domain:
Some configurations may require specific credentials to query the LDAP domain. The credentials can be specified in the following highlighted options:
By default, the negotiate authentication handler resolves nested domains. In a large or complicated LDAP environment, resolving nested domains may result in a slow lookup or a lot of memory being used for each user. Nested domain resolution can be disabled using the IgnoreNestedGroups option.
Anonymous requests are allowed. Use ASP.NET Core Authorization to challenge anonymous requests for authentication.
Windows environment configuration
The Microsoft.AspNetCore.Authentication.Negotiate component performs User Mode authentication. Service Principal Names (SPNs) must be added to the user account running the service, not the machine account. Execute setspn -S HTTP/myservername.mydomain.com myuser in an administrative command shell.
Linux and macOS environment configuration
Instructions for joining a Linux or macOS machine to a Windows domain are available in the Connect Azure Data Studio to your SQL Server using Windows authentication — Kerberos article. The instructions create a machine account for the Linux machine on the domain. SPNs must be added to that machine account.
When following the guidance in the Connect Azure Data Studio to your SQL Server using Windows authentication — Kerberos article, replace python-software-properties with python3-software-properties if needed.
Once the Linux or macOS machine is joined to the domain, additional steps are required to provide a keytab file with the SPNs:
- On the domain controller, add new web service SPNs to the machine account:
- setspn -S HTTP/mywebservice.mydomain.com mymachine
- setspn -S HTTP/mywebservice@MYDOMAIN.COM mymachine
- Use ktpass to generate a keytab file:
- ktpass -princ HTTP/mywebservice.mydomain.com@MYDOMAIN.COM -pass myKeyTabFilePassword -mapuser MYDOMAIN\mymachine$ -pType KRB5_NT_PRINCIPAL -out c:\temp\mymachine.HTTP.keytab -crypto AES256-SHA1
- Some fields must be specified in uppercase as indicated.
- Copy the keytab file to the Linux or macOS machine.
- Select the keytab file via an environment variable: export KRB5_KTNAME=/tmp/mymachine.HTTP.keytab
- Invoke klist to show the SPNs currently available for use.
A keytab file contains domain access credentials and must be protected accordingly.
HTTP.sys
HTTP.sys supports Kernel Mode Windows Authentication using Negotiate, NTLM, or Basic authentication.
Add authentication services by invoking AddAuthentication (Microsoft.AspNetCore.Server.HttpSys namespace) in Startup.ConfigureServices :
Configure the app’s web host to use HTTP.sys with Windows Authentication (Program.cs). UseHttpSys is in the Microsoft.AspNetCore.Server.HttpSys namespace.
HTTP.sys delegates to Kernel Mode authentication with the Kerberos authentication protocol. User Mode authentication isn’t supported with Kerberos and HTTP.sys. The machine account must be used to decrypt the Kerberos token/ticket that’s obtained from Active Directory and forwarded by the client to the server to authenticate the user. Register the Service Principal Name (SPN) for the host, not the user of the app.
HTTP.sys isn’t supported on Nano Server version 1709 or later. To use Windows Authentication and HTTP.sys with Nano Server, use a Server Core (microsoft/windowsservercore) container. For more information on Server Core, see What is the Server Core installation option in Windows Server?.
Authorize users
The configuration state of anonymous access determines the way in which the [Authorize] and [AllowAnonymous] attributes are used in the app. The following two sections explain how to handle the disallowed and allowed configuration states of anonymous access.
Disallow anonymous access
When Windows Authentication is enabled and anonymous access is disabled, the [Authorize] and [AllowAnonymous] attributes have no effect. If an IIS site is configured to disallow anonymous access, the request never reaches the app. For this reason, the [AllowAnonymous] attribute isn’t applicable.
Allow anonymous access
When both Windows Authentication and anonymous access are enabled, use the [Authorize] and [AllowAnonymous] attributes. The [Authorize] attribute allows you to secure endpoints of the app which require authentication. The [AllowAnonymous] attribute overrides the [Authorize] attribute in apps that allow anonymous access. For attribute usage details, see Simple authorization in ASP.NET Core.
By default, users who lack authorization to access a page are presented with an empty HTTP 403 response. The StatusCodePages Middleware can be configured to provide users with a better «Access Denied» experience.


