Иконки icns для mac os
Beautiful app icons are an important part of the user experience on all Apple platforms. A unique, memorable icon evokes your app and can help people recognize it at a glance on the desktop, in Finder, and in the Dock. Polished, expressive icons can also hint at an app’s personality and even its overall level of quality.
In macOS 11, app icons share a common set of visual attributes, including the rounded-rectangle shape, front-facing perspective, level position, and uniform drop shadow. Rooted in the macOS 11 design language, these attributes showcase the lifelike rendering style people expect in macOS while presenting a harmonious user experience. To download templates that specify the correct shape and drop shadow, see Apple Design Resources.

IMPORTANT When you update your app for macOS 11, use your new app icon design to replace the icon you designed for earlier versions. You can’t include two different app icons for one app, and the macOS 11 app icon style looks fine on a Mac running Catalina or earlier.
Design a beautiful icon that clearly represents your app. Combine an engaging design with an artistic interpretation of your app’s purpose that people can instantly understand.
Embrace simplicity. Find a concept or element that captures the essence of your app and express it in a simple, unique way, adding details only when doing so enhances meaning. Too many details can be hard to discern and can make the icon appear muddy, especially at smaller sizes.
Establish a single focus point. A single, centered point of interest captures the user’s attention and helps them recognize your app at a glance. Presenting multiple focus points can obscure the icon’s message.
To give people a familiar and consistent experience, prefer a design that works well across multiple platforms. If your app runs on other platforms, use a similar image for all app icons while rendering them in the style that’s appropriate for each platform. For example, in iOS and watchOS, the Mail app icon depicts the white envelope in a streamlined, graphical style; in macOS 11, the envelope includes depth and detail that communicate a realistic weight and texture.
Consider depicting a familiar tool to communicate what people use your app to do. To give context to your app’s purpose, you can use the icon background to portray the tool’s environment or the items it affects. For example, the TextEdit icon pairs a mechanical pencil with a sheet of lined paper to suggest a utilitarian writing experience. After you create a detailed, realistic image of a tool, it often works well to let it float just above the background and extend slightly past the icon boundaries. If you do this, make sure the tool remains visually unified with the background and doesn’t overwhelm the rounded-rectangle shape.
Make real objects look real. If you depict real objects in your app icon, make them look like they’re made of physical materials and have actual mass. Replicate the characteristics of substances like fabric, glass, paper, and metal to convey an object’s weight and feel. For example, the Xcode app icon features a hammer that looks like it has a steel head and polymer grip.
If text is essential for communicating your app’s purpose, consider creating a graphic abstraction of it. Actual text in an icon can be difficult to read and doesn’t support accessibility or localization. To give the impression of text without implying that people should zoom in to read it, you can create a graphic texture that suggests it.
To depict photos or parts of your app’s UI, create idealized images that emphasize the features you want people to notice. Photos are often full of details that obscure the main content when viewed at small sizes. If you want to use a photo in your icon, pick one with strongly contrasting values that make the main subject stand out. Remove unimportant details that make primary lines and shapes fuzzy or indistinct. If your app has a UI that people recognize, avoid simply replicating standard UI elements or using a screenshot in your icon. Instead, consider designing a graphic that echoes the UI and expresses the personality of your app.
Don’t use replicas of Apple hardware products. Apple products are copyrighted and can’t be reproduced in your icons or images. Avoid displaying replicas of devices, because hardware designs tend to change frequently and can make your icon look dated.
Use the drop shadow in the icon-design template. The template includes the system-defined drop shadow that helps your app icon coordinate with other macOS 11 icons.
Consider using interior shadows and highlights to add definition and realism. For example, the Mail app icon uses both shadows and highlights to give the envelope authenticity and to suggest that the flap is slightly open. In icons that include a tool that floats above a background — such as TextEdit or Xcode — interior shadows can strengthen the perception of depth and make the tool look real. Shadows and highlights should suggest a light source that faces the icon, positioned just above center and tilted slightly downward.
Avoid defining contours that suggest a shape other than a rounded rectangle. In rare cases, you might want to fine-tune the basic app icon shape, but doing so risks creating an icon that looks like it doesn’t belong in macOS 11. If you must alter the shape, prefer subtle adjustments that continue to express a rounded rectangle silhouette.
Consider adding a slight glow just inside the edges of your icon. If your app icon includes a dark reflective surface, like glass or metal, add an inner glow to make the icon stand out and prevent it from appearing to dissolve into dark backgrounds.
Keep primary content within the icon grid bounding box; keep all content within the outer bounding box. If an icon’s primary content extends beyond the icon grid bounding box, it tends to look out of place. If you overlay a tool on your icon, it works well to align the tool’s top edge with the outer bounding box and its bottom edge with the inner bounding box, as shown below.
In addition to the bounding boxes and suggested tool placement, the icon design template provides a grid to help you position items within an icon. You can also use the icon grid to ensure that centered inner elements like circles use a size that’s consistent with other icons in the system.
App Icon Attributes
All app icons should use the following specifications.
| Attribute | Value |
|---|---|
| Format | PNG |
| Color space | sRGB (color) or Gray Gamma 2.2 (grayscale) |
| Layers | Flattened with transparency as appropriate |
| Resolution | @1x and @2x (see Image Size and Resolution) |
| Shape | Square with rounded corners |
Don’t provide app icons in ICNS or JPEG format. The ICNS format doesn’t support features like wide color gamut or deliver the performance and efficiency you get when you use asset catalogs. JPEG doesn’t support transparency through alpha channels, and its compression can blur or distort an icon’s images. For best results, add deinterlaced PNG files to the app icon fields of your Xcode project’s asset catalog.
App Icon Sizes
Your app icon is displayed in many places, including in Finder, the Dock, Launchpad, and the App Store. To ensure that your app icon looks great everywhere people see it, provide it in the following sizes:
- 512×512 pt (512×512 px @1x, 1024×1024 px @2x)
- 256×256 pt (256×256 px @1x, 512×512 px @2x)
- 128×128 pt (128×128 px @1x, 256×256 px @2x)
- 32×32 pt (32×32 px @1x, 64×64 px @2x)
- 16×16 pt (16×16 px @1x, 32×32 px @2x)
Maintain visual consistency in all icon sizes. As icon size decreases, fine details become muddy and hard to distinguish. At the smallest sizes, it’s important to remove unnecessary features and exaggerate primary features to help the content remain clear. As you simplify icons that are visually smaller, don’t let them appear drastically different from their larger counterparts. Strive to make subtle variations that ensure the icon remains visually consistent when displayed in different environments. For example, if people drag your icon between displays with different resolutions, the icon’s appearance shouldn’t suddenly change.
The 512×512 pt Safari app icon (on the left) uses a circle of tick marks to indicate degrees; the 16×16 pt version of the icon (on the right) doesn’t include this detail.
Источник
Теперь у вас уникальный Mac. Поменяйте иконку любого приложения
Многие пользователи любят настраивать все под себя и кардинально менять внешний вид операционной системы.
Иногда так и хочется заменить иконку той или иной программы, чтобы она не выбивалась из общей стилистики, была более заметна или просто не надоедала.
? Спасибо re:Store за полезную информацию. ?
Изменить иконки программ и игр в macOS проще простого.
Как менять иконки приложений
1. Для начала понадобится найти саму иконку. Подойдут далеко не все картинки – только файлы в формате *.icns.
Вот большая база подходящих иконок с поиском и каталогизатором.
2. После скачивания иконки нужно найти приложение, иконку к которому будем менять.
Чаще всего приложения находятся в папке Программы (открыть её можно в верхней панели Finder: Переход -> Программы), но иногда могут располагаться и по другому пути.
3. Теперь открываем свойства нужного нам приложения через контекстное меню или при помощи сочетания клавиш ⌘+I при выделенном объекте.
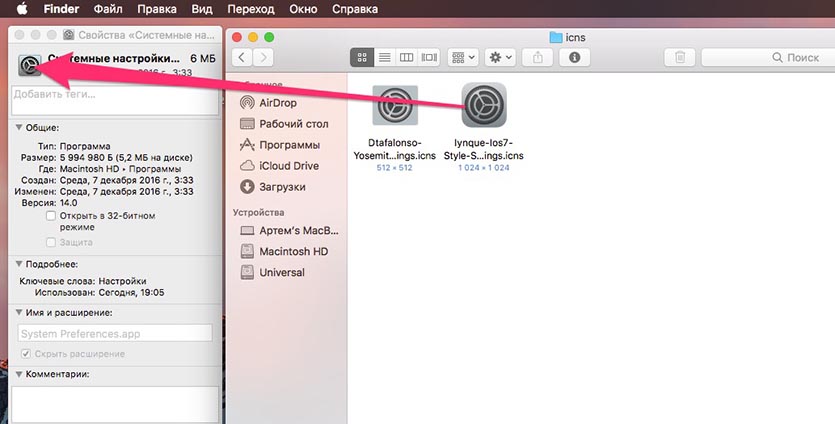
4. Остается лишь перетянуть скачанную иконку на родную пиктограмму в свойствах.
Вот и все, иконка заменена. Если в Док или Launchpad продолжает отображаться старая картинка, она изменится после перезагрузки Mac.
Источник
Создание иконок для приложений Mac OS X

По роду деятельности я начинающий IOS кодер. Так случилось что недавно собрал совсем маленькую прогу под Mac и мне нужно было сделать иконку для своего же небольшого приложения. Узнав что установка иконки под эти две платформы сильно отличается решил опубликовать туториал для тех кому это может понадобиться.
Те кто писал под IOS знают что в минимальном случае для отображения приложения в симуляторе нужно всего две иконки — для старых и для ретиновских дисплеев (случай публикации где нужно больше размеров в этой статье мы рассматривать не будем). Существующие иконки в соответствующих размерах просто перетягиваются в соответствующие плейсхолдеры в Xcode 4. С четвертой версии их даже не нужно подписывать специальным образом — XCode делает это автоматически записывая их как icon.png и icon@2x.png. С приложениями для Mac OS X все не так просто, поэтому приступим.
Этап 1 — Подготовка размеров
И так для начала мы должны понимать что приложение в системе будет отображаться в разных местах и поэтому размеров только для отображения в системе (опять таки публикацию не рассматриваем) будет гораздо больше. Например иконка в доке, в списке программ, при отображении через Cover Flow или в строке Spotlight. И так стандартных размеров до появления ретиновских дисплеев необходимо было пять:
Здесь обратите внимание на то что если Ваша иконка имеет высокую детализацию то вам может понадобиться отдельно перерисовать иконку для размеров 32х32 и 16х16 для ее более адекватного отображения. Также с появлением ретины теперь Вам нужно представить 10 иконок для приложения.
Итак всего нам понадобится десять иконок. Пять под старые и пять с учетом ретина-дисплеев.
Обратите внимание на то что для того чтобы вы смогли завершить процесс Вам нужно верно подписать все иконки. Ретиновские иконки должны быть подписаны не их реальным размером а удвоенным от стандартного. Например ретиновская иконка размером 1024х1024 должна быть подписана как icon_512x512@2x.png. То есть название ретиновских совпадает со стандартными и содержит префикс @2x.
Хабраюзер Dreddikлюбезно предоставил информацию по радиусам иконок что может быть полезно интересующимся, за что ему большое спасибо!
1024×1024 = 160
512×512 = 80
144×144 = 23 (iPad retina)
114×114 = 18 (iPhone/iPod touch (Retina))
72×72 = 11 (iPad)
57×57 = 9 (iPhone/iPod touch)
Этап 2 — Собираем бандл.
Итак иконки всех размеров у Вас готовы, подписаны и лежат в одной папке. Вы не можете просто перетащить их в Xcode, сначала для это мы сделаем из всех этих иконок бандл. Для начала создайте (например на рабочем столе) новую папку и переименуйте ее в icon.iconset. Перед сохранением имени выскочит модальное окошко с уточнением действительно ли мы хотим сохранить эту папку с расширением .iconset, мы соглашаемся.
Далее перетаскиваем подготовленные иконки в этот новосозданный бандл. Если после перетаскивания вы кликнете на этом бандле и нажмете пробел Вы должны будете увидеть что Finder уже видит это как бандл а не папку. Двигая слайдер внизу Вы можете просмотреть все версии иконок находящиеся в папке.
Далее нам необходимо произвести конвертацию этого бандла в формат в котором Xcode сможет им воспользоваться. В этом нам поможет утилита iconutil. Открываем Terminal и идем в ту директорию где лежит наш бандл, в нашем случае на рабочем столе и вводим в Terminal следующее:
iconutil -c icns icon.iconset
После этой процедуры в этой же директории появляется файл icon.icns который нам и нужен. Обратите внимание что процедура пройдет успешно только если количество иконок было верным и они были подписаны правильно, иначе Вы получите предупреждение.
Завершающия стадия. Идем в Xcode, открываем рабочую область проекта и идем Project -> Targets -> Summary. На этой вкладке сверху видна область для иконки. Перетягиваем наш новосозданный .icns туда и все готово.
Всем добрых выходных!
Источник


